ArduPilot开源代码之AP_InertialSensor
ArduPilot开源代码之AP_InertialSensor
- 1. 源由
- 2. AP_InertialSensor类
-
- 2.1 init
- 2.2 periodic
- 2.3 update
- 3. 重要应用方法
-
- 3.1 BatchSampler::push_data_to_log
- 3.2 wait_for_sample
- 3.2 calibrate_gyros
- 4. 总结
- 5. 参考资料
1. 源由
前面研读了IMU如何通过front-end/back-end获取传感数据。ArduPilot在对模型IMU最初的校准就是在传感数据获取的基础上,通过AP_InertialSensor应用类完成的。
在此,对该类的实际原理和设计,以及代码进行深入的了解。
2. AP_InertialSensor类
该应用类,重要的入口函数主要如下:
- init:初始化
- periodic:日志记录
- update:front-end数据更新
2.1 init
针对硬件进行probe和初始化,详见:ArduPilot开源代码之AP_InertialSensor_Backend。
AP_Vehicle::setup
 └──> init_ardupilot
     └──> Copter::startup_INS_ground
         └──> ins.init
             ├──> _start_backends
             │   └──> detect_backends
             │       └──> HAL_INS_PROBE_LIST --> HAL_INS_PROBE1;HAL_INS_PROBE2
             │           ├──> ADD_BACKEND(AP_InertialSensor_BMI270::probe(*this,hal.spi->get_device("bmi270_1"),ROTATION_ROLL_180_YAW_90))
             │           └──> ADD_BACKEND(AP_InertialSensor_BMI270::probe(*this,hal.spi->get_device("bmi270_2"),ROTATION_PITCH_180))
             └──> batchsampler.init
2.2 periodic
通过SCHED_TASK_CLASS进行ArduPilot任务调度。
SCHED_TASK_CLASS(AP_InertialSensor, &copter.ins, periodic, 400, 50, 123),
AP_InertialSensor::periodic
 └──>  batchsampler.periodic
     └──> <_sensor_mask == 0> return  //没有IMU,也就不需要记录日志数据了
         └──> push_data_to_log
2.3 update
通过FAST_TASK_CLASS进行ArduPilot任务调度。
// update INS immediately to get current gyro data populated
FAST_TASK_CLASS(AP_InertialSensor, &copter.ins, update),
AP_InertialSensor::update
 ├──> wait_for_sample
 ├──> [mark sensors unhealthy and let update() in each backend mark them healthy via _publish_gyro() and _publish_accel()]
 ├──> _backends[i]->update() //更新IMU数据
 ├──> [记录2秒_accel_startup_error_count/_gyro_startup_error_count]
 ├──> [更新have_zero_accel_error_count/have_zero_gyro_error_count]
 ├──> [更新_gyro_healthy/_accel_healthy]
 ├──> [set primary to first healthy accel and gyro; _primary_gyro/_primary_accel]
 └──> _last_update_usec = AP_HAL::micros()
3. 重要应用方法
3.1 BatchSampler::push_data_to_log
AP_InertialSensor::BatchSampler::push_data_to_log
 ├──>  return
 ├──> <_sensor_mask == 0> return
 ├──>  return
 ├──>  return
 ├──> <(AP_Logger *logger = AP_Logger::get_singleton()) == nullptr> return
 ├──> [send isb header] Write_ISBH
 ├──> [send a data packet] Write_ISBD
 ├──> data_read_offset += samples_per_msg
 ├──> = _real_required_count>
 └──> [rotate to next instance] rotate_to_next_sensor
3.2 wait_for_sample
AP_InertialSensor::wait_for_sample
 ├──> <_have_sample> return
 ├──> <第一次进入等待采样> 直接跳转到[开始检查采样数据]
 ├──> <接近下次采样时间> 等待一段时差;更新下次采样时间;然后进入[开始检查采样数据]
 ├──>  更新下次采样时间;直接进入[开始检查采样数据]
 ├──>  以当前时刻为基点更新下次采样时间;直接进入[开始检查采样数据]
 └──> [开始检查采样数据]
     ├──> [标记需要需要获取采样数据对应的gyro bit位]
     ├──> [标记需要需要获取采样数据对应的acc bit位]```
     ├──> <在1/3 loop时间内等待到了有效数据> 结束本次采样等待
     ├──> <1/3 loop时间超时,不再等待其他有效数据> 结束本次采样等待
     └──> 更新_delta_time/_last_sample_usec时间
3.2 calibrate_gyros
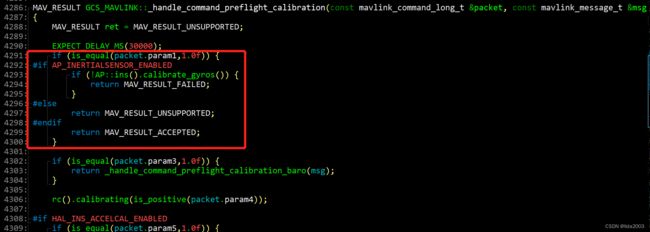
除了上面能够显而易见看到的几个功能以外,还有一个GCS出发的IMU校准功能。
注:具体6面校准原理和逻辑我们后续研读,这里先把出发校准的API接口暴露出来。有兴趣的朋友可以先看看整个逻辑实现
AP_InertialSensor::calibrate_gyros
 ├──> init_gyro
 ├──>  return false
 └──> AP::ahrs().reset_gyro_drift()
下面是GCS_MAVLINK应用类实现的出发校准。
4. 总结
AP_InertialSensor应用类,总的来说完成以下功能:
- IMU自动芯片侦测&初始化
- IMU数据日志记录
- IMU的font-end数据更新
- IMU校准
本文主要针对每个功能的入口以及AP_InertialSensor应用类进行的介绍,比较具体的功能代码细节,如有时间将和大家一起研读。
5. 参考资料
【1】ArduPilot开源飞控系统之简单介绍
【2】ArduPilot之开源代码框架
【3】ArduPilot飞控之ubuntu22.04-SITL安装
【4】ArduPilot飞控之ubuntu22.04-Gazebo模拟
【5】ArduPilot飞控之Mission Planner模拟
【6】ArduPilot飞控AOCODARC-H7DUAL固件编译
【7】ArduPilot之开源代码Library&Sketches设计
【8】ArduPilot之开源代码Sensor Drivers设计
【9】ArduPilot之开源代码基础知识&Threading概念
【10】ArduPilot之开源代码UARTs and the Console使用
【11】ArduPilot飞控启动&运行过程简介
【11】ArduPilot之开源代码Task介绍
【12】ArduPilot开源代码之AP_Param
【13】ArduPilot开源代码之AP_Scheduler
【14】ArduPilot开源代码之AP_VideoTX
【15】ArduPilot开源代码之AP_InertialSensor_Backend