vrep外部控制器力矩控制实例——以matlab脚本控制平面两连杆为例
前言
抱歉,我不知道要怎么将每个自然段开头空两格。大家将就看吧。
V-rep(virtual robot experimentation platform)是一款较为小众的机器人仿真软件,其最大的优势是跨平台优势明显,支持多种语言对场景中的对象进行控制,被戏称为机器人仿真软件中的“瑞士军刀”,其EDU版本对学习科研用途免费开放。跟具体的介绍就不继续说了,本博客目的在于讲述如何对已经建好的被控对象(机械臂) 通过外部控制器对其进行控制,而且专指力矩控制。
想要入门Vrep的同学可以仔细地把vrep 的user manual通读一遍,并把tutorial都仔细看一遍并动手做几个实践,然后遇到不懂的问题在forum里面搜索一下,想要获得更具体的功能,可以到youtube里面看一些关于vrep的教程,国内的教程暂时还比较稀缺。建议连接有:
[1] http://www.coppeliarobotics.com/helpFiles/ (该链接可以在vrep的菜单栏中的help->Help topics中直接跳转)
[2] http://www.forum.coppeliarobotics.com/
因为前面几篇博客的学习笔记暂时还没有提到控制器的设计,所以这里先不讨论比较高级的控制器的设计方法,只是先做一个铺垫。先用PD控制器给大家看一下控制效果,了解①利用vrep建立被控对象。②编写外部控制器实现被控对象的控制。③理清整个框架的搭建。
本教程以下面版本的Vrep进行讲解,其他资料的版本比较老,这里的函数会跟其他教程有些不同。
过程
废话就不多说了,来点实际的东西,下面开始讲要怎么做
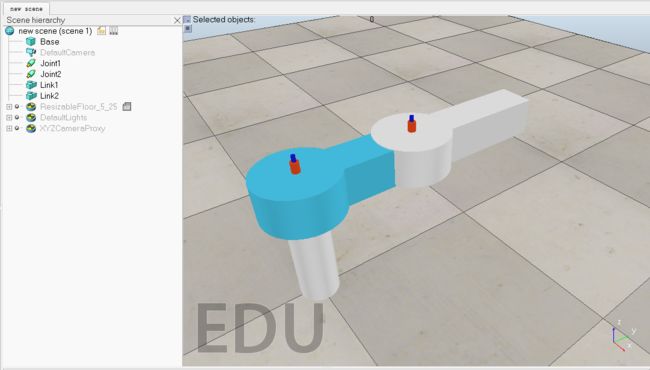
1. 在Vrep内建立一个平面两连杆模型
- 打开Vrep,ctrl+N打开新的场景 。
- 添加部件。add->primitive shape->cylinder,add->primitive shape->cuboid,add->joint->revolute 注意添加部件的时候,dynamic和respondable shape要check√(因为我们需要用到的是力矩控制,要使用物理引擎)。使用快捷键ctrl+E来调节摆放的位置,然后通过ctrl+D选择view geometry,uncheck keep proportion,修改文本框的参数设置部件的大小和长度,还可以adjust color来调节颜色。最终摆放效果如下:
- 配置scene hierarchy中的shapes之间的关系如下图所示:
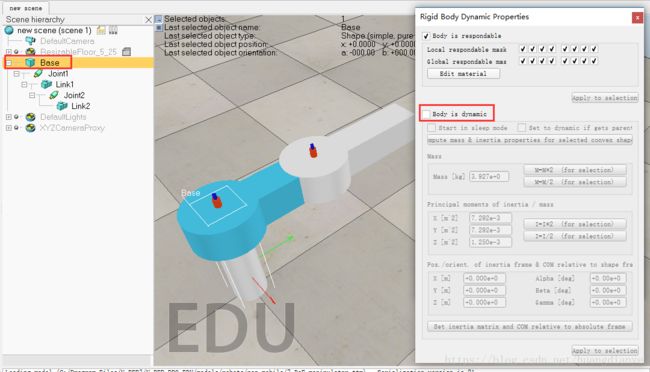
左侧的hierarchy tree表示了部件之间的连接方式,关节将两个连杆之间的运动相互联动。按照上图左侧的层次数配置好部件之间的层级关系之后,还需要更改部件之间的dynamic properties。除了要mask部件之间的respondable关系之外,还要注意uncheck掉base的dynamic属性,使得各个关节就像是有一个平稳的底座,固连在大地上一样,保证不会因为动力学的原因底座不稳。最后还要在common properties中令两个关节的visibility勾选到只剩下第10层,让场景中看不到关节。
2. 连接Vrep中的两连杆模型和matlab控制脚本
完成第一个步骤之后,我们将获得一个完整的被控对象,这时候需要将vrep中的两连杆模型与matlab相互连接。
- Vrep场景中添加脚本。在场景中层次数的任意一个object中右键,add->associate child script->non-thread. 然后双击新出现的icon,在sysCall_init()函数中添加以下语句,其他可以不用管,这个场景不需要添加任何代码了。
repeat until (simRemoteApi.start(19999,1300,false,true)~=-1)为什么要这么添加呢?其实之前看的到现在写blog隔了这么久,我也忘了具体的语句要怎么写,但是我知道要怎么查user manual,所以查看这些资料还是很重要的。打开[1]链接,在导航栏中的Writing code in and around Vrep->V-REP API framework-> Remote API->Enabling the Remote API- server side(注意Vrep是server side而外部控制器则是client side)
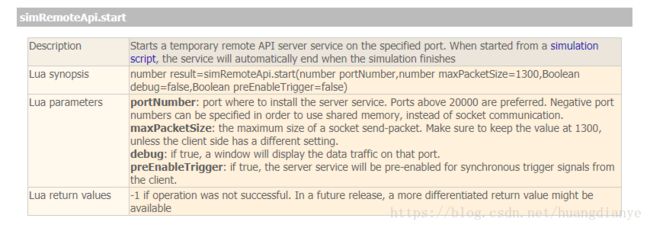
打开之后通读一遍,着重要关注的是simRemoteApi.start这个函数。
number result=simRemoteApi.start(number portNumber,number maxPacketSize=1300,Boolean debug=false,Boolean preEnableTrigger=false)我们需要把该函数添加到场景中的任意一处的子脚本内,且一个场景只要有一个脚本有这个东西就行了。通常portNumber会选择19999,其他没有特殊要求的话,使用默认值即可。当然我们说的是没有特殊要求,实际上,在进行力矩控制的时候,力矩控制是precise control 不是loose control因此我们需要vrep与matlab的控制命令同步运行,因此,我们需要选择使用EnableTrigger功能。
为什么需要打开这个功能呢?再次查询user manual,刚刚的Remote API下面有一个叫做“Remote API modus operandi”即一些控制模式的惯用技巧。在进行同步模式的时候,必须要注意提前使能这种控制模式。

synchronous mode同步模式是什么将会在第3点中给大家解释。
- 上面是Vrep部分的配置。下面我们再来讲一下matlab部分要怎么配置。matlab部分要声明连接的IP地址和端口号。打开matlab,新建一个命令脚本,然后添加以下代码:
vrep=remApi('remoteApi'); % using the prototype file (remoteApiProto.m)
vrep.simxFinish(-1); % just in case, close all opened connections
clientID=vrep.simxStart('127.0.0.1',19999,true,true,5000,5);
这个代码是怎么来的呢?查看user manual:
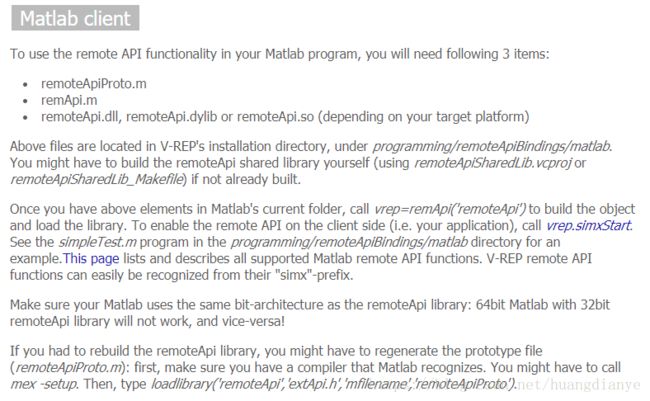
注意配置几个文件,就像添加matlab工具箱那样,在Matlab添加接口相关文件,这些文件可以在Vrep的安装文件夹中找到,包括:
①remApi.m ②remoteApiProto.m
③选择操作系统相同的文件操作文件: “remoteApi.dll” (Windows), “remoteApi.dylib” (Mac) or “remoteApi.so” (Linux) ④simpleTest.m (or any other example program)
Vrep安装文件夹->programming->remoteApiBindings->
(1)->lib->lib->(剩下的根据电脑的操作系统和matlab的安装位数来选择)
(2)->matlab->matlab->剩下的对比上述文件选择
将这些文件复制到另一个自己定义的文件夹中(建议放置在matlab安装路径的toolbox文件夹下),最后再把路径添加到matlab的path中。
剩下的如何启动,如何获取场景中的句柄,如何设置关节的力矩等将会在第3点中讲到。
3. 进行力矩控制
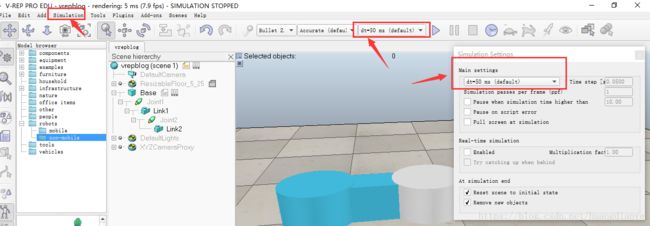
Vrep的配置。在simulation settings中设置仿真时间步为5ms。关于时间不user manual中多次提到了默认情况下物理引擎的执行频率是仿真周期频率的10倍,而默认情况下仿真周期是50ms,也就是说,物理引擎的调用周期是5ms。这样一来,我们通过matlab脚本对Vrep进行同步控制,其控制周期就只能够是50ms,这样的控制频率是远远不够的,因此我们需要人为地将仿真周期改为5ms,与物理引擎同步,从而实现力矩控制。可以在simulation->simulation settings中修改,又或者是在快捷菜单中修改。选择costum模式,然后改为0.005。
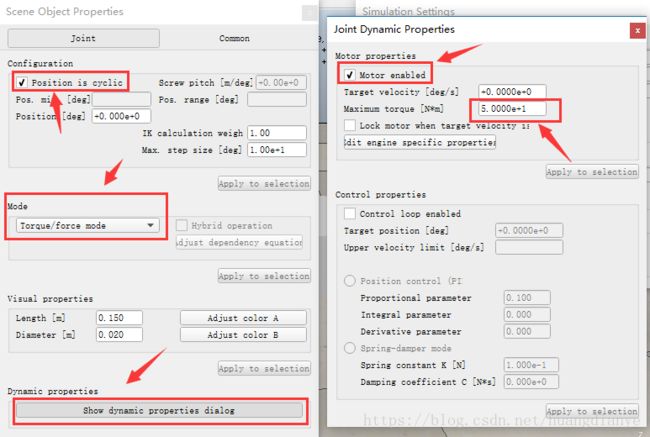
关节的配置方面。
mode选择为torque/force,dynamic properties中check “motor enable”,最大力矩改为50N,其实这里多少都没有太大的关系,也可以设置为零,因为后续在控制脚本中会有所改动。
matlab控制脚本的书写
下面我先将整个代码贴上来,有兴趣的可以仔细看一遍,没兴趣的自己复制粘贴一下然后调一下pd参数,看看运行的效果。(emmm,虽然注释都是英文,那是为了粘贴复制的时候不乱吗,代码和注释都是我自己写的,就不要问出处了)
%% Configuration codes
jointNum=2;    baseName='Base';
torqueLimit=[50,50];
jointName='Joint';
displayOn=false;
torque=zeros(jointNum,1); qd=zeros(jointNum,1); intE=zeros(jointNum,1);
E=[]; Q=[];  DQ=[]; QD=[]; DQD=[]; TAU=[];

%% Connect to the Vrep
% 1. load api library
vrep=remApi('remoteApi'); % using the prototype file (remoteApiProto.m)
% 2. close all the potential link
vrep.simxFinish(-1);
% 3. wait for connecting vrep, detect every 0.2s
while true
    clientID=vrep.simxStart('127.0.0.1',19999,true,true,5000,5);
    if clientID>-1
        break;
    else
        pause(0.2);
        disp('please run the simulation on vrep...')
    end
end
disp('Connection success!')
% 4. set the simulation time step
tstep = 0.005;  % 5ms per simulation pass
vrep.simxSetFloatingParameter(clientID,vrep.sim_floatparam_simulation_time_step,tstep,vrep.simx_opmode_oneshot);
% 5. open the synchronous mode to control the objects in vrep
vrep.simxSynchronous(clientID,true);

%% Simulation Initialization
vrep.simxStartSimulation(clientID,vrep.simx_opmode_oneshot);
% get the handles
jointHandle=zeros(jointNum,1);
for i=1:jointNum  % handles of the left and right arms
    [~,returnHandle]=vrep.simxGetObjectHandle(clientID,[jointName,int2str(i)],vrep.simx_opmode_blocking);
    jointHandle(i)=returnHandle;
end
[~,baseHandle]=vrep.simxGetObjectHandle(clientID,baseName,vrep.simx_opmode_blocking);  % reference coordinates of the arms'
vrep.simxSynchronousTrigger(clientID);
disp('Handles available!')
% first call to read the joints' configuration and end-effector pose, the mode is chosen to be simx_opmode_streaming
jointConfig=zeros(jointNum,1);
for i=1:jointNum
    [~,jpos]=vrep.simxGetJointPosition(clientID,jointHandle(i),vrep.simx_opmode_streaming);
    jointConfig(i)=jpos;
end

for i=1:jointNum
    vrep.simxSetJointTargetVelocity(clientID,jointHandle(i),0.1,vrep.simx_opmode_oneshot);
    vrep.simxSetJointForce(clientID,jointHandle(i),0,vrep.simx_opmode_oneshot);
end
% get simulation time
currCmdTime=vrep.simxGetLastCmdTime(clientID);
tipPosLast=tipPos;
tipOrtLast=tipOrt;
lastCmdTime=currCmdTime;
jointConfigLast=jointConfig;

vrep.simxSynchronousTrigger(clientID);         % every calls this function, verp is triggered, 50ms by default

%% Simulation Start
t=0;  % start the simulation
while (vrep.simxGetConnectionId(clientID) ~= -1)  % vrep connection is still active
    % 0. time update
    currCmdTime=vrep.simxGetLastCmdTime(clientID);
    dt=(currCmdTime-lastCmdTime)/1000;              % simulation step, unit: s
    % 1. read the joints' and tips' configuration (position and velocity)
    for i=1:jointNum
        [~,jpos]=vrep.simxGetJointPosition(clientID,jointHandle(i),vrep.simx_opmode_buffer);
        jointConfig(i)=jpos;
    end
    % using Finit Difference Method to get the velocity of joints' configuration (a simple version)
    q=jointConfig;       dq=(q-jointConfigLast)./dt;  % column vector
    % 2. display the acquisition data, or store them if plotting is needed.
    if displayOn==true
        disp('joints config:');       disp(q'.*180/pi);
        disp('joints dconfig:');      disp(dq'.*180/pi);
    end
    % 3. control alorithm can write down here
    % 1.pid controller
    %   3.1 feedback signal q,dq,c,dc, more importantly input the reference signal
    qd=[sin(t),cos(t)]';  dqd=[cos(t),-sin(t)]';
    qe=qd-q; dqe=dqd-dq;
    %   3.2 actuatation calculation
    Kp=[60,0;0,60];
    Kd=[2,0;0,2];
    Ki=[0.02 0;0 0.02];
    intE=intE+qe.*dt;
    torque=ddqd+Kp*qe+Kd*dqe+Ki*intE;

    %   3.3 set the torque in vrep way
    for i=1:jointNum
        if sign(torque(i))<0
            setVel=-9999; % set a trememdous large velocity for the screwy operation of the vrep torque control implementaion
            if torque(i)<-torqueLimit(i)
                setTu=-torqueLimit(i);
            else
                setTu=-torque(i);
            end
        else
            setVel=9999;
            if torque(i)>torqueLimit(i)
                setTu=torqueLimit(i);
            else
                setTu=torque(i);
            end
        end
        vrep.simxSetJointTargetVelocity(clientID,jointHandle(i),setVel,vrep.simx_opmode_oneshot);
        vrep.simxSetJointForce(clientID,jointHandle(i),setTu,vrep.simx_opmode_oneshot);
    end

    % data recording for plotting
    E=[E qe];    Q=[Q q];        QD=[QD qd];
    DQ=[DQ dq];  DQD=[DQD dqd];  TAU=[TAU torque];

    % 4. update vrep(the server side)
    tipPosLast=tipPos;
    tipOrtLast=tipOrt;
    lastCmdTime=currCmdTime;
    jointConfigLast=jointConfig;
    vrep.simxSynchronousTrigger(clientID);
    t=t+dt; % updata simulation time
end
vrep.simxFinish(-1);  % close the link
vrep.delete();        % destroy the 'vrep' class

%%
figure(1); hold off;
subplot(411); plot(E(1,:),'r'); hold on; plot(E(2,:),'b'); title('error')
subplot(412); plot(Q(1,:),'r'); hold on; plot(Q(2,:),'b');  plot(QD(1,:),'k'); hold on; plot(QD(2,:),'k'); title('trajectory')
subplot(413); plot(DQ(1,:),'r'); hold on; plot(DQ(2,:),'b');  plot(DQD(1,:),'k'); hold on; plot(DQD(2,:),'k'); title('velocity')
subplot(414); plot(TAU(1,:),'r'); hold on; plot(TAU(2,:),'b'); title('torque')
代码的控制框架就是
①首先连接vrep,这里使用了死循环等待连接。
②获取Vrep仿真周期作为dt,获取vrep场景中的句柄,主要是获取关节句柄,初始化数据流。
③构造一个大循环,检测到连接断开之后就跳出循环
④在大循环中,接受场景中关节的位置信息(这里只能读取到关节位置信息,类似于机械臂中只读取到编码器的数值,没有速度信息,速度信息要自行计算获得),利用有限差分的方法计算得到速度信息。然后通过控制器代码来计算应该输出的控制力矩。最后加一个限幅,输出力矩命令给Vrep场景中的关节,控制机械臂运动。
⑤跳出循环后对采集到的信号作图
这里只是为了验证设计的控制器做的一个很粗糙的框架,不用太过较真,真正要完成一个外部控制器控制的任务的时候,可以在这个框架下细化。
暂且不看其他东西,我们这里首要亟需解决的问题是,如何通过脚本将力矩传到vrep中,这也是这篇博文的精华所在。当然前面也是精华,但是没有这个精。
在论坛上,这个问题被提出过几次。物理引擎并没有直接提供函数接口给力矩控制使用。 只提供了两个意味深长的函数接口;①设置最大力矩函数;②目标速度设定。这两个函数是这样的,我们可以在user manual中对这两个函数的描述中,理解这两个函数之间的关联:当物体没有达到目标速度的时候,输出力矩将等于最大可输出力矩。当达到了目标速度的时候,我不记得了,因为不太重要。这种条件设置跟bang-bang控制有点像,着实有点意味深长。然而,利用这种规则,我们可以构造出力矩控制所需要的方式:给定关节多少力矩,他就输出多少力矩。注意:这里输出的力矩是没有方向的,方向需要目标速度给定。因此,我们需要设置一个非常大的不可能达到的速度给Vrep的关节,并且根据力矩的正负相应地给不可能达到的速度添加正负号,然后,在安安心心地setforce给关节。
主要用到的两个函数如下:
vrep.simxSetJointTargetVelocity(clientID,jointHandle,set_velocity,vrep.simx_opmode_oneshot);
vrep.simxSetJointForce(clientID,jointHandle,set_force,vrep.simx_opmode_oneshot);
4. 查看控制效果
运行的方式是,先运行matlab脚本,然后再打开vrep。或者换个顺序也行。然后就能够看到机械臂在动了。想要结束运行的话,可以直接停止vrep里面的仿真,然后matlab自己自动就停了还会自动作图。当然显示当前控制性能也可以在vrep中增加graph实时地显示曲线,单不是本博文的主要目的,所以在这里就不教大家了。最后控制的运动效果如下图所示:

结束语
为了节省时间,没有仔细排版,大家随意享用。
D. Huang
2018年6月9日
写于华工