c实现桌面截图鼠标周边区域及生成dll供python调用

文章目录

  • 前言
  • 一、动态链接库编写
    • 1. C实现截图功能
    • 2. 生成动态链接库
  • 二、python调用
    • 1.使用方法
    • 2.截图计时


前言

为了方便opencv进行fps游戏指针附近目标检测,需要降低截图延迟。自带PIL库的ImageGrab功能速度较慢,这里尝试使用C实现截图后用python调用动态链接库的方法尝试加速,最后实测可快5倍左右,用时与python的mss库相近(该库也是调用c链接库实现)


一、动态链接库编写

1. C实现截图功能

目标是实现以指针为中心,截图桌面一个width*height的区域,我一般截图640*640

#include 
#include 

extern "C" {
    __declspec(dllexport) void CaptureDesktop(int width, int height, unsigned char* buffer) {
        POINT my_cursor;
        int centerX, centerY;
        GetCursorPos(&my_cursor);

        centerX = my_cursor.x;
        centerY = my_cursor.y;

        //
        
        // 获取屏幕设备上下文
        HDC hScreenDC = GetDC(NULL);
        // 创建内存设备上下文
        HDC hMemoryDC = CreateCompatibleDC(hScreenDC);

        // 确保截图区域在屏幕范围内
        int left = centerX - (width / 2);
        int top = centerY - (height / 2);

        // 这一行代码创建了一个与指定设备兼容的位图。
        // CreateCompatibleBitmap 函数用于创建一个与给定设备上下文兼容的位图对象。
        // 在这里,它以屏幕设备上下文 hScreenDC 为基础,创建了一个宽度为 width,高度为 height 的位图对象。
        HBITMAP hBitmap = CreateCompatibleBitmap(hScreenDC, width, height);
        // SelectObject 函数将位图对象 hBitmap 选择(或者说关联)到指定的设备上下文 hMemoryDC 中。
        // 这个步骤将创建的位图与内存设备上下文关联,以便进行后续的绘图操作。
        SelectObject(hMemoryDC, hBitmap);

        // BitBlt 函数执行位图的位块传输操作,从屏幕设备上下文 hScreenDC 中复制指定区域的图像到内存设备上下文 hMemoryDC 中的位图中。
        // 这里,它从屏幕上指定位置 (left, top) 复制一个宽为 width,高为 height 的区域到内存中的位图。
        BitBlt(hMemoryDC, 0, 0, width, height, hScreenDC, left, top, SRCCOPY);

        // 获取位图数据
        BITMAPINFOHEADER bi;
        bi.biSize = sizeof(BITMAPINFOHEADER);
        bi.biWidth = width;
        bi.biHeight = -height; // 垂直反转,使图片正向显示
        bi.biPlanes = 1;
        bi.biBitCount = 24; // 24位色彩
        bi.biCompression = BI_RGB;
        bi.biSizeImage = 0;
        bi.biXPelsPerMeter = 0;
        bi.biYPelsPerMeter = 0;
        bi.biClrUsed = 0;
        bi.biClrImportant = 0;

        //GetDIBits 函数用于检索与设备无关位图的数据。
        // 它将位图 hBitmap 中的像素数据复制到一个缓冲区 buffer 中。
        // BITMAPINFO 结构体 bi 包含了有关位图的信息,如宽度、高度、色彩深度等。
        // 这里的参数设置了从 hMemoryDC 和 hBitmap 中提取数据,并将提取的数据以 RGB 格式存储在 buffer 中。
        GetDIBits(hMemoryDC, hBitmap, 0, height, buffer, (BITMAPINFO*)&bi, DIB_RGB_COLORS);

        // 释放资源
        DeleteObject(hBitmap);
        DeleteDC(hMemoryDC);
        ReleaseDC(NULL, hScreenDC);
    }
}

int main() {
    const int screenWidth = 640;
    const int screenHeight = 640;
    const int bufferSize = screenWidth * screenHeight * 3; // 3 bytes per pixel for 24-bit color depth

    unsigned char* pixelBuffer = new unsigned char[bufferSize]; // 分配足够大的缓冲区
    CaptureDesktop(640, 640, pixelBuffer);
    return 0;
}

2. 生成动态链接库

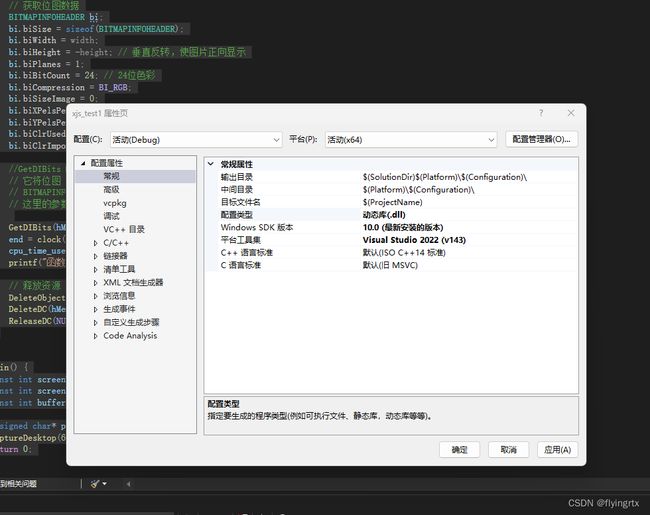
修改visual studio的项目属性,改exe生成为dll生成
c实现桌面截图鼠标周边区域及生成dll供python调用_第1张图片

二、python调用

1.使用方法

import ctypes
import numpy as np
from PIL import Image

# 加载DLL
screenshot_dll = ctypes.CDLL('path/to/your/dll/screenshot.dll')

# 定义函数原型
screenshot_dll.CaptureDesktop.argtypes = [
    ctypes.c_int, ctypes.c_int, ctypes.POINTER(ctypes.c_ubyte)
]
screenshot_dll.CaptureDesktop.restype = None

def capture_screen(width, height):
    buffer_size = width * height * 3  # 3 channels (RGB)
    buffer = (ctypes.c_ubyte * buffer_size)()
    screenshot_dll.CaptureDesktop(width, height, buffer)

    # 将截图数据转换为NumPy数组
    image_data = np.frombuffer(buffer, dtype=np.uint8)
    image_data = image_data.reshape((height, width, 3))

    return Image.fromarray(image_data)

# 使用示例
width, height = 640, 640  # 截图尺寸

screenshot = capture_screen(width, height)
screenshot.show()  # 显示截图

2.截图计时

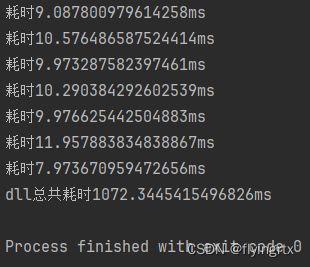
将上述python函数封装好,截图100次,大小640*640,本人用时结果如下:
c实现桌面截图鼠标周边区域及生成dll供python调用_第2张图片
同时,使用python mss库的结果如下:
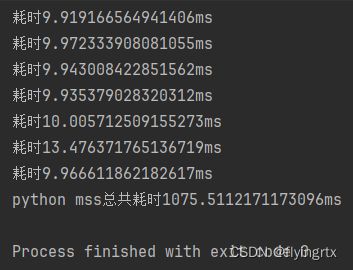
c实现桌面截图鼠标周边区域及生成dll供python调用_第3张图片
二者结果几乎一致。
仔细研究发现,C中内存拷贝一句代码就占据了整个过程90%的时间,因此暂时没有更好的降低截图延迟办法


你可能感兴趣的:(python基础,cs2,c语言,python,开发语言)