IOS学习之关于导航那些事
想写一篇文章,用一个demo, 把导航相关的知识都包含在内. 这个demo要尽量简单,切合实际开发需求,不能偏离主题,所以也不能涉及到太多其它非导航相关的知识点。 经过苦思冥想,最终这个集简单,奢华于一体的demo配上这篇行云流水的博文宣布出炉。
一 开发环境
mac os + xcode5.0 + ios7模拟器。
二 效果展示
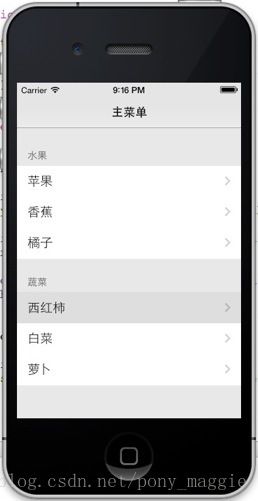
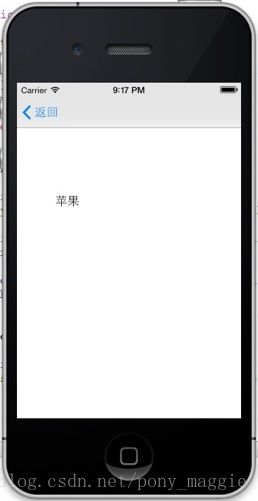
先上最终的效果图:

三 实现细节
1 总体布局
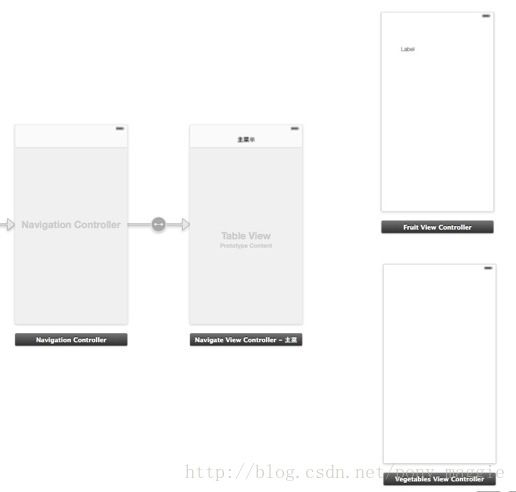
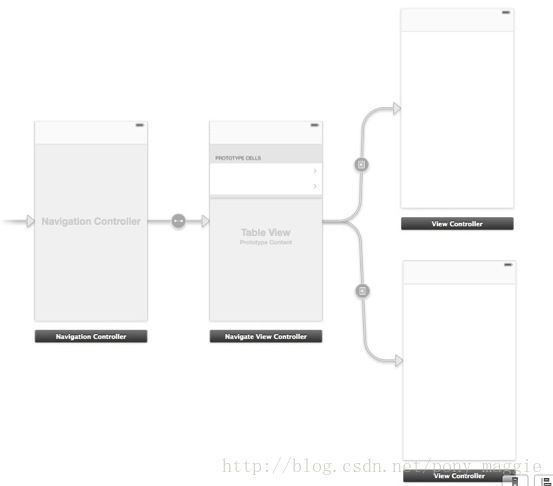
根据上面的最终效果图,我们可以先在storyboard上布局,我需要一个导航控制器,一个根视图,两个子视图.根视图里有个tableView。 第一个子视图上有一个label负责显示水果的名称. 第二个子视图没有控件,我是动态的生成alert来提示. 布局效果如下:
这个过程之前的博文都有介绍过,这里不再累述。
2 table view相关的.
关于tableView的实现细节,请参看之前的博文,有详细的过程,这里仅贴出代码。 有一点特别的地方说明,正如效果图所示,这个tableView有两个section,每个section有一组cell,不同的section会切换到不同格的子视图(注意这个描述)代理的实现要有小小的差别。
- (NSInteger)numberOfSectionsInTableView:(UITableView*)tableView
{

    return 2;//有两种风格的section
}

//给两个section加入不同的标题
- (NSString *)tableView:(UITableView *)tableView titleForHeaderInSection:(NSInteger)section
{
    if (section == 0)
    {
        return @"水果";
    }
    else
    {
        return @"蔬菜";
    }
    return nil;
}

- (NSInteger)tableView:(UITableView*)tableView numberOfRowsInSection:(NSInteger)section
{
    if (section == 0)
    {
        return [self.sectionOneData count];
    }
    else
    {
        return [self.sectionTwoData count];
    }
}

//根据不同的section创建cell
- (UITableViewCell*)tableView:(UITableView *)tableView
        cellForRowAtIndexPath:(NSIndexPath*)indexPath
{
    NSUInteger section = indexPath.section;


    static NSString *fruitCellIdentifier = @"fruitCell";
    static NSString *vegetablesCellIdentifier = @"vegetablesCell";

    UITableViewCell *cell;

    if (section == 0)
    {
        cell = [tableView dequeueReusableCellWithIdentifier:fruitCellIdentifier];

        if (cell == nil)
        {
            cell = [[UITableViewCell alloc] initWithStyle:UITableViewCellStyleDefault reuseIdentifier:fruitCellIdentifier];
        }

        cell.textLabel.text = [self.sectionOneData objectAtIndex:indexPath.row];
    }
    else if (section == 1)
    {
        cell = [tableView dequeueReusableCellWithIdentifier:vegetablesCellIdentifier];

        if (cell == nil)
        {
            cell = [[UITableViewCell alloc] initWithStyle:UITableViewCellStyleDefault reuseIdentifier:vegetablesCellIdentifier];
        }
        cell.textLabel.text = [self.sectionTwoData objectAtIndex:indexPath.row];
    }


    return cell;
}
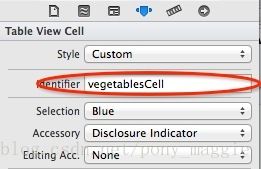
3 从cell切换到视图
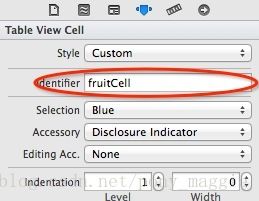
从cell是如何切换到视图的呢?我们在根视图的tableView里增加两个cell, 为他们命名不同的标识符,这两个cell就代表不同section里的两组cell了,从创建cell的代码可以看出, 我们是不同的section用不同的标识符创建。如下图所示:
然后对两个cell, 分别按住control键,拖到对应的视图上。在弹出的selection segue里选对push(后面会说细讲这个)。 目前的布局效果图如下:
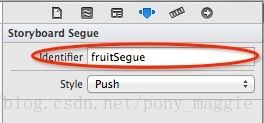
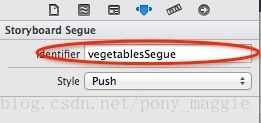
我们给刚刚生成的两个segue,命名标识符,因为要在根视图和子视图之间传递数据,要根据标识符确定是哪个子视图被切换。分别选中两个segue, 设置一个标识符:
总结一下就是,指定标识的cell 通过我们拖过去的segue导航到一个子视图。现在运行程序,已经可以从tableView切换到各自的视图了,只不过还不能在视图间传递数据。
Segue有必要再细说一下. 分为push,modal, custom三种:
push通常就是用在navigationcontroller中的,从一个视图导航到另一个。有圧栈的意思。官方的解释是这样的:
Push:Create a chain of scenes where the user can moveforward or back
Modal 即模态,如果你了解mfc,对这个概念不会陌生。新出来的视图盖住原来那个,在关掉当前这个视图之前,不可能操作原来那个. 官方解释:
Modal:Transition to another scene for the purposes ofcompleting a task
Custome 顾名思义就是自定义切换的方式,具体方法是新建一个类,继承自UIStoryboardSegue父类,并且实现一个perform的方法.
4 如何在根视图和子视图之间传递数据
视图和视图控制器(VC)是不可分割的,要操作视图,就要用到VC。首先在工程里新增两个基于VC的类,方法是”file-new-file”,然后选择”objective-cclass”, 最终新增四个文件如下图所示:
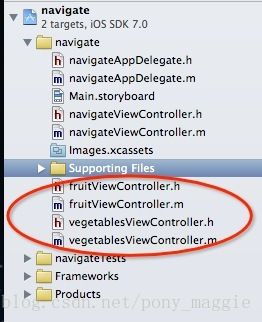
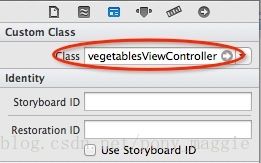
还要把这两个类关联到相应的视图上,在storyboard里选中对应的视图,然后分别给他们指定控制器类,如下所示:
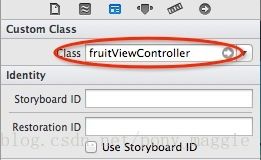
对于fruitViewController,我们这样处理:
#import

@interface fruitViewController : UIViewController
@property (nonatomic , strong)NSString *fruitName;
@end
#import "fruitViewController.h"

@interface fruitViewController ()
@property (weak, nonatomic) IBOutlet UILabel *fruitNameLabel;

@end

- (void)viewDidLoad
{
    [super viewDidLoad];
	// Do any additional setup after loading the view.

    self.fruitNameLabel.text = self.fruitName;
}
对于vegetablesViewController,我们这样处理:
#import

@interface vegetablesViewController : UIViewController
@property (nonatomic, strong)NSString *vegetablesName;
@end
- (void)viewDidLoad
{
    [super viewDidLoad];
	// Do any additional setup after loading the view.

    UIAlertView *alert=[[UIAlertView alloc] initWithTitle:@"提示" message:self.vegetablesName delegate:self cancelButtonTitle:nil otherButtonTitles:@"确定",nil];

    alert.alertViewStyle=UIAlertViewStyleDefault;
    [alert show];
}
注意它们两个都有一个可供外部访问的NSString类型。
然后我们在根视图的控制器类里,重载prepareForSegue方法,把数据传递过去。
//界面跳转开始时,prepareForSegue方法会被调用
- (void)prepareForSegue:(UIStoryboardSegue *)segue sender:(id)sender
{
NSIndexPath *indexPath = [self.tableView indexPathForSelectedRow];
NSLog(@"row=%d", indexPath.row);
if ([segue.identifier isEqualToString:@"fruitSegue"])
{
fruitViewController *fruitDestVC = segue.destinationViewController;
fruitDestVC.fruitName = [self.sectionOneData objectAtIndex:indexPath.row];
}
else if ([segue.identifier isEqualToString:@"vegetablesSegue"])
{
vegetablesViewController *vegetablesDestVC = segue.destinationViewController;
vegetablesDestVC.vegetablesName = [self.sectionTwoData objectAtIndex:indexPath.row];
}
}
5 导航标题
当导航到子视图之后,左上角的提示就是我们根视图的标题,能不能改呢,比如在子视图里左上解,我就想用”返回”,不叫做”主菜单”. 当然是可以的. 代码如下:
- (void)viewDidLoad
{
    [super viewDidLoad];
	// Do any additional setup after loading the view, typically from a nib.

    self.sectionOneData = [NSArray arrayWithObjects:@"苹果", @"香蕉", @"橘子", nil];
    self.sectionTwoData = [NSArray arrayWithObjects:@"西红柿", @"白菜", @"萝卜", nil];

    //设置子view返回标题
    self.navigationItem.backBarButtonItem = [[UIBarButtonItem alloc] initWithTitle:@"返回" style:UIBarButtonItemStylePlain target:self action:nil];
}
四 延伸思考
1 两个子视图是否多余,用一个也是可以的吧?
首先肯定是可以实现的,通过传递数据的方式告诉子视图,当前选中的是哪个cell, 然后在同一个子视图里,决定是用label显示,还是用alert弹出显示。
但是我个人的观点,不同风格的view(一个是用label显示,一个是用alert弹出), 应该有不同的view(controller), 这样的代码结构比较清晰。
2 设置导航标题时,不能直接给title赋值吗?
我们注意到上面的代码里,是给整个backBarButtonItem赋新的对象, 但是我们关心的其实只是它的title成员,能不能像下面这样直接给title赋值:
self.navigationItem.backBarButtonItem.title = @"返回";
可以自己试一下,会发现是起不到作用的,apple的文档上是这么说的,
You should set this property before adding the item to a bar. The default value is nil
也就是说这个内置的backBarButtonItem是nil, 所以直接设置不起作用,要给它指向一个可用的对象。
源码下载地址:
http://download.csdn.net/detail/pony_maggie/7242661
或
https://github.com/pony-maggie/navigate