当前公司在使用HighCharts来做图表展示大量数据. 其中HighStock是很好的展示时间轴图表的工具. 最近一个需求是要求在图表的Navigator上面拖动的时候显示日期tooltip, 好让用户知道拖到了哪里. 在网上搜索找到了一个别人写的三年前的highcharts插件库, 已经不能用了, 但是思路可以借鉴.
首先借鉴
- 首先把上面提到的人家写的库的代码拿出来复制到自己的项目内
- 你会发现很多变量已经变了(Highcharts正常更新, 这个插件库年久失修, 很多变量很多方法都发生了翻天覆地的变化), 把已经不存在的变量修复成为当前的变量
- 修改插件中定义的各种位置数值(很多位置不对, 要自己慢慢调整)
修改完成后的代码
(function(H) {
  const widthMap = {
    left: 70,
    right: 70,
    center: 150,
  }

  /**
   * Render tooltip into navigatorGroup
   *
   * @name renderTooltip
   * @param {Scroller} scroller
   * @param {String} position: position of tooltip [left, right, center]
   * @param {String} str: string to initially display in tooltip
   * @returns {undefined}
   */
  const renderTooltip = function(scroller, position, str) {
    const {
      chart: { renderer },
    } = scroller;
    scroller[`${position}Tooltip`] = renderer.rect(0, 0, 95, 40, 3, 0).add(scroller.navigatorGroup);
    scroller[`${position}TooltipText`] = renderer.text(str, 5, 15).add(scroller.navigatorGroup);
    scroller[`${position}TooltipArrow`] = renderer
    .path(['M', 0, 0, 'H', 10, 'L', 5, 5, 'L', 0, 0])
    .add(scroller.navigatorGroup);
  };

  /**
   * Fade in/out tooltip
   *
   * @name fade
   * @param {String} direction: direction of fade [in, out]
   * @returns {Function}
   */
  const fade = direction => {
    return function(scroller, position) {
      const { [`${position}Tooltip`]: tooltip, [`${position}TooltipText`]: text, [`${position}TooltipArrow`]: tooltipArrow } = scroller;
      const fadeClass = `fade-${direction}`;

      tooltip.attr('class', fadeClass);
      text.attr('class', fadeClass);
      tooltipArrow.attr('class', fadeClass);
    };
  };

  const fadeInTooltip = fade('in');
  const fadeOutTooltip = fade('out');

  const debounceFadeOut = _.debounce(fadeOutTooltip, 1000);

  const tooltipPadding = 12;

  /**
   * Find the correct position for the tooltip and the tooltip's arrow
   *
   * @name findTooltipPosition
   * @param {Scroller} scroller
   * @param {String} position: position of tooltip [left, right, center]
   * @param {String} tooltipWidth
   * @returns {Object}
   *   @returns {Number} x
   *   @returns {Number} y
   *   @returns {Number} arrow
   *     @returns {Number} x
   *     @returns {Number} y
   */
  const findTooltipPosition = function(scroller, position, tooltipWidth) {
    const { size, left, range } = scroller;
    const handleIndex = { left: 0, right: 1, center: 0 };
    const handle = scroller.handles[handleIndex[position]];
    const offset = (tooltipWidth + tooltipPadding * 2) / 2;
    let x = handle.translateX - offset;
    const arrow = {
      x: handle.translateX - 5,
      y: handle.translateY - 13,
    };

    if (position === 'center') {
      x = handle.translateX + (range - tooltipWidth) / 2;
      arrow.x = x + tooltipWidth / 2 - 5;
    }

    // tooltip is outside right edge of minimap
    if (x + tooltipWidth > size) {
      x = size - tooltipWidth;
      arrow.x = size - 5;
    }

    // tooltip is outside of left edge of minimap
    if (x < left) {
      x = left;
      arrow.x = x;
    }

    return { x, y: handle.translateY - 25, arrow };
  };

  const tooltipFill = THEME.fifth;

  /**
   * Adjust the position, width of the tooltip
   *
   * @name adjustTooltip
   * @param {Scroller} scroller
   * @param {String} position: position of tooltip [left, right, center]
   * @param {String} str: string to initially display in tooltip
   * @returns {undefined}
   */
  const adjustTooltip = function(scroller, position, str) {
    const { [`${position}TooltipArrow`]: arrow, [`${position}Tooltip`]: tooltip, [`${position}TooltipText`]: text } = scroller;
    text.attr({ text: str });
    // const { clientWidth: textWidth, clientHeight: textHeight } = text.element;
    const textWidth = widthMap[position];
    const textHeight = 14;

    const {
      x,
      y,
      arrow: { x: arrowX, y: arrowY },
    } = findTooltipPosition(scroller, position, textWidth);

    tooltip.attr({
      width: textWidth + tooltipPadding * 2,
      height: textHeight + tooltipPadding * 2,
      fill: tooltipFill,
      x,
      y: y - textHeight - tooltipPadding,
    });

    text.attr({ text: str, x: x + tooltipPadding, y: y }).css({
      color: THEME.primary,
      fontSize: '14px',
    });

    arrow.attr({
      d: ['M', arrowX, arrowY, 'H', arrowX + 10, 'L', arrowX + 5, arrowY + 5, 'L', arrowX, arrowY],
      fill: tooltipFill,
    });
  };

  /**
   * Render the scroller as it changes through interaction
   *
   * @name render
   * @param {Function} proceed: effectively `_super`
   * @param {Number} min: min xAxis value of currently represented by the navigator
   * @param {Number} max: max xAxis value of currently represented by the navigator
   * @param {Number} pxMin: min pixel position of current navigator selection
   * @param {Number} pxMax: max pixel position of current navigator selection
   * @returns {undefined}
   */
  H.wrap(H.Navigator.prototype, 'render', function(proceed, min, max, pxMin, pxMax) {
    const [, ...args] = arguments;
    proceed.call(this, ...args);

    const {
      navigatorOptions: { tooltipFormatter },
    } = this;

    if (!tooltipFormatter) return;

    const { chart } = this;
    const { dataMin, dataMax } = chart.xAxis[0];
    const diff = dataMax - dataMin;
    const unit = diff / chart.xAxis[0].width;
    const range = { min: dataMin + unit * this.zoomedMin, max: dataMin + unit * this.zoomedMax };

    const formattedTooltipText = tooltipFormatter(range.min, range.max, pxMin, pxMax);
    formattedTooltipText.center = `${formattedTooltipText.left} - ${formattedTooltipText.right}`;

    if (!this.tooltipRendered) {
      renderTooltip(this, 'left', formattedTooltipText.left);
      renderTooltip(this, 'right', formattedTooltipText.right);
      renderTooltip(this, 'center', formattedTooltipText.center);

      this.tooltipRendered = true;
    }

    if (!formattedTooltipText.left) return;
    const positions = ['left', 'right', 'center'];
    positions.forEach(position => {
      const capitalizedPosition = position.charAt(0).toUpperCase() + position.slice(1);
      const grabbed = this[`grabbed${capitalizedPosition}`];
      if (grabbed) {
        fadeInTooltip(this, position);
        adjustTooltip(this, position, formattedTooltipText[position]);
        debounceFadeOut(this, position);
      } else {
        fadeOutTooltip(this, position);
      }
    });
  });
})(Highcharts);
然后应用
进行完上面的修改调整之后, 就可以在调用的地方使用啦
- 首先, 把上面经过调整后的代码粘贴到你要使用Highcharts的地方的上面
- 在你要用的地方这样使用
navigator: {
        height: 32,
        margin: 20,
        xAxis: {
          labels: {
            enabled: true,
          },
        },
        tooltipFormatter: function(min, max) {
          return { left: formatter.dateFormatter(min), right: formatter.dateFormatter(max) };
        },
      },
当然你可以按照你自己的需要调整属性数值
最后的效果

拉动左边

拉动右边
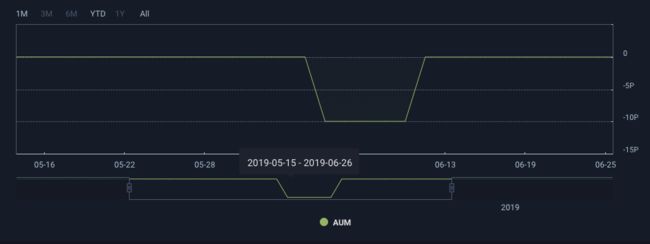
拉动中间