【Wio Terminal教程】使用LCD屏幕(1)
使用LCD屏幕(1)
- 一、安装LCD相关库
-
- 1、安装Seeed_Arduino_LCD库
- 2、安装Adafruit Zero DMA库
- 二、LCD基本原理
-
- 1、像素坐标系统
- 2、8-bit 和 16-bit 颜色模型
- 2、TFT LCD屏幕初始化
- 三、基础绘制功能
-
- 1、绘制像素
- 2、画水平/垂直线
- 3、画矩形
- 4、画圆
- 5、画三角形
- 6、画圆角矩形
- 7、画字符
- 8、屏幕纯色
一、安装LCD相关库
1、安装Seeed_Arduino_LCD库
点此处下载
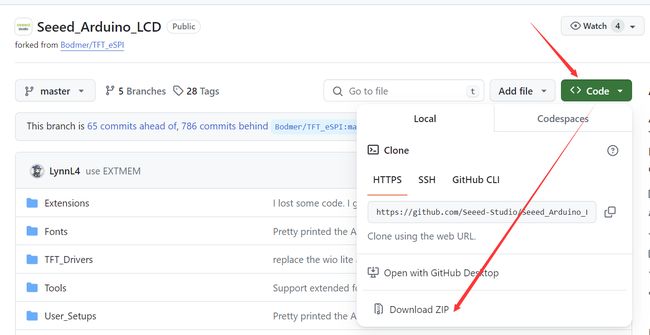
打开arduino,添加zip库,选择刚才下载的zip文件,添加即可。

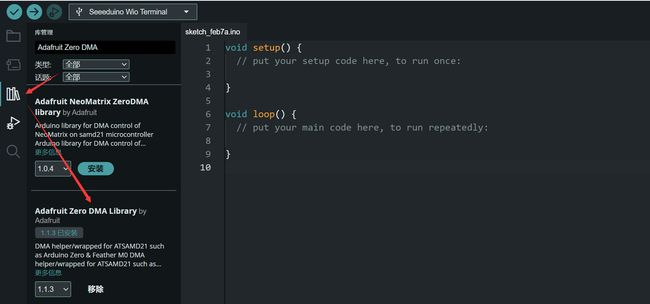
2、安装Adafruit Zero DMA库
搜索库并下载。
二、LCD基本原理
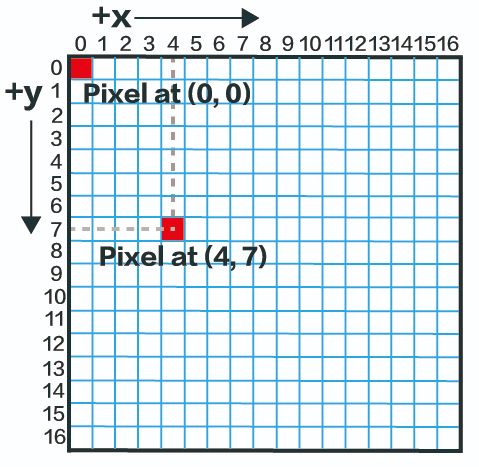
1、像素坐标系统
一个二维的数字图像由像素的行和列组成。图像中的像素可以通过指定其所在的列和行来标识。简单来说,像素可以通过一对整数来识别,这对整数提供了列号和行号。例如,坐标为(4,7)的像素将位于第4列和第7行。
2、8-bit 和 16-bit 颜色模型
8-bit 颜色模型
| 位 | 7 | 6 | 5 | 4 | 3 | 2 | 1 | 0 |
|---|---|---|---|---|---|---|---|---|
| 颜色 | 红 | 红 | 红 | 绿 | 绿 | 绿 | 蓝 | 蓝 |
16-bit 颜色模型
| 位 | 15 | 14 | 13 | 12 | 11 | 10 | 9 | 8 | 7 | 6 | 5 | 4 | 3 | 2 | 1 | 0 |
|---|---|---|---|---|---|---|---|---|---|---|---|---|---|---|---|---|
| 颜色 | 红 | 红 | 红 | 红 | 红 | 绿 | 绿 | 绿 | 绿 | 绿 | 绿 | 蓝 | 蓝 | 蓝 | 蓝 | 蓝 |
下面是一些在LCD库中常见的预定义16位颜色示例:
#define TFT_BLACK       0x0000      /*   0,   0,   0 */
#define TFT_NAVY        0x000F      /*   0,   0, 128 */
#define TFT_DARKGREEN   0x03E0      /*   0, 128,   0 */
#define TFT_DARKCYAN    0x03EF      /*   0, 128, 128 */
#define TFT_MAROON      0x7800      /* 128,   0,   0 */
#define TFT_PURPLE      0x780F      /* 128,   0, 128 */
#define TFT_OLIVE       0x7BE0      /* 128, 128,   0 */
#define TFT_LIGHTGREY   0xC618      /* 192, 192, 192 */
#define TFT_DARKGREY    0x7BEF      /* 128, 128, 128 */
#define TFT_BLUE        0x001F      /*   0,   0, 255 */
#define TFT_GREEN       0x07E0      /*   0, 255,   0 */
#define TFT_CYAN        0x07FF      /*   0, 255, 255 */
#define TFT_RED         0xF800      /* 255,   0,   0 */
#define TFT_MAGENTA     0xF81F      /* 255,   0, 255 */
#define TFT_YELLOW      0xFFE0      /* 255, 255,   0 */
#define TFT_WHITE       0xFFFF      /* 255, 255, 255 */
#define TFT_ORANGE      0xFDA0      /* 255, 180,   0 */
#define TFT_GREENYELLOW 0xB7E0      /* 180, 255,   0 */
2、TFT LCD屏幕初始化
初始化Terminal的屏幕
#include"TFT_eSPI.h"
TFT_eSPI tft;

void setup() {
  ...
    tft.begin();
    tft.setRotation(r);					// 旋转屏幕,r = 0 ~ 4
    digitalWrite(LCD_BACKLIGHT, HIGH); 	// 打开LCD背光
  ...
}
示例:
#include"TFT_eSPI.h"
TFT_eSPI tft;

void setup() {
    tft.begin();
    tft.setRotation(3);

    tft.fillScreen(TFT_RED); // 让整块屏幕显示红色
}

void loop() {

}
关闭屏幕背光
#include"TFT_eSPI.h"
TFT_eSPI tft;
#define LCD_BACKLIGHT (72Ul) // 72U1是控制屏幕背光的引脚

void setup() {
  // 程序效果为屏幕亮-灭-亮,间隔2s

    tft.begin();
    tft.setRotation(3);
    tft.fillScreen(TFT_RED);

    delay(2000);
    // 关闭背光
    digitalWrite(LCD_BACKLIGHT, LOW);
    delay(2000);
    // 开启背光
    digitalWrite(LCD_BACKLIGHT, HIGH);
}

void loop() {

}
控制背光亮度
代码下载地址:WioTerminal_BackLight
效果为:屏幕由灭逐渐到亮。
三、基础绘制功能
1、绘制像素
在屏幕上绘制一个像素点:
drawPixel(int32_t x, int32_t y, uint32_t color);
将(x,y)坐标上的像素点设置为color色。
示例:
#include"TFT_eSPI.h"
TFT_eSPI tft;

void setup() {
    tft.begin();
    tft.setRotation(3);

    tft.fillScreen(TFT_RED); // 屏幕全红
    tft.drawPixel(4,7,TFT_BLACK); //(4,7)处黑色
}

void loop() {
}
2、画水平/垂直线
在屏幕上画线:
drawFastHLine(int32_t x, int32_t y, int32_t w, uint32_t color); // 水平线
drawFastVLine(int32_t x, int32_t y, int32_t h, uint32_t color); // 垂直线
// 其中,(x, y) 是起始坐标,w 是水平线的宽度,h 是垂直线的高度,以及 color 是颜色。
示例:
#include"TFT_eSPI.h"
TFT_eSPI tft;

void setup() {
    tft.begin();
    tft.setRotation(3);

    tft.fillScreen(TFT_RED); //红色背景
    tft.drawFastHLine(0,120,320,TFT_BLACK); //黑色水平线 从(0, 120)开始画
    tft.drawFastVLine(160,0,240,TFT_BLACK); // 黑色垂直线 从(160, 0)开始画
}

void loop() {
}
3、画矩形
画空心/实心矩形:
drawRect(int32_t x, int32_t y, int32_t w, int32_t h, uint32_t color);
fillRect(int32_t x, int32_t y, int32_t w, int32_t h, uint32_t color);
// (x, y) 是矩形的起始坐标,w 是矩形的宽度,h 是矩形的高度,而 color 是矩形的颜色。
示例:
#include"TFT_eSPI.h"
TFT_eSPI tft;

void setup() {
    tft.begin();
    tft.setRotation(3);

    tft.fillScreen(TFT_RED); //红色背景
    tft.drawRect(110,70,100,100,TFT_BLACK); //一个从(110, 70)开始的 100x100 黑色矩形
}

void loop() {}
4、画圆
画空心/实心圆:
drawCircle(int32_t x0, int32_t y0, int32_t r, uint32_t color);
fillCircle(int32_t x0, int32_t y0, int32_t r, uint32_t color);
// (x0, y0) 是圆的圆心坐标,r 是圆的半径,而 color 是圆的颜色。
示例:
#include"TFT_eSPI.h"
TFT_eSPI tft;

void setup() {
    tft.begin();
    tft.setRotation(3);

    tft.fillScreen(TFT_RED); //红色背景
    tft.drawCircle(160,120,50,TFT_BLACK); //一个以 (160, 120) 为圆心的黑色圆
}

void loop() {}
画空心/实心椭圆:
drawEllipse(int16_t x0, int16_t y0, int32_t rx, int32_t ry, uint16_t color);
fillEllipse(int16_t x0, int16_t y0, int32_t rx, int32_t ry, uint16_t color);
// (x0, y0) 是椭圆的中心点坐标,rx 是椭圆的水平半径(即在x轴方向上的半径长度),ry 是椭圆的垂直半径(即在y轴方向上的半径长度),而 color 是椭圆的颜色。
示例:
#include"TFT_eSPI.h"
TFT_eSPI tft;

void setup() {
    tft.begin();
    tft.setRotation(3);

    tft.fillScreen(TFT_RED); //Red background
    tft.drawEllipse(160,120,50,100,TFT_BLACK);
    // 一个以 (160, 120) 为中心,水平半径为 50,垂直半径为 100 的黑色椭圆。
}

void loop() {}
5、画三角形
画空心/实心三角形:
drawTriangle(int32_t x0, int32_t y0, int32_t x1, int32_t y1, int32_t x2, int32_t y2, uint32_t color);
fillTriangle(int32_t x0, int32_t y0, int32_t x1, int32_t y1, int32_t x2, int32_t y2, uint32_t color);
// (x0, y0)、(x1, y1) 和 (x2, y2) 分别是三角形的三个顶点的坐标,而 color 是三角形的颜色。
示例:
#include"TFT_eSPI.h"
TFT_eSPI tft;

void setup() {
    tft.begin();
    tft.setRotation(3);

    tft.fillScreen(TFT_RED); //Red background
    tft.drawTriangle(160,70,60,170,260,170,TFT_BLACK);
    //一个以 (160, 70), (60, 170) 和 (260, 170)为顶点的三角形
}

void loop() {}
6、画圆角矩形
画空心/实心圆角矩形:
drawRoundRect(int32_t x, int32_t y, int32_t w, int32_t h, int32_t r, uint32_t color);
fillRoundRect(int32_t x, int32_t y, int32_t w, int32_t h, int32_t r, uint32_t color);
// (x, y) 是矩形的起始坐标,w 和 h 分别是矩形的宽度和高度,r 是矩形角的圆角半径,而 color 是矩形的颜色。
示例:
#include"TFT_eSPI.h"
TFT_eSPI tft;

void setup() {
    tft.begin();
    tft.setRotation(3);

    tft.fillScreen(TFT_RED); //Red background
    tft.drawRoundRect(110,70,100,100,10,TFT_BLACK);
    // 一个从坐标 (110, 70) 开始的 100x100 的黑色圆角矩形。
}

void loop() {}
7、画字符
画字符:
drawChar(int32_t x, int32_t y, uint16_t c, uint32_t color, uint32_t bg, uint8_t size);
//(x, y) 是字符的起始位置,c 是要绘制的字符,color 是字符的颜色,bg 是字符的背景颜色,而 size 是字符的尺寸缩放因子。
示例:
#include"TFT_eSPI.h"
TFT_eSPI tft;

void setup() {
    tft.begin();
    tft.setRotation(3);

    tft.fillScreen(TFT_RED); //Red background
    tft.drawChar(140,120,'A',TFT_BLACK, TFT_RED,2); // 从坐标 (140,120) 开始绘制一个黑色的字符 "A"。
    tft.drawChar(155,120,'B',TFT_BLACK, TFT_RED,2); // 从坐标 (155,120) 开始绘制一个黑色的字符 "B"。
    tft.drawChar(170,120,'C',TFT_BLACK, TFT_RED,2); // 从坐标 (170,120) 开始绘制一个黑色的字符 "C"。
}

void loop() {}
8、屏幕纯色
fillScreen(uint32_t color);
示例:
#include"TFT_eSPI.h"
TFT_eSPI tft;

void setup() {
  tft.begin();
  tft.setRotation(3);
}

void loop() {
    //Looping through color R-G-B
    tft.fillScreen(TFT_RED);
    delay(1000);
    tft.fillScreen(TFT_GREEN);
    delay(1000);
    tft.fillScreen(TFT_BLUE);
    delay(1000);
}

void loop() {}