12_树莓派_树莓派外设板_编译过程实际例子
一.Git仓库地址
1.Address:
https://github.com/WiringPi/WiringPi //git到本地即可,目前作者最新版本是2.70
wish@raspberrypi:/WiringPi/wiringPi $ gpio -v
gpio version: 2.70
Copyright (c) 2012-2018 Gordon Henderson
This is free software with ABSOLUTELY NO WARRANTY.
For details type: gpio -warranty

Raspberry Pi Details:
  Type: Pi 4B, Revision: 05, Memory: 8192MB, Maker: Sony
  * Device tree is enabled.
  *--> Raspberry Pi 4 Model B Rev 1.5
  * This Raspberry Pi supports user-level GPIO access.
wish@raspberrypi:/WiringPi/wiringPi $
2.SDK介绍
wish@raspberrypi:/WiringPi $ ls
build  COPYING.LESSER  debian  debian-template  devLib  examples  gpio  INSTALL  newVersion  People  pins  README.md  update  VERSION  version.h  wiringPi  wiringPiD
wish@raspberrypi:/WiringPi $
1)WiringPi_SDK:
在软件开发中,SDK(Software Development Kit)是一组工具、库和文档的集合,用于帮助开发人员创建特定平台或技术的应用程序。
2)Build:
构建配置:构建文件用于配置项目的构建过程,包括编译源代码、链接库文件、生成可执行文件等。它定义了编译器选项、依赖关系、目标文件路径等构建相关的设置。
自动化构建:构建文件可以用于自动化构建过程,通过简单的命令或脚本,可以执行一系列构建步骤,从而减少手动操作的工作量。这样可以提高开发效率,并确保每次构建都是一致的。
依赖管理:构建文件可以指定项目所依赖的其他库或模块,以及它们的版本要求。这样,在构建过程中,构建工具可以自动下载、编译和链接这些依赖项,确保项目能够正确地使用它们。
跨平台支持:构建文件可以针对不同的操作系统和平台进行配置,以适应不同的开发环境。通过构建文件,可以定义不同平台上的编译器选项、库文件路径等,从而实现跨平台的开发和构建。
3)devLib
已经支持的设备相关源代码和链接库
4)examples
示例代码
Makefile
5)INSTALL
For help and support see:
* https://github.com/WiringPi/WiringPi/issues
* https://discord.gg/SM4WUVG
* wiringPi originally created by Gordon Henderson
* https://projects.drogon.net/
6)newVersion
# This file is part of wiringPi:
# A "wiring" library for the Raspberry Pi
# wiringPi is free software: you can redistribute it and/or modify
# it under the terms of the GNU Lesser General Public License as published by
# the Free Software Foundation, either version 3 of the License, or
# (at your option) any later version.
#
# wiringPi is distributed in the hope that it will be useful,
# but WITHOUT ANY WARRANTY; without even the implied warranty of
# MERCHANTABILITY or FITNESS FOR A PARTICULAR PURPOSE. See the
# GNU Lesser General Public License for more details.
#
# You should have received a copy of the GNU Lesser General Public License
# along with wiringPi. If not, see
7)People
Just a quick note to some people who've provided help, suggestions,
bug-fixes, etc. along the way...
8)wiringPi
源码
9)Others
二.硬件接口对应
1按照wringpi的对应关系
const int Red_Pin=1; //wPi中的1
const int Green_Pin=4; //wPi中的4
const int Blue_Pin=5; //wPi中的5
wish@raspberrypi:/WiringPi/examples $ gpio readall
 +-----+-----+---------+------+---+---Pi 4B--+---+------+---------+-----+-----+
 | BCM | wPi |   Name  | Mode | V | Physical | V | Mode | Name    | wPi | BCM |
 +-----+-----+---------+------+---+----++----+---+------+---------+-----+-----+
 |     |     |    3.3v |      |   |  1 || 2  |   |      | 5v      |     |     |
 |   2 |   8 |   SDA.1 |   IN | 1 |  3 || 4  |   |      | 5v      |     |     |
 |   3 |   9 |   SCL.1 |   IN | 1 |  5 || 6  |   |      | 0v      |     |     |
 |   4 |   7 | GPIO. 7 |   IN | 1 |  7 || 8  | 1 | IN   | TxD     | 15  | 14  |
 |     |     |      0v |      |   |  9 || 10 | 1 | IN   | RxD     | 16  | 15  |
 |  17 |   0 | GPIO. 0 |   IN | 0 | 11 || 12 | 1 | OUT  | GPIO. 1 | 1   | 18  |
 |  27 |   2 | GPIO. 2 |   IN | 0 | 13 || 14 |   |      | 0v      |     |     |
 |  22 |   3 | GPIO. 3 |   IN | 0 | 15 || 16 | 0 | OUT  | GPIO. 4 | 4   | 23  |
 |     |     |    3.3v |      |   | 17 || 18 | 0 | OUT  | GPIO. 5 | 5   | 24  |
 |  10 |  12 |    MOSI |   IN | 0 | 19 || 20 |   |      | 0v      |     |     |
 |   9 |  13 |    MISO |   IN | 0 | 21 || 22 | 0 | IN   | GPIO. 6 | 6   | 25  |
 |  11 |  14 |    SCLK |   IN | 0 | 23 || 24 | 1 | IN   | CE0     | 10  | 8   |
 |     |     |      0v |      |   | 25 || 26 | 1 | IN   | CE1     | 11  | 7   |
 |   0 |  30 |   SDA.0 |   IN | 1 | 27 || 28 | 1 | IN   | SCL.0   | 31  | 1   |
 |   5 |  21 | GPIO.21 |   IN | 1 | 29 || 30 |   |      | 0v      |     |     |
 |   6 |  22 | GPIO.22 |   IN | 1 | 31 || 32 | 0 | IN   | GPIO.26 | 26  | 12  |
 |  13 |  23 | GPIO.23 |   IN | 0 | 33 || 34 |   |      | 0v      |     |     |
 |  19 |  24 | GPIO.24 |   IN | 0 | 35 || 36 | 0 | IN   | GPIO.27 | 27  | 16  |
 |  26 |  25 | GPIO.25 |   IN | 0 | 37 || 38 | 0 | IN   | GPIO.28 | 28  | 20  |
 |     |     |      0v |      |   | 39 || 40 | 0 | IN   | GPIO.29 | 29  | 21  |
 +-----+-----+---------+------+---+----++----+---+------+---------+-----+-----+
 | BCM | wPi |   Name  | Mode | V | Physical | V | Mode | Name    | wPi | BCM |
 +-----+-----+---------+------+---+---Pi 4B--+---+------+---------+-----+-----+
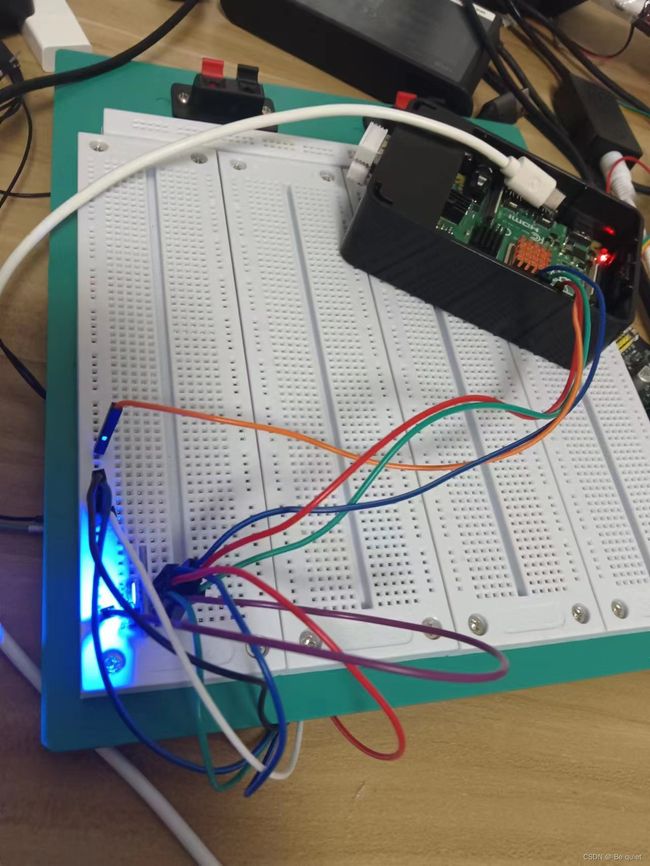
2.实物接线
比较混乱是因为还接了一个逻辑分析仪
三.已经验证的版本C源码
1.网上找到的初步版本代码
#include
#include
#include
#include
#include

const int Red_Pin=1;
const int Green_Pin=4;
const int Blue_Pin=5;


void RGB_Color_Init()
{
    softPwmCreate(Red_Pin, 0, 255);
    softPwmCreate(Green_Pin, 0, 255);
    softPwmCreate(Blue_Pin, 0, 255);

}

int main()
{

  if(wiringPiSetup() == -1)//树莓派引脚初始化,返回-1则初始化失败
     {
        printf("Error!\n");
        return 1;
     }
     RGB_Color_Init();


    while(1)

    {
        //实现彩色渐变循环亮功能
        for(int i=0;i <= 255;i++)//实现彩色渐变循环亮功能
        {
            softPwmWrite(Red_Pin,255);//红
            softPwmWrite(Green_Pin,0);
            softPwmWrite(Blue_Pin,0);
            printf("RED\n");
            delay(10);
        }

         for(int i = 255; i>= 0; i--)
        {
            softPwmWrite(Red_Pin,230);//橙
            softPwmWrite(Green_Pin,20);
            softPwmWrite(Blue_Pin,0);
            printf("ORANGE\n");
            delay(10);
        }

         for(int i=0;i <= 255;i++)
        {
            softPwmWrite(Red_Pin,255);//黄
            softPwmWrite(Green_Pin,30);
            softPwmWrite(Blue_Pin,0);
            printf("YELLOW\n");
            delay(10);

        }

        for(int i = 255; i>= 0; i--)
        {
            softPwmWrite(Red_Pin,0);//绿
            softPwmWrite(Green_Pin,255);
            softPwmWrite(Blue_Pin,0);
            printf("GREEN\n");
            delay(10);
        }

        for(int i=0;i <= 255;i++)
        {
            softPwmWrite(Red_Pin,0);//青
            softPwmWrite(Green_Pin,250);
            softPwmWrite(Blue_Pin,154);
            printf("MedSpringGreen\n");
            delay(10);
        }

        for(int i = 255; i>= 0; i--)
        {
            softPwmWrite(Red_Pin,0);//蓝
            softPwmWrite(Green_Pin,0);
            softPwmWrite(Blue_Pin,255);
            printf("BLUE\n");
            delay(10);
        }

        for(int i=0;i <= 255;i++)
        {
            softPwmWrite(Red_Pin,139);//紫
            softPwmWrite(Green_Pin,0);
            softPwmWrite(Blue_Pin,139);
            printf("Purple\n");
            delay(10);
        }

    }
    return 0;

}
2.优化及调试过程
1)循环太多,采用二维数组优化。
   {
        //实现彩色渐变循环亮功能

        for (i=0; i < numColors; i++)
         {
            softPwmWrite(Red_Pin, colors[i][0]);
            softPwmWrite(Green_Pin, colors[i][1]);
            softPwmWrite(Blue_Pin, colors[i][2]);
            printf("%s\n", colorNames[i]);
            delay(1000);

         }
        printf("Color_Cycle_success\n");
        i=0;

    }
2)循环次数设置成了255次,直接干出那个二维数组的内存区域了,指针越界会发送段错误,采用sizeof动态采集
pwmrainbow.c: In function ‘main’:
pwmrainbow.c:42:9: warning: variable ‘i’ set but not used [-Wunused-but-set-var                                                                                                           iable]
   42 |     int i=0;
      |         ^
wish@raspberrypi:/WiringPi/examples $ ^C
wish@raspberrypi:/WiringPi/examples $
wish@raspberrypi:/WiringPi/examples $
wish@raspberrypi:/WiringPi/examples $ gcc -Wall -o pwmrainbow pwmrainbow.c -lwi                                                                                                           ringPi
pwmrainbow.c: In function ‘main’:
pwmrainbow.c:57:9: warning: statement with no effect [-Wunused-value]
   57 |         for (i; i <255; i++)
      |         ^~~
wish@raspberrypi:/WiringPi/examples $ gcc -Wall -o pwmrainbow pwmrainbow.c -lwi                                                                                                           ringPi
wish@raspberrypi:/WiringPi/examples $ ./pwmrainbow
3)char型数组无法放置长英文,采用char型指针读取颜色符号
wish@raspberrypi:/WiringPi/examples $ gcc -Wall -o pwmrainbow pwmrainbow.c -lwr                                                                                                           omhPi
pwmrainbow.c:23:5: error: excess elements in ‘char’ array initializer
   23 |     "Orange",
      |     ^~~~~~~~
pwmrainbow.c:23:5: note: (near initialization for ‘colorNames’)
pwmrainbow.c:24:5: error: excess elements in ‘char’ array initializer
   24 |     "Yellow",
      |     ^~~~~~~~
pwmrainbow.c:24:5: note: (near initialization for ‘colorNames’)
pwmrainbow.c:25:5: error: excess elements in ‘char’ array initializer
   25 |     "Green",
      |     ^~~~~~~
pwmrainbow.c:25:5: note: (near initialization for ‘colorNames’)
pwmrainbow.c:26:5: error: excess elements in ‘char’ array initializer
   26 |     "Cyan",
      |     ^~~~~~
pwmrainbow.c:26:5: note: (near initialization for ‘colorNames’)
pwmrainbow.c:27:5: error: excess elements in ‘char’ array initialize
char* colorNames[] =
{
"Red",
"Orange",
"Yellow",
"Green",
"Cyan",
"Blue",
"Purple"
};3.优化后的代码【个人拙改】
#include
#include
#include
#include
#include
const int Red_Pin=1;
const int Green_Pin=4;
const int Blue_Pin=5;
int i;
int colors[][3] =
{
{255, 0, 0}, // 红色
{230, 20, 0}, // 橙色
{255, 30, 0}, // 黄色
{0, 255, 0}, // 绿色
{0, 250, 154}, // 青色
{0, 0, 255}, // 蓝色
{139, 0, 139} // 紫色
};
int numColors = sizeof(colors) / sizeof(colors[0]);
char* colorNames[] =
 {
    "Red",
    "Orange",
    "Yellow",
    "Green",
    "Cyan",
    "Blue",
    "Purple"
};
void RGB_Color_Init()
{
softPwmCreate(Red_Pin, 0, 255);
softPwmCreate(Green_Pin, 0, 255);
softPwmCreate(Blue_Pin, 0, 255);
}
int main()
{
if(wiringPiSetup() == -1)//树莓派引脚初始化,返回-1则初始化失败
{
printf("Error!\n");
return 1;
}
RGB_Color_Init();
while(1)
{
//实现彩色渐变循环亮功能
for (i=0; i < numColors; i++)
{
softPwmWrite(Red_Pin, colors[i][0]);
softPwmWrite(Green_Pin, colors[i][1]);
softPwmWrite(Blue_Pin, colors[i][2]);
printf("%s\n", colorNames[i]);
delay(1000);
}
printf("Color_Cycle_success\n");
i=0;
}
return 0;
} 四.编译过程
1.过程及原理
gcc -Wall -o pwmrainbow pwmrainbow.c -lwiringPi
这个命令是使用gcc编译器来编译一个名为pwmrainbow.c的源代码文件,并生成一个可执行文件名为pwmrainbow。下面是对该命令中各个参数的解释:
gcc: 是GNU Compiler Collection(GNU编译器集合)的缩写,它是一种常用的编译器工具。-Wall: 是gcc的一个编译选项,表示开启所有警告信息。这样可以让编译器在编译过程中输出更多的警告信息,帮助开发者发现潜在的问题。-o pwmrainbow: 是指定生成的可执行文件的名称为pwmrainbow。-o是gcc的一个选项,用于指定输出文件的名称。pwmrainbow.c: 是要编译的源代码文件的名称,这里假设源代码文件为pwmrainbow.c。-lwiringPi: 是指定链接wiringPi库。-l是gcc的一个选项,用于指定需要链接的库文件。这里假设需要链接的库文件为wiringPi。
综上所述,该命令的作用是将pwmrainbow.c源代码文件编译成一个可执行文件pwmrainbow,并在链接过程中使用wiringPi库。编译过程中会开启所有警告信息的输出。
2.动态和静态编译
动态库和静态库是在软件开发中常用的两种库文件形式,它们有不同的工作原理。
静态库(Static Library): 静态库是一组预编译的目标代码文件的集合,这些文件包含了函数、变量和其他可供程序使用的资源。在编译时,静态库的代码会被完整地复制到最终的可执行文件中。当程序运行时,所有需要的函数和资源都已经包含在可执行文件中,因此程序可以独立运行,不依赖于外部的库文件。静态库的优点是使用简单,不需要额外的依赖,但缺点是每个可执行文件都会包含一份完整的库代码,导致可执行文件体积较大。
动态库(Dynamic Library): 动态库是一组共享的目标代码文件,它们在程序运行时被加载到内存中,并可以被多个程序共享使用。在编译时,可执行文件只包含对动态库的引用,而不包含实际的库代码。当程序运行时,操作系统会根据需要将动态库加载到内存中,并建立与可执行文件之间的链接。动态库的优点是节省内存空间,多个程序可以共享同一个库,更新库时只需替换动态库文件而无需重新编译可执行文件。但缺点是需要依赖外部的库文件,如果动态库版本不兼容或缺失,程序可能无法正常运行。
总结起来,静态库在编译时被完整地复制到可执行文件中,而动态库在程序运行时被加载到内存中。静态库适合于独立运行的程序,而动态库适合于多个程序共享使用的情况。选择使用哪种库取决于具体的需求和项目要求。
3.依赖的动态so
libwiringPi.so.2.70
wish@raspberrypi:/WiringPi/wiringPi $ ls
ads1115.c       drcNet.o     htu21d.o             mcp23008.c     mcp23017.o    mcp3002.c  mcp4802.c     pcf8591.o     rht03.h      softServo.h  wiringPiI2C.c   wiringSerial.o
ads1115.h       drcSerial.c  libwiringPi.so.2.70  mcp23008.h     mcp23s08.c    mcp3002.h  mcp4802.h     piHiPri.c     rht03.o      softTone.c   wiringPiI2C.h   wiringShift.c
ads1115.o       drcSerial.h  Makefile             mcp23008.o     mcp23s08.h    mcp3002.o  mcp4802.o     piHiPri.o     sn3218.c     softTone.h   wiringPiI2C.o   wiringShift.h
bmp180.c        drcSerial.o  max31855.c           mcp23016.c     mcp23s08.o    mcp3004.c  noMoreStatic  piThread.c    sn3218.h     softTone.o   wiringPi.o      wiringShift.o
bmp180.h        ds18b20.c    max31855.h           mcp23016.h     mcp23s17.c    mcp3004.h  pcf8574.c     piThread.o    sn3218.o     sr595.c      wiringPiSPI.c   wpiExtensions.c
bmp180.o        ds18b20.h    max31855.o           mcp23016.o     mcp23s17.h    mcp3004.o  pcf8574.h     pseudoPins.c  softPwm.c    sr595.h      wiringPiSPI.h   wpiExtensions.h
COPYING.LESSER  ds18b20.o    max5322.c            mcp23016reg.h  mcp23s17.o    mcp3422.c  pcf8574.o     pseudoPins.h  softPwm.h    sr595.o      wiringPiSPI.o   wpiExtensions.o
drcNet.c        htu21d.c     max5322.h            mcp23017.c     mcp23x0817.h  mcp3422.h  pcf8591.c     pseudoPins.o  softPwm.o    wiringPi.c   wiringSerial.c
drcNet.h        htu21d.h     max5322.o            mcp23017.h     mcp23x08.h    mcp3422.o  pcf8591.h     rht03.c       softServo.c  wiringPi.h   wiringSerial.h
wish@raspberrypi:/WiringPi/wiringPi $ ^C
五.实现
1.编译运行
wish@raspberrypi:/WiringPi/examples $ ./pwmrainbow
Red
Orange
Yellow
Green
Cyan
Blue
Purple
^C
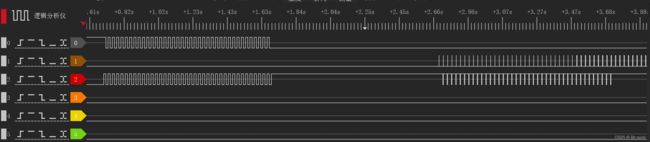
2.逻辑分析仪PWM波形
3.实现效果
https://www.bilibili.com/video/BV1cF411X7p7/?spm_id_from=333.999.0.0