Unity笔记:相机移动
基础知识
鼠标输入
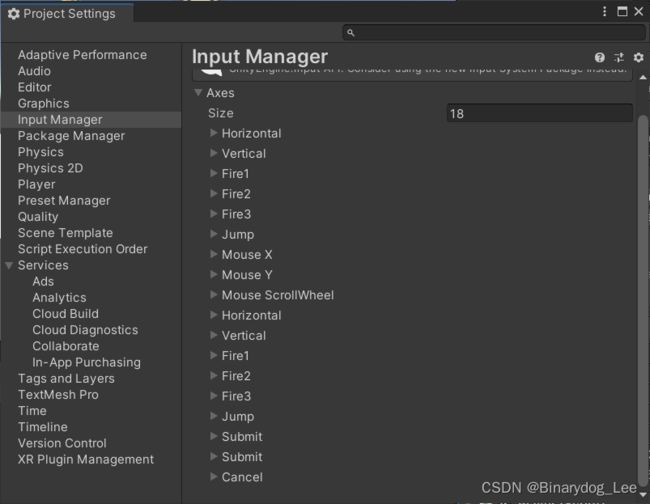
在Unity中,开发者在“Edit” > “Project Settings” > “Input Manager”中设置输入,如下图所示:
在设置了Mouse X后,Input.GetAxis("Mouse X")返回的是鼠标在X轴上的增量值。这意味着它会返回鼠标在上一帧和当前帧之间的变化量。如果鼠标在X轴上向右移动,返回值将是正数;如果鼠标向左移动,返回值将是负数。
根据Unity官方文档 - Input.GetAxis的说明,这里要强调的是:Input.GetAxis返回由axisName标识的虚拟轴的值(没说是增量)
对于键盘和操纵杆输入设备,该值将在 [ − 1 , 1 ] [-1,1] [−1,1]的范围内。
如果将轴映射到鼠标,则值会有所不同,并且不会在 [ − 1 , 1 ] [-1,1] [−1,1]的范围内。相反,它将是当前鼠标增量乘以轴灵敏度。通常,正值表示鼠标向右/向下移动,负值表示鼠标向左/向上移动。
这与帧速率无关;使用此值时,不需要担心帧速率的变化。
相机代码及解析
基本代码
using UnityEngine;

public class CameraController: MonoBehaviour
{
    [Tooltip("the object that camera look at")]
    public Transform targetObject;  // 指定的物体
    public float distance = 5.0f;   // 相机距离

    public float rotationSpeed = 2.0f;  // 旋转速度

    private float currentRotationX = 0.0f;
    private float currentRotationY = 0.0f;

    void Start()
    {
        if (targetObject == null)
        {
            Debug.LogError("Please assign a target object to the CameraManager script.");
        }
    }

    void Update()
    {
        // 获取鼠标输入
        float mouseX = Input.GetAxis("Mouse X");
        float mouseY = Input.GetAxis("Mouse Y");

        // 计算旋转角度,单位是度
        currentRotationX -= mouseY * rotationSpeed;
        currentRotationY += mouseX * rotationSpeed;

        // 限制垂直旋转角度在-90到90度之间
        currentRotationX = Mathf.Clamp(currentRotationX, -90.0f, 90.0f);

        // 计算相机位置
        Vector3 direction = new Vector3(0, 0, -distance);
        Quaternion rotation = Quaternion.Euler(currentRotationX, currentRotationY, 0);
        Vector3 cameraPosition = targetObject.position + rotation * direction;

        // 应用相机位置和旋转
        transform.position = cameraPosition;
        transform.LookAt(targetObject.position);
    }
}
主要先旋转相机,再通过LookAt方法使之朝向人物就完事了。所以核心就是计算相机位置的三行代码(如下)。
// 计算相机位置
Vector3 direction = new Vector3(0, 0, -distance);
Quaternion rotation = Quaternion.Euler(currentRotationX, currentRotationY, 0);
Vector3 cameraPosition = targetObject.position + rotation * direction;
Quaternion×Vector3的意义:四元数×三维向量会得到一个新的Vector3,表示旋转后的新方向。
首先定义了一个叫做direction的三维向量,这里说实话我本身没想明白,困扰了很久。
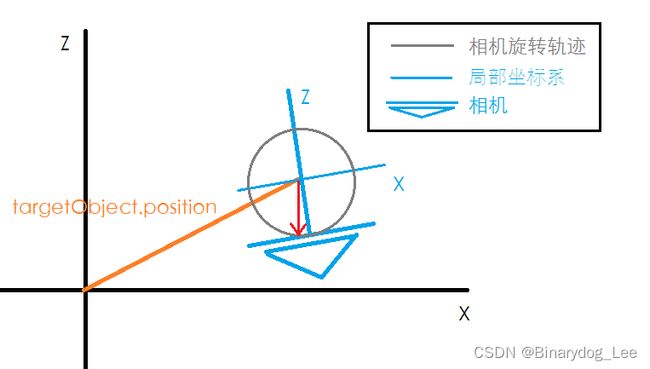
(上图略去了y轴)
但是我查了一下,一个局部坐标系的Vector3变量乘以一个世界坐标系表示旋转操作的四元数,其结果是世界坐标系的Vector3变量。
那这样就好理解了,这个direction不是世界坐标系的(不是图中红色箭头),而是上图那个局部坐标系的,它代表了一个从相机朝向目标物体的一个向量,尽管相机是时刻移动的(相应地这个局部坐标系在全局坐标系的位置和方向也在变),但是乘完之后总是能得到一个全局的、经过旋转变换之后的量。
延伸1:Unity默认局部坐标系的Z轴是对象的前方(朝向),X轴是右方,Y轴是上方。
延伸2:在Quaternion乘法中,顺序很重要,因为乘法是不符合交换律的。
相比之下一种看似正确实则错误的写法是如下这种(显然是没理解direction到底是啥):
// 计算相机位置
Vector3 direction = new Vector3(0, 0, -distance);
Quaternion rotation = Quaternion.Euler(currentRotationX, currentRotationY, 0);
Vector3 globalOffset = camTransform.TransformPoint(rotation * direction);
Vector3 cameraPosition = targetObject.position + globalOffset;
碰撞检测与SpringArm
碰撞检测和弹簧臂是相辅相成的。
如果游戏环境中有障碍物,就得考虑实现碰撞检测,以防止相机穿过物体。(通常需要使用Raycast来检查相机和目标之间的障碍物)。但是硬生生直接变化相机和人物的距离有些生硬,所以还要实现弹簧臂。
弹簧臂的基本原理是将相机连接到一个虚拟的弹簧臂结构上,这个结构允许相机在跟随目标的同时保持一定的弹性。弹簧臂可以有一定的长度,角度和阻尼参数,使相机能够在目标移动时更加平滑地跟随。
在Unity中,可以使用SpringJoint或编写自定义的弹簧臂逻辑来实现这一点。弹簧臂常见的实现及其优缺点如下:
-
Transform.Lerp:
- 优点:
- 实现简单,易于理解。
- 不需要额外的组件或配置。
- 缺点:
- 在快速移动的情况下,可能会感觉到迟滞,因为它只是简单地进行线性插值,可能无法捕捉到加速和减速的变化。
- 优点:
-
SpringJoint组件:
- 优点:
- 使用物理引擎,可以产生更真实的弹簧效果。
- 不需要手动编写平滑插值逻辑。
- 缺点:
- 对性能的影响较大,特别是在移动的物体较多的情况下。
- 需要调整SpringJoint的参数来获取理想的效果,这可能需要一些调试工作。
- 优点:
-
Vector3.SmoothDamp:
- 优点:
- 提供更高级的平滑插值算法,能够更好地处理加速和减速。
- 相比Lerp,更适合处理相机跟随玩家运动的场景。
- 缺点:
- 可能需要调整参数以适应不同的场景。
- 对于初学者来说,可能需要一些时间来理解其工作原理。
- 优点:
有时候也可以结合多个方法,根据不同的情况使用不同的技术。例如,在高速移动时使用Vector3.SmoothDamp,在需要物理效果时使用SpringJoint。
碰撞检测实现
using UnityEngine;

public class CameraController: MonoBehaviour
{
    [Tooltip("the object that camera look at")]
    public Transform targetObject;  // 指定的物体
    [Tooltip("the distance that from the camera to the target")]
    public float distance = 5.0f;   // 相机距离
    [Tooltip("碰撞检测平滑过渡的时间")]
    public float smoothTime = 0.3f;
    [Tooltip("相机碰撞检测的层")]
    public LayerMask obstacleLayer;
    public float rotationSpeed = 2.0f;  // 旋转速度

    // camera rotate
    private float currentRotationX = 0.0f;
    private float currentRotationY = 0.0f;
    private Transform camTransform;
    // SpringArm
    private Vector3 velocity = Vector3.zero;

    void Start()
    {
        if (targetObject == null)
        {
            Debug.LogError("Please assign a target object to the CameraManager script.");
        }
        camTransform = GetComponent<Transform>();
    }

    void Update()
    {
        // 获取鼠标输入
        float mouseX = Input.GetAxis("Mouse X");
        float mouseY = Input.GetAxis("Mouse Y");

        // 计算旋转角度,单位是度
        currentRotationX -= mouseY * rotationSpeed;
        currentRotationY += mouseX * rotationSpeed;

        // 限制垂直旋转角度在-85到85度之间
        currentRotationX = Mathf.Clamp(currentRotationX, -85.0f, 85.0f);

        // 计算相机位置
        Vector3 direction = new Vector3(0, 0, -distance);
        Quaternion rotation = Quaternion.Euler(currentRotationX, currentRotationY, 0);
        Vector3 desiredCameraPosition = targetObject.position + rotation * direction;

        // 进行碰撞检测并调整相机位置
        RaycastHit hit;
        if (Physics.Raycast(targetObject.position, desiredCameraPosition - targetObject.position, out hit, distance, obstacleLayer))
        {
            // 如果碰撞到障碍物,调整相机位置
            Vector3 adjustedCameraPosition = hit.point;
            transform.position = Vector3.SmoothDamp(transform.position, adjustedCameraPosition, ref velocity, smoothTime);
        }
        else
        {
            // 如果没有碰撞,直接移动相机到目标位置
            // 这里也可以使用SmoothDamp,但是效果有些怪
            transform.position = desiredCameraPosition;
        }
        // 应用相机旋转
        transform.LookAt(targetObject.position);
    }
}
主要就是在应用transform.position的时候前进行碰撞检测并查看其结果,若有碰撞结果就把相机位置改到那里。
当然这样的话碰到障碍物变化起来也有些生硬,可以再观察别的游戏细化,加更多的逻辑。而且这里的碰撞点是很不合适的(随着人物靠近障碍物,相机总是靠近人物脚,所以还得改y轴)