windows下使用pybind11生成python调用c++模块(超详细一看就会)
1.环境配置
python;vs>=2017; pybind11
pybind11安装 pip install pybind11
我自己的环境:python3.8; vs2019;pybind11==2.10.3
2.通过vs2019 创建cmake工程
2.1 创建cmake 工程
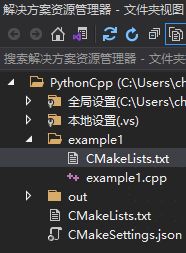
如下,创建的cmake工程。解决方案名称PythonCpp与项目名称example1随意。
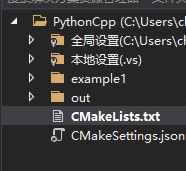
注意:解决方案下的顶层CMakeList.txt 中的project 和add_subdirectory 要和当前解决方案名称和项目名称一致,如下
# CMakeList.txt: 顶层 CMake 项目文件,在此处执行全局配置
# 并包含子项目。
#
cmake_minimum_required (VERSION 3.8)

project ("PythonCpp")

# 包含子项目。
add_subdirectory ("example1")
2.2 项目下的(当前为example1)CmakeLists.txt
# CMakeList.txt: example1 的 CMake 项目,在此处包括源代码并定义
# 项目特定的逻辑。
#
cmake_minimum_required (VERSION 3.8)

# 添加python 和 pybind11路径
set(PYTHONPATH C:/py38)
set(PYBINDPATH C:/py38/Lib/site-packages/pybind11)

# 添加头文件
include_directories(${PYTHONPATH}/include ${PYBINDPATH}/include)

# 生成动态库
add_library(ex1 SHARED example1.cpp)

# 后缀名改成pyd能够被python引用
set_target_properties(ex1 PROPERTIES SUFFIX ".pyd")

# 添加python静态库
target_link_libraries(ex1 ${PYTHONPATH}/libs/python38.lib)
# target_link_libraries 必须放在 add_executable (或者 add_library )的后面
# add_library set_target_propertie target_link_libraries中的名称可任意,但是一定要保持一致
2.3 c++代码
// example1.cpp: 定义应用程序的入口点。
//
/*
官方文档链接
https://pybind11.readthedocs.io/en/stable/basics.html
windows + vs2019 + CmakeLists
vs2017 及以上支持
安装pip install pybind11
*/
#include
namespace py = pybind11;
// 定义函数
int add(int i, int j)
{
return i + j;
}
int mul(int i, int j)
{
return i * j;
}
/*
使用pybind11创建 python能够导入的模块
PYBIND11_MODULE(module_name, m)
module_name是python import的模块名称,一定要与CmakeLists.txt中生成动态库的名称一致即ex1
m是py::module_的类型用来构建函数
函数名称随意,这里改写成ad和mu
*/
PYBIND11_MODULE(ex1, m)
{
m.doc() = "pybind11 example1 module"; // 名称描述,可以通过help打印出来
m.def("ad", &add, "A function that adds two numbers"); //函数名称,来源, 描述
m.def("mu", &mul, "A function that multiplies two numbers");
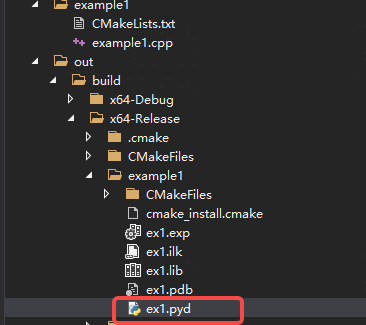
} 2.4 编译生成pyd文件copy到python文件目录的DLLs中


3.python调用c++编译生成的pyd模块
通过help打印可以看到我们在c++代码中对模块的描述和函数的描述
>>> import ex1
>>> help(ex1)
Help on module ex1:

NAME
    ex1 - pybind11 example1 module

FUNCTIONS
    ad(...) method of builtins.PyCapsule instance
        ad(arg0: int, arg1: int) -> int

        A function that adds two numbers

    mu(...) method of builtins.PyCapsule instance
        mu(arg0: int, arg1: int) -> int

        A function that multiplies two numbers

FILE
    c:\py38\dlls\ex1.pyd


>>> help(ex1.ad)
Help on built-in function ad in module ex1:

ad(...) method of builtins.PyCapsule instance
    ad(arg0: int, arg1: int) -> int

    A function that adds two numbers

>>> ex1.ad(3,4)
7
>>> ex1.mu(3,4)
12
>>>
4.如何调用c++中的对象
4.1 结构
在上面c++代码中添加一个结构模块如下
#include

...

//定义结构
struct Pet {
    Pet(const std::string &name):name(name){ }
    void setName(const std::string& name_) { name = name_; }
    const std::string& getName() const { return name; }

    std::string name;
};
在PYBIND11_MODULE中增加结构和结构中的函数,使python能够调用
PYBIND11_MODULE(ex1, m)
{

    ...

    py::class_(m, "Pe")                    //定义结构名称
        .def(py::init())    //构造函数
        .def("sN", &Pet::setName)               //需要python调用的setName
        .def("gN", &Pet::getName)               //需要python调用的getName
        .def_readwrite("name", &Pet::name);     //需要python调用的name
}
python引用重新生成pyd的结果,可以看一下help打印信息
>>> import ex1
>>> help(ex1)
Help on module ex1:

NAME
    ex1 - pybind11 example1 module

CLASSES
    pybind11_builtins.pybind11_object(builtins.object)
        Pe

    class Pe(pybind11_builtins.pybind11_object)
     |  Method resolution order:
     |      Pe
     |      pybind11_builtins.pybind11_object
     |      builtins.object
     |
     |  Methods defined here:
     |
     |  __init__(...)
     |      __init__(self: ex1.Pe, arg0: str) -> None
     |
     |  gN(...)
     |      gN(self: ex1.Pe) -> str
     |
     |  sN(...)
     |      sN(self: ex1.Pe, arg0: str) -> None
     |
     |  ----------------------------------------------------------------------
     |  Data descriptors defined here:
     |
     |  name
     |
     |  ----------------------------------------------------------------------
     |  Static methods inherited from pybind11_builtins.pybind11_object:
     |
     |  __new__(*args, **kwargs) from pybind11_builtins.pybind11_type
     |      Create and return a new object.  See help(type) for accurate signature.

FUNCTIONS
    ad(...) method of builtins.PyCapsule instance
        ad(arg0: int, arg1: int) -> int

        A function that adds two numbers

    mu(...) method of builtins.PyCapsule instance
        mu(arg0: int, arg1: int) -> int

        A function that multiplies two numbers

FILE
    c:\py38\dlls\ex1.pyd


>>>
>>> p = ex1.Pe("Ptt")
>>> print(p)

>>> p.name
'Ptt'
>>> p.gN()
'Ptt'
>>> p.sN("P")
>>> p.name
'P'
>>> p.gN()
'P'
>>> p.name = "MM"
>>> p.name
'MM'
>>> p.gN()
'MM'
>>>
4.2类
这里和官方文档中一些部分描述有出入,由于name是私有数据,只能通过def_property去绑定,不能通过.def_readwrite("name", &Pet_c::name)绑定,原因Pet_c::name这里编译报错,无法访问私有数据,不知道它文档里为何可以操作,有可能与编译器有关。
//定义类
class Pet_c {
public:
    Pet_c(const std::string& name) :name(name) { }
    void setName(const std::string& name_) { name = name_; }
    const std::string& getName() const { return name; }
private:
    std::string name;
};

//添加类的绑定
PYBIND11_MODULE(ex1, m)
{

    ...

    py::class_(m, "Pc")
        .def(py::init())
        .def_property("name", &Pet_c::getName, &Pet_c::setName)
        .def("sN", &Pet_c::setName)
        .def("gN", &Pet_c::getName);
}
这里也不像文档中说的那样,事实可以通过p.name = “sss”这种语法去修改私有数据。但是不能通过p.age = 2添加数据,添加py::dynamic_attr()后是可以的
>>> import ex1
>>> help(ex1)
Help on module ex1:

NAME
    ex1 - pybind11 example1 module

CLASSES
    pybind11_builtins.pybind11_object(builtins.object)
        Pc
        Pe

    class Pc(pybind11_builtins.pybind11_object)
     |  Method resolution order:
     |      Pc
     |      pybind11_builtins.pybind11_object
     |      builtins.object
     |
     |  Methods defined here:
     |
     |  __init__(...)
     |      __init__(self: ex1.Pc, arg0: str) -> None
     |
     |  gN(...)
     |      gN(self: ex1.Pc) -> str
     |
     |  sN(...)
     |      sN(self: ex1.Pc, arg0: str) -> None
     |
     |  ----------------------------------------------------------------------
     |  Data descriptors defined here:
     |
     |  name
     |
     |  ----------------------------------------------------------------------
     |  Static methods inherited from pybind11_builtins.pybind11_object:
     |
     |  __new__(*args, **kwargs) from pybind11_builtins.pybind11_type
     |      Create and return a new object.  See help(type) for accurate signature.

    class Pe(pybind11_builtins.pybind11_object)
     |  Method resolution order:
     |      Pe
     |      pybind11_builtins.pybind11_object
     |      builtins.object
     |
     |  Methods defined here:
     |
     |  __init__(...)
     |      __init__(self: ex1.Pe, arg0: str) -> None
     |
     |  gN(...)
     |      gN(self: ex1.Pe) -> str
     |
     |  sN(...)
     |      sN(self: ex1.Pe, arg0: str) -> None
     |
     |  ----------------------------------------------------------------------
     |  Data descriptors defined here:
     |
     |  name
     |
     |  ----------------------------------------------------------------------
     |  Static methods inherited from pybind11_builtins.pybind11_object:
     |
     |  __new__(*args, **kwargs) from pybind11_builtins.pybind11_type
     |      Create and return a new object.  See help(type) for accurate signature.

FUNCTIONS
    ad(...) method of builtins.PyCapsule instance
        ad(arg0: int, arg1: int) -> int

        A function that adds two numbers

    mu(...) method of builtins.PyCapsule instance
        mu(arg0: int, arg1: int) -> int

        A function that multiplies two numbers

FILE
    c:\py38\dlls\ex1.pyd


>>>
>>>
>>> p = ex1.Pc("class")
>>> p.name
'class'
>>> p.name = "sss"
>>> p.name
'sss'
>>> p.gN()
'sss'
>>> p.age = 2
Traceback (most recent call last):
  File "", line 1, in
AttributeError: 'ex1.Pc' object has no attribute 'age'
c++使能动态属性py::dynamic_attr()
PYBIND11_MODULE(ex1, m)
{

    ...

    py::class_(m, "Pc", py::dynamic_attr())

         ...

}
help下描述会多增加一行__dict__
| ----------------------------------------------------------------------
| Data descriptors defined here:
|
| __dict__
|
| name
|
| ----------------------------------------------------------------------
可以像python中的类一样添加数据p.age
>>> import ex1
>>>
>>> p=ex1.Pc("pccc")
>>> p.age = 2
>>> p.__dict__
{'age': 2}
>>>
>>>