基于YOLOv8的目标识别、计数、电子围栏的项目开发过程
0 前言
用于生产环境中物体检测、识别、跟踪,人、车流量统计,越界安全识别
1 YOLOv8概述
YOLOv8 是Ultralytics的YOLO的最新版本。作为一种前沿、最先进(SOTA)的模型,YOLOv8在之前版本的成功基础上引入了新功能和改进,以提高性能、灵活性和效率。YOLOv8支持全范围的视觉AI任务,包括检测、分割,、姿态估计、跟踪和分类。这种多功能性使用户能够利用YOLOv8的功能应对多种应用和领域的需求。
2 环境搭建
2.1 NIVIDA、PyTorch、CUDA、CUDNN安装-GPU训练开发
- NIVIDA显卡驱动下载链接

CUDA与驱动对应版本链接

-
PyTorch安装 主页链接
使用GPU训练,选择相应CUDA版本

-
CUDA CUDNN 版本对应链接

-
CUDA下载链接

-
CUDNN下载链接
将bin,include,lib中的文件夹复制粘贴到cuda的根文件夹下

2.2 yolov8 pip安装(推荐)
# pip 安装
pip install ultralytics -i https://pypi.tuna.tsinghua.edu.cn/simple
# 已安装可进行升级
pip install -U ultralytics -i https://pypi.tuna.tsinghua.edu.cn/simple
# 安装依赖(推荐在虚拟环境中安装)
# 虚拟环境安装
pip install virtualenv
# 安装依赖
pip install -r requirements.txt
2.3 GitHub下载
git clone https://github.com/ultralytics/ultralytics
2.4 依赖包
# Ultralytics YOLO , AGPL-3.0 license

# Overview:
# This pyproject.toml file manages the build, packaging, and distribution of the Ultralytics library.
# It defines essential project metadata, dependencies, and settings used to develop and deploy the library.

# Key Sections:
# - [build-system]: Specifies the build requirements and backend (e.g., setuptools, wheel).
# - [project]: Includes details like name, version, description, authors, dependencies and more.
# - [project.optional-dependencies]: Provides additional, optional packages for extended features.
# - [tool.*]: Configures settings for various tools (pytest, yapf, etc.) used in the project.

# Installation:
# The Ultralytics library can be installed using the command: 'pip install ultralytics'
# For development purposes, you can install the package in editable mode with: 'pip install -e .'
# This approach allows for real-time code modifications without the need for re-installation.

# Documentation:
# For comprehensive documentation and usage instructions, visit: https://docs.ultralytics.com

[build-system]
requires = ["setuptools>=43.0.0", "wheel"]
build-backend = "setuptools.build_meta"

# Project settings -----------------------------------------------------------------------------------------------------
[project]
name = "ultralytics"
dynamic = ["version"]
description = "Ultralytics YOLOv8 for SOTA object detection, multi-object tracking, instance segmentation, pose estimation and image classification."
readme = "README.md"
requires-python = ">=3.8"
license = { "text" = "AGPL-3.0" }
keywords = ["machine-learning", "deep-learning", "computer-vision", "ML", "DL", "AI", "YOLO", "YOLOv3", "YOLOv5", "YOLOv8", "HUB", "Ultralytics"]
authors = [
    { name = "Glenn Jocher" },
    { name = "Ayush Chaurasia" },
    { name = "Jing Qiu" }
]
maintainers = [
    { name = "Glenn Jocher" },
    { name = "Ayush Chaurasia" },
    { name = "Jing Qiu" }
]
classifiers = [
    "Development Status :: 4 - Beta",
    "Intended Audience :: Developers",
    "Intended Audience :: Education",
    "Intended Audience :: Science/Research",
    "License :: OSI Approved :: GNU Affero General Public License v3 or later (AGPLv3+)",
    "Programming Language :: Python :: 3",
    "Programming Language :: Python :: 3.8",
    "Programming Language :: Python :: 3.9",
    "Programming Language :: Python :: 3.10",
    "Programming Language :: Python :: 3.11",
    "Topic :: Software Development",
    "Topic :: Scientific/Engineering",
    "Topic :: Scientific/Engineering :: Artificial Intelligence",
    "Topic :: Scientific/Engineering :: Image Recognition",
    "Operating System :: POSIX :: Linux",
    "Operating System :: MacOS",
    "Operating System :: Microsoft :: Windows",
]

# Required dependencies ------------------------------------------------------------------------------------------------
dependencies = [
    "matplotlib>=3.3.0",
    "numpy>=1.22.2",
    "opencv-python>=4.6.0",
    "pillow>=7.1.2",
    "pyyaml>=5.3.1",
    "requests>=2.23.0",
    "scipy>=1.4.1",
    "torch>=1.8.0",
    "torchvision>=0.9.0",
    "tqdm>=4.64.0", # progress bars
    "psutil", # system utilization
    "py-cpuinfo", # display CPU info
    "thop>=0.1.1", # FLOPs computation
    "pandas>=1.1.4",
    "seaborn>=0.11.0", # plotting
]

# Optional dependencies ------------------------------------------------------------------------------------------------
[project.optional-dependencies]
dev = [
    "ipython",
    "check-manifest",
    "pre-commit",
    "pytest",
    "pytest-cov",
    "coverage[toml]",
    "mkdocs-material",
    "mkdocstrings[python]",
    "mkdocs-jupyter", # for notebooks
    "mkdocs-redirects", # for 301 redirects
    "mkdocs-ultralytics-plugin>=0.0.34", # for meta descriptions and images, dates and authors
]
export = [
    "onnx>=1.12.0", # ONNX export
    "coremltools>=7.0; platform_system != 'Windows'", # CoreML only supported on macOS and Linux
    "openvino-dev>=2023.0", # OpenVINO export
    "tensorflow<=2.13.1", # TF bug https://github.com/ultralytics/ultralytics/issues/5161
    "tensorflowjs>=3.9.0", # TF.js export, automatically installs tensorflow
]
explorer = [
    "lancedb", # vector search
    "duckdb", # SQL queries, supports lancedb tables
    "streamlit", # visualizing with GUI
]
# tensorflow>=2.4.1,<=2.13.1  # TF exports (-cpu, -aarch64, -macos)
# tflite-support  # for TFLite model metadata
# scikit-learn==0.19.2  # CoreML quantization
# nvidia-pyindex  # TensorRT export
# nvidia-tensorrt  # TensorRT export
logging = [
    "comet", # https://docs.ultralytics.com/integrations/comet/
    "tensorboard>=2.13.0",
    "dvclive>=2.12.0",
]
extra = [
    "hub-sdk>=0.0.2", # Ultralytics HUB
    "ipython", # interactive notebook
    "albumentations>=1.0.3", # training augmentations
    "pycocotools>=2.0.6", # COCO mAP
]

[project.urls]
"Bug Reports" = "https://github.com/ultralytics/ultralytics/issues"
"Funding" = "https://ultralytics.com"
"Source" = "https://github.com/ultralytics/ultralytics/"

[project.scripts]
yolo = "ultralytics.cfg:entrypoint"
ultralytics = "ultralytics.cfg:entrypoint"

# Tools settings -------------------------------------------------------------------------------------------------------
[tool.setuptools]  # configuration specific to the `setuptools` build backend.
packages = { find = { where = ["."], include = ["ultralytics", "ultralytics.*"] } }
package-data = { "ultralytics" = ["**/*.yaml"], "ultralytics.assets" = ["*.jpg"] }

[tool.setuptools.dynamic]
version = { attr = "ultralytics.__version__" }

[tool.pytest]
norecursedirs = [".git", "dist", "build"]
addopts = "--doctest-modules --durations=30 --color=yes"

[tool.coverage.run]
source = ["ultralytics/"]
data_file = "tests/.coverage"
omit = ["ultralytics/utils/callbacks/*"]

[tool.isort]
line_length = 120
multi_line_output = 0

[tool.yapf]
based_on_style = "pep8"
spaces_before_comment = 2
column_limit = 120
coalesce_brackets = true
spaces_around_power_operator = true
space_between_ending_comma_and_closing_bracket = true
split_before_closing_bracket = false
split_before_first_argument = false

[tool.ruff]
line-length = 120

[tool.docformatter]
wrap-summaries = 120
wrap-descriptions = 120
in-place = true
pre-summary-newline = true
close-quotes-on-newline = true

[tool.codespell]
ignore-words-list = "crate,nd,ned,strack,dota,ane,segway,fo,gool,winn,commend,bloc,nam,afterall"
skip = '*.pt,*.pth,*.torchscript,*.onnx,*.tflite,*.pb,*.bin,*.param,*.mlmodel,*.engine,*.npy,*.data*,*.csv,*pnnx*,*venv*,*translat*,__pycache__*,*.ico,*.jpg,*.png,*.mp4,*.mov,/runs,/.git,./docs/??/*.md,./docs/mkdocs_??.yml'
2.5 yolov8目录结构

2.6 命令行语法
# 语法格式
yolo TASK MODE ARGS
- TASK 选择其中之一 (detect, segment, classify, pose)
- MODE 选择其中之一(train, val, predict, export, track)
- ARGS 选择其中之一 参数名=参数值 例如: imgsz=640 命令行参数将覆盖文件默认配置(默认配置文件:ultralytics-main/ultralytics/cfg/default.yaml)
例:
yolo train data=coco128.yaml model=yolov8n.pt epochs=10 lr0=0.01
# 参数传递格式,必须为参数名=参数值,以下为示例:
yolo predict model=yolov8n.pt imgsz=640 conf=0.25 ✅
yolo predict model yolov8n.pt imgsz 640 conf 0.25 ❌ (缺失 =)
yolo predict model=yolov8n.pt, imgsz=640, conf=0.25 ❌ (不能使用 ,)
yolo predict --model yolov8n.pt --imgsz 640 --conf 0.25 ❌ (不能使用 --)
3 使用预训练模型
3.1 模型验证
s模型验证
yolo detect val model=weights\yolov8s.pt
3.2 模型预测
yolo detect predict model=weights/yolov8s.pt source=assets

3.3 模型导出
以导出onnx为例,model=weights/yolov8n.pt为模型存放路径
yolo export model=weights/yolov8n.pt format=onnx

4 使用自定义数据集
4.1 标注数据集
使用labelImg工具直接标注生成yolo所需的txt:
最简安装方式:
pip3 install labelImg -i https://pypi.tuna.tsinghua.edu.cn/simple
github labelImg标注工具 链接
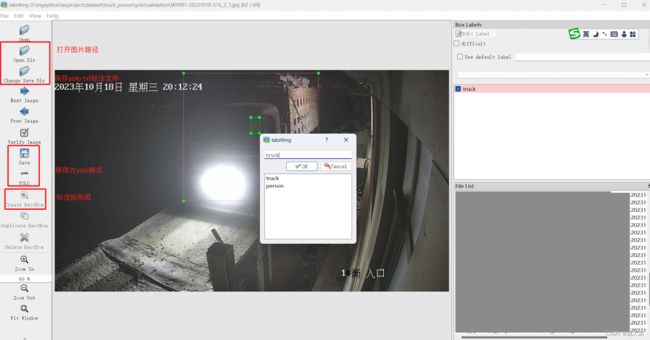
Tip: 标注训练和验证样本时,注意类别编号保持一致,不要错乱。例如:训练样本是:0-truck,1-person,验证样本也必须相同, 不能是:1-truck,0-person
4.2 模型训练
Tip: Ultralytics YOLOv8.1.3 Python-3.9.13 torch-1.12.0+cu113 CUDA:0 (NVIDIA T600 Laptop GPU, 4096MiB) 表示已使用GPU进行高速训练。确保环境(或python虚拟环境)中安装支持CUDA的torch版本,并配置好CUDA CUDNN对应版本的环境变量
使用yolov8s权重, 图片批次3 ,训练50次
yolo task=detect mode=train model=weights/yolov8s.pt data=cfg/datasets/truck.yaml batch=3 epochs=50
truck.yaml文件配置详情:
path: D:\truck_person\yolo  # dataset root dir
train: images/train  # train images (relative to 'path') 118287 images
val: images/val  # val images (relative to 'path') 5000 images
#test:   # 20288 of 40670 images, submit to

# Classes
names:
  0: person
  1: truck
nc: 2
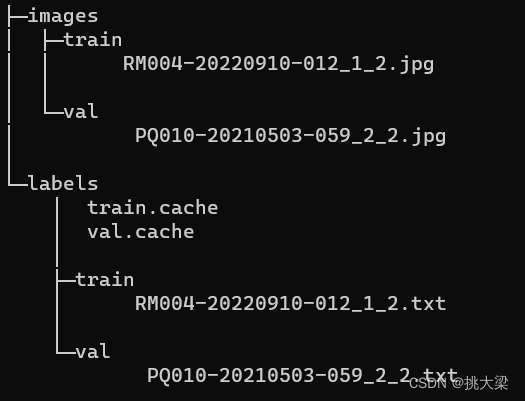
训练和验证样本的图片和标注文件路径:
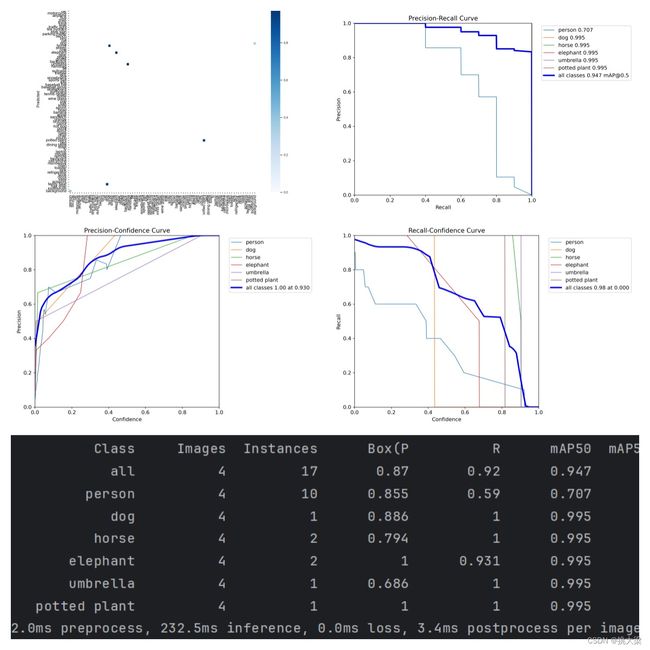
训练过程

4.3 模型预测
yolo detect predict model=weights/best.pt source=truck_person
5 目标计数
演示视频
5.1 视频检测线
capture = cv2.VideoCapture(VIDEO_PATH)
width = int(capture.get(cv2.CAP_PROP_FRAME_WIDTH))
height = int(capture.get(cv2.CAP_PROP_FRAME_HEIGHT))
# 视频高度一半 水平显示 检测线
line_pt0 = (0, height//2)
line_pt1 = (width, height//2)
while True:
    _, frame = capture.read()
    if frame is None:
        break

    cv2.line(frame, line_pt0, line_pt1, (0, 0, 255), thickness=2)
5.2 计算目标中心点
# 通过yolov8获得所有指定的目标集合(detections),包含左上角和右下角坐标
for xyxy, _, _, _ in detections:
	x1, y1, x2, y2 = xyxy
	# 计算中心点
	center_point = ((x1 + x2)/2,(y1 + y2)/2)
	# 放入数组
	points.append(center_point)
5.3 检测目标位置算法
基于向量的外积公式,计算检测目标是在检测线的顺时针还是逆时针方向, 顺时针方向为正,逆时针方向为负,正好在检测线上为0
x1, y1 = line_pt0 # 检测线起始点坐标
x2, y2 = line_pt1 # 检测线终止点坐标
x, y = center_point # 检测目标的中心点
res = np.sign((x2 - x1) * (y - y1) - (y2 - y1) * (x - x1))
5.5 目标计数逻辑
根据顺、逆时针,分别记录目标的上一帧和当前帧的状态,如果上一帧同当前帧状态一致则未跨越检测线,反之则跨越检测线
在顺时针方向:
| 上一帧标识 | 当前帧标识 | 记数 |
|---|---|---|
| 1 | 1 | +0 |
| 1 | -1 | +1 |
在逆时针方向:
| 上一帧标识 | 当前帧标识 | 记数 |
|---|---|---|
| -1 | -1 | +0 |
| -1 | 1 | +1 |
6 电子围栏
演示视频
6.1 画出围栏区域
poly_points = [[810, 500],[1210, 500],[910, 700],[510, 700]]
mask = np.zeros_like(image)
mask = cv2.fillPoly(mask, [poly_points], color=(100,100,100))
cv2.polylines(image, [poly_points], isClosed=True, color=(255, 0, 0), thickness=3)
6.2 目标区域检测算法
射线交叉法(RayCasting)是一种计算机图形学中常用的算法,用于判断一个点是否在一个封闭的多边形内部。该算法通过发射一条射线从待判断的点出发,与多边形的边进行交点计数,交点数为奇数则在内部,偶数则在外部。
def ray_casting(point, polygon):
	count = 0
	for i in range(len(polygon)):
	j = (i + 1) % len(polygon)
	if (polygon[i][1] > point[1]) != (polygon[j][1] > point[1]):
		if point[0] < (polygon[j][0] - polygon[i][0]) * (point[1] - polygon[i][1]) / (polygon[j][1] - polygon[i][1]) + polygon[i][0]:
		count += 1
	return count % 2 ==1

point = (1, 1)
polygon =[(0, 0), (0, 2), (2, 2), (2, 0)]
if ray_casting(point, polygon):
	print("点在多边形内部")
else:
	print("点在多边形外部")
请尊重别人的劳动成果 转载请务必注明出处