七、Redis 缓存 —— 超详细操作演示!
七、Redis 缓存 —— 超详细操作演示!
-
- 七、Redis 缓存
-
- 7.1 Jedis 客户端
-
-
- 7.1.1 Jedis 简介
- 7.1.2 创建工程
- 7.1.3 使用 Jedis 实例
- 7.1.4 使用 JedisPool
- 7.1.5 使用 JedisPooled
- 7.1.6 连接 Sentinel 高可用集群
- 7.1.7 连接分布式系统
- 7.1.8 操作事务
-
- 7.2 金融产品交易平台
- 7.3 高并发问题
- 八、Lua脚本详解
-
- 8.1 Lua 简介
- 8.2 Linux 系统的Lua
- 8.3 Win 系统的Lua
- 8.4 Lua 脚本基础
- 8.5 Lua 语法进阶
- 九、分布式锁
-
- 9.1 分布式锁的工作原理
- 9.2 问题引入
- 9.3 setnx 实现方式
- 9.4 为锁添加过期时间
- 9.5 为锁添加标识
- 9.6 添加 Lua 脚本
- 9.7 Redisson 可重入锁
- 9.8 Redisson 红锁
- 9.9 分段锁
- 9.10 Redisson 详解
数据库系列文章:
关系型数据库:
- MySQL —— 基础语法大全
- MySQL —— 进阶
非关系型数据库:
- 一、Redis 的安装与配置
- 二、Redis 基本命令(上)
- 三、Redis 基本命令(下)
- 四、Redis 持久化
- 五、Redis 主从集群
七、Redis 缓存
7.1 Jedis 客户端
7.1.1 Jedis 简介
Jedis 是一个 基于 java 的 Redis 客户端连接工具 ,旨在提升性能与易用性 。 其 github 上的官网地址为: https://github.com/redis/jedis 。
7.1.2 创建工程
首先创建一个普通的 Maven 工程 01-jedis ,然后在 POM 文件中添加 Jedis 与 Junit 依赖。
<properties>
	<project.build.sourceEncoding>UTF-8project.build.sourceEncoding>
	<maven.compiler.source>1.8maven.compiler.source>
	<maven.compiler.target>1.8maven.compiler.target>
properties>

<dependencies>

	<dependency>
		<groupId>redis.clientsgroupId>
		<artifactId>jedisartifactId>
		<version>4.2.0version>
	dependency>

	<dependency>
		<groupId>junitgroupId>
		<artifactId>junitartifactId>
		<version>4.11version>
		<scope>testscope>
	dependency>
dependencies>
7.1.3 使用 Jedis 实例
Jedis 基本使用十分简单, 其提供了非常丰富的操作 Redis 的方法,而这些方法名几乎与 Redis 命令相同。 在每次使用时直接创建 Jedis 实例即可。在 Jedis 实例 创建好之后, Jedis 底层实际会创建一个到指定 Redis 服务器的 Socket 连接 。所以 ,为 了节省系统资源与网络带宽 在每次使用完 Jedis 实例 之后,需要立即调用 close() 方法将 连接关闭。
首先,需要在工程的 src/test/java 下创建测试类 JedisTest 。
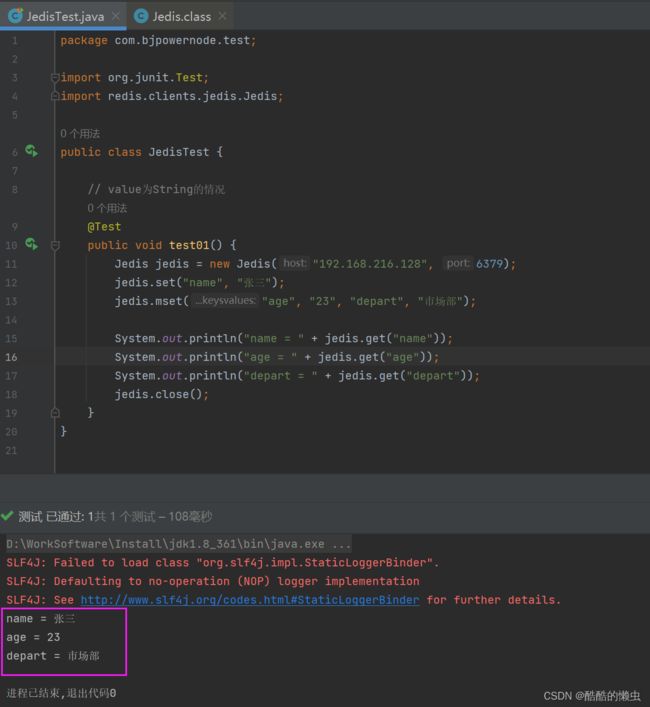
⭐️(1) value 为 String 的测试
@Test
public void test01() {
Jedis jedis = new Jedis("redis", 6379);
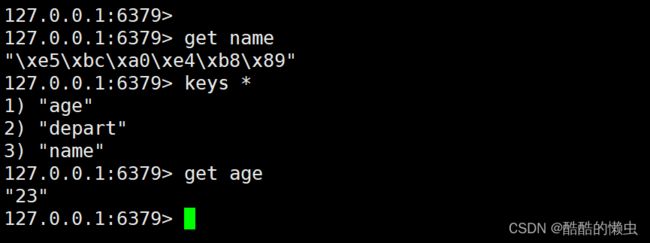
jedis.set("name", "张三");
jedis.mset("age", "23", "depart", "市场部");
System.out.println("name = " + jedis.get("name"));
System.out.println("age = " + jedis.get("age"));
System.out.println("depart = " + jedis.get("depart"));
jedis.close();
}
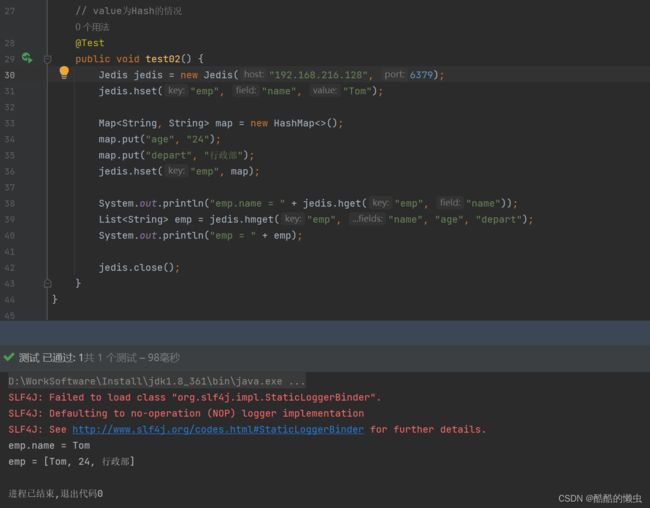
⭐️(2) value 为 Hash 的测试
@Test
public void test02() {
    Jedis jedis = new Jedis("redis", 6379);
    jedis.hset("emp", "name", "Tom");

    Map<String, String> map = new HashMap<>();
    map.put("age", "24");
    map.put("depart", "行政部");
    jedis.hset("emp", map);

    System.out.println("emp.name = " + jedis.hget("emp", "name"));
    List<String> emp = jedis.hmget("emp", "name", "age", "depart");
    System.out.println("emp = " + emp);

    jedis.close();
}
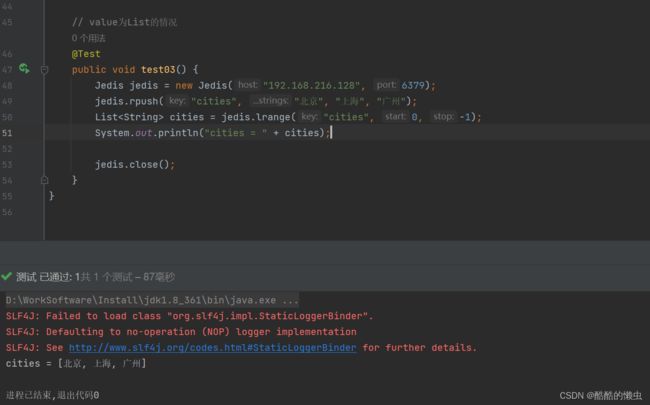
⭐️(3) value 为 List 的测试
// value为List的情况
@Test
public void test03() {
    Jedis jedis = new Jedis("redis", 6379);
    jedis.rpush("cities", "北京", "上海", "广州");
    List<String> cities = jedis.lrange("cities", 0, -1);
    System.out.println("cities = " + cities);

    jedis.close();
}
⭐️(4) value 为 Set 的测试
// value为Set的情况
@Test
public void test04() {
    Jedis jedis = new Jedis("redis", 6379);
    jedis.sadd("courses", "Redis", "RocketMQ", "Zookeeper", "Kafka");
    Set<String> courses = jedis.smembers("courses");
    System.out.println("courese = " + courses);

    jedis.close();
}

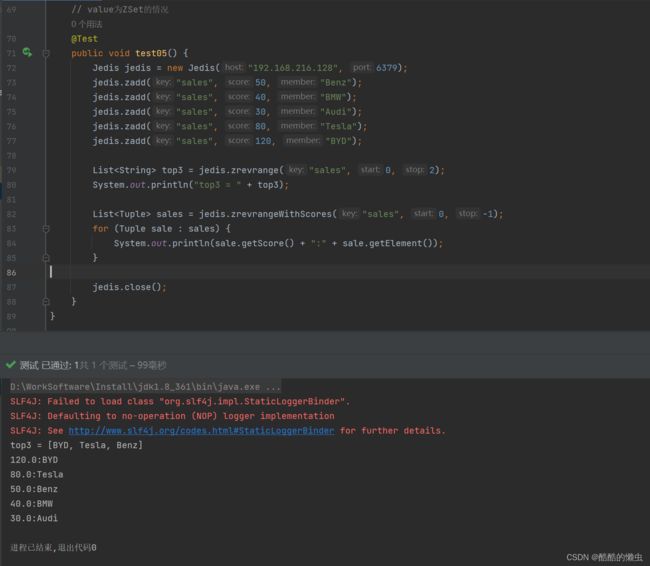
⭐️(5) value 为 Zset 的测试
// value为ZSet的情况
@Test
public void test05() {
    Jedis jedis = new Jedis("redis", 6379);
    jedis.zadd("sales", 50, "Benz");
    jedis.zadd("sales", 40, "BMW");
    jedis.zadd("sales", 30, "Audi");
    jedis.zadd("sales", 80, "Tesla");
    jedis.zadd("sales", 120, "BYD");

    List<String> top3 = jedis.zrevrange("sales", 0, 2);
    System.out.println("top3 = " + top3);

    List<Tuple> sales = jedis.zrevrangeWithScores("sales", 0, -1);
    for (Tuple sale : sales) {
        System.out.println(sale.getScore() + ":" + sale.getElement());
    }

    jedis.close();
}
7.1.4 使用 JedisPool
如果应用非常 频繁地 创建和销毁 Jedis 实例 虽然节省了系统资源与网络带宽,但会大大降低系统性能。 因为 创建和销毁 Socket 连接 是比较耗时的 。 此时可以使用 Jedis 连接池 来解决该问题。
使用 JedisPool 与使用 Jedis 实例的区别是, JedisPool 是全局性的,整个类只需创建一次即可,然后每次需要操作 Redis 时,只需从 JedisPool 中拿出一个 Jedis 实例 直接使用即可。使用完毕后,无需释放 Jedis 实例,只需 返回 JedisPool 即可。
public class JedisPoolTest{
	private JedisPool jedisPool = new JedisPool("redis", 6379);
	// value为String的情况
	@Test
	public void test01() {
		try (Jedis jedis = jedisPool.getResource()) {
			jedis.set("name", "张三");
			jedis.mset("age", "23", "depart", "行政部");

			System.out.println("name = " + jedis.get("name"));
			System.out.println("age = " + jedis.get("age"));
			System.out.println("depart = " + jedis.get("depart"));
		}
	}
}
7.1.5 使用 JedisPooled
对于每次对 Redis 的操作都需要使用 try-with-resource 块是比较麻烦的,而使用 JedisPooled 则无需再使用该结构来自动释放资源了。
public class JedisPooledTest {
	private JedisPooled jedisPooled = new JedisPooled("redis", 6379);

	// vaLue为String的情况
	@Test
	public void test01() {
		jedisPooled.set("name", "张三");
		jedisPooled.mset("age", "23", "depart", "行政部");

		System.out.println("name = " + jedisPooled.get("name"));
		System,out.println("age = " + jedisPooled.get("age"));
		System.out.println("depart = " + jedisPooled.get("depart"));
	}
}
7.1.6 连接 Sentinel 高可用集群
对于 Sentinel 高可用集群的连接,直接使用 JedisSentinelPool 即可。在该客户端只需注册所有 Sentinel 节点 及其监控的 Master 的名称即可,无需出现 master -slave 的任何地址信息。其采用的也是 JedisPool ,使用完毕的 Jedis 也需要通过 close() 方法将其返回给 连接池。
public class JedisSentinelPoolTest {
	private JedisSentinelPool jedisPool;

	{
		HashSet<String> sentinels = new HashSet<>();
		sentinels.add("redis:26380");
		sentinels.add("redis:26381");
		sentinels.add("redis:26382");
		jedisPool = new JedisSentinelPool("mymaster", sentinels);
	}

	// vaLue为String的情况
	@Test
	public void test01() {
		try (Jedis jedis = jedisPool.getResource()) {
			jedis.set("name", "张三");
			jedis.mset("age", "23", "depart", "行政部");

			System.out.println("name = " + jedis.get("name"));
			System.out.println("age = " + jedis.get("age"));
			System.out.println("depart = " + jedis.get("depart"));
		}
	}
}
7.1.7 连接分布式系统
对于 Redis 的分布式系统的连接,直接使用 JedisCluster 即可。其底层采用的也是 Jedis连接池技术。每次使用完毕后,无需显式关闭,其会自动关闭。
对于 JedisCluster 常用的 构造器 有两个。
- 一个是 只需一个集群节点 的构造器,这个节点可以是集群中的任意节点,只要连接上了该节点,就连接上了整个集群。但该构造器存在一个风险:其指定的这个节点在连接之前恰好宕机,那么该客户端将无法连接上集群。
- 所以,推荐使用第二个构造器,即将集群中所有节点全部罗列出来。这样就会避免这种风险了 。
public class JedisClusterTest{
	private JedisCluster jedisCluster;
	{
		// 连接CLuster中的任意主机
		// HostAndPort node = new HostAndPort("redis", 6380);
		// jedisCluster = new JedisCluster(node);

		//连接整个CLuster
		HashSet<HostAndPort> nodes = new HashSet<>();
		nodes.add(new HostAndPort("redis", 6380));
		nodes.add(new HostAndPort("redis", 6381));
		nodes.add(new HostAndPort("redis", 6382));
		nodes.add(new HostAndPort("redis", 6383));
		nodes.add(new HostAndPort("redis", 6384));
		nodes.add(new HostAndPort("redis", 6385));
		jedisCluster = new JedisCluster(nodes);
	}

	// value为String的情况
	@Test
	public void test01() {
		jedisCluster,set("name", "张三");
		// 会出现跨槽,报错
		// jedisClustermset("age", "23", "depart","行政部");
		System.out.println("name = " + jedisCluster.get("name"));
	}
}
7.1.8 操作事务
对于 Redis 事务 的操作, Jedis 提供了 multi() 、 watch() 、 unwatch() 方法来对应 Redis 中的 multi 、 watch 、 unwatch 命令。 Jedis 的 multi() 方法返回一个 Transaction 对象,其 exec() 与 discard() 方法用于 执行和取消事务的执行。
⭐️(1) 抛出 Java 异常
public class JedisTxTest {
private JedisPool jedisPool = new JedisPool("redis", 6379);

@Test
public void test01() {
	try (Jedis jedis = jedisPool.getResource()) {
	jedis.set("name", "张三");
	jedis.set("age", "23");

	Transaction multi = jedis.multi();
		try {
			multi.set("name", "李四");
			// 构造一个Java异常
			int i = 3/0;
			multi.set("age", "24");
			multi.exec();
		} catch (Exception e) {
			// 一旦发生异常,全部回滚
			multi.discard();
		} finally {
			System.out.println(jedis.get("name")); // 张三
			System.out.println(jedis.get("age")); // 23
		}
	}
}
其输出结果为全部回滚的结果。
⭐️(2) 让 Redis 异常
@Test
public void test02() {
	try (Jedis jedis = jedisPool.getResource()) {
		jedis.set("name", "张三");
		jedis.set("age", "23");

		Transaction multi = jedis.multi();
		try {
			multi.set("name", "李四");
			// 构造一个Redis异常,不会影响后面的执行
			multi.incr("name");
			multi.set("age", "24");
			multi.exec();
		} catch (Exception e) {
			// Redis异常不会被Java代码捕获到
			multi.discard();
		} finally {
			System.out.println(jedis.get("name")); // 李四
			System.out.println(jedis.get("age")); // 24
		}
	}
}
其输出结果为修改过的值。说明 Redis 运行时 抛出的异常不会被 Java 代码捕获到,其不会影响 Java 代码的执行。
⭐️(3) watch()
@Test
public void test03() {
	try (Jedis jedis = jedisPool.getResource()) {
		jedis.set("age", "23");
		System.out.println("增一前的age值:" + jedis.get("age")); // 23

		jedis.watch("age");
		Transaction multi = jedis.multi();
		multi.incr("age");
		multi.exec();

		System.out.println("增一后的age值:" + jedis.get("age"));
	}
}
7.2 金融产品交易平台
7.2.1 Spring Boot 整合 Redis
7.2.2 Redis 操作模板
Spring Boot 中可以直接使用 Jedis 实现对 Redis 的操作,但一般不这样用,而是使用 Redis 操作模板 RedisTemplate 类的实例来操作 Redis 。
RedisTemplate 类是一个对 Redis 进行操作的模板类。该模板类中具有很多方法,这些方法很多与 Redis 操作命令同名或类似。例如, delete() 、 keys() 、 scan(),还有事务相关的 multi() 、exec() 、 discard() 、 watch() 等。当然还有获取对各种 Value 类型进行操作的操作实例的两类方法 boundXxxOps(k) 与 opsForXxx() 。
7.2.3 需求
下面通过一个例子来说明 Spring Boot 是如何与 Redis 进行整合的。
对于一个资深成熟的金融产品交易平台,其用户端首页一般会展示其最新金融产品列表同时还为用户提供了产品查询功能。另外,为了显示平台的实力与信誉,在平台首页非常显眼的位置还会展示平台已完成的总交易额与注册用户数量。对于管理端,管理员可通过管理页面修改产品、上架新产品、下架老产品。
为了方便了解 Redis 与 Spring Boot 的整合流程,这里对系统进行了简化:用户端首页仅提供根据金融产品名称的查询,显眼位置仅展示交易总额。管理端仅实现上架新产品功能。
7.2.4 创建 SSM 工程
⭐️(1) 创建工程
定义一个 Spring Boot 工程,并命名为 ssm 。
⭐️(2) 定义 pom 文件
在 pom 文件中需要导入 MySQL 驱动、 Druid 等大量依赖。 POM 文件中的重要内容如下:
<properties>
        <project.build.sourceEncoding>UTF-8project.build.sourceEncoding>
        <maven.compiler.source>1.8maven.compiler.source>
        <maven.compiler.target>1.8maven.compiler.target>
    properties>

    <dependencies>
        <dependency>
            <groupId>org.projectlombokgroupId>
            <artifactId>lombokartifactId>
        dependency>

        <dependency>
            <groupId>org.mybatis.spring.bootgroupId>
            <artifactId>mybatis-spring-boot-starterartifactId>
            <version>1.3.2version>
        dependency>

        <dependency>
            <groupId>mysqlgroupId>
            <artifactId>mysql-connector-javaartifactId>
            <version>5.1.47version>
        dependency>

        <dependency>
            <groupId>com.alibabagroupId>
            <artifactId>druidartifactId>
            <version>1.1.12version>
        dependency>

        <dependency>
            <groupId>org.apache.tomcat.embedgroupId>
            <artifactId>tomcat-embed-jasperartifactId>
        dependency>

        <dependency>
            <groupId>javax.servletgroupId>
            <artifactId>jstlartifactId>
            <version>1.2version>
        dependency>

        <dependency>
            <groupId>org.springframework.bootgroupId>
            <artifactId>spring-boot-starter-webartifactId>
        dependency>

        <dependency>
            <groupId>org.springframework.bootgroupId>
            <artifactId>spring-boot-starter-testartifactId>
            <scope>testscope>
        dependency>
    dependencies>

    <build>
        <resources>
            <resource>
                <directory>src/main/javadirectory>
                <includes>
                    <include>**/*.xmlinclude>
                includes>
            resource>
            <resource>
                <directory>src/main/webappdirectory>
                <targetPath>META-INF/resourcestargetPath>
                <includes>
                    <include>**/*.*include>
                includes>
            resource>
        resources>
    build>
⭐️(3) 修改主配置文件
在主配置文件中配置 MyBatis 、 Spring 、日志等配置:
⭐️(4) 实体类 Product
平台交易总额,即“产品募集结束日期”小于“当前查询日期”的“产品募集总额”之和。
⭐️(5) 创建数据库表
在 test 数据库中创建一个名称为 product 的表。创建的 sql 文件如下,直接运行该文件即可。
⭐️(6) 定义 index.jsp
在 src/main 下创建 webap 目录,用于存放 jsp 文件。这就是一个普通的目录,无需执行 Mark Directory As 。在 webapp 目录中创建一个 index.jsp 文件。
⭐️(7) 定义 manager.jsp
在 webapp 目录下再创建一个 jsp 子目录,在其中定义 manager.jsp 。
⭐️(8) 定义 result.jsp
在 webapp/jsp 中定义 result.jsp 。
⭐️(9) ProductController 类
A、 indexHandle()
B、 registerHandle()
C、 listHandle()
⭐️(10) ProductService 接口
⭐️(11) ProductServiceImpl 类
A、 saveProduct()
B、 三个 find 方法
⭐️(12) ProductDao 接口
⭐️(13) 映射文件
⭐️(14) Application 启动类
7.2.5 创建 SSRM 工程
7.3 高并发问题
八、Lua脚本详解
8.1 Lua 简介
8.2 Linux 系统的Lua
8.3 Win 系统的Lua
8.4 Lua 脚本基础
8.5 Lua 语法进阶
九、分布式锁
9.1 分布式锁的工作原理
9.2 问题引入
9.3 setnx 实现方式
9.4 为锁添加过期时间
9.5 为锁添加标识
9.6 添加 Lua 脚本
9.7 Redisson 可重入锁
9.8 Redisson 红锁
9.9 分段锁
9.10 Redisson 详解
Redis 快速食用:---------------------------------------------------------------------------------------------------------------------------------------------------------------------------->