springboot-02
springboot-02
- 学习目标
- 1. SpringBoot 整合Mybatis
- 2.SpringBoot数据访问操作
-
-
- 查询
- 添加
-
- PostMan 接口测试工具下载与使用
- 修改
- 删除
- 分页查询
-
- 3.API 文档构建工具-Swagger2
-
-
-
- 环境整合配置
- Swagger2 常用注解说明
-
- @Api
- @ApiOperation
- @ApiImplicitParams
- @ApiResponses
- @ApiModel
- Swagger2 接口文档访问
-
-
- 4.SpringBoot应用热部署
-
-
- 热部署环境配置与测试
-
- 配置 DevTools 环境
- Idea 配置
- 全局配置文件配置
-
- 5.分布式缓存Ehcache整合
-
-
- @Cacheable
- @CachePut
- @CacheEvict
- 环境配置
- 缓存代码添加
-
- 6.事物控制
-
-
- Spring Boot事物支持
-
学习目标
1. SpringBoot 整合Mybatis
SpringBoot集成Mybatis并实现持久层数据基本增删改查操作。
- Idea 下创建Maven 普通工程 springboot_mybatis
- pom.xml 添加核心依赖
<properties>
    <project.build.sourceEncoding>UTF-8</project.build.sourceEncoding>
    <maven.compiler.source>1.8</maven.compiler.source>
    <maven.compiler.target>1.8</maven.compiler.target>
</properties>

<parent>
    <groupId>org.springframework.boot</groupId>
    <artifactId>spring-boot-starter-parent</artifactId>
    <version>2.2.2.RELEASE</version>
</parent>
<dependencies>
    <dependency>
        <groupId>org.springframework.boot</groupId>
        <artifactId>spring-boot-starter-web</artifactId>
    </dependency>
    <!--
          mybatis 集成
        -->
    <dependency>
        <groupId>org.mybatis.spring.boot</groupId>
        <artifactId>mybatis-spring-boot-starter</artifactId>
        <version>2.1.1</version>
    </dependency>
    <!-- springboot分页插件 -->
    <dependency>
        <groupId>com.github.pagehelper</groupId>
        <artifactId>pagehelper-spring-boot-starter</artifactId>
        <version>1.2.13</version>
    </dependency>

    <!--mysql 驱动-->
    <dependency>
        <groupId>mysql</groupId>
        <artifactId>mysql-connector-java</artifactId>

    </dependency>
    <!-- https://mvnrepository.com/artifact/com.mchange/c3p0 -->
    <dependency>
        <groupId>com.mchange</groupId>
        <artifactId>c3p0</artifactId>
        <version>0.9.5.5</version>
    </dependency>
</dependencies>

<build>
    <plugins>
        <plugin>
            <groupId>org.springframework.boot</groupId>
            <artifactId>spring-boot-maven-plugin</artifactId>
        </plugin>
    </plugins>
</build>
- resouces包下新建 application.yml 整合配置
## 端口号
server:
  port: 9999

## 数据源配置
spring:
  datasource:
    type: com.mchange.v2.c3p0.ComboPooledDataSource
    driver-class-name: com.mysql.cj.jdbc.Driver
    url: jdbc:mysql://127.0.0.1:3306/springboot_mybatis?useUnicode=true&characterEncoding=utf8&serverTimezone=GMT%2B8
    username: root
    password: root

## mybatis 配置
mybatis:
//映射文件,在resources包下新建一个mappers包
  mapper-locations: classpath:/mappers/*.xml
  type-aliases-package: com.xxxx.springboot.vo
  configuration:
    ## 下划线转驼峰配置
    map-underscore-to-camel-case: true

## pageHelper
pagehelper:
  helper-dialect: mysql

#显示dao 执行sql语句
logging:
  level:
    com:
      xxxx:
        springboot:
          dao: debug
- 实体类

-
- Dao层接口方法定义
com.xxxx.springboot.dao 包下创建UserDao.java 接口声明查询方法
public interface UserMapper  {
	// 根据用户名查询用户记录
    User queryUserByUserName(String userName);
}
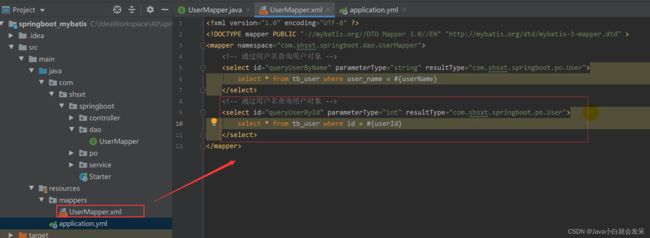
- SQL映射文件添加
resources/mappers 目录下添加UserMapper.xml 配置查询statetment
<?xml version="1.0" encoding="UTF-8" ?>
<!DOCTYPE mapper PUBLIC "-//mybatis.org//DTD Mapper 3.0//EN" "http://mybatis.org/dtd/mybatis-3-mapper.dtd" >
<mapper namespace="com.xxxx.springboot.dao.UserMapper">
    <select id="queryUserByUserName" parameterType="string" resultType="com.xxxx.springboot.vo.User">
        select
        id,user_name,user_pwd
        from t_user
        where user_name=#{userName}
    </select>
</mapper>
- 添加service 、controller 对应代码
UserService.java
@Service
public class UserService {
    @Autowired
    private UserMapper userMapper;

    public User queryUserByUserName(String userName){
        return userMapper.queryUserByUserName(userName);
    }
}
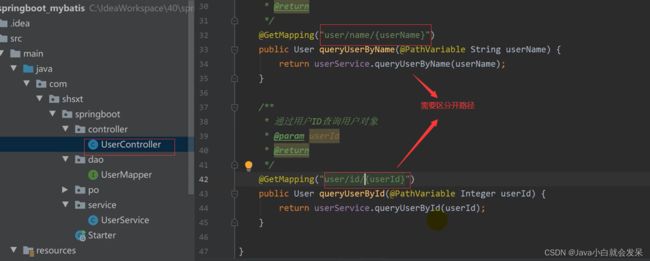
UserController.java
@RestController//表示该类的所有方法返回的都是(json)字符串
public class UserController {

    @Resource
    private UserService userService;


    @GetMapping("user/{userName}")
    public User queryUserByUserName(@PathVariable String userName){
        return userService.queryUserByUserName(userName);
    }
}
- 添加应用启动入口
@SpringBootApplication
@MapperScan("com.xxxx.springboot.dao")
public class Starter {

    public static void main(String[] args) {
        SpringApplication.run(Starter.class);
    }
}
- 启动测试
2.SpringBoot数据访问操作
查询
dao层:

UserMapper.xml 映射文件配置:
service层:

controller层:

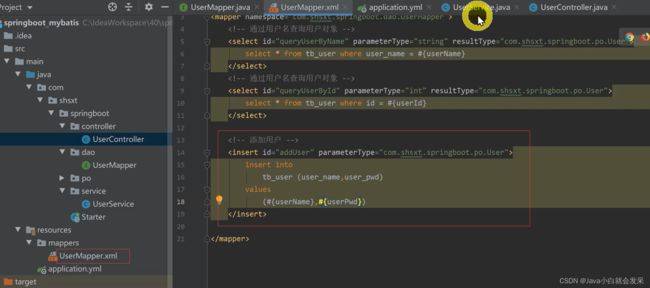
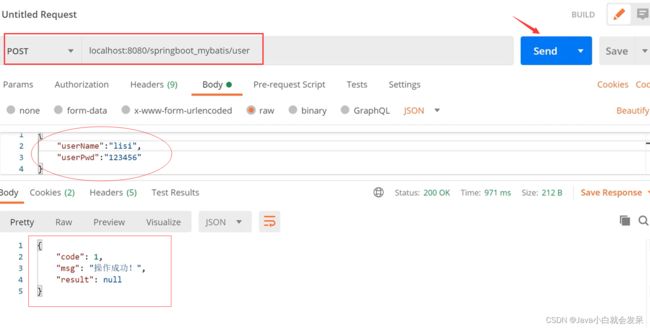
添加
- dao层接口:

- 映射文件:
- service层:
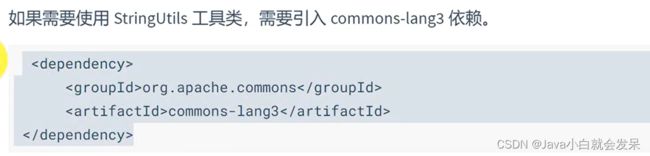
非空判断,引进工具类到pom判断
写一个工具类,实现校验,避免service层代码臃肿

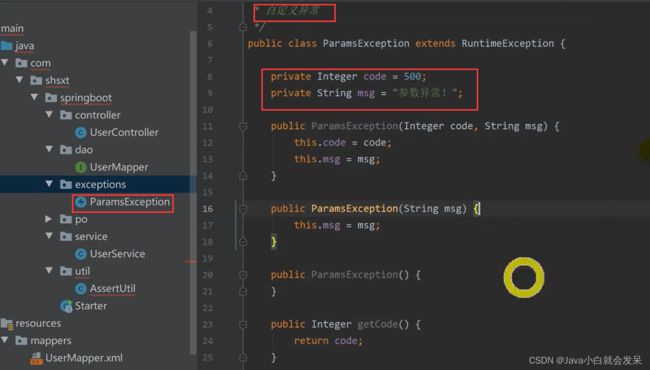
自定义异常类
service层实现判断

- controller层
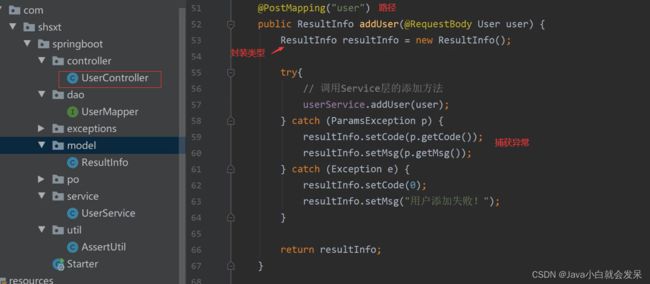
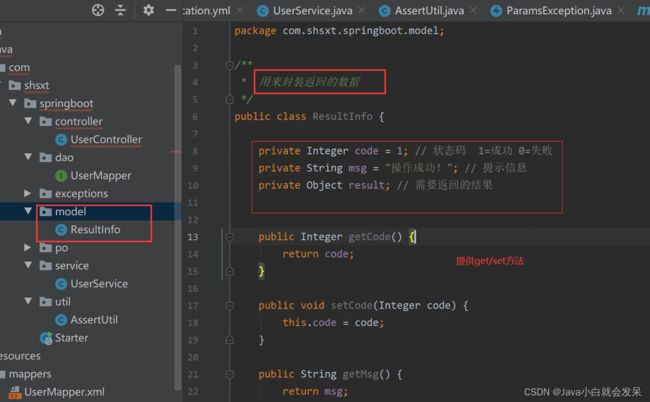
对应的封装类型
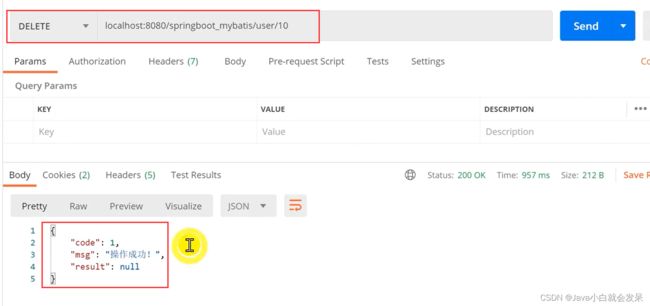
PostMan 接口测试工具下载与使用
在企业web 应用开发中,对服务器端接口进行测试,通常借助接口测试工具,这里使用Postman 接口测试工具来对后台restful接口进行测试
下载地址:https://www.postman.com/downloads/
下载安装后,启动Postman 根据后台接口地址发送响应请求即可对接口进行测试。
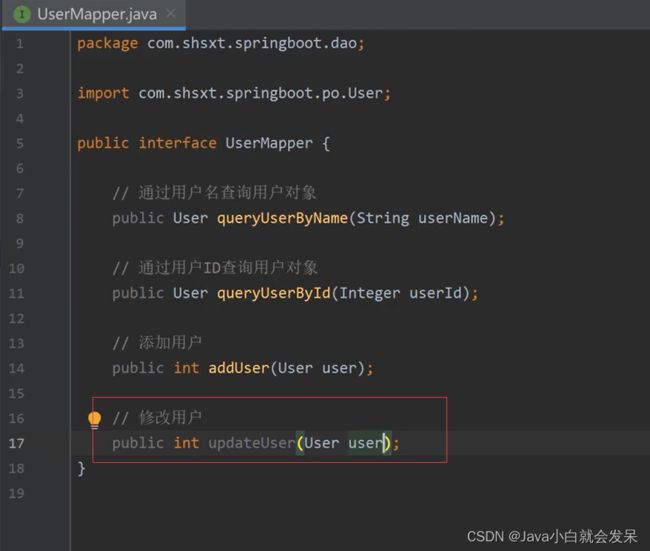
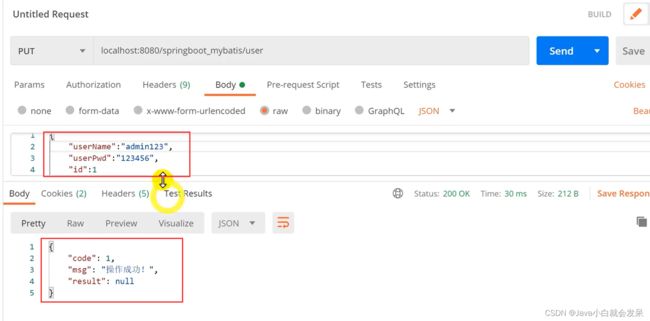
修改
- dao层
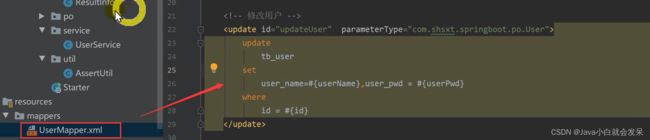
- 映射文件:
- service层:

- controller层:

- 测试
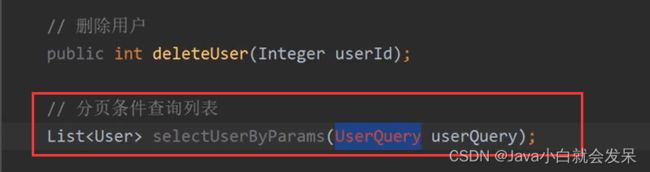
删除
- 接口:

- sql语句:

- service层:

- controller层:

- 测试
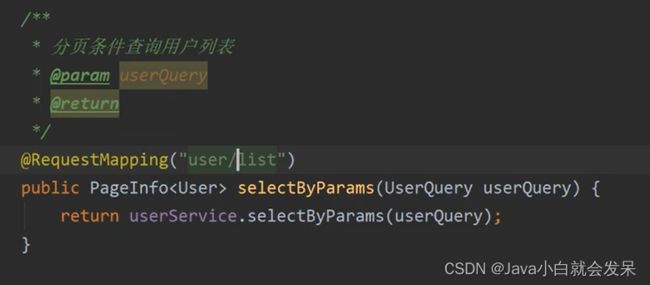
分页查询
- 接口
-
分页类

-
映射文件

-
service层:

-
controller层:
测试:

3.API 文档构建工具-Swagger2
对于服务端开发人员来说就需要编写接口文档,描述接口调用地址参数结果等,这里借助第三方构建工具Swagger2来实现Api文档生成功能。
环境整合配置
- pom.xml 依赖添加
<dependency>
  <groupId>io.springfox</groupId>
  <artifactId>springfox-swagger2</artifactId>
  <version>2.9.2</version>
</dependency>
<dependency>
  <groupId>io.springfox</groupId>
  <artifactId>springfox-swagger-ui</artifactId>
  <version>2.9.2</version>
</dependency>
- 配置类添加
@Configuration
@EnableSwagger2
public class Swagger2 {
    @Bean
    public Docket createRestApi() {
        return new Docket(DocumentationType.SWAGGER_2)
                .apiInfo(apiInfo())
                .select()
                .apis(RequestHandlerSelectors.basePackage("com.xxxx.springboot.controller"))
                .paths(PathSelectors.any())
                .build();
    }
    private ApiInfo apiInfo() {
        return new ApiInfoBuilder()
                .title("用户管理接口API文档参考")
                .version("1.0")
                .build();
    }
}
Swagger2 常用注解说明
@Api
@Api(tags="APP用户注册Controller")
@ApiOperation
@ApiOperation:"用在请求的方法上,说明方法的作用"
    value="说明方法的作用"
    notes="方法的备注说明"
@ApiOperation(value="用户注册",notes="手机号、密码都是必输项,年龄随边填,但必须是数字")
@ApiImplicitParams
@ApiImplicitParams:用在请求的方法上,包含一组参数说明
    @ApiImplicitParam:用在 @ApiImplicitParams 注解中,指定一个请求参数的配置信息
        name:参数名
        value:参数的汉字说明、解释
        required:参数是否必须传
        paramType:参数放在哪个地方
            · header --> 请求参数的获取:@RequestHeader
            · query --> 请求参数的获取:@RequestParam
            · path(用于restful接口)--> 请求参数的获取:@PathVariable
            · body(不常用)
            · form(不常用)
        dataType:参数类型,默认String,其它值dataType="Integer"
        defaultValue:参数的默认值

@ApiResponses
@ApiResponses:用于请求的方法上,表示一组响应
    @ApiResponse:用在@ApiResponses中,一般用于表达一个错误的响应信息
        code:数字,例如400
        message:信息,例如"请求参数没填好"
        response:抛出异常的类
@ApiOperation(value = "select请求",notes = "多个参数,多种的查询参数类型")
@ApiResponses({
    @ApiResponse(code=400,message="请求参数没填好"),
    @ApiResponse(code=404,message="请求路径没有或页面跳转路径不对")
})
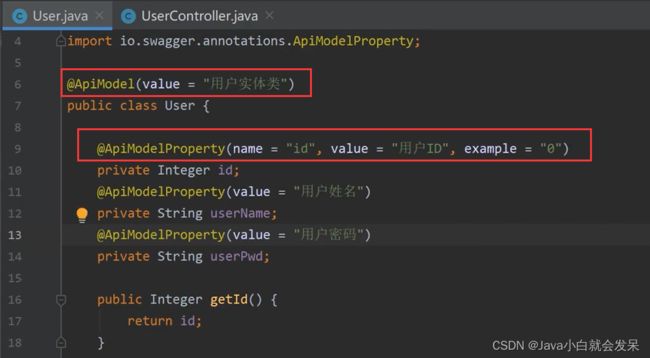
@ApiModel
@ApiModel:用于响应类上,表示一个返回响应数据的信息
(这种一般用在post创建的时候,使用@RequestBody这样的场景, 请求参数无法使用@ApiImplicitParam注解进行描述的时候)
  @ApiModelProperty:用在属性上,描述响应类的属性
Swagger2 接口文档访问
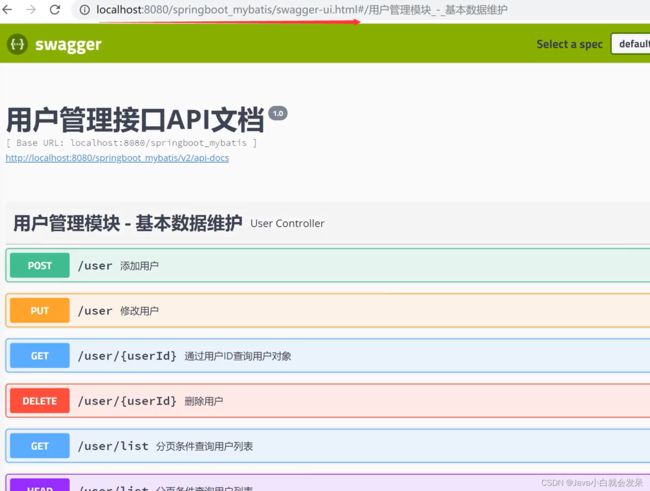
4.SpringBoot应用热部署
热部署,就是在应用正在运行的时候升级软件(增加业务/修改bug),却不需要重新启动应用。
它监听到如果有 Class 文件改动了,就会创建一个新的 ClaassLoader 进行加载该文件,经过一系列的过程,最终将结果呈现在我们眼前,其实就是重新编译生成了新的 Class 文件,这个文件里记录着和代码等对应的各种信息,然后 Class 文件将被虚拟机的 ClassLoader 加载。由于需要加载的类相比较少,所以实现了较快的重启时间。
热部署环境配置与测试
配置 DevTools 环境
- 修改 Pom 文件,添加 DevTools 依赖
<!-- DevTools 的坐标 -->
<dependency>
	<groupId>org.springframework.boot</groupId>
	<artifactId>spring-boot-devtools</artifactId>
     <!--当前这个项目被继承之后,这个不向下传递-->
	<optional>true</optional>
</dependency>
同时在plugin中添加devtools生效标志
<plugin>
  <groupId>org.springframework.boot</groupId>
  <artifactId>spring-boot-maven-plugin</artifactId>
  <configuration>
      <fork>true</fork><!-- 如果没有该配置,热部署的devtools不生效 -->
  </configuration>
</plugin>
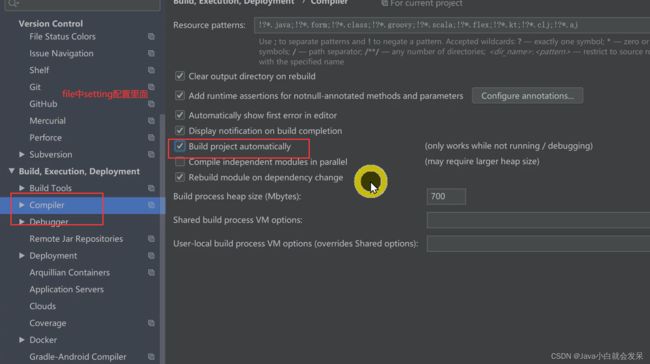
Idea 配置
当我们修改了Java类后,IDEA默认是不自动编译的,而spring-boot-devtools又是监测classpath下的文件发生变化才会重启应用,所以需要设置IDEA的自动编译
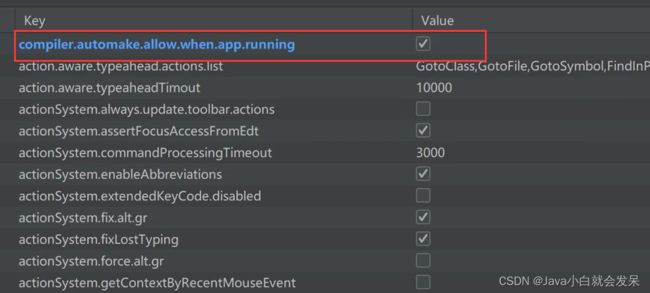
- Registry 属性修改
按ctrl + shift + alt + /,选择Registry,勾上 Compiler autoMake allow when app running
全局配置文件配置
在application.yml中配置spring.devtools.restart.enabled=false,此时restart类加载器还会初始化,但不会监视文件更新。
spring:
  ## 热部署配置
  devtools:
    restart:
      enabled: true
      # 设置重启的目录,添加目录的文件需要restart
      additional-paths: src/main/java
      # 解决项目自动重新编译后接口报404的问题
      poll-interval: 3000
      quiet-period: 1000
5.分布式缓存Ehcache整合
1.EhCache是一个比较成熟的Java缓存框架,最早从hibernate发展而来, 是进程中的缓存系统,它提供了用内存,磁盘文件存储,以及分布式存储方式等多种灵活的cache管理方案,快速简单。
2.Spring Boot对Ehcache的使用提供支持,所以在Spring Boot中只需简单配置即可使用Ehcache实现数据缓存处理。
@Cacheable
应用到读取数据的方法上,即可缓存的方法,如查找方法,先从缓存中读取,如果没有再调用相应方法获取数据,然后把数据添加到缓存中。
@Cacheable(value = "user", key = "#id")
User selectUserById(final Integer id);
@CachePut
应用到写数据的方法上,如新增/修改方法,调用方法时会自动把相应的数据放入缓存,@CachePut的参数与@Cacheable类似,示例如下:
@CachePut(value = "user", key = "#user.id")
public User save(User user) {
    users.add(user);
    return user;
}
@CacheEvict
应用到移除数据的方法上,如删除方法,调用方法时会从缓存中移除相应的数据,示例如下:
除了同@Cacheable一样的参数之外,@CacheEvict还有下面两个参数:

- **allEntries**:非必需,默认为false。当为true时,会移除所有数据
- **beforeInvocation**:非必需,默认为false,会在调用方法之后移除数据。当为true时,会在调用方法之前移除数据。
@CacheEvict(value = "user", key = "#id")
void delete(final Integer id);
环境配置
- pom.xml 依赖添加
<dependency>
    <groupId>org.springframework.boot</groupId>
    <artifactId>spring-boot-starter-cache</artifactId>
</dependency>
<!-- Ehcache 坐标 -->
<dependency>
    <groupId>net.sf.ehcache</groupId>
    <artifactId>ehcache</artifactId>
</dependency>
- ehcahe.xml 文件添加
src/main/resources 目录下添加ehcache.xml 文件,内容如下:
<ehcache name="mycache">
    <diskStore path="C:\java\cache"/> //此处需要改
    <!--
        name:缓存名称。
        maxElementsInMemory:缓存最大数目
        maxElementsOnDisk:硬盘最大缓存个数。
        eternal:对象是否永久有效,一但设置了,timeout将不起作用。
        overflowToDisk:是否保存到磁盘,当系统宕机时
        timeToIdleSeconds:设置对象在失效前的允许闲置时间(单位:秒)。
               仅当eternal=false对象不是永久有效时使用,可选属性,默认值是0,也就是可闲置时间无穷大。
        timeToLiveSeconds:设置对象在失效前允许存活时间(单位:秒)。
             最大时间介于创建时间和失效时间之间。仅当eternal=false对象不是永久有效时使用,默认是0.,也就是对象存活时间无穷大。
       diskExpiryThreadIntervalSeconds:磁盘失效线程运行时间间隔,默认是120秒。
        -->
    <defaultCache
            maxElementsInMemory="10000"
            eternal="false"
            timeToIdleSeconds="120"
            timeToLiveSeconds="120"
            maxElementsOnDisk="10000000"
            diskExpiryThreadIntervalSeconds="120"
            memoryStoreEvictionPolicy="LRU">
    </defaultCache>

    <cache
            name="users"
            eternal="false"
            maxElementsInMemory="100"
            overflowToDisk="false"
            diskPersistent="false"
            timeToIdleSeconds="0"
            timeToLiveSeconds="300"
            memoryStoreEvictionPolicy="LRU"/>
</ehcache>
- application.yml 添加缓存配置
spring:
  datasource:
    type: com.mchange.v2.c3p0.ComboPooledDataSource
    driver-class-name: com.mysql.cj.jdbc.Driver
    url: jdbc:mysql://127.0.0.1:3306/springboot_mybatis?useUnicode=true&characterEncoding=utf8&serverTimezone=GMT%2B8
    username: root
    password: root
  devtools:
    restart:
      enabled: true
      # 设置重启的目录,添加目录的文件需要restart
      additional-paths: src/main/java
      # 解决项目自动重新编译后接口报404的问题
      poll-interval: 3000
      quiet-period: 1000
  cache:
    ehcache:
      config: classpath:ehcahe.xml
- Starter 启动入口类启动缓存
@MapperScan("com.xxxx.springboot.dao")
@EnableCaching
@SpringBootApplication
public class Starter {

    public static void main(String[] args) {
        SpringApplication.run(Starter.class);
    }
}
- 缓存User 对象实现序列化接口
@ApiModel(description = "用户实体对象")
public class User implements Serializable {
    @ApiModelProperty(value = "用户id主键")
    private Integer id;
    @ApiModelProperty(value = "用户名")
    private String userName;
    @ApiModelProperty(value = "用户密码")
    private String userPwd;
    /*
      省略 get|set方法
    */
}
缓存代码添加
这里以UserService 方法为例
- 用户详情查询缓存添加
@Cacheable(value = "users",key = "#userId")
public User queryUserByUserId(Integer userId){
    return userMapper.queryById(userId);
}
- 用户列表查询缓存
@Cacheable(value = "users",key="#userQuery.userName+'-'+#userQuery.pageNum+'-'+#userQuery.pageSize")
public PageInfo<User> queryUserByParams(UserQuery userQuery){
    PageHelper.startPage(userQuery.getPageNum(),userQuery.getPageSize());
    return new PageInfo<User>(userMapper.selectByParams(userQuery));
}
- 用户更新&删除缓存清除
@Transactional(propagation = Propagation.REQUIRED)
@CacheEvict(value = "users",key="#user.id")
public void updateUser(User user) {
    AssertUtil.isTrue(StringUtils.isBlank(user.getUserName()), "用户名不能为空!");
    AssertUtil.isTrue(StringUtils.isBlank(user.getUserPwd()),"用户密码不能为空!");
    User temp = userMapper.queryUserByUserName(user.getUserName());
    AssertUtil.isTrue(null != temp && !(temp.getId().equals(user.getId())), "该用户已存在!");
    AssertUtil.isTrue(userMapper.update(user)<1,"用户记录添加失败!");
}

@Transactional(propagation = Propagation.REQUIRED)
@CacheEvict(value = "users",allEntries=true)
public  void deleteUser(Integer userId){
    AssertUtil.isTrue(null == userId || null ==userMapper.queryById(userId),"待删除记录不存在!");
    AssertUtil.isTrue(userMapper.delete(userId)<1,"用户删除失败!");
}
6.事物控制
Spring Boot事物支持
Spring Boot 环境下对事物进行控制,事物实现由Spring Boot实现并自动配置,在使用时通过注解方式标注相关方法加入事物控制即可
- 在添加,更新,删除方法上面加上注解即可
@Transactional(propagation = Propagation.REQUIRED)
