Springboot——Web开发
一、SpringMVC自动配置概览
Springboot提供SpringMVC的自动配置,大多场景我们都无需自定义配置
Springboot根据条件自动装配各种Java Bean到容器中,替换掉xml读取方式
-
内容协商视图解析器
ContentNegotiatingViewResolver和BeanName视图解析器BeanNameViewResolver -
支持静态资源(包括webjars)
-
自动注册
Converter,GenericConverter,Formatter -
支持
HttpMessageConverters(后来我们配合内容协商理解原理) -
静态index.html 页支持
-
自定义
Favicon小图标 -
自动使用
ConfigurableWebBindingInitializer,DataBinder负责将请求数据绑定到JavaBean上 -
定制化
- 不用@EnableWebMvc注解。使用
@Configuration+WebMvcConfigurer自定义规则 - 声明
WebMvcRegistrations改变默认底层组件 - 使用
@EnableWebMvc + @Configuration+DelegatingWebMvcConfiguration全面接管SpringMVC
- 不用@EnableWebMvc注解。使用
二、简单功能分析
1. 静态资源访问
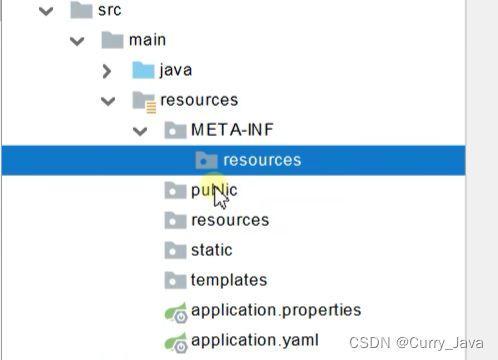
1.1 静态资源目录:
只要静态资源放在类路径下:
/static(or/publicor/resourcesor/META-INF/resources
-
访问路径 : 当前项目根路径/ + 静态资源名(localhost:8080/temp.jpg)
-
原理: 静态映射是/**,即拦截所有请求。
当请求进来,先去找Controller看能不能处理。不能处理的所有请求又都交给静态资源处理器。静态资源也找不到则响应404页面
1.2 静态资源访问前缀:
默认无前缀,/**
spring:
  mvc:
    static-path-pattern: /resource/**
当前项目 + static-path-pattern + 静态资源名 = 静态资源文件夹下找(localhost:8080/resource/temp.jpg)
1.3 webjar
可用jar方式添加css,js等资源文件
https://www.webjars.org/
例如,添加jquery依赖
<dependency>
    <groupId>org.webjarsgroupId>
    <artifactId>jqueryartifactId>
    <version>3.5.1version>
dependency>
访问地址:http://localhost:8080/webjars/jquery/3.5.1/jquery.js 后面地址要按照依赖里面的包路径
2. 欢迎页支持
-
静态资源路径static下 index.html
- 可以配置静态资源路径
- 但是不可以配置静态资源的访问前缀。否则导致 index.html不能被默认访问
-
controller能处理/index
3. 自定义Favicon
- 指网页标签上的小图标,将favicon.ico 放在静态资源目录下即可
4. 静态资源配置原理(源码)
-
SpringBoot启动默认加载 xxxAutoConfiguration 类(自动配置类)
-
SpringMVC功能的自动配置类autoconfigure—>web—>servlet—>
WebMvcAutoConfiguration,注解条件生效 -
给容器中配置的内容:WebMvcAutoConfigurationAdapter(配置类)
- 配置文件的相关属性的绑定:WebMvcProperties绑定spring.mvc前缀资源
- ResourceProperties绑定spring.web前缀资源
@Configuration(proxyBeanMethods = false)
@Import(EnableWebMvcConfiguration.class)
@EnableConfigurationProperties({ WebMvcProperties.class, ResourceProperties.class })
@Order(0)
public static class WebMvcAutoConfigurationAdapter implements WebMvcConfigurer {
    ...
}
a> 配置类只有一个有参构造器
有参构造器所有参数的值都会从容器中确定
- ResourceProperties resourceProperties:获取和spring.resources绑定的所有的值的对象
- WebMvcProperties mvcProperties :获取和spring.mvc绑定的所有的值的对象
- ListableBeanFactory beanFactory :Spring的beanFactory
- HttpMessageConverters:找到所有的HttpMessageConverters
- ResourceHandlerRegistrationCustomizer:找到资源处理器的自定义器。
- DispatcherServletPath
- ServletRegistrationBean:给应用注册Servlet、Filter…
b>资源处理默认规则
...
public class WebMvcAutoConfiguration {
    ...
	public static class EnableWebMvcConfiguration extends DelegatingWebMvcConfiguration implements ResourceLoaderAware {
        ...
		@Override
		protected void addResourceHandlers(ResourceHandlerRegistry registry) {
			super.addResourceHandlers(registry);
			if (!this.resourceProperties.isAddMappings()) {
				logger.debug("Default resource handling disabled");
				return;
			}
			ServletContext servletContext = getServletContext();
			addResourceHandler(registry, "/webjars/**", "classpath:/META-INF/resources/webjars/");
			addResourceHandler(registry, this.mvcProperties.getStaticPathPattern(), (registration) -> {
				registration.addResourceLocations(this.resourceProperties.getStaticLocations());
				if (servletContext != null) {
					registration.addResourceLocations(new ServletContextResource(servletContext, SERVLET_LOCATION));
				}
			});
		}
        ...

    }
    ...
}
- 禁止所有静态资源规则配置
spring:
  resources:
    add-mappings: false   #禁用所有静态资源规则
静态资源规则:
@ConfigurationProperties(prefix = "spring.resources", ignoreUnknownFields = false)
public class ResourceProperties {

    private static final String[] CLASSPATH_RESOURCE_LOCATIONS = { "classpath:/META-INF/resources/",
            "classpath:/resources/", "classpath:/static/", "classpath:/public/" };

    /**
     * Locations of static resources. Defaults to classpath:[/META-INF/resources/,
     * /resources/, /static/, /public/].
     */
    private String[] staticLocations = CLASSPATH_RESOURCE_LOCATIONS;
    ...
}
三、请求参数处理
1. 请求映射
1.1 rest使用
- @RequestMapping(value=“/Hello”, method = RequestMethod.GET)
- @GetMapping
- @PostMapping
- @PutMapping
- @DeleteMapping
- Rest风格支持(使用HTTP请求方式动词来表示对资源的操作)
- /user
- GET-获取用户
- DELETE-删除用户
- PUT-修改用户
- POST-保存用户
- 核心Filter;HiddenHttpMethodFilter
- 用法
- 开启页面表单的Rest功能,配置属性
- 页面 form的属性method=post,隐藏域 _method=put、delete等(如果直接get或post,无需隐藏域)
- 编写请求映射
spring:
  mvc:
    hiddenmethod:
      filter:
        enabled: true   #开启页面表单的Rest功能
-
Rest原理(表单提交要使用REST的时候)
-
表单提交会带上
\_method=PUT -
请求过来被
HiddenHttpMethodFilter拦截- 请求是否正常,并且是POST
a> 获取到\_method的值
b> 兼容以下请求;PUT.DELETE.PATCH
c> 包装模式requesWrapper重写了getMethod方法,返回_method=PUT
d> 控制器拿到请求进行映射时PUT实现匹配
- 请求是否正常,并且是POST
-
Rest使用客户端工具
a> 如PostMan可直接发送put、delete等方式请求(前后端分离)
-
<form action="/user" method="get">
    <input value="REST-GET提交" type="submit" />
form>

<form action="/user" method="post">
    <input value="REST-POST提交" type="submit" />
form>

<form action="/user" method="post">
    <input name="_method" type="hidden" value="DELETE"/>
    <input value="REST-DELETE 提交" type="submit"/>
form>

<form action="/user" method="post">
    <input name="_method" type="hidden" value="PUT" />
    <input value="REST-PUT提交"type="submit" />
<form>
@GetMapping("/user")
//@RequestMapping(value = "/user",method = RequestMethod.GET)
public String getUser(){
    return "GET-张三";
}

@PostMapping("/user")
//@RequestMapping(value = "/user",method = RequestMethod.POST)
public String saveUser(){
    return "POST-张三";
}

@PutMapping("/user")
//@RequestMapping(value = "/user",method = RequestMethod.PUT)
public String putUser(){
    return "PUT-张三";
}

@DeleteMapping("/user")
//@RequestMapping(value = "/user",method = RequestMethod.DELETE)
public String deleteUser(){
    return "DELETE-张三";
}
1.2 请求映射原理
原理分析:
- HttpServlet:
- HttpServletBean:
- FrameworkSerlet:重写doGet和doPost方法(调用processRequest—>doService)
- DispatcherServlet:处理所有请求开始,实现doService—>doDispatch()
- FrameworkSerlet:重写doGet和doPost方法(调用processRequest—>doService)
- HttpServletBean:
- SpringMVC功能分析都从
org.springframework.web.servlet.DispatcherServlet->doDispatch()开始 - 找到当前请求使用哪个Controller方法映射处理:mappedHandler = getHandler(processedRequest);
- **
getHandler()**方法中HandlerMapping:处理器映射 /xxx->>xxxx,有5个请求映射

- 其中**
RequestMappingHandlerMapping**保存了所有@RequestMapping和handler的映射规则- 通过Springboot启动扫描注解解析到HandlerMapping中,通过循环遍历5个请求映射,找到处理该请求路径的处理器,以
RequestMappingHandlerMapping为例:
- 通过Springboot启动扫描注解解析到HandlerMapping中,通过循环遍历5个请求映射,找到处理该请求路径的处理器,以
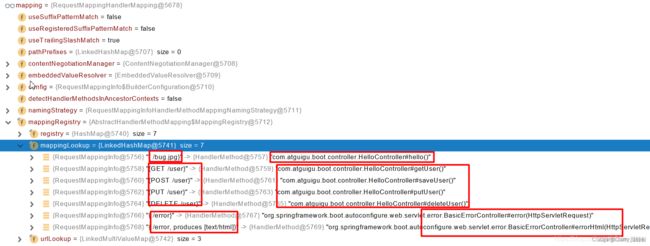
所有的请求映射都在HandlerMapping中:
-
SpringBoot自动配置欢迎页的 WelcomePageHandlerMapping 。访问 /能访问到index.html;
-
SpringBoot自动配置了默认的 RequestMappingHandlerMapping,与@RequestMapping(“”)映射
-
请求进来,挨个尝试所有的HandlerMapping(5个)看是否有请求信息。
- 如果有就找到这个请求对应的handler
- 如果没有就是下一个 HandlerMapping
-
我们需要一些自定义的映射处理,我们也可以自己给容器中放HandlerMapping。自定义 HandlerMapping
2. 参数处理—获取参数与共享数据
2.1 注解
@ResponseBody响应报文返回值可以是String,Map,实体对象类型
@PathVariablerest风格路径变量
@GetMapping("/car/{id}/owner/{username}")
public Map<String, Object> getCar(@PathVariable("id") Integer id,
                                  @PathVariable("username") String username,
                                  @PathVariable Map<String,String> pv){
    Map<String,Object> map = new HashMap<>();
    map.put("id",id);
    map.put("username", username);
    map.put("自动封装map", pv);
    return map;
}
测试路径:http://localhost:8080/car/3/owner/wz
结果:{“自动封装map”:{“id”:“3”,“username”:“wz”},“id”:3,“username”:“wz”}
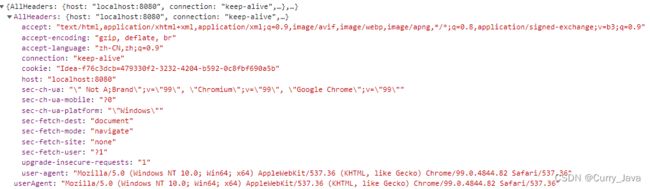
@RequestHeader获取请求头信息
@GetMapping("/header")
public Map<String, Object> getHeaders(@RequestHeader("User-Agent") String userAgent,
                                      @RequestHeader Map<String,String> mp){
    Map<String,Object> map = new HashMap<>();
    map.put("userAgent", userAgent);
    map.put("AllHeaders", mp);
    return map;
}
@RequestParam获取请求参数(指问号后的参数,url?username=wz&inters=basketball&inters=football)
@RequestMapping("/Hello")
public Map<String, Object> Hello(@RequestParam("username") String name,
                    @RequestParam("inters") List<String> inters
                    @RequestParam Map<String,String> params){}
@CookieValue获取Cookie值
@GetMapping("/Cookie")
public Map<String, Object> getCookies(@CookieValue("_ga") String _ga,
                                     @CookieValue("_ga") Cookie cookie){}
@RequestBody获取请求体[POST]
@PostMapping("/save")
public Map<String, Object> getResponseBody(@RequestBody String content){
    Map<String, Object> map = new HashMap<>();
    map.put("content", content);
    return map;
}
结果:{"content":"username=123&email=1231"}
@RequestAttribute获取request域中保存的键值对
@RequestMapping("/goto")
public String gotoPage(Model model,
                       HttpServletRequest request){
    model.addAttribute("bf","fkd");
    request.setAttribute("gf", "wz");
    return "forward:/success";
}

@ResponseBody
@RequestMapping("/success")
public Map<String, Object> success(@RequestAttribute("gf") String gf,
                                   HttpServletRequest request){
    Object bf = request.getAttribute("bf");
    Map<String, Object> map = new HashMap<>();
    map.put("gf", gf);
    map.put("bf", bf);
    return map;
}
@MatrixVariable矩阵变量- 请求路径:
/cars/sell;low=34;brand=byd,audi,yd;/boss/1;age=20/2;age=22 - 矩阵变量必须有url路径变量才能被解析
- 请求路径:
页面开发,cookie被禁用了,session中的内容如何使用?
1.没禁用时session.set(a,b)—>jsessionId保存在—>cookie—>每次发请求都携带,服务器根据每次cookie中携带的jsessionId找到session对象,调用set方法
2.以矩阵变量的形式带上jsessionId,url重写:/abc;jsessionid=xxxx,把cookie值使用矩阵变量的方式传递
a> SpringBoot默认禁用矩阵变量,需要手动开启矩阵变量,将UrlPathHelper的removeSemicolonContent设置为false
@Configuration(proxyBeanMethods = false)
public class WebConfig implements WebMvcConfigurer {
    @Override
    public void configurePathMatch(PathMatchConfigurer configurer) {

        UrlPathHelper urlPathHelper = new UrlPathHelper();
        // 不移除;后面的内容。矩阵变量功能就可以生效
        urlPathHelper.setRemoveSemicolonContent(false);
        configurer.setUrlPathHelper(urlPathHelper);
    }
}
b> 以http://localhost:8080/cars/sell;low=34;brand=byd,audi,yd访问路径为例
@GetMapping("/cars/{path}")
public Map carsSell(@MatrixVariable(value = "low",pathVar = "path") Integer low,
                    @MatrixVariable(value = "brand",pathVar = "path") List<String> brand,
                    @PathVariable("path") String path){
    Map<String, Object> map = new HashMap<>();
    map.put("low", low);
    map.put("brand", brand);
    map.put("path", path);
    return map;
}
结果:{“path”:“sell”,“low”:34,“brand”:[“byd”,“audi”,“yd”]}
2.2 ServletAPI
WebRequest、ServletRequest、MultipartRequest、 HttpSession、javax.servlet.http.PushBuilder、Principal、InputStream、Reader、HttpMethod、Locale、TimeZone、ZoneId
原理分析:
-
执行核心处理目标方法:invocableMethod.invokeAndHandle(webRequest,mavContainer)
-
执行完invokeForRequest(webRequest, mavContainer, providedArgs)后,执行自定义的目标方法controller
-
获取目标方法中所有参数值
-
遍历找到支持该参数的解析器
-
调用ServletRequestMethodArgumentResolver来处理以上的参数
-
2.3 复杂参数
-
Mapmap.put() -
Model modelmodel.addAttribute() -
**
HttpServletRequest request** request.setAttribute()三者可以给request域中放数据,用HttpServletRequest
request.getAttribute()或者@RequestAttribute获取 -
ServletResponse:response响应
@RequestMapping("/goto")
public String gotoPage(Map<String, Object> map,
                       Model model,
                       HttpServletRequest request,
                       HttpServletResponse response){
    model.addAttribute("bf","fkd");
    request.setAttribute("gf", "wz");
    map.put("msg", "love");
    //添加cookie
    response.addCookie(new Cookie("k1", "v1"));
    return "forward:/success";
}

@ResponseBody
@RequestMapping("/success")
public Map<String, Object> success(@RequestAttribute("gf") String gf,
                                   HttpServletRequest request){
    Object bf = request.getAttribute("bf");
    Object msg = request.getAttribute("msg");
    Map<String, Object> map = new HashMap<>();
    map.put("msg", msg);
    map.put("gf", gf);
    map.put("bf", bf);
    return map;
}
- RedirectAttributes:重定向携带数据
原理分析:Map与Model model解析
-
执行目标方法invokeForRequest(webRequest, mavContainer, providedArgs)获取请求
-
解析参数,getMethodArgumentValues(request, mavContainer, providedArgs)
-
遍历解析器,
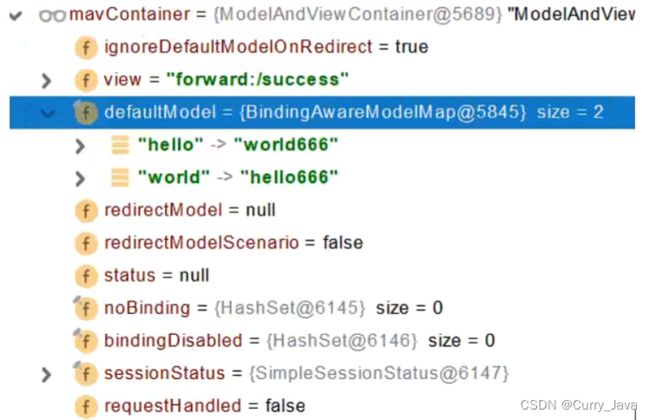
Map参数用MapMethodProcessor处理,Model model用ModelMethodProcessor处理;- Map类型的参数,会调用ModelAndViewContainer mavContainer.getModel(),得到BindingAwareModelMap 对象
- Model类型的参数,也会调用mavContainer.getModel(),得到相同BindingAwareModelMap 对象
-
invokeForRequest中方法doInvoke(args)执行目标方法的内容
-
-
处理返回结果handleReturnValue,传入mavContainer,包含模型(数据)和视图(跳转地址)
-
目标方法执行完成后,会将所有的数据都放在ModelAndViewContainer,包含要去的地址View和Model数据
- 将数据封装到ModelAndViewd对象
- 处理派发结果processDispatchResult(processedRequest, response, mappedHandler, mv, dispatchException)
- renderMergedOutputModel(mergedModel, getRequestToExpose(request), response)
- 视图解析流程
- 渲染合并的输出模型,renderMergedOutputModel(mergedModel, getRequestToExpose(request), response)
- 暴露模型作为请求域属性,exposeModelAsRequestAttributes(model, request)
- 遍历model数据,底层调用HttpServletRequest request.setAttribute(name, Value)放在请求域中
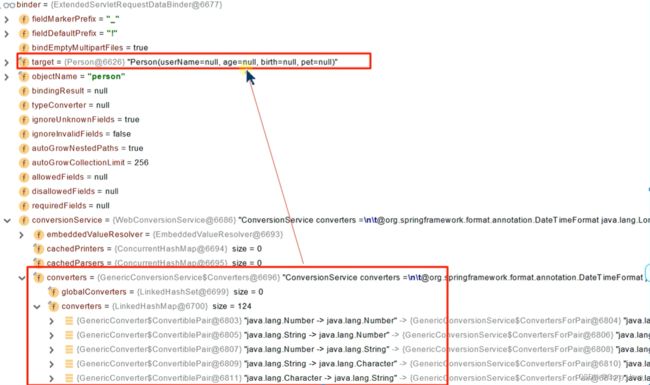
2.4 自定义对象Pojo绑定
可以自动绑定属性和级联封装
定义实体类对象pojo:
- 级联属性默认触发了JavaBean底层的级联封装规则
/**
 *     姓名:

 *     年龄:

 *     生日:

 *     宠物姓名:

 *     宠物年龄:
 */
@Data
public class Person {

    private String userName;
    private Integer age;
    private Date birth;
    private Pet pet;

}

@Data
public class Pet {

    private String name;
    private Integer age;

}
控制器方法:
@RestController
public class ParameterTestController {

    /**
     * 数据绑定:页面提交的请求数据(GET、POST)都可以和对象属性进行绑定
     * @param person
     * @return
     */
    @PostMapping("/saveuser")
    public Person saveuser(Person person){
        return person;
    }
}
输出json对象:{“userName”:“wz”,“age”:23,“birth”:“1998-12-21T16:00:00.000+00:00”,“pet”:{“name”:“dog”,“age”:2}}
3. POJO封装过程
3.1 原理分析
封装过程用到ServletModelAttributeMethodProcessor这个参数处理器支持
-
判断是否是简单类型,否
-
创建空Person对象attribute = createAttribute(name, parameter, binderFactory, webRequest);
-
利用binderFactory创建一个web数据绑定器:WebDataBinder binder = binderFactory.createBinder(webRequest, attribute, name);
-
WebDataBinder 利用它里面的 **Converters (124个)**将请求数据转成指定的数据类型。再次封装到JavaBean中(即attribute)。
-
bindRequestParameters(binder, webRequest);执行该步后完成将请求参数绑定到javaBean中
-
得到所有请求参数的key-value对,封装成PropertyValue
-
底层利用反射进行赋值
-
在过程当中,用到GenericConversionService:在设置每一个值的时候,找它里面的所有converter哪个可以将这个数据类型(request带来参数的字符串)转换到指定的类型
-
-
3.2 自定义Converter
未来我们可以给WebDataBinder里面放自己的Converter,自定义类型封装规则,默认浏览器读到的都是String
需求:将字符串“猫猫,3”转换成Pet对象
//WebMvcConfigurer定制化SpringMVC的功能

@Configuration(proxyBeanMethods = false)
public class WebConfig implements WebMvcConfigurer {

    @Override
    public void addFormatters(FormatterRegistry registry) {
        registry.addConverter(new Converter<String, Pet>() {
            @Override
            public Pet convert(String source) {
                //规则:"猫猫,3"->Pet
                //字符串非空
                if (!StringUtils.hasText(source)){
                    String[] str = source.split(",");
                    Pet pet = new Pet();
                    pet.setName(str[0]);
                    pet.setAge(Integer.parseInt(str[1]));
                    return pet;
                }
                return null;
            }
        });
    }
}
4. 参数处理原理
这要从DispatcherServlet开始:
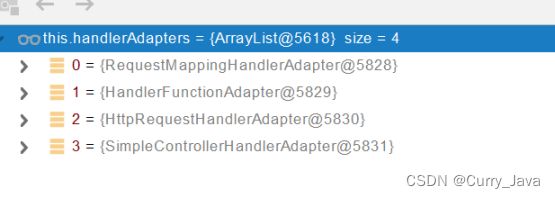
HandlerMapping中找到能处理请求的Handler(Controller.method())。- 为当前Handler 找一个适配器
HandlerAdapter,用的最多的是RequestMappingHandlerAdapter- 默认会加载所有
HandlerAdapter- 0.支持方法上标注
@RequestMapping - 1.支持函数式编程
- 0.支持方法上标注
- 默认会加载所有
- 适配器执行目标方法并确定方法参数的每一个值。
public class DispatcherServlet extends FrameworkServlet {

	protected void doDispatch(HttpServletRequest request, HttpServletResponse response) throws Exception {
        ModelAndView mv = null;
        ...
        // Determine handler adapter for the current request.
        HandlerAdapter ha = getHandlerAdapter(mappedHandler.getHandler());
        ...
		//本节重点
        // Actually invoke the handler.
        mv = ha.handle(processedRequest, response, mappedHandler.getHandler());
- mv = ha.handle(processedRequest, response, mappedHandler.getHandler());
HandlerAdapter接口实现类RequestMappingHandlerAdapter(主要用来处理@RequestMapping)- 执行目标方法:mav = invokeHandlerMethod(request, response, handlerMethod);
- 设置参数解析器argumentResolvers(26个对应参数注解),即确定将要执行的目标方法的每一个参数的值是什么
- 判断当前参数解析器是否支持解析折中参数,支持就调用 resolveArgument
- 设置controller目标方法返回值处理器returnValueHandlers(15种)
- 将返回值处理器,参数解析器都放到了目标方法包装的
invocableMethod中 - 执行核心处理目标方法:invocableMethod.invokeAndHandle(webRequest,mavContainer)
- 执行完invokeForRequest(webRequest, mavContainer, providedArgs)后,执行自定义的目标方法controller
- getMethodArgumentValues(request, mavContainer, providedArgs)获取目标方法中所有参数值
- 挨个遍历参数解析器找到支持该参数的解析器(HandlerMethodArgumentResolver resolver),找到后放入缓存,方便下次取
- 调用解析器HandlerMethodArgumentResolver解析这个参数的值
- 设置参数解析器argumentResolvers(26个对应参数注解),即确定将要执行的目标方法的每一个参数的值是什么
四、数据响应与内容协商
- 响应页面:进行视图解析和页面跳转
- 响应数据:前后端分离,后端给前端响应json数据
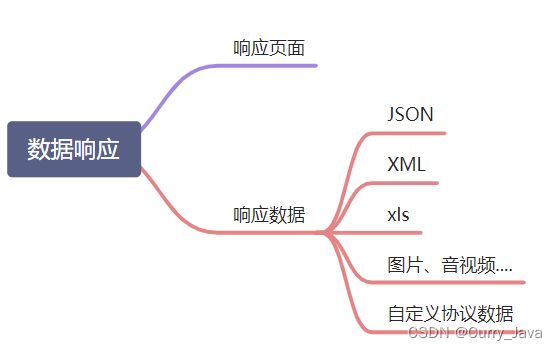
1. 响应JSON
1.1 jackson.jar + @ResponseBody
- 假设给前端自动返回json数据,需要引入相关的依赖:
<dependency>
    <groupId>org.springframework.bootgroupId>
    <artifactId>spring-boot-starter-webartifactId>
dependency>
--------------------------------------------------------

<dependency>
    <groupId>org.springframework.bootgroupId>
    <artifactId>spring-boot-starter-jsonartifactId>
    <version>2.6.7version>
    <scope>compilescope>
dependency>
- 在控制层上方法加@ResponseBody
@Controller
public class ResponseTestController {

	@ResponseBody  //利用返回值处理器里面的消息转换器进行处理
    @GetMapping(value = "/test/person")
    public Person getPerson(){
        Person person = new Person();
        person.setAge(28);
        person.setBirth(new Date());
        person.setUserName("zhangsan");
        return person;
    }
}
原理:返回值解析器ReturnValueHandler(15个)
-
调用
returnValueHandlers.handleReturnValue(returnValue, getReturnValueType(returnValue), mavContainer, webRequest)返回值处理器,来处理返回值 -
返回值处理器判断是否支持这种类型返回值
supportsReturnType -
返回值处理器调用
handleReturnValue处理 -
调用RequestResponseBodyMethodProcessor处理器,可以处理返回值标了@ResponseBody 的注解
-
利用消息转换器
MessageConverters,进行writeWithMessageConverters处理,将数据写为json- 内容协商(浏览器默认会以请求头的方式告诉服务器他能接受什么样的内容类型,浏览器能接受json数据,q=0.8)
-

- 服务器最终根据自己自身的能力,决定服务器能生产出什么样内容类型的数据,Json数据

- SpringMVC会挨个遍历所有容器底层的 `HttpMessageConverter` ,看谁能处理?
  - 得到`MappingJackson2HttpMessageConverter`可以将对象写为json
  - 利用`MappingJackson2HttpMessageConverter`将对象转为json再写出去。
SpringMVC支持返回值:
- ModelAndView
- Model
- View
- ResponseEntity
- ResponseBodyEmitter
- StreamingResponseBody
- HttpEntity
- HttpHeaders
- Callable
- DeferredResult
- ListenableFuture
- CompletionStage
- WebAsyncTask
- 有 @ModelAttribute 且为对象类型的
- @ResponseBody 注解 ---> RequestResponseBodyMethodProcessor
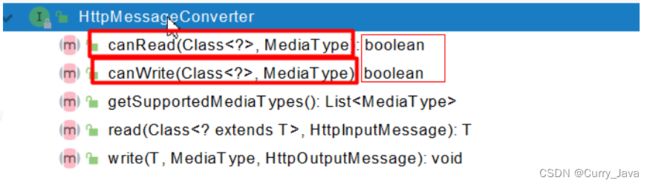
1.2 HTTPMessageConverter原理
HttpMessageConverter: 看是否支持将此Class类型的对象,转为MediaType类型的数据。
例子:
Person对象转为JSON,或者 JSON转为Person,这将用到MappingJackson2HttpMessageConverter
默认MessageConverter:
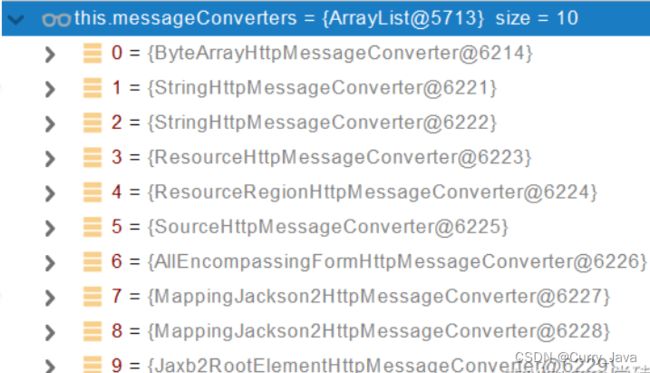
0 - 只支持Byte类型的
1 - String,支持字符集utf-8
2 - String,支持byte[]数组类型,支持字符集ISO-8859-1
3 - Resource
4 - ResourceRegion
5 - DOMSource.class \ SAXSource.class) \ StAXSource.class \StreamSource.class \Source.class
6 - MultiValueMap
7 - true ,  ==任何类型都支持(导入jackson才有)==
8 - true,任何类型都支持
9 - 支持注解方式xml处理的
- 最终 MappingJackson2HttpMessageConverter 把对象转为JSON(利用底层的jackson的objectMapper转换的)
2. 内容协商
根据客户端(比如浏览器)接收能力不同,返回不同媒体类型的数据(json,xml…)
举例:返回xml数据类型
- 引入XML依赖即可:
<dependency>
     <groupId>com.fasterxml.jackson.dataformatgroupId>
     <artifactId>jackson-dataformat-xmlartifactId>
dependency>
-
可用Postman软件分别测试返回json和xml:
-
只需要改变请求头中Accept字段(application/json、application/xml)
-
Http协议中规定的,Accept字段告诉服务器本客户端可以接收的数据类型
-
2.1 内容协商原理
-
判断当前响应头中是否已经有确定的媒体类型
MediaType。即要返回的数据类型。 -
获取客户端(PostMan、浏览器)支持接收的内容类型。(获取客户端Accept请求头字段application/xml)
a>
contentNegotiationManager内容协商管理器 默认使用基于请求头的策略

HeaderContentNegotiationStrategy确定客户端可以接收的内容类型
- 遍历循环所有当前系统的
MessageConverter,看谁支持操作这个对象(Person)

-
找到支持操作Person的converter,把converter支持的媒体类型统计出来
-
客户端需要application/xml,服务端能够产出10种
MediaType
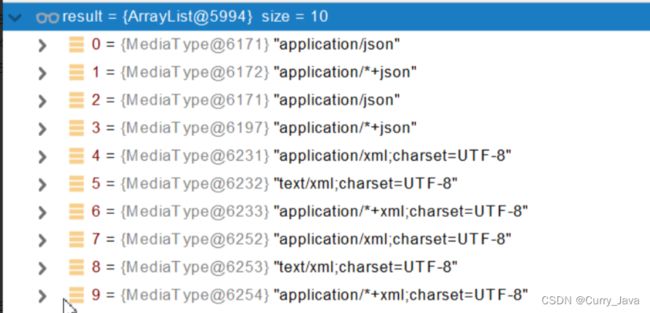
-
进行内容协商的最佳匹配媒体类型
-
调用支持将对象转为最佳匹配媒体类型的converter(即将Person类型转化为xml类型的converter)进行转化
2.2 开启浏览器参数方式内容协商功能
- 因为浏览器不方便更改请求头,为了方便内容协商,开启浏览器基于请求参数的内容协商功能。
spring:
  mvc:
    contentnegotiation:
      favor-parameter: true  #开启请求参数内容协商模式
-
然后,浏览器地址输入带format参数的URL:
- http://localhost:8080/person?format=json
- http://localhost:8080/person?format=xml
-
这样,后端会根据参数format的值,返回对应json或xml格式的数据。
原理:
此时由Spring容器注入了一个
ParameterContentNegotiationStrategy到内容协商管理器中,参数策略优先确定,获取参数format的值

2.3 自定义MessageConverter
- 实现多协议数据兼容。json、xml、x-fkd(这个是自创的):
@ResponseBody响应数据出去 调用RequestResponseBodyMethodProcessor处理- Processor 处理方法返回值。通过
MessageConverter处理 - 所有
MessageConverter合起来可以支持各种媒体类型数据的操作(读、写) - 内容协商(客户端需要的数据类型与底层支持的数据类型匹配)找到最终的
messageConverter
- 需求:
1、浏览器发请求直接返回 xml [application/xml] jacksonXmlConverter
2、如果是ajax请求返回 json [application/json] jacksonJsonConverter
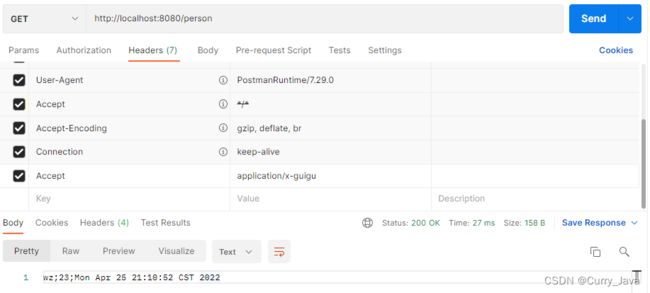
3、如果硅谷app发请求,返回自定义协议数据 [appliaction/x-guigu] xxxxConverter
属性值1;属性值2;
- 实现步骤:
1、添加自定义的MessageConverter进系统底层
2、系统底层就会统计出所有MessageConverter能操作哪些类型
3、客户端内容协商 [guigu--->guigu]
- 定制SpringMVC的无论什么功能,在configure类给容器中添加一个
WebMvcConfigurer
@Configuration(proxyBeanMethods = false)
public class WebConfig implements WebMvcConfigurer {
    @Override
    public void extendMessageConverters(List<HttpMessageConverter<?>> converters) {
        converters.add(new GuiguMessageConverter());
    }
}
- 自定义Converter
/**
* 自定义的Converter
*/
public class GuiguMessageConverter implements HttpMessageConverter<Person> {
@Override
public boolean canRead(Class<?> clazz, MediaType mediaType) {
return false;
}
@Override
public boolean canWrite(Class<?> clazz, MediaType mediaType) {
return clazz.isAssignableFrom(Person.class);
}
/**
* 服务器要统计所有MessageConverter都能写出哪些内容类型
*
* application/x-guigu
* @return
*/
@Override
public List<MediaType> getSupportedMediaTypes() {
return MediaType.parseMediaTypes("application/x-guigu");
}
@Override
public Person read(Class<? extends Person> clazz, HttpInputMessage inputMessage) throws IOException, HttpMessageNotReadableException {
return null;
}
@Override
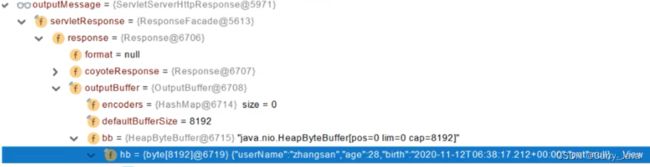
public void write(Person person, MediaType contentType, HttpOutputMessage outputMessage) throws IOException, HttpMessageNotWritableException {
//自定义协议数据的写出
String data = person.getUserName()+";"+person.getAge()+";"+person.getBirth();
//写出去
OutputStream body = outputMessage.getBody();
body.write(data.getBytes());
}
}
- 用Postman发送
/person(请求头Accept:application/x-guigu),将返回自定义协议数据的写出。
2.4 浏览器与PostMan内容协商完全适配
基于自定义请求参数的自定义内容协商功能
需求:在地址栏输入http://localhost:8080/person?format=atguigu返回数据,跟http://localhost:8080/person且请求头参数Accept:application/x-guigu的返回自定义协议数据的一致
@Configuration(proxyBeanMethods = false)
public class WebConfig implements WebMvcConfigurer {

    @Override
    public void configureContentNegotiation(ContentNegotiationConfigurer configurer) {
        //Map mediaTypes
        Map<String, MediaType> mediaTypes = new HashMap<>();
        mediaTypes.put("json", MediaType.APPLICATION_JSON);
        mediaTypes.put("xml",MediaType.APPLICATION_XML);
        //自定义媒体类型
        mediaTypes.put("atguigu",MediaType.parseMediaType("application/x-guigu"));
        //指定支持解析哪些参数对应的哪些媒体类型
        ParameterContentNegotiationStrategy parameterStrategy = new ParameterContentNegotiationStrategy(mediaTypes);
        //还需添加请求头处理策略,否则accept:application/json、application/xml则会失效
        HeaderContentNegotiationStrategy headeStrategy = new HeaderContentNegotiationStrategy();

        configurer.strategies(Arrays.asList(parameterStrategy, headeStrategy));
    }
}
日后开发要注意,有可能我们添加的自定义的功能会覆盖默认很多功能,导致一些默认的功能失效
五、视图解析与模板引擎
视图解析:SpringBoot默认不支持 JSP,需要引入第三方模板引擎技术实现页面渲染
thymeleaf:服务端Java模板引擎,在页面没有经过服务端渲染或者无法获取数据的情况下,会保持标签的默认使用
1. 视图解析原理流程
视图解析原理流程:
-
目标方法处理的过程中,所有数据都会被放在
ModelAndViewContainer里面,其中包括数据和视图地址
a>: 方法的参数是一个自定义类型对象(从请求参数中确定的),把他重新放在ModelAndViewContainer。 -
任何目标方法执行完成以后都会返回
ModelAndView(数据和视图地址)。 -
processDispatchResult()处理派发结果(页面改如何响应)a>
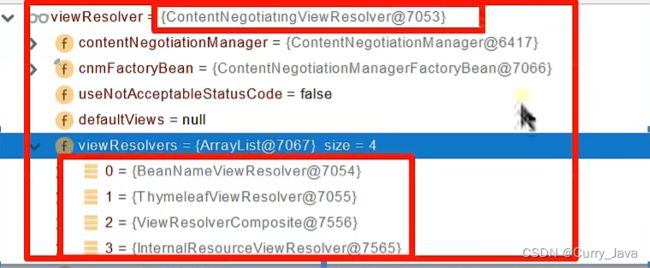
render(mv, request, response);进行页面渲染逻辑根据方法的`String`返回值得到 `View` 对象【==定义了页面的渲染逻辑==】(1) 遍历所有的视图解析器尝试是否能根据当前返回值内容协商得到
View对象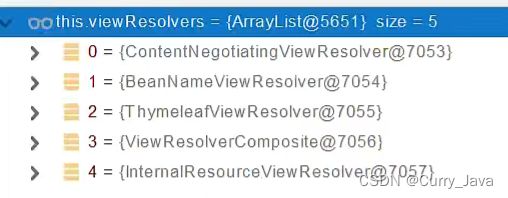
(2)ContentNegotiationViewResolver里面包含了下面所有的视图解析器,内部还是利用下面所有视图解析器得到视图对象
(3) 得到了redirect:/mapMain --> 调用ThymeleafViewController解析器 new RedirectView()
(4) view.render(mv.getModelInternal(), request, response); 视图对象view调用自定义的render进行页面渲染工作
RedirectView如何渲染【重定向到一个页面】- 获取目标url地址(/mapMain)
response.sendRedirect(encodedURL);
视图解析:
- 返回值以
forward:开始:new InternalResourceView(forwardUrl);--> 转发request.getRequestDispatcher(path).forward(request, response); - 返回值以
redirect:开始:new RedirectView()--> render就是重定向 - 返回值是普通字符串:
new ThymeleafView()
2. Thymeleaf语法
2.1 基本语法
- 表达式
| 表达式名字 | 语法 | 用途 |
|---|---|---|
| 变量取值 | ${…} | 获取请求域request{user.name}、session域${session.user.name}、对象等值 |
| 选择变量 | *{…} | 获取上下文对象值 |
| 消息 | #{…} | 获取国际化等值 |
| 链接 | @{…} | 生成链接 |
| 片段表达式 | ~{…} | jsp:include 作用,引入公共页面片段 |
-
字面量
-
文本值:‘one text’,‘Another one!’,…
-
数字: 0 ,34 , 3.0,12.3 ,…
-
布尔值: true ,false
-
空值: null
-
变量: one,two,… 变量不能有空格
-
-
文本操作
-
字符串拼接: +
-
变量替换: |The name is ${name}|
-
-
数学运算
- 运算符: + , - , * , / , %
-
布尔运算
-
运算符: and , or
-
一元运算: ! , not
-
-
比较运算
-
比较: > , < , >= , <= ( gt , lt , ge , le )
-
等式: == , != ( eq , ne )
-
-
条件运算
-
If-then: (if) ? (then)
-
If-then-else: (if) ? (then) : (else)
-
Default: (value) ?: (defaultvalue)
-
-
特殊操作
- 无操作: _
2.2 设置属性值
<input type="submit" value="Subscribe!" th:value="#{subscribe.submit}"/>
<form action="subscribe.html" th:action="@{/subscribe}">
2.3 迭代
<tr th:each="prod : ${prods}">
    <td th:text="${prod.name}">Onionstd>
    <td th:text="${prod.price}">2.41td>
    <td th:text="${prod.inStock}? #{true} : #{false}">yestd>
tr>
<tr th:each="prod,status : ${prods}">
    <td th:text="${prod.name}">Onionstd>
    <td th:text="${prod.price}">2.41td>
    <td th:text="${status.count}">yestd>
tr>
2.4 条件运算
<a href="comments.html"
	th:href="@{/product/comments(prodId=${prod.id})}"
	th:if="${not #lists.isEmpty(prod.comments)}">viewa>
<div th:switch="${user.role}">
      <p th:case="'admin'">User is an administratorp>
      <p th:case="#{roles.manager}">User is a managerp>
      <p th:case="*">User is some other thingp>
div>
2.5 内联写法
thymeleaf内联写法:
<p>Hello, [[${session.user.name}]]p>
3. Thymeleaf使用
thymeleaf只会针对绝对路径自动拼接项目路径,相对路径不会做拼接操作
3.1 引入Starter
<dependency>
    <groupId>org.springframework.bootgroupId>
    <artifactId>spring-boot-starter-thymeleafartifactId>
dependency>
3.2 已经自动配置好了thymeleaf
@Configuration(proxyBeanMethods = false)
@EnableConfigurationProperties(ThymeleafProperties.class)
@ConditionalOnClass({ TemplateMode.class, SpringTemplateEngine.class })
@AutoConfigureAfter({ WebMvcAutoConfiguration.class, WebFluxAutoConfiguration.class })
public class ThymeleafAutoConfiguration {
    ...
}
自动配好的策略
- 所有thymeleaf的配置值都在 ThymeleafProperties
public static final String DEFAULT_PREFIX = "classpath:/templates/";//模板放置处
public static final String DEFAULT_SUFFIX = ".html";//文件的后缀名
- 配置好了模板引擎 SpringTemplateEngine
- 配好了视图 解析器ThymeleafViewResolver
- 我们只需要直接开发页面
3.3 直接开发页面
- 编写一个控制层:
@RequestMapping("/hello1")
public String Hello(Model model){
    model.addAttribute("msg", "wzz");
    model.addAttribute("location","http://wwww.baidu.com");
    return "success";
}
- 渲染的页面
/templates/success.html:
DOCTYPE html>
<html lang="en" xmlns:th="http://www.thymeleaf.org">
<head>
    <meta charset="UTF-8">
    <title>Titletitle>
head>
<body>
<h1 th:text="${msg}">h1>
<h2>
    <a th:href="${location}">百度a>
    <a th:href="@{/Hello}">Helloa>
h2>
body>
html>
/Hello:设置的是绝对路径,即 http://localhost:8080/Hello
- 增加服务器的前置访问路径
server:
  servlet:
    context-path: /app
这个设置后,URL要插入/app, 如http://localhost:8080/app/hello.html。
4. 构建后台管理系统
4.1 项目构建
使用IDEA的Spring Initializr:
导入thymeleaf、web-starter、devtools、lombok依赖
4.2 静态资源处理
已经自动配置了处理器,我们只需要把所有静态资源放到 static 文件夹下
/static放置 css,js等静态资源/templates/login.html登录页/templates/main.html主页
4.3 路径构建
th:action="@{/login}”
4.4 模板抽取
抽取左侧和上方导航栏common.html
th:fragment="xxx"声明公共部分
引用:
th:include; th:replace; th:insert
- 抽取模板页面:common.html
DOCTYPE html>
<html lang="en" xmlns:th="http://www.thymeleaf.org">
<head th:fragment="commonheader">

    <link href="css/style.css" th:href="@{css/style.css}" rel="stylesheet">


head>
<body>

    <div th:fragment="leftmenu" class="left-side sticky-left-side"...>div>


	<div th:fragment="headermenu" class="header-section".../>


<div th:fragment="commonscript">
    <script th:src="@{js/jquery-1.10.2.min.js}">script>
    <script th:src="@{js/jquery-ui-1.9.2.custom.min.js}">script>
    <script th:src="@{js/jquery-migrate-1.2.1.min.js}">script>
    <script th:src="@{js/bootstrap.min.js}">script>
    <script th:src="@{js/modernizr.min.js}">script>
    <script th:src="@{js/jquery.nicescroll.js}">script>

    <script th:src="@{js/scripts.js}">script>
div>

body>
html>
- basic_table.html引用公共部分
DOCTYPE html>
<html lang="en" xmlns:th="http://www.thymeleaf.org">
<head>
  <meta charset="utf-8">
  <meta name="viewport" content="width=device-width, initial-scale=1.0, maximum-scale=1.0">
  <meta name="description" content="">
  <meta name="author" content="ThemeBucket">
  <link rel="shortcut icon" href="#" type="image/png">

  <title>Basic Tabletitle>

    <link th:replace="table/common :: commonheader">
head>

<body class="sticky-header">

<section>

    <div th:replace="table/common :: leftmenu">div>


    <div class="main-content".../>

section>


<div th:replace="table/common :: commonscript">div>

body>
html>
官方文档 - Template Layout
4.5 页面跳转
- 重定向redirect:/不能直接访问template里的页面,可以访问任何其他资源
- 转发forward:/能访问template里的页面,只能访问服务器内资源
@Controller
public class IndexController {

    /**
     * 登录页
     * @return
     */
    @RequestMapping(value = {"/","/login"})
    public String loginPage(){

        return "login";
    }
    @PostMapping("/login")
    public String main(User user, HttpSession session, Model model){
        if (StringUtils.hasText(user.getUserName()) && user.getPassword().equals("123456")){
            //把登录成功的用户保存起来
            session.setAttribute("loginUser", user);
            //登录成功重定向到mapMain,重定向防止表单重复提交
            return "redirect:/mapMain";
        }else{
            //存入错误信息
            model.addAttribute("msg", "账号或密码错误");
            return "/login";
        }
    }
    @GetMapping("mapMain")
    public String mainPage(HttpSession session,Model model){
        //是否登录?  拦截器、过滤器
        Object loginUser = session.getAttribute("loginUser");
        if (loginUser != null){
            return "main";
        }else {
            model.addAttribute("msg", "请重新登录");
            return "/login";
        }
    }
}
- 模型
@AllArgsConstructor
@NoArgsConstructor
@Data
public class User {
    private String userName;
    private String password;
}
4.6 数据渲染
遍历输出表格数据
- 控制层
@GetMapping("/dynamic_table")
public String dynamic_table(Model model){
    List<User> users = Arrays.asList(new User("fkd", "123456"),
                                     new User("wzz", "123456"),
                                     new User("lzj", "123456"),
                                     new User("WL", "123456"),
                                     new User("yjw", "123456"));
    model.addAttribute("users",users);
    return "table/dynamic_table";
}
- 页面
<table class="display table table-bordered" id="hidden-table-info">
    <thead>
        <tr>
            <th>#th>
            <th>用户名th>
            <th>密码th>
        tr>
    thead>
    <tbody>
        <tr class="gradeX" th:each="user,status: ${users}">
            <td th:text="${status.count}">td>
            <td>[[${user.userName}]]td>
            <td>[[${user.password}]]td>
        tr>
    tbody>
table>
六、拦截器
登录检查与静态资源放行,要实现
HandlerInterceptor接口
1. 配置拦截器
- 编写一个拦截器实现
HandlerInterceptor接口
@Slf4j
public class LoginInterceptor implements HandlerInterceptor {

    /**
     * 在目标方法执行之前
     * @param request
     * @param response
     * @param handler
     * @return true:放行  false:拦截
     * @throws Exception
     */
    @Override
    public boolean preHandle(HttpServletRequest request, HttpServletResponse response, Object handler) throws Exception {

        String uri = request.getRequestURI();
        log.info("preHandle拦截的请求路径是{}", uri);
        //登录检查逻辑
        HttpSession session = request.getSession();
        Object user = session.getAttribute("loginUser");
        if (user != null){
            //放行
            return true;
        }
        request.setAttribute("msg","请重新登录");
        //未登录,拦截住,跳转到登录页面
        //response.sendRedirect("/");
        request.getRequestDispatcher("/").forward(request,response);

        return false;
    }

    /**
     * 目标方法执行之后
     * @param request
     * @param response
     * @param handler
     * @param modelAndView
     * @throws Exception
     */
    @Override
    public void postHandle(HttpServletRequest request, HttpServletResponse response, Object handler, ModelAndView modelAndView) throws Exception {
        HandlerInterceptor.super.postHandle(request, response, handler, modelAndView);
    }

    /**
     * 页面渲染完成以后
     * @param request
     * @param response
     * @param handler
     * @param ex
     * @throws Exception
     */
    @Override
    public void afterCompletion(HttpServletRequest request, HttpServletResponse response, Object handler, Exception ex) throws Exception {
        HandlerInterceptor.super.afterCompletion(request, response, handler, ex);
    }
}
-
拦截器注册到容器中(实现
WebMvcConfigurer的addInterceptors()),并制定拦截规则(注意,如果是拦截所有,静态资源也会被拦截)
@Configuration
public class AdminWebConfig implements WebMvcConfigurer {

    @Override
    public void addInterceptors(InterceptorRegistry registry) {
        //将拦截器注册到容器中.拦截所有请求.放行的请求
        registry.addInterceptor(new LoginInterceptor())
                .addPathPatterns("/**")
                .excludePathPatterns("/","/login","/css/**","/fonts/**","/images/**","/js/**");
    }
}
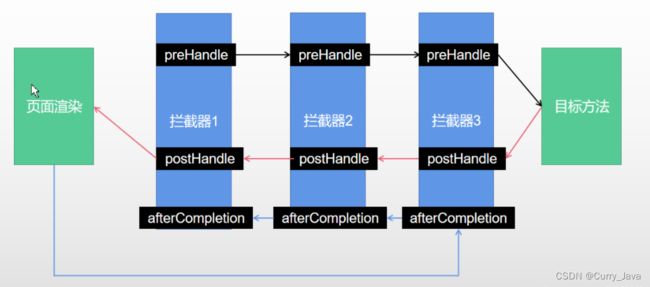
2. 拦截器原理
拦截器同filter执行顺序差不多,顺序进来,倒序出去
-
根据当前请求,找到
HandlerExecutionChain(可以处理请求的handler以及handler的所有拦截器链) -
先按顺序执行所有拦截器的
preHandle()方法。-
如果当前拦截器
preHandle()返回为true。则执行下一个拦截器的preHandle() -
如果当前拦截器返回为
false。直接从当前拦截器倒序执行所有已经执行了的拦截器的afterCompletion();。 -
如果任何一个拦截器返回
false,直接跳出不执行目标方法。 -
所有拦截器都返回
true,才执行目标方法。
-
-
倒序执行所有拦截器的
postHandle()方法。 -
(都执行)前面的步骤有任何异常都会直接从当前拦截器倒序触发
afterCompletion();页面成功渲染完成以后,也会倒序触发afterCompletion()。
七、文件上传
1. 单文件与多文件上传
单文件:input type=“file” name=“headerImg” id=“exampleInputFile”>
多文件:input type=“file” name=“photos” multiple>
表单提交路径:form role=“form” th:action=“@{/upload}” method=“post” enctype=“multipart/form-data”>
- 页面代码
/static/form/form_layouts.html
<form role="form" th:action="@{/upload}" method="post" enctype="multipart/form-data">
    <div class="form-group">
        <label for="exampleInputEmail1">邮箱label>
        <input type="email" class="form-control" id="exampleInputEmail1" placeholder="Enter email">
    div>
    <div class="form-group">
        <label for="exampleInputPassword1">名字label>
        <input type="text" name="username" class="form-control" id="exampleInputPassword1" placeholder="username">
    div>
    <div class="form-group">
        <label for="exampleInputFile">头像label>
        <input type="file" name="headerImg" id="exampleInputFile">
    div>
    <div class="form-group">
        <label for="exampleInputFile">生活照label>
        <input type="file" name="photos" multiple>
    div>
    <div class="checkbox">
        <label>
            <input type="checkbox"> Check me out
        label>
    div>
    <button type="submit" class="btn btn-primary">提交button>
form>
- 控制层代码:
- MultipartFile自动封装上传过来的文件
- **@RequestPart(“values”)**注解接收上传过来的文件
- 调用封装的保存到磁盘路径的方法transforTo(File file)
 /**
     * MultipartFile 自动封装上传过来的文件
     * @param username
     * @param email
     * @return
     */
    @PostMapping("/upload")
    public String upload(@RequestParam("username") String username,
                         @RequestParam("email") String email,
                         @RequestPart("headerImg") MultipartFile headerImg,
                         @RequestPart("photos") MultipartFile[] photos) throws IOException {
        //保存文件到文件服务器,OSS服务器
        if (!headerImg.isEmpty()){
            String filename = headerImg.getOriginalFilename();
            headerImg.transferTo(new File("D:\\cache\\header\\"+filename));
        }
        if (photos.length > 0){
            for(MultipartFile photo: photos){
                String filename = photo.getOriginalFilename();
                photo.transferTo(new File("D:\\cache\\photos\\"+filename));
            }
        }
        return "main";
    }
- 文件大小相关配置项:
spring:
  servlet:
    multipart:
      max-request-size: 32MB
      max-file-size: 4MB
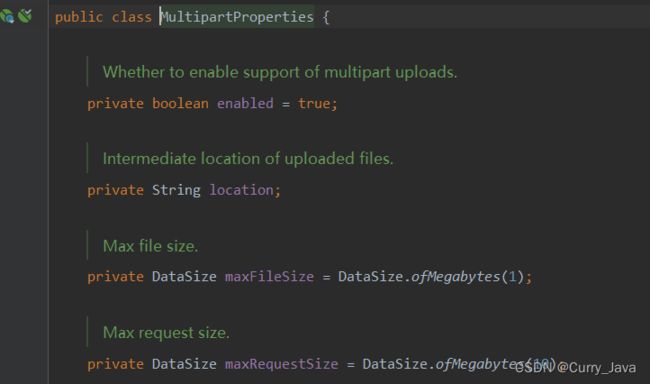
2. 自动配置原理
文件上传自动配置类—MultipartAutoConfiguration—MultipartProperties
- 自动配置【文件上传参数解析器】
StandardServletMultipartResolver - 原理步骤
- 请求进来使用文件上传解析器判断(
multipartResolver.isMultipart),并封装(调用resolveMultipart方法,返回MultipartHttpServletRequest类型)文件上传请求 - 参数解析器
requestPartMethodArgumentResolver来解析请求中的文件内容封装成MultipartFile - 将request中文件信息封装为一个Map;
MultiValueMap。内部使用FileCopyUtiles实现文件流的拷贝
- 请求进来使用文件上传解析器判断(
八、异常处理
1. 异常处理默认规则
Spring Boot官方文档 - Error Handling
默认规则:
-
默认情况下,Spring Boot提供
/error处理所有错误的映射- 机器客户端(postman),它将生成JSON响应,其中包含错误,HTTP状态和异常消息的详细信息
{ "timestamp": "2020-11-22T05:53:28.416+00:00", "status": 404, "error": "Not Found", "message": "No message available", "path": "/asadada" }- 对于浏览器客户端,响应一个“ whitelabel”错误视图,以HTML格式呈现相同的数据
-
要对其进行自定义,添加
View解析为error-
要完全替换默认行为,可以实现
ErrorController并注册该类型的Bean定义,或添加ErrorAttributes类型的组件以使用现有机制但替换其内容。 -
/templates/error/或/public/error/下的4xx,5xx页面会被自动解析;
-
2. 定制错误处理逻辑
- 方法一:自定义错误页(/templates/error/引入4xx或5xx页面)
- error/404.html error/5xx.html;
- 匹配逻辑:有精确的错误状态码404页面就匹配精确,没有就首字母匹配找4xx.html;如果都没有就触发白页
- 方法二(建议):
@ControllerAdvice+@ExceptionHandler处理全局异常;底层是 ExceptionHandlerExceptionResolver支持的
@Slf4j
@ControllerAdvice
public class GlobalExceptionHandler {
/**
* 定制要处理的异常逻辑
* @param e
* @return
*/
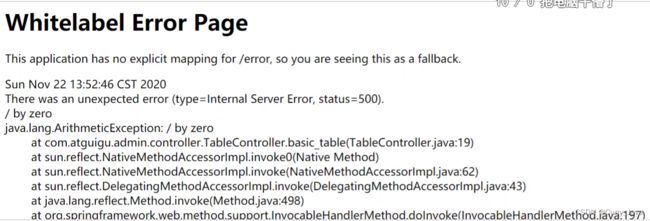
@ExceptionHandler({ArithmeticException.class,NullPointerException.class})
public String handleException(Exception e){
log.info("异常是{}",e);
return "login";
}
}
@ResponseStatus+自定义异常 ;- 底层是
ResponseStatusExceptionResolver,把responseStatus注解的信息底层调用response.sendError(statusCode, resolvedReason),tomcat发送的/error
- 底层是
package com.zju.admin.exception;

/**
 * 自定义异常处理
 */
@ResponseStatus(value = HttpStatus.FORBIDDEN, reason = "用户数量太多")
public class UserTooManyException extends RuntimeException{

    public UserTooManyException() {
    }

    public UserTooManyException(String message) {
        super(message);
    }
}
@GetMapping("/dynamic_table")
    public String dynamic_table(Model model){
        List<User> users = Arrays.asList(new User("fkd", "123456"),
                new User("wzz", "123456"),
                new User("lzj", "123456"),
                new User("WL", "123456"),
                new User("yjw", "123456"));
        if (users.size()>3){
            //抛出自定义异常
            throw new UserTooManyException();
        }
        model.addAttribute("users",users);
        return "table/dynamic_table";
    }
-
Spring框架底层的异常,如参数类型转换异常;由DefaultHandlerExceptionResolver 处理框架底层的异常。
response.sendError(HttpServletResponse.SC_BAD_REQUEST/*400*/, ex.getMessage());- 自定义实现
HandlerExceptionResolver处理异常;可以作为默认的全局异常处理规则
@Order(value= Ordered.HIGHEST_PRECEDENCE)  //优先级,数字越小优先级越高
@Component
public class CustomerHandlerExceptionResolver implements HandlerExceptionResolver {
    @Override
    public ModelAndView resolveException(HttpServletRequest request,
                                         HttpServletResponse response,
                                         Object handler, Exception ex) {
        try {
            response.sendError(511,"我喜欢的错误");
        } catch (IOException e) {
            e.printStackTrace();
        }
        return new ModelAndView();
    }
}
3. 异常处理自动配置原理
ErrorMvcAutoConfiguration 自动配置异常处理规则:
-
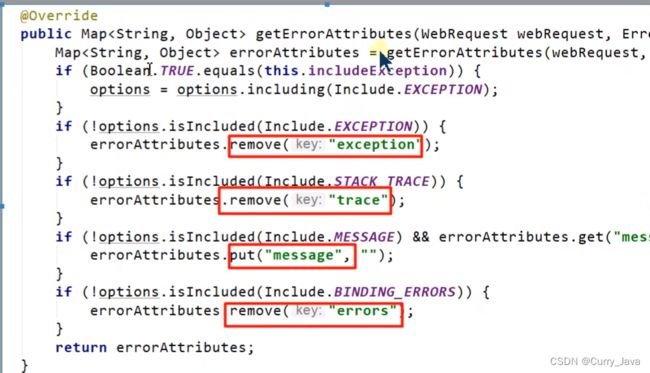
容器中的组件:类型:
DefaultErrorAttributes; id:errorAttributes(自定义错误信息内容)- 声明
public class DefaultErrorAttributes implements ErrorAttributes, HandlerExceptionResolver DefaultErrorAttributes:定义错误页面中可以包含数据(异常明细,堆栈信息等)。
- 声明
-
容器中的组件:类型:
BasicErrorController;id:basicErrorController(自定义json+白页,适配响应)-
处理默认
/error路径的请求,页面响应new ModelAndView("error", model); -
容器中有组件
View->id是error;(响应默认错误页) -
容器中放组件
BeanNameViewResolver(视图解析器);按照返回的视图名作为组件的id去容器中找View对象。
-
-
容器中的组件:类型:
DefaultErrorViewResolver;id:conventionErrorViewResolver(自定义错误页面访问路径)- 如果发生异常错误,会以HTTP的状态码作为视图页地址(viewName),找到真正的页面(主要作用)。
- 即解释了我们为什么将自定义的错误页名称定义为error/404、5xx.html
如果想要返回页面,就会找error视图(StaticView默认是一个白页)

4. 异常处理步骤流程
1、执行目标方法,目标方法运行期间有任何异常都会被catch、而且标志当前请求结束;并且用 dispatchException
2、进入视图解析流程(页面渲染?)
processDispatchResult(processedRequest, response, mappedHandler, mv, dispatchException);
3、mv = processHandlerException;处理handler发生的异常,处理完成返回ModelAndView;
-
遍历所有的 handlerExceptionResolvers,看谁能处理当前异常**【HandlerExceptionResolver处理器异常解析器】**
-
系统默认的异常解析器;
-
DefaultErrorAttributes先来处理异常。把异常信息保存到request域,并且返回null;
-
默认没有任何人能处理异常,所以异常会被抛出
- 1、如果没有任何人能处理最终底层就会发送 /error 请求。会被底层的BasicErrorController处理
- 2、解析错误视图;遍历所有的 ErrorViewResolver 看谁能解析。
- 3、默认的DefaultErrorViewResolver ,作用是把响应状态码作为错误页的地址,error/500.html
- 4、模板引擎最终响应这个页面 error/500.html
-
九、原生组件注入
web原生组件注入:Servlet、Filter、Listener
官方文档 - Servlets, Filters, and listeners
1. 使用Servlet API
-
在主启动类添加注解
@ServletComponentScan("com.zju.admin")来发现注册的组件 -
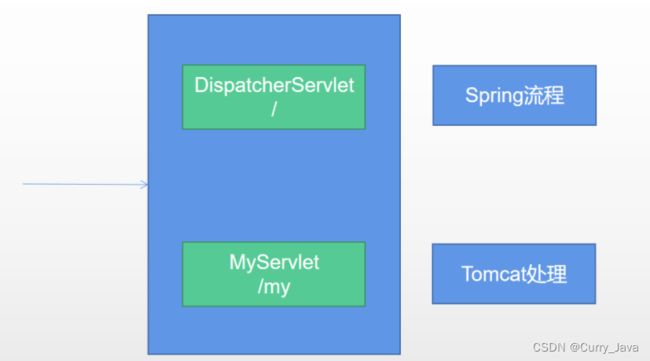
@WebServlet(urlPatterns = “/my”):效果:直接响应,没有经过Spring拦截器?
根据精确优先原则,DispatcherServlet处理"/“请求,MyServlet处理”/my"请求,更精确,所以由原生的servlet(Tomcat处理),而只有由DispatcherServlet(Spring)处理的请求才会经过spring的拦截器。效率不同。
@WebServlet(urlPatterns = "/my")
public class MyServlet extends HttpServlet {

    @Override
    protected void doGet(HttpServletRequest req, HttpServletResponse resp) throws ServletException, IOException {
        resp.getWriter().write("66666");
    }
}
- @WebFilter(urlPatterns={“/css/*”,“/images/*”})
@Slf4j
@WebFilter(urlPatterns={"/css/*","/images/*"}) //servlet写法是/*
public class MyFilter implements Filter {
    @Override
    public void init(FilterConfig filterConfig) throws ServletException {
        log.info("MyFilter初始化完成");
    }

    @Override
    public void doFilter(ServletRequest request, ServletResponse response, FilterChain chain) throws IOException, ServletException {
        log.info("MyFilter工作");
        chain.doFilter(request,response);
    }

    @Override
    public void destroy() {
        log.info("MyFilter销毁");
    }
}
- @WebListener
@Slf4j
@WebListener
public class MyServletContextListener implements ServletContextListener {


    @Override
    public void contextInitialized(ServletContextEvent sce) {
        log.info("MySwervletContextListener监听到项目初始化完成");
    }

    @Override
    public void contextDestroyed(ServletContextEvent sce) {
        log.info("MySwervletContextListener监听到项目销毁");
    }
}
2. Spring方式注入
ServletRegistrationBean, FilterRegistrationBean, and ServletListenerRegistrationBean
@Configuration(proxyBeanMethods = true)
public class MyRegistConfig {

    @Bean
    public ServletRegistrationBean myServlet(){
        MyServlet myServlet = new MyServlet();

        return new ServletRegistrationBean(myServlet,"/my","/my02");
    }


    @Bean
    public FilterRegistrationBean myFilter(){

        MyFilter myFilter = new MyFilter();
        FilterRegistrationBean filterRegistrationBean = new FilterRegistrationBean(myFilter);
        filterRegistrationBean.setUrlPatterns(Arrays.asList("/my","/css/*"));
        return filterRegistrationBean;
    }

    @Bean
    public ServletListenerRegistrationBean myListener(){
        MySwervletContextListener mySwervletContextListener = new MySwervletContextListener();
        return new ServletListenerRegistrationBean(mySwervletContextListener);
    }
}
3. DispatcherServlet如何注册
DispatcherServlet默认映射的是 / 路径,可以通过在配置文件修改spring.mvc.servlet.path=/mvc
- 容器中自动配置了DispatcherServlet,WebMvcProperties进行属性绑定。对应的配置文件配置项是 spring.mvc
- 通过 ServletRegistrationBean 把 DispatcherServlet 配置进来
- 默认映射的是 / 路径
- Tomcat-Servlet中多个Servlet都能处理到同一层路径,采用精确优选原则
十、嵌入式Web容器
1. 切换嵌入式Servlet容器
默认支持的WebServer
Tomcat,Jetty, orUndertowServletWebServerApplicationContext容器启动寻找ServletWebServerFactory并引导创建服务器
Spring Boot默认使用Tomcat服务器,若需更改其他服务器,则修改工程pom.xml:
<dependency>
    <groupId>org.springframework.bootgroupId>
    <artifactId>spring-boot-starter-webartifactId>
    <exclusions>
        <exclusion>
            <groupId>org.springframework.bootgroupId>
            <artifactId>spring-boot-starter-tomcatartifactId>
        exclusion>
    exclusions>
dependency>

<dependency>
    <groupId>org.springframework.bootgroupId>
    <artifactId>spring-boot-starter-jettyartifactId>
dependency>
2. 定制Servlet容器
-
修改配置文件:
server.xxx -
实现
WebServerFactoryCustomizer- 把配置文件的值和
ServletWebServerFactory进行绑定
- 把配置文件的值和
-
直接自定义
ConfigurableServletWebServerFactory
十一、定制化原理
1. 定制化的常见方式(深入后)
- 修改配置文件
- 编写自定义的配置类
xxxConfiguration+@Bean替换、增加容器中默认组件,视图解析器- Web应用 编写一个配置类实现
WebMvcConfigurer即可定制化web功能 +@Bean给容器中再扩展一些组件
- Web应用 编写一个配置类实现
@Configuration
public class AdminWebConfig implements WebMvcConfigurer{
    @Override
    public void addInterceptors(InterceptorRegistry registry) {...}
}s
-
xxxxxCustomizer -
@EnableWebMvc+WebMvcConfigurer—@Bean可以全面接管SpringMVC,所有规则全部自己重新配置; 实现定制和扩展功能(高级功能,初学者退避三舍)。
原理:WebMvcAutoConfiguration默认的SpringMVC的自动配置功能类,如静态资源、欢迎页等。- 一旦使用
@EnableWebMvc,会@Import(DelegatingWebMvcConfiguration.class)。 DelegatingWebMvcConfiguration的作用,只保证SpringMVC最基本的使用- 把所有系统中的
WebMvcConfigurer拿过来,所有功能的定制都是这些WebMvcConfigurer合起来一起生效。 - 自动配置了一些非常底层的组件,如
RequestMappingHandlerMapping,这些组件依赖的组件都是从容器中获取如。 public class DelegatingWebMvcConfiguration extends WebMvcConfigurationSupport。
- 把所有系统中的
WebMvcAutoConfiguration里面的配置要能生效必须@ConditionalOnMissingBean(WebMvcConfigurationSupport.class)。- @EnableWebMvc 导致了WebMvcAutoConfiguration 没有生效。
2. 源码分析套路
场景starter – **xxxxAutoConfiguration – 导入xxx组件(@Bean) – 绑定xxxProperties **-- 绑定配置文件项