FlexiGrid Jquery使用
以前我们做了一个管理项目,有一个很强大的插件FlexGrid,通过JS代码从后台获取数据,并显示一定的分页数据。首先,预览一下效果,
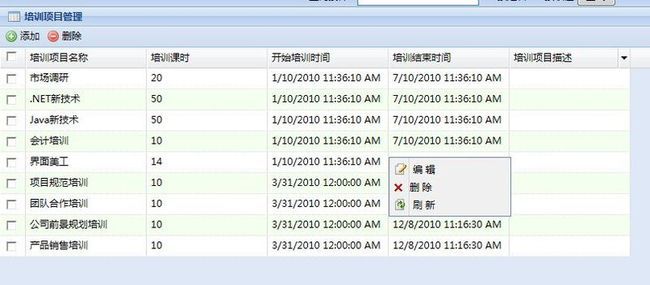
这是整体的外观。
下面介绍怎么使用:
首先导入
FlexiGrid.dll,FlexiGridHelper.dll文件,导入以后把flexigrid控件拖进编辑区域 这时候会生成以下代码

<%@ Page Language="C#" Inherits="System.Web.Mvc.ViewPage<dynamic>" %>

<%@ Register Assembly="FlexiGrid" Namespace="FlexiGrid" TagPrefix="cc1" %>

<!DOCTYPE html PUBLIC "-//W3C//DTD XHTML 1.0 Transitional//EN" "http://www.w3.org/TR/xhtml1/DTD/xhtml1-transitional.dtd">

<html xmlns="http://www.w3.org/1999/xhtml" >
<head runat="server">
    <title>Index</title>
</head>
<body>
    <cc1:FlexiGrid ID="FlexiGrid1" runat="server" />
    <div>

    </div>
</body>
</html>
然后我们就开始编写JS代码和后台代码(本项目是用的是MVC2)
我直接从项目中复制:
 1  //获取浏览器的高度和宽度
 2             var mainHeight = document.documentElement.clientHeight;
 3             var mainWidth = document.documentElement.clientWidth;
 4             //设置常用属性
 5             tableId = "tblStudentList";
 6             title = "部门列表";
 7             pageSize = 18;
 8             width = mainWidth;
 9             height = 450;
10             ajaxUrl = '<%=Url.Action("GetDepartmentList","DepartmentManage") %>';
11             //设置列名(注意:主键列不用写)
12             cells = new Array(
13                 new cell("部门名称", "DepartmentName", 140, true, "left", null),
14                 new cell("负责人", "DepartmentPrincipal", 140, true, "left", null),
15                 new cell("部门电话", "DepartmentPhone", 140, true, "left", null),
16                 new cell("部门传真", "DepartmentFax", 140, true, "left", null),
17                 new cell("部门描述", "DepartmentIntro", 140, true, "left", null)
18             );
19             menus = new Array(
20                     new rightKeyMenu("查 看", "http://www.cnblogs.com/Scripts/FlexiGrid/css/images/icons/view.png", "view"),
21                     new rightKeyMenu("编 辑", "http://www.cnblogs.com/Scripts/FlexiGrid/css/images/icons/edit.png", "Edit"),
22                     new rightKeyMenu(" 删 除", "http://www.cnblogs.com/Scripts/FlexiGrid/css/images/icons/Item.Delete.gif", "Delete"),
23                     new rightKeyMenu("刷 新", "http://www.cnblogs.com/Scripts/FlexiGrid/css/images/icons/Btn.Refresh.gif", "Refresh")
24             );
25             //右键菜单事件
26             menuItem_click = function (cmd, cell, id) { //id就是每一行数据的主键列,cell是这一行数据的列的集合。要取数据则为cell[索引],cmd同上
27                 if (cmd == "view") {
28                     ymPrompt.win({ message: '../DepartmentManage/SelectNews/' + id, width: 300, height: 200, title: '部门详细信息', handler: ManageNews, maxBtn: false, minBtn: false, iframe: true });
29                 }
30                 if (cmd == "Edit") {
31                     ymPrompt.win({ message: '../DepartmentManage/UpdateNews/' + id, width: 300, height: 200, title: '更新部门信息', maxBtn: false, minBtn: false, iframe: true });
32                 }
33                 if (cmd == "Delete") {
34                     $.post("../DepartmentManage/DeleteDepartment/" + id, "", function (date) {
35                         $("#tblStudentList").flexReload();
36                         if (date == "Success") {
37                             ymPrompt.succeedInfo({ message: '删除成功!', height: 160, width: 250, title: '操作提示', winPos: 'rb', useSlide: true, slideCfg: { increment: 0.2, interval: 100 }, closeBtn: false })
38                         }
39                         else {
40                             ymPrompt.errorInfo({ message: '删除失败', height: 160, width: 250, title: '操作提示', winPos: 'rb', useSlide: true, slideCfg: { increment: 0.2, interval: 100 }, closeBtn: false })
41                         }
42                     });
43
44                 }
45                 if (cmd == "Refresh") {
46                     $("#tblStudentList").flexReload();
47                 }
48             }
49             //设置菜单按钮
50             buttons = new Array(
51                 new button("Add", "添加部门", "Add"),
52                 new button("Delete", "删除部门", "Delete")
53             );
54             button_click = function (cmd, grid) {//cmd就是匹配每个按钮的唯一标识(所以在上面创建按钮时每个按钮的标识必须是唯一的)
55                 if (cmd == "Add") {
56                     ymPrompt.win({ message: '/DepartmentManage/AddDepartment/', width: 500, height: 500, maxBtn: false, minBtn: false, iframe: true, msgCls: 'myContent', title: '添加部门'
57                     });
58                 }
59                 if (cmd == "Delete") {
60                     var id = "";
61                     var check = $("#tblStudentList input:checked");
62                     if (check.length == 0) {
63                         ymPrompt.alert({ message: '请选择要删除的部门!', height: 160, width: 250, title: '温馨提示', winPos: 'rb', useSlide: true, slideCfg: { increment: 0.2, interval: 100 }, closeBtn: false })
64                     } else {
65                         $("#tblStudentList input:checked").each(function () {
66                             id += $(this).val() + ",";
67                         });
68                         id = id.substring(0, id.length - 1);
69                         $.post('<%=Url.Action("../DepartmentManage/DeleteDepartment") %>/' + id, "", function (date) {
70                             $("#tblStudentList").flexReload();
71                             if (date == "success") {
72                                 ymPrompt.succeedInfo({ message: '删除成功!', height: 160, width: 250, title: '操作提示', winPos: 'rb', useSlide: true, slideCfg: { increment: 0.2, interval: 100 }, closeBtn: false })
73                             }
74                             else {
75                                 ymPrompt.errorInfo({ message: '删除失败', height: 160, width: 250, title: '操作提示', winPos: 'rb', useSlide: true, slideCfg: { increment: 0.2, interval: 100 }, closeBtn: false })
76                             }
77                         });
78                     }
79                 }
80
81             }
82             //加载FlexiGrid的方法加载数据
83             flexiGridLoad();
84         }
注意: ajaxUrl = '<%=Url.Action("GetDepartmentList","DepartmentManage") %>'; 是指Action和Controller
接下来到指定的Action里编写代码
我解释写得很详细:
 1 public ActionResult GetDepartmentList(FormCollection forms)
 2         {
 3             //部门集合
 4             List<DepartmentInfo> stuList = dpaservice.GetPartmentInfo();
 5             //实例化页面信息类,获取页面传来的参数。该类是FlexiGridHelper中定义的类,封装了很多功能需要的数据
 6             PageView pageView = new PageView(forms);
 7             string name = pageView.Query;
 8             //获取分页后的数据集
 9             List<DepartmentInfo> pagerStudentList = stuList.Skip((pageView.PageIndex - 1) * pageView.PageSize).Take(pageView.PageSize).ToList();
10             //构建表格
11             DataTable dt = new DataTable();
12             //构建列
13             //注意:第一列必须是数据库的主键列
14             DataColumn dc0 = new DataColumn("DepartmentId", typeof(int));
15             DataColumn dc1 = new DataColumn("DepartmentName", typeof(string));
16             DataColumn dc2 = new DataColumn("DepartmentPrincipal", typeof(string));
17             DataColumn dc3 = new DataColumn("DepartmentPhone", typeof(string));
18             DataColumn dc4 = new DataColumn("DepartmentFax", typeof(string));
19             DataColumn dc5 = new DataColumn("DepartmentIntro", typeof(string));
20
21             ////把构建的列添加到数据表中
22             dt.Columns.AddRange(new DataColumn[] { dc0, dc1, dc2, dc3, dc4, dc5 });
23             ////填充数据
24             foreach (var item in pagerStudentList)
25             {
26                 //新建行,注意是dt.NewRow();而不是new DataRow();
27                 DataRow dr = dt.NewRow();
28
29                 dr["DepartmentId"] = item.DepartmentId;
30                 dr["DepartmentName"] = item.DepartmentName;
31                 dr["DepartmentPrincipal"] = item.DepartmentPrincipal;
32                 dr["DepartmentPhone"] = item.DepartmentPhone;
33                 dr["DepartmentFax"] = item.DepartmentFax;
34                 dr["DepartmentIntro"] = item.DepartmentIntro;
35                 dt.Rows.Add(dr);
36             }
37             ////实例化一个GetDataHelper类
38             GetDataHelper gdh = new GetDataHelper();
39             ////通过GetDataHelper类的GetFlexiGridData方法获取FlexiGridData对象
40             FlexiGridData fgd = gdh.GetFlexiGridData(pageView, dt, stuList.Count);
41             ////序列化FlexiGridData对象,并返回序列化结果
42             return Json(fgd);
43         }
最后,我给大家找了参考:
封装JS类及参数说明:
该插件我新添加了一个JS文件(FlexiGridHelper.js),该文件封装了头部按钮,列头和右键菜单。把它们全部以类的形式封装起来。创建它们的时候以new一个新对象的方式创建。(具体结构如下)

//列头类
function cell(display, name, width, sortable, align, process) {
    this.display = display; //列头显示的名称
    this.name = name; //对应数据表的字段
    this.width = width; //列的宽度
    this.sortable = sortable; //是否可交换列
    this.align = align; //文本对齐样式(center,left,right)
    this.process = process; //文本显示格式自定义函数
};

//按钮类
function button(name, displayName, bclass) {
    this.name = name; //按钮的名称(唯一的)
    this.displayName = displayName; //按钮显示的文本名称
    this.bclass = bclass; //按钮的样式
};

//右键菜单类
function rightKeyMenu(text, icon, cmdName) {
    this.text = text; //按钮显示的文本
    this.icon = icon; //按钮的图标
    this.alias = cmdName; //按钮的标示名称(唯一的)
};

定义了3个数组,分别来存放上面3个类的每一个实例
var cells = new Array(); //列集合数组
var buttons = new Array(); //按钮集合数组
var menus = new Array(); //右键菜单集合数组

创建列头使用方法:
cells = new Array(new cell("列头显示名称", "映射字段",宽度 , 是否可以交换列(Bool类型), "文本对齐方式",格式函数(没有特定的格式设为null)));
多个列在后面累加,用“,”隔开
Cells = new Array(new cell(1), new cell(2), new cell(3), new cell(4));
创建头部按钮使用方法:
buttons = new Array(new button("标识名称(唯一的)", "按钮显示的文本", "所对应的样式(类选择器)"));
多个按钮在后面累加:
buttons = new Array(new button(1), new button(2), new button(3));
创建右键菜单使用方法:
menus = new Array(new rightKeyMenu ("显示的文本", "按钮对应的图片路径", "标识名称(唯一的)));
多个按钮在后面累加:
menus = new Array(new rightKeyMenu (1), new rightKeyMenu (2), new rightKeyMenu (3));
定义了3个函数
var menuItem_click = function(cmd, cell, id) { } //右键菜单函数
var button_click = function(cmd, grid) { } //头部按钮函数
var formatCell = function(value, pid) { } //格式函数(根据用户的需要而设定)

使用方法:

//头部按钮事件(根据用户的需要而设定)
button_click = function(cmd, grid) {//cmd就是匹配每个按钮的唯一标识(所以在上面创建按钮时每个按钮的标识必须是唯一的)
    if (cmd == "Add") {
       alert("Add");
     }
  if (cmd == "Delete") {
         alert("Delete");
    }
 }

//右键菜单按钮事件(根据用户的需要而设定)
menuItem_click = function(cmd, cell, id) {//id就是每一行数据的主键列,
cell是这一行数据的列的集合。要取数据则为cell[索引],cmd同上
    if (cmd == "view") {
       alert("编辑,产品编号=" + id);
    }
    if (cmd == "edit") {
        alert("编辑,产品编号=" + id);
}
}

//格式函数(根据用户的需要而设定)
formatCell = function(value, pid) {
   return "¥" + parseFloat(value).toFixed(2);//返回2位小数
   return value;//返回原始值
}

常用属性:(页面上如果不设定则为默认值)
var tableId = ""; 	//页面上<table>的id(必须设定)
var title = "";     //标题
var pageSize = 20; //每页显示的数据数量
var showCheckbox = true; //是否显示复选框
var width = "auto"; //宽度(auto表示根据每列的宽度自动计算)
var height = 200;   //高度
var ajaxUrl = "";   //异步请求服务器路径(必须设定)
var query = "";       //搜索查询的条件
var qtype = "";     //搜索查询的类别
var sortorder = "asc"; //排序方式
var sortname = "";  //排序字段
var qop = "Eq";     //,Eq表示精确查询,like表示模糊查询
使用方法:
在页面上直接使用变量名=值。如:tableId=“stuInfo”  title=“学生信息”
注意:该插件是用JS代码写的,所以在页面上使用的时候必须写在JS代码块里面。即:
<script type="text/javascript">
	写在这里面
</script>

由于该插件把所有的JS都封装成了FlexiGrid.dll。所以看不见上面所贴出来的代码
该插件用的是Jquery1.32的版本
谢谢!