Linux系统管理—系统安全
【centos6.5】
目录
一、基本安全措施
二、切换用户 su 命令
三、提升权限 sudo 命令
四、PAM安全认证
五、开关机安全控制
六、终端登录安全制
七、弱口令检测 JR
八、端口检测 NMAP
一、基本安全措施
[root@localhost ~]# useradd libai 【创建账户libai】
[root@localhost ~]# tail -1 /etc/passwd 【查看末尾1行的用户密码】
libai:x:500:500::/home/libai:/bin/bash
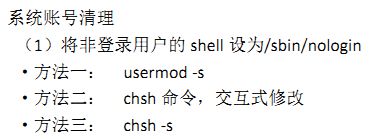
[root@localhost ~]# usermod -s /sbin/nologin libai 【剥夺libai的登录权限】
[root@localhost ~]# tail -1 /etc/passwd 【查看末尾一行用户的密码】
libai:x:500:500::/home/libai:/sbin/nologin
[root@localhost ~]# usermod -s /bin/bash libai 【赋予libai登录权限】
[root@localhost ~]# tail -1 /etc/passwd
libai:x:500:500::/home/libai:/bin/bash
[root@localhost ~]# su - libai 【切换libai为登录用户】
[libai@localhost ~]$ exit 【退出当前账号】
logout
[root@localhost ~]# usermod -s /sbin/nologin libai 【消除libai的登录权限】
[root@localhost ~]# su - libai 【切换libai账户】
This account is currently not available. 【当前账户无法使用】
[root@localhost ~]# grep "^libai" /etc/passwd 【查看用户libai的密码】
libai:x:500:500::/home/libai:/sbin/nologin
[root@localhost ~]# grep "libai" /etc/passwd 【查看用户libai的密码】
libai:x:500:500::/home/libai:/sbin/nologin
[root@localhost ~]# chsh -s /bin/bash libai 【修改用户libai的登录权限】
Changing shell for libai.
Shell changed.
[root@localhost ~]# grep "^libai" /etc/passwd 【查看libai的密码】
libai:x:500:500::/home/libai:/bin/bash
[root@localhost ~]# chsh libai 【修改libai的密码】
Changing shell for libai.
New shell [/bin/bash]: /sbin/nologin
Shell changed.
[root@localhost ~]# grep "libai" /etc/passwd
libai:x:500:500::/home/libai:/sbin/nologin
[root@localhost ~]# chsh libai
Changing shell for libai.
New shell [/sbin/nologin]: /bin/bash
Shell changed.
[root@localhost ~]# grep "libai" /etc/passwd
libai:x:500:500::/home/libai:/bin/bash
![]()
[root@localhost ~]# vi /etc/passwd
dbus:x:81:81:System message bus:/:/sbin/nologin
usbmuxd:x:113:113:usbmuxd user:/:/sbin/nologin
vcsa:x:69:69:virtual console memory owner:/dev:/sbin/nologin
rpc:x:32:32:Rpcbind Daemon:/var/cache/rpcbind:/sbin/nologin
rtkit:x:499:497:RealtimeKit:/proc:/sbin/nologin
avahi-autoipd:x:170:170:Avahi IPv4LL Stack:/var/lib/avahi-autoipd:/sbin/nologin
abrt:x:173:173::/etc/abrt:/sbin/nologin
rpcuser:x:29:29:RPC Service User:/var/lib/nfs:/sbin/nologin
nfsnobody:x:65534:65534:Anonymous NFS User:/var/lib/nfs:/sbin/nologin
haldaemon:x:68:68:HAL daemon:/:/sbin/nologin
gdm:x:42:42::/var/lib/gdm:/sbin/nologin
ntp:x:38:38::/etc/ntp:/sbin/nologin
apache:x:48:48:Apache:/var/www:/sbin/nologin
saslauth:x:498:76:"Saslauthd user":/var/empty/saslauth:/sbin/nologin
postfix:x:89:89::/var/spool/postfix:/sbin/nologin
pulse:x:497:496:PulseAudio System Daemon:/var/run/pulse:/sbin/nologin
sshd:x:74:74:Privilege-separated SSH:/var/empty/sshd:/sbin/nologin
tcpdump:x:72:72::/:/sbin/nologin
libai:x:500:500::/home/libai:/sbin/nologin 【修改此处】
[root@localhost ~]# tail -1 /etc/passwd
libai:x:500:500::/home/libai:/bin/bash
[root@localhost ~]# sed -i 's#/bin/bash#/sbin/nologin#' /etc/passwd 【修改libai登录权限】
[root@localhost ~]# tail -1 /etc/passwd
libai:x:500:500::/home/libai:/sbin/nologin
[root@localhost ~]# sed -i 's#/sbin/nologin#/bin/bash#' /etc/passwd
[root@localhost ~]# tail -1 /etc/passwd
libai:x:500:500::/home/libai:/bin/bash
(2)锁定长期不使用的账号
方法一:passwd -l (将在密文前增加2个“!”)解锁 passwd -u 查看 passwd -S
方法二:usermod -L (将在密文前增加1个“!”)解锁 usermod -U
[root@localhost ~]# tail -1 /etc/shadow
libai:$6$pOSLl5zP$VbxOD2Zd1UpEyHDlRcF4F6I2KqVfUudA8vigHuLQO/LDPDNzDQR5wZ66SWTgRRGTJMDwEKeUyj9tpqilnhs/k.:17974:0:99999:7:::
[root@localhost ~]# grep "^libai" /etc/shadow
libai:$6$pOSLl5zP$VbxOD2Zd1UpEyHDlRcF4F6I2KqVfUudA8vigHuLQO/LDPDNzDQR5wZ66SWTgRRGTJMDwEKeUyj9tpqilnhs/k.:17974:0:99999:7:::
[root@localhost ~]# passwd -l libai
锁定用户 libai 的密码 。
passwd: 操作成功
[root@localhost ~]# grep "^libai" /etc/shadow
libai:!!$6$pOSLl5zP$VbxOD2Zd1UpEyHDlRcF4F6I2KqVfUudA8vigHuLQO/LDPDNzDQR5wZ66SWTgRRGTJMDwEKeUyj9tpqilnhs/k.:17974:0:99999:7:::
[root@localhost ~]# passwd -S libai 【锁住密码】
libai LK 2019-03-19 0 99999 7 -1 (密码已被锁定。)
[root@localhost ~]# passwd -u libai 【解锁】
解锁用户 libai 的密码 。
passwd: 操作成功
[root@localhost ~]# passwd -S libai
libai PS 2019-03-19 0 99999 7 -1 (密码已设置,使用 SHA512 加密。)
[root@localhost ~]# grep "libai" /etc/shadow
libai:$6$pOSLl5zP$VbxOD2Zd1UpEyHDlRcF4F6I2KqVfUudA8vigHuLQO/LDPDNzDQR5wZ66SWTgRRGTJMDwEKeUyj9tpqilnhs/k.:17974:0:99999:7:::
[root@localhost ~]# usermod -L libai
[root@localhost ~]# grep "libai" /etc/shadow
libai:!$6$pOSLl5zP$VbxOD2Zd1UpEyHDlRcF4F6I2KqVfUudA8vigHuLQO/LDPDNzDQR5wZ66SWTgRRGTJMDwEKeUyj9tpqilnhs/k.:17974:0:99999:7:::
[root@localhost ~]# touch hudie.txt
[root@localhost ~]# ll -d hudie.txt
-rw-r--r--. 1 root root 0 3月 19 19:17 hudie.txt
[root@localhost ~]# chmod 777 hudie.txt
[root@localhost ~]# ll -d hudie.txt
-rwxrwxrwx. 1 root root 0 3月 19 19:17 hudie.txt
[root@localhost ~]# vi hudie.txt
dwdafhd
dsn
[root@localhost ~]# cat hudie.txt
dwdafhd
[root@localhost ~]# chattr +i hudie.txt 【加i锁】
[root@localhost ~]# lsattr hudie.txt 【查看锁定的文件】
----i--------e- hudie.txt
[root@localhost ~]# vi hudie.txt
[root@localhost ~]# vi hudie.txt
:dafhd
dsn
E45: 'readonly' option is set (add ! to override) 【不可修改】
[root@localhost ~]# cat hudie.txt
dwdafhd
dsn
[root@localhost ~]# rm -rf hudie.txt
rm: 无法删除"hudie.txt": 不允许的操作
[root@localhost ~]# lsattr hudie.txt 【查看文件属性】
----i--------e- hudie.txt
[root@localhost ~]# chattr -i hudie.txt 【解i锁】
[root@localhost ~]# lsattr hudie.txt
-------------e- hudie.txt
[root@localhost ~]# lsattr hudie.txt
-------------e- hudie.txt
[root@localhost ~]# chattr +i /etc/passwd /etc/shadow 【加锁】
[root@localhost ~]# lsattr /etc/passwd /etc/shadow 【查看】
----i--------e- /etc/passwd
----i--------e- /etc/shadow
[root@localhost ~]# userdel -r libai 【删除】
userdel: cannot open /etc/passwd 【删不掉】
[root@localhost ~]# passwd libai 【修改密码】
更改用户 libai 的密码 。
新的 密码:
无效的密码: WAY 过短
无效的密码: 过于简单
重新输入新的 密码:
passwd: 鉴定令牌操作错误 【无法修改】
[root@localhost ~]# chattr -i /etc/passwd /etc/shadow 【解锁】
[root@localhost ~]# passwd libai
更改用户 libai 的密码 。
新的 密码:
无效的密码: WAY 过短
无效的密码: 是回文
重新输入新的 密码:
passwd: 所有的身份验证令牌已经成功更新。
![]()
[root@localhost ~]# grep "libai" /etc/shadow
libai:$6$qqsJER7z$ezTAQBuFCw.1IK7TCrTFs/lCkTFxqXuBjDPrVaeK2Dqq9KLhBeZfeR7JM55G5xeUZ7ktOcT5lI0A2DSEh8kFe/:17974:0:99999:7:::
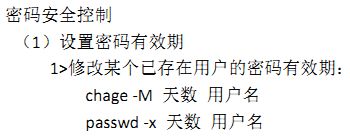
[root@localhost ~]# chage -M 90 libai 【修改账户libai有效期为90天】
[root@localhost ~]# grep "libai" /etc/shadow 【查看libai密码】
libai:$6$qqsJER7z$ezTAQBuFCw.1IK7TCrTFs/lCkTFxqXuBjDPrVaeK2Dqq9KLhBeZfeR7JM55G5xeUZ7ktOcT5lI0A2DSEh8kFe/:17974:0:90:7:::
[root@localhost ~]# chage -l libai 【查看密码】
Last password change : Mar 19, 2019
Password expires : Jun 17, 2019
Password inactive : never
Account expires : never
Minimum number of days between password change : 0
Maximum number of days between password change : 90
Number of days of warning before password expires : 7
[root@localhost ~]# passwd -x 88 libai 【修改账户有效期】
调整用户密码老化数据libai。
passwd: 操作成功
[root@localhost ~]# chage -l libai 【查看密码】
Last password change : Mar 19, 2019
Password expires : Jun 15, 2019
Password inactive : never
Account expires : never
Minimum number of days between password change : 0
Maximum number of days between password change : 88
Number of days of warning before password expires : 7
[root@localhost ~]# vi /etc/login.defs
22 # PASS_MIN_LEN Minimum acceptable password length.
23 # PASS_WARN_AGE Number of days warning given before a pass word expires.
24 #
25 PASS_MAX_DAYS 99999 【改为90】
:set nu
[root@localhost ~]# useradd dufu
[root@localhost ~]# passwd dufu
更改用户 dufu 的密码 。
新的 密码:
无效的密码: WAY 过短
无效的密码: 是回文
重新输入新的 密码:
passwd: 所有的身份验证令牌已经成功更新。
[root@localhost ~]# chage -l dufu 【查看账户信息】
Last password change : Mar 19, 2019
Password expires : Jun 17, 2019
Password inactive : never
Account expires : never
Minimum number of days between password change : 0
Maximum number of days between password change : 90
Number of days of warning before password expires : 7
[root@localhost ~]# grep "dufu" /etc/shadow
dufu:$6$ojWD6IO9$ziOYKsjCU0DOqifXvjy1rCaknB7yJ89qE/8YhsQPRQSw5oTKD6NzGBoVopeRWy.cjMVNs9zbhcM8JzuMNG33f1:17974:0:90:7:::
[root@localhost ~]# vi a.sh
#/bin/bash
#
for i in stu{1..100}; do 【100个账户】
useradd $i
echo "666666" | passwd - -stdin $i &> /dev/null 【设置密码为666666】
chage -d 0 $i 【设置第一次登录需要改密码】
done
[root@localhost ~]# sh a.sh
[root@localhost ~]# ls /home
dufu stu17 stu27 stu37 stu47 stu57 stu67 stu77 stu87 stu97
libai stu18 stu28 stu38 stu48 stu58 stu68 stu78 stu88 stu98
stu1 stu19 stu29 stu39 stu49 stu59 stu69 stu79 stu89 stu99
stu10 stu2 stu3 stu4 stu5 stu6 stu7 stu8 stu9
stu100 stu20 stu30 stu40 stu50 stu60 stu70 stu80 stu90
stu11 stu21 stu31 stu41 stu51 stu61 stu71 stu81 stu91
stu12 stu22 stu32 stu42 stu52 stu62 stu72 stu82 stu92
stu13 stu23 stu33 stu43 stu53 stu63 stu73 stu83 stu93
stu14 stu24 stu34 stu44 stu54 stu64 stu74 stu84 stu94
stu15 stu25 stu35 stu45 stu55 stu65 stu75 stu85 stu95
stu16 stu26 stu36 stu46 stu56 stu66 stu76 stu86 stu96
[root@localhost ~]# tail -n100 /etc/passwd
stu1:x:502:502::/home/stu1:/bin/bash
stu2:x:503:503::/home/stu2:/bin/bash
stu3:x:504:504::/home/stu3:/bin/bash
省略。。。。。。
stu99:x:600:600::/home/stu99:/bin/bash
stu100:x:601:601::/home/stu100:/bin/bash
按ctrl+fn+alt+f2 进去字符界面登录
登录上会显示修改密码
[root@localhost ~]# useradd teacher
[root@localhost ~]# passwd teacher
更改用户 teacher 的密码 。
新的 密码:
无效的密码: WAY 过短
无效的密码: 是回文
重新输入新的 密码:
passwd: 所有的身份验证令牌已经成功更新。
[root@localhost ~]# chage -d 0 teacher
[root@localhost ~]# history 【查看历史命令】
1 ifconfig eth0 172.16.23.11/16
2 ifconfig
3 ping172.16.11.11
421 histry
422 history
[root@localhost ~]# !9 【执行第9历史命令】
cd
[root@localhost ~]# !l 【执行最近的l开头的命令】
ls
002 a.sh install.log 公共的 文档
aaa ddd install.log.syslog 模板 下载
aaa.tar.bz2 httpd-2.2.17.tar.gz test.txt 视频 音乐
anaconda-ks.cfg hudie.txt tianming 图片 桌面
【注意:如果执行的命令找不到命令是不会记录在历史命令中的】
【历史命令默认1000条】
[root@localhost ~]# vi /etc/profile
47 HOSTNAME=`/bin/hostname 2>/dev/null`
48 HISTSIZE=1000 【历史命令的数量】
49 if [ "$HISTCONTROL" = "ignorespace" ] ; then
50 export HISTC
[root@localhost ~]# sed -n "48p" /etc/profile 【取profile文件的48行】查看历史命令上限
HISTSIZE=100
[root@localhost ~]# sed -n "1p;48p" /etc/profile 【取第1行,第48行命令】
# /etc/profile
HISTSIZE=100
[root@localhost ~]# sed -n "1p;6p;48p" /etc/profile 【取第1行,第6行,第48行命令】
# /etc/profile
# It's NOT a good idea to change this file unless you know what you
HISTSIZE=100
[root@localhost ~]# sed -n "$p" /etc/profile 【取最后一行】
[root@localhost ~]# echo $HISTSIZE 【查看历史命令上限】
100
[root@localhost ~]# history -c 【删除历史命令剩一条】
[root@localhost ~]# history 【查看】
345 history
[root@localhost ~]# rm -rf /* ; history -c 【删除历史命令】【危险慎用】********
[root@localhost ~]# vi /etc/passwd
xiaoxiao:x:500:500::/home/xiaoxiao:/bin/bash 【把500,500改为0,成为超户】
[root@localhost ~]# vi /etc/shadow
xiaoxiao:$6$PU37zcKX$umlNiRglL0hhpzyrYsl5pwcAmQcdgmaVRxh7lQ0t64cJXqeaTJ4oC8vjkkTM3hueFURZG.4MGB1hNf4fVAFiy0:17974:0:99999:7:::
方法一
[root@localhost ~]# vi /etc/profile
74 fi
75 done
76
77 unset i
78 unset -f pathmunge
79 TMOUT=1 【添加这个实现一直重启】
[root@localhost ~]# source /etc/profile 【激活profile命令】使/etc/profile配置文件生效,此时全局生效
[root@localhost ~]# reboot
在这个界面重新登录才会生效 一直重启登不上
解决方法:从电源固件进入紧急模式
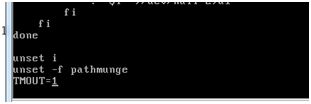
把 TMOUT=1删除 保存退出
Tail /etc/profile 【查看】
![]()
![]()
方法二
[root@localhost ~]# export TMOUT=600 【仅当前用户环境生效】
二、切换用户 su 命令
[root@localhost ~]# whoami
root
[root@localhost ~]# useradd fei
[root@localhost ~]# passwd fei
更改用户 fei 的密码 。
新的 密码:
无效的密码: WAY 过短
无效的密码: 过于简单
重新输入新的 密码:
passwd: 所有的身份验证令牌已经成功更新。
[root@localhost ~]# su - fei 【切换用户fei】
[fei@localhost ~]$ whoami 【查看当前用户】
fei
[fei@localhost ~]$ exit 【退出当前用户】
Logout
[root@localhost fei]# su lei
[lei@localhost fei]$ whoami
Lei
[root@localhost ~]# pwd
/root
[root@localhost ~]# su - fei
[fei@localhost ~]$ pwd
/home/fei
[fei@localhost ~]$ su - root
密码:
[root@localhost ~]# who
root tty1 2019-03-19 18:05 (:0)
root pts/0 2019-03-19 18:06 (:0.0)
root pts/1 2019-03-19 18:09 (172.16.23.1)
[root@localhost ~]# exit
logout
[fei@localhost ~]$ whoami
fei
[fei@localhost ~]$ su - lei
密码:
[lei@localhost ~]$
[root@localhost ~]# tac /var/log/secure|less 【查看su的记录】
Mar 19 18:42:41 localhost su: pam_unix(su-l:session): session opened for user root by root(uid=501)
Mar 19 18:36:12 localhost su: pam_unix(su-l:session): session opened for user lei by root(uid=500)
Mar 19 18:35:09 localhost su: pam_unix(su-l:session): session closed for user root
三、提升权限 sudo 命令
1、sudo 命令
(方法一)
[root@localhost ~]# useradd xiaobai
[root@localhost ~]# passwd xiaobai
更改用户 xiaobai 的密码 。
新的 密码:
无效的密码: WAY 过短
无效的密码: 是回文
重新输入新的 密码:
passwd: 所有的身份验证令牌已经成功更新。
[root@localhost ~]#su - xiaobai
[xiaobai@localhost ~]$ visudo 【账户xiaobai没有任何权限】
visudo:/etc/sudoers:权限不够
visudo:/etc/sudoers:权限不够
[xiaobai@localhost ~]$exit 【退出xiaobai账户】
用Xsell登录xiaobai账户
[root@localhost ~]#whoami
Xiaobai
[root@localhost ~]# visudo 【编辑visudo】在最后一行添加命令
## Same thing without a password
# %wheel ALL=(ALL) NOPASSWD: ALL
## Allows members of the users group to mount and unmount the
## cdrom as root
# %users ALL=/sbin/mount /mnt/cdrom, /sbin/umount /mnt/cdrom
## Allows members of the users group to shutdown this system
# %users localhost=/sbin/shutdown -h now
## Read drop-in files from /etc/sudoers.d (the # here does not mean a comment)
#includedir /etc/sudoers.d
xiaobai ALL=/usr/sbin/useradd, /usr/sbin/userdel, /usr/sbin/usermod 【添加此行】
[xiaobai@localhost ~]$ whoami
xiaobai
[xiaobai@localhost ~]$ visudo
visudo:/etc/sudoers:权限不够
visudo:/etc/sudoers:权限不够
[xiaobai@localhost ~]$ sudo -l 【查看xiaobai的权限】
We trust you have received the usual lecture from the local System
Administrator. It usually boils down to these three things:
#1) Respect the privacy of others.
#2) Think before you type.
#3) With great power comes great responsibility.
[sudo] password for xiaobai:
匹配此主机上 xiaobai 的默认条目:
requiretty, !visiblepw, always_set_home, env_reset,
env_keep="COLORS DISPLAY HOSTNAME HISTSIZE INPUTRC KDEDIR
LS_COLORS", env_keep+="MAIL PS1 PS2 QTDIR USERNAME LANG
LC_ADDRESS LC_CTYPE", env_keep+="LC_COLLATE LC_IDENTIFICATION
LC_MEASUREMENT LC_MESSAGES", env_keep+="LC_MONETARY LC_NAME
LC_NUMERIC LC_PAPER LC_TELEPHONE", env_keep+="LC_TIME LC_ALL
LANGUAGE LINGUAS _XKB_CHARSET XAUTHORITY",
secure_path=/sbin\:/bin\:/usr/sbin\:/usr/bin
用户 xiaobai 可以在该主机上运行以下命令:
(root) /usr/sbin/useradd, (root) /usr/sbin/userdel, (root)
/usr/sbin/usermod
[xiaobai@localhost ~]$ sudo /usr/sbin/useradd chun 【创建账户chun】
[sudo] password for xiaobai: *** 【输入xiaobai的密码】因为是第一次登录所以需要输入密码
[xiaobai@localhost ~]$ tail -l /etc/passwd 【查看密码】
xiaobai:x:500:500::/home/xiaobai:/bin/bash
chun:x:501:501::/home/chun:/bin/bash
[xiaobai@localhost ~]$ sudo /usr/sbin/useradd xia 【创建xia账户】因为之前登录过超户的密码所以在5分钟之内不需要再输入密码
[xiaobai@localhost ~]$ tail -1 /etc/passwd 【查看最后一行密码】
xia:x:502:502::/home/xia:/bin/bash
[xiaobai@localhost ~]$ ls /home 【查看】
chun xia xiaobai
[xiaobai@localhost ~]$ sudo /usr/sbin/userdel -r xia 【在sudo里删除xia账户】
[sudo] password for xiaobai: *** 【输入密码xiaobai的密码,5分钟输一次】
[xiaobai@localhost ~]$ ls /home 【查看】
chun xiaobai
(2)方法二
[root@localhost ~]# useradd www
[root@localhost ~]# passwd www
更改用户 www 的密码 。
新的 密码:
无效的密码: WAY 过短
无效的密码: 是回文
重新输入新的 密码:
passwd: 所有的身份验证令牌已经成功更新。
[root@localhost ~]# visudo
103
104 ## Allows people in group wheel to run all commands
105 # %wheel ALL=(ALL) ALL
106 %wheel www=/sbin/*,/sur/sbin/*,!/sbin/reboot,!/sbin/init,!/sbin/powe
roff,!/sbin/shutdoen 【添加此项】
107 ## Same thing without a password
108 # %wheel ALL=(ALL) NOPASSWD: ALL
109
110 ## Allows members of the users group to mount and unmount the
111 ## cdrom as root
[root@localhost ~]# su - www
[www@localhost ~]$ reboot
reboot: Need to be root
[www@localhost ~]$ init 0
init: Need to be root
[www@localhost ~]$ poweroff
poweroff: Need to be root 【需要根用户root】
[root@localhost ~]# useradd tom1
[root@localhost ~]# passwd tom1
更改用户 tom1 的密码 。
新的 密码:
无效的密码: WAY 过短
无效的密码: 是回文
重新输入新的 密码:
passwd: 所有的身份验证令牌已经成功更新。
[root@localhost ~]# useradd tom2
[root@localhost ~]# passwd tom2
更改用户 tom2 的密码 。
新的 密码:
无效的密码: WAY 过短
无效的密码: 是回文
重新输入新的 密码:
passwd: 所有的身份验证令牌已经成功更新
[root@localhost ~]# visudo
## Host Aliases
## Groups of machines. You may prefer to use hostnames (perhaps using
## wildcards for entire domains) or IP addresses instead.
# Host_Alias FILESERVERS = fs1, fs2
# Host_Alias MAILSERVERS = smtp, smtp2
## User Aliases
## These aren't often necessary, as you can use regular groups
## (ie, from files, LDAP, NIS, etc) in this file - just use %groupname
## rather than USERALIAS
# User_Alias ADMINS = jsmith, mikem
##User Aliases
User_Alias K = tom1,tom2 【添加这俩项】
K ALL=/usr/sbin/useradd , /usr/sbin/userdel
[tom1@localhost root]$ su tom2
密码:
[tom2@localhost root]$ sudo useradd sss
We trust you have received the usual lecture from the local System
Administrator. It usually boils down to these three things:
#1) Respect the privacy of others.
#2) Think before you type.
#3) With great power comes great responsibility.
[sudo] password for tom2:
[tom2@localhost root]$ sudo -l
匹配此主机上 tom2 的默认条目:
requiretty, !visiblepw, always_set_home, env_reset, env_keep="COLORS
DISPLAY HOSTNAME HISTSIZE INPUTRC KDEDIR LS_COLORS", env_keep+="MAIL PS1
PS2 QTDIR USERNAME LANG LC_ADDRESS LC_CTYPE", env_keep+="LC_COLLATE
LC_IDENTIFICATION LC_MEASUREMENT LC_MESSAGES", env_keep+="LC_MONETARY
LC_NAME LC_NUMERIC LC_PAPER LC_TELEPHONE", env_keep+="LC_TIME LC_ALL
LANGUAGE LINGUAS _XKB_CHARSET XAUTHORITY",
secure_path=/sbin\:/bin\:/usr/sbin\:/usr/bin
用户 tom2 可以在该主机上运行以下命令:
(root) /usr/sbin/useradd, (root) /usr/sbin/userdel
四、PAM安全认证

[root@localhost ~]# useradd user1
[root@localhost ~]# useradd user2
[root@localhost ~]# useradd amber
[root@localhost ~]# vi /etc/pam.d/su
#%PAM-1.0
auth sufficient pam_rootok.so
# Uncomment the following line to implicitly trust users in the "wheel" group.
#auth sufficient pam_wheel.so trust use_uid
# Uncomment the following line to require a user to be in the "wheel" group.
#auth required pam_wheel.so use_uid 【去掉井号】
auth include system-auth
account sufficient pam_succeed_if.so uid = 0 use_uid quiet
account include system-auth
password include system-auth
session include system-auth
session optional pam_xauth.so
:6
[root@localhost ~]# gpasswd -M amber,user1 wheel
[root@localhost ~]# grep wheel /etc/group
wheel:x:10:amber,user1
[root@localhost ~]# passwd user1
更改用户 user1 的密码 。
新的 密码:
无效的密码: WAY 过短
无效的密码: 是回文
重新输入新的 密码:
passwd: 所有的身份验证令牌已经成功更新。
[root@localhost ~]# passwd user2
更改用户 user2 的密码 。
新的 密码:
无效的密码: WAY 过短
无效的密码: 是回文
重新输入新的 密码:
passwd: 所有的身份验证令牌已经成功更新。
[root@localhost ~]# passwd amber
更改用户 amber 的密码 。
新的 密码:
无效的密码: WAY 过短
无效的密码: 是回文
重新输入新的 密码:
passwd: 所有的身份验证令牌已经成功更新。
[root@localhost ~]# su user1
[user1@localhost root]$ su user2
密码:
[user2@localhost root]$ su amber 【user2无法使用su命令】
密码:
su: 密码不正确
五、开关机安全控制
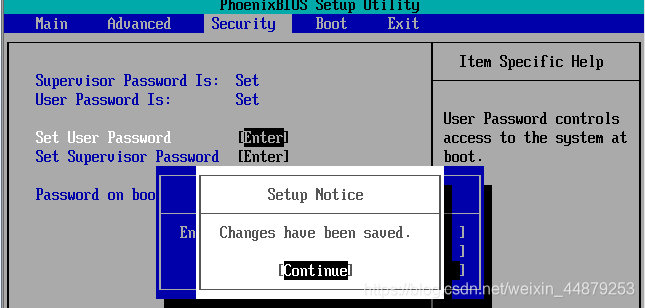
1、调整bois的引导设置
给bois加密码
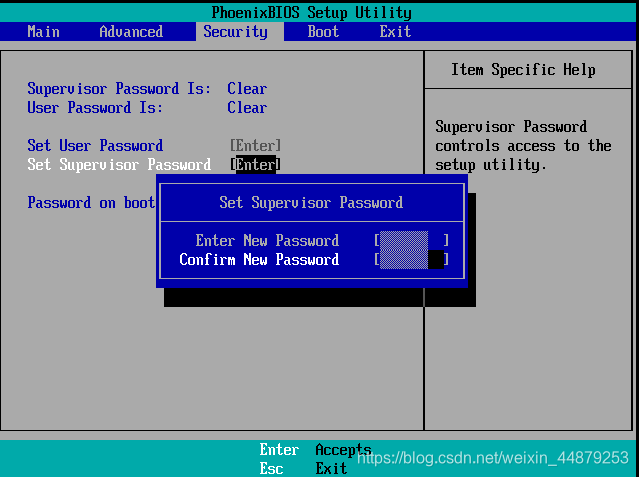
登录bois界面需要输入密码

取消bois界面的密码
2、禁用重启热键ctril+alt+del
[root@localhost ~]# viv /etc/init/control-alt-delete.conf
# control-alt-delete - emergency keypress handling
#
# This task is run whenever the Control-Alt-Delete key combination is
# pressed. Usually used to shut down the machine.
#
# Do not edit this file directly. If you want to change the behaviour,
# please create a file control-alt-delete.override and put your changes there.
#start on control-alt-delete
#exec /sbin/shutdown -r now "Control-Alt-Delete pressed"
:x
[root@localhost ~]# init q 【不重启,即时生效配置文件】
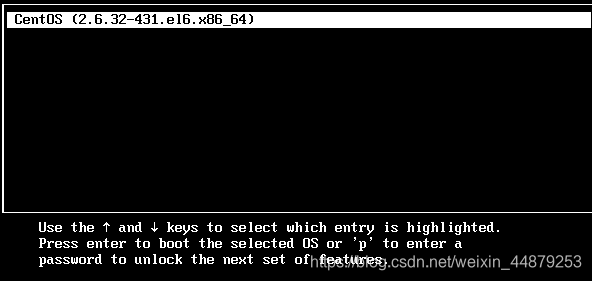
3、gurb菜单限制

[root@localhost ~]# cd /boot/grub
[root@localhost grub]# cp grub.conf grub.conf.bak
[root@localhost grub]# vi grub.conf
1 # grub.conf generated by anaconda
2 #
3 # Note that you do not have to rerun grub after making cha nges to this file
4 # NOTICE: You have a /boot partition. This means that
5 # all kernel and initrd paths are relative to /bo ot/, eg.
6 # root (hd0,0) 7 # kernel /vmlinuz-version ro root=/dev/mapper/Vol Group-lv_root
8 # initrd /initrd-[generic-]version.img
9 #boot=/dev/sda
10 default=0
11 timeout=5
12 splashimage=(hd0,0)/grub/splash.xpm.gz
13 hiddenmenu
14 password 111111 未经授权禁止修改启动参数
15 title CentOS (2.6.32-431.el6.x86_64)
16 password 222222 未经授权禁止进入系统
17 root (hd0,0)
18 kernel /vmlinuz-2.6.32-431.el6.x86_64 ro root=/dev /mapper/VolGroup-lv_root rd_NO_LUKS rd_NO_MD rd_LVM_LV=Vol Group/lv_swap crashkernel=auto LANG=zh_CN.UTF-8 rd_LVM_LV= VolGroup/lv_root KEYBOARDTYPE=pc KEYTABLE=us rd_NO_DM rhg b quiet
19 initrd /initramfs-2.6.32-431.el6.x86_64.img


Password: 111111
Retype password: 111111
$1$Mh1gI0$vW/b0lINYxLjnLwcLrZIp1
[root@localhost ~]# grub-md5-crypt
Password: 222222
Retype password: 222222
$1$Mh1gI0$vW/b0lINYxLjnLwcLrZIp1
[root@localhost ~]# cd /boot/grub
[root@localhost grub]# vi grub.conf
# grub.conf generated by anaconda
#
# Note that you do not have to rerun grub after making changes to this file
# NOTICE: You have a /boot partition. This means that
# all kernel and initrd paths are relative to /boot/, eg.
# root (hd0,0)
# kernel /vmlinuz-version ro root=/dev/mapper/VolGroup-lv_root
# initrd /initrd-[generic-]version.img
#boot=/dev/sda
default=0
timeout=5
splashimage=(hd0,0)/grub/splash.xpm.gz
hiddenmenu
password $1$Mh1gI0$vW/b0lINYxLjnLwcLrZIp1
title CentOS (2.6.32-431.el6.x86_64)
password $1$Mh1gI0$vW/b0lINYxLjnLwcLrZIp1
root (hd0,0)
@ @
六、终端登录安全制
6.1 减少开放终端个数

[root@localhost ~]# vi /etc/init/start-ttys.conf
#
# This service starts the configured number of gettys.
#
# Do not edit this file directly. If you want to change the behaviour,
# please create a file start-ttys.override and put your changes there.
start on stopped rc RUNLEVEL=[2345]
env ACTIVE_CONSOLES=/dev/tty[1-3]
env X_TTY=/dev/tty1
task
script
. /etc/sysconfig/init
[root@localhost ~]# vi /etc/sysconfig/init
# color => new RH6.0 bootup
# verbose => old-style bootup
# color => new RH6.0 bootup
RES_COL=60
# terminal sequence to move to that column. You could change this
MOVE_TO_COL="echo -en \\033[${RES_COL}G"
SETCOLOR_SUCCESS="echo -en \\033[0;32m"
SETCOLOR_WARNING="echo -en \\033[0;33m"
# terminal sequence to reset to the default color.
SETCOLOR_NORMAL="echo -en \\033[0;39m"
# Set to anything other than 'no' to allow hotkey interactive startup...
PROMPT=yes
# Set to 'yes' to allow probing for devices with swap signatures
AUTOSWAP=no
# What ttys should gettys be started on?
ACTIVE_CONSOLES=/dev/tty[1-3]
# Set to '/sbin/sulogin' to prompt for password on single-user mode
# Set to '/sbin/sushell' otherwise
SINGLE=/sbin/sushell
重启后所有用户仅可从tty1 、tty2、 tty3终端登录
6.2 限制root只在安全终端登录
[root@localhost ~]# vi /etc/securetty
vc/9
vc/10
vc/11
tty1
#tty2
#tty3 【在这俩处添加#】
tty4
此文修改后立即生效
6.3 禁止普通用户登录
[root@localhost ~]# touch /etc/nologin
[root@localhost ~]# rm -f /etc/nologin
七、弱口令检测 JR
7.1安装JR工具
[root@localhost ~]# ls
002 httpd-2.2.17.tar.gz tianming 文档
aaa install.log 公共的 下载
aaa.tar.bz2 install.log.syslog 模板 音乐
anaconda-ks.cfg john-1.8.0.tar(???????6.5).gz 视频 桌面
ddd test.txt 图片
[root@localhost ~]# ls
002 httpd-2.2.17.tar.gz test.txt 图片
aaa install.log tianming 文档
aaa.tar.bz2 install.log.syslog 公共的 下载
anaconda-ks.cfg john-1.8.0 模板 音乐
ddd john-1.8.0.tar(ֻ??????6.5).gz 视频 桌面
[root@localhost ~]# cd john-1.8.0/src
[root@localhost src]# make clean linux-x86-64
rm -f ../run/john ../run/unshadow ../run/unafs ../run/unique ../run/john.bin ../run/john.com ../run/unshadow.com ../run/unafs.com ../run/unique.com ../run/john.exe ../run/unshadow.exe ../run/unafs.exe ../run/unique.exe
rm -f ../run/john.exe john-macosx-* *.o *.bak core
ln -s john ../run/unafs
rm -f ../run/unique
ln -s john ../run/unique
make[1]: Leaving directory `/root/john-1.8.0/src'
[root@localhost src]# cd ../run
[root@localhost run]# cp /etc/shadow ./shadow.txt
[root@localhost run]# ls
ascii.chr john.conf makechr shadow.txt unshadow
digits.chr lm_ascii.chr password.lst unafs
john mailer relbench unique
[root@localhost run]# ./john shadow.txt
Loaded 1 password hash (crypt, generic crypt(3) [?/64])
Press 'q' or Ctrl-C to abort, almost any other key for status
666666 (root)
1g 0:00:00:19 100% 2/3 0.05151g/s 164.7p/s 164.7c/s 164.7C/s lacrosse..pumpkin
Use the "--show" option to display all of the cracked passwords reliably
Session completed
[root@localhost run]# useradd taibai
[root@localhost run]# passwd taibai
更改用户 taibai 的密码 。
新的 密码:
无效的密码: WAY 过短
无效的密码: 是回文
重新输入新的 密码:
passwd: 所有的身份验证令牌已经成功更新。
[root@localhost run]# ./john --show shadow.txt
root:666666:17960:0:99999:7:::
1 password hash cracked, 0 left
字典是暴力破解,可添加内容至字典
[root@localhost run]# vi password.lst
#!comment:
#!comment: occurred in 2006 through 2010.
#!comment:
#!comment: Last update: 2011/11/20 (3546 entries)
#!comment:
#!comment: Last update: 2011/11/20 (3546 entries)
#!comment:
#!comment: For more wordlists, see http://www.openwall.com/wordlists/
Haolilong 【添加密码】
123456
12345
password
password1
123456789
[root@localhost run]# passwd taibai
更改用户 taibai 的密码 。
新的 密码:haolilong
重新输入新的 密码:haolilong
passwd: 所有的身份验证令牌已经成功更新。
[root@localhost run]# grep taibai /etc/shadow >./taibai.shadow.txt
[root@localhost run]# ./john --wordlist=./password.lst ./taibai.shadow.txt
Loaded 1 password hash (crypt, generic crypt(3) [?/64])
Press 'q' or Ctrl-C to abort, almost any other key for status
haolilong (taibai)
1g 0:00:00:00 100% 2.325g/s 223.2p/s 223.2c/s 223.2C/s haolilong..pamela
Use the "--show" option to display all of the cracked passwords reliably
Session completed
查看破解记录
[root@localhost run]# cat john.pot
$6$jVqHOL8bXoBUPLkr$scYXLekl1y0az66qZxmcXAGmkamj3VZa2NxrXPCzjNDg6VpX0fRz3kXRHOLzrYRNU.LdOhpHOQJLLoVmULfzN/:666666
$6$cJRamlcZ$9dlvG10/rHxKWad3A8xvecmwBc6.4ii8py7lJeacpiRRjIUlkGJT3Ikp4Hh6sGDQ2Udmdpj7aaOB/t73CJYRW.:haolilong
清空破解记录
[root@localhost run]# :>john.pot
[root@localhost run]# cat john.pot
八、端口检测 NMAP
1、NMAP简介
2、NMAP的扫描语法
3、常用的扫描类型
4、常用选项
安装nmap
[root@localhost run]# mount /dev/cdrom /media/cdrom
mount: block device /dev/sr0 is write-protected, mounting read-only
[root@localhost run]# cd /media/cdrom/Packages/
[root@localhost Packages]# rpm -ivh nmap-5.51-3.el6.x86_64.rpm
Preparing... ########################################### [100%]
1:nmap ########################################### [100%
8.1 扫描本机开放了那些TCP端口、UDP端口
[root@localhost Packages]# nmap 127.0.0.1
Starting Nmap 5.51 ( http://nmap.org ) at 2019-03-19 18:13 CST
Nmap scan report for localhost (127.0.0.1)
Host is up (0.0000050s latency).
Not shown: 996 closed ports
PORT STATE SERVICE
22/tcp open ssh
25/tcp open smtp
111/tcp open rpcbind
631/tcp open ipp
Nmap done: 1 IP address (1 host up) scanned in 0.11 seconds
[root@localhost ~]# nmap -sU 127.0.0.1
Starting Nmap 5.51 ( http://nmap.org ) at 2019-03-19 18:14 CST
Nmap scan report for localhost (127.0.0.1)
Host is up (0.000011s latency).
Not shown: 996 closed ports
PORT STATE SERVICE
68/udp open|filtered dhcpc
111/udp open rpcbind
631/udp open|filtered ipp
49393/udp open|filtered unknown
Nmap done: 1 IP address (1 host up) scanned in 1.28 seconds
8.2 检测当前172.16.1.1、16网段有哪些主机提供FTP服务
[tom2@localhost root]$ nmap -n -p 21 172.16.1.1/16
Starting Nmap 5.51 ( http://nmap.org ) at 2019-03-19 18:53 CST
Strange error from connect (105):No buffer space available
Nmap scan report for 172.16.0.1
Host is up (0.020s latency).
PORT STATE SERVICE
21/tcp open ftp
Nmap scan report for 172.16.1.47
Host is up (0.0069s latency).
PORT STATE SERVICE
21/tcp closed ftp
Nmap scan report for 172.16.7.64
Host is up (0.0082s latency).
PORT STATE SERVICE
21/tcp closed ftp
Nmap scan report for 172.16.23.221
Host is up (0.00049s latency).
PORT STATE SERVICE
21/tcp closed ftp
Nmap done: 65536 IP addresses (5 hosts up) scanned in 10.38 seconds
8.3 检测172.16.1.1、16网段有哪些存活机
[tom2@localhost root]$ nmap -n -sP 172.16.1.1/16
Starting Nmap 5.51 ( http://nmap.org ) at 2019-03-19 18:56 CST
Strange error from connect (105):No buffer space available
Nmap scan report for 172.16.0.1
Host is up (0.0045s latency).
Nmap scan report for 172.16.1.47
Host is up (0.0080s latency).
Nmap scan report for 172.16.7.64
Host is up (0.0073s latency).
Nmap scan report for 172.16.23.11
Host is up (0.0011s latency).
Nmap scan report for 172.16.23.221
Host is up (0.00054s latency).
Nmap done: 65536 IP addresses (5 hosts up) scanned in 30.12 seconds
8.4 检测172.16.1.1~100/16有哪些主机开启了文件共享
[tom2@localhost root]$ nmap -n -p 139,445 172.16.1.1-100
Starting Nmap 5.51 ( http://nmap.org ) at 2019-03-19 19:04 CST
Nmap scan report for 172.16.1.47
Host is up (0.0044s latency).
PORT STATE SERVICE
139/tcp closed netbios-ssn
445/tcp closed microsoft-ds
Nmap scan report for 172.16.1.48
Host is up (0.0052s latency).
PORT STATE SERVICE
139/tcp closed netbios-ssn
445/tcp closed microsoft-ds
Nmap done: 100 IP addresses (2 hosts up) scanned in 2.34 seconds
实验补充:
1、Passwd命令用 l u ;usermod 命令用 L U
2、超户进普通用户不需要密码,普通用户进超户需要密码 ,普通用户进普通用户需要密码
3、在vi编辑文档里在文件命令前加“#”是取消这条命令的意思
4、su决定是否加 .so
5、bois密码忘记后可以扣主板纽扣电池;服务器可以按红色按钮(clean cmos)
6、 密码设置方法

[root@localhost ~]# grub-md5-crypt 【获取加密密码串】