Apache Airflow (十) :SSHOperator及调度远程Shell脚本

个人主页:IT贫道_大数据OLAP体系技术栈,Apache Doris,Clickhouse 技术-CSDN博客
私聊博主:加入大数据技术讨论群聊,获取更多大数据资料。
博主个人B栈地址:豹哥教你大数据的个人空间-豹哥教你大数据个人主页-哔哩哔哩视频
目录
1. 安装“apache-airflow-providers-ssh ”provider package
2. 配置SSH Connection连接
3. 准备远程执行脚本
4. 编写DAG python配置文件
5. 调度python配置脚本
在实际的调度任务中,任务脚本大多分布在不同的机器上,我们可以使用SSHOperator来调用远程机器上的脚本任务。SSHOperator使用ssh协议与远程主机通信,需要注意的是SSHOperator调用脚本时并不会读取用户的配置文件,最好在脚本中加入以下代码以便脚本被调用时会自动读取当前用户的配置信息:
#Ubunto系统

. ~/.profile


#CentoOS或者RedHat系统

. ~/.bashrc
关于SSHOperator参数详解可以参照:
airflow.providers.ssh.operators.ssh — apache-airflow-providers-ssh Documentation
SSHOperator的常用参数如下:
ssh_conn_id(str):ssh连接id,名称自取,需要在airflow webserver界面配置,具体配置参照案例。

remote_host(str):远程连接节点host,如果配置,可替换ssh_conn_id中配置的远程host,可选。
command(str):在远程主机上执行的命令或脚本。
按照如下步骤来使用SSHOperator调度远程节点脚本:
1. 安装“apache-airflow-providers-ssh ”provider package
首先停止airflow webserver与scheduler,在node4节点切换到python37环境,安装ssh Connection包。另外,关于Providers package安装方式可以参照如下官网地址:
https://airflow.apache.org/docs/apache-airflow-providers/packages-ref.html#apache-airflow-providers-ssh
#切换Python37环境

[root@node4 ~]# conda activate python37


#安装ssh provider package

(python37) [root@node4 ~]# pip install apache-airflow-providers-ssh==2.1.1


#启动airflow

(python37) [root@node4 ~]# airflow webserver --port 8080

(python37) [root@node4 ~]# airflow scheduler
2. 配置SSH Connection连接
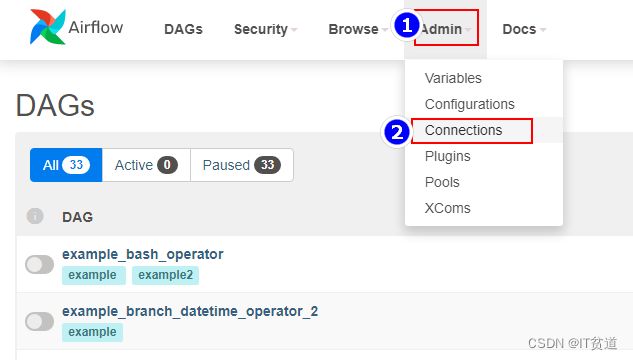
登录airflow webui ,选择“Admin”->“Connections”:
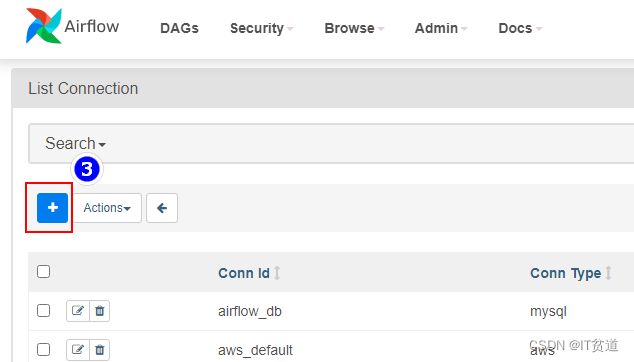
点击“+”添加连接,这里host连接的是node5节点:

3. 准备远程执行脚本
在node5节点/root路径下创建first_shell.sh,内容如下:
#!/bin/bash

echo "==== execute first shell ===="
在node3节点/root路径下创建second_shell.sh,内容如下:
#!/bin/bash

echo "==== execute second shell ===="
4. 编写DAG python配置文件
注意在本地开发工具编写python配置时,需要用到SSHOperator,需要在本地对应的python环境中安装对应的provider package。
C:\Users\wubai>d:

D:\>cd d:\ProgramData\Anaconda3\envs\python37\Scripts

d:\ProgramData\Anaconda3\envs\python37\Scripts>pip install apache-airflow-providers-ssh==2.1.1
python配置文件:
from datetime import datetime, timedelta
from airflow import DAG
from airflow.operators.bash import BashOperator
from airflow.providers.ssh.operators.ssh import SSHOperator

default_args = {
    'owner':'lisi',
    'start_date':datetime(2021, 9, 23),
    'retries': 1,  # 失败重试次数
    'retry_delay': timedelta(minutes=5) # 失败重试间隔
}

dag = DAG(
    dag_id = 'execute_remote_shell',
    default_args=default_args,
    schedule_interval=timedelta(minutes=1)
)

first=SSHOperator(
    task_id='first',
    ssh_conn_id='ssh-node5',# 配置在Airflow webui Connection中配置的SSH Conn id
    command='sh /root/first_shell.sh ',
    dag = dag
)

second=SSHOperator(
    task_id='second',
    ssh_conn_id='ssh-node5',# 配置在Airflow webui Connection中配置的SSH Conn id
    command='sh /root/second_shell.sh ',
    remote_host="192.168.179.6",#如果配置remote_host ,将会替换Connection中的SSH 配置的host
    dag=dag
)

first >> second
5. 调度python配置脚本
将以上配置好的python文件上传至node4节点$AIRFLOW_HOME/dags下,重启Airflow websever与scheduler,登录webui,开启调度:

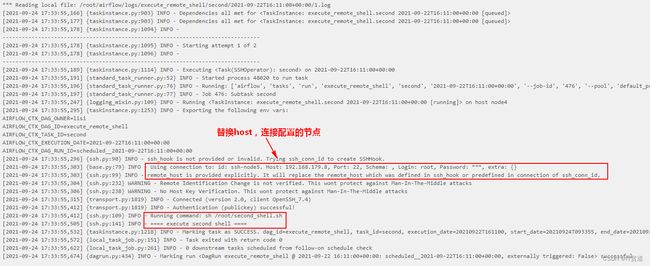
调度结果如下: