ChatBots are conversational agents, programs capable of conducting a conversation with an Internet user. In this tutorial I’ll walk you through an implementation of WhatsApp chatbot using Twilio platform.
ChatBots是对话代理,是能够与Internet用户进行对话的程序。 在本教程中,我将指导您使用Twilio平台实现WhatsApp聊天机器人的实现。
In addition to static chatbots, we will also benefit from the power of Google’s Dialogflow to create intelligent bots, capable of understanding human language.
除了静态聊天机器人之外,我们还将受益于Google的Dialogflow来创建能够理解人类语言的智能机器人。
1. WhatsApp聊天机器人 (1. WhatsApp Chatbot)
WhatsApp is the most popular OTT app in many parts of the world. Thanks to WhatsApp chatbots you can provide your customers with support on a platform they use and answer their questions immediately.
WhatsApp是世界许多地方最受欢迎的OTT应用程序。 借助WhatsApp聊天机器人,您可以在客户使用的平台上为其提供支持,并立即回答他们的问题。
Using Twilio, Flask and Heroku, as well as many other advanced platforms like DialogFlow, we can build amazing chatbots as we will do in this tutorial.
使用Twilio,Flask和Heroku以及DialogFlow等许多其他高级平台,我们可以像本教程中一样构建令人惊叹的聊天机器人 。
特威里奥 (Twilio)
Twilio is a cloud communications platform as a service (CPaaS) company which allows software developers to programmatically make and receive phone calls, send and receive text messages, and perform other communication functions using its web service APIs.
Twilio是一家云通信平台即服务(CPaaS)公司,它允许软件开发人员使用其Web服务API以编程方式拨打和接听电话,发送和接收短信以及执行其他通信功能。
With the Twilio API for WhatsApp, you can send notifications, have two-way conversations, or build chatbots.
使用适用于WhatsApp的Twilio API,您可以发送通知,进行双向对话或构建聊天机器人。
For free, and without waiting for your Twilio number to be approved for WhatsApp, Twilio Sandbox for WhatsApp enables you to create your chatbot immediately as we are about to see in this project.
免费且无需等待您的Twilio号码获得WhatsApp批准,Twilio Sandbox for WhatsApp可使您立即创建聊天机器人,就像我们将在此项目中看到的那样。
1. Create a Twilio account
1.创建一个Twilio帐户
2. Create a new project
2.创建一个新项目
3. On project console, open Programmable SMS Dashboard
3.在项目控制台上,打开“可编程SMS仪表板”
4. Select WhatsApp Beta
4.选择WhatsApp Beta
When you activate your sandbox, you will see the phone number associated with it (here +1 415 …) as well as its name (here regular-syllable)
激活沙箱后,您会看到与其关联的电话号码(此处为+1 415…)以及其名称(此处为常规音节)
使用Flask创建应用 (Create the application using Flask)
1. Create a new Python virtual environment :
1.创建一个新的Python虚拟环境:
In a new folder open terminal and execute :
python -m venv myvenv在新文件夹中,打开终端并执行:
python -m venv myvenv
2. Activate your virtual environment :
2.激活您的虚拟环境:
Windows :
myvenv\Scripts\activateWindows:
myvenv\Scripts\activateLinux :
source myvenv/bin/activateLinux:
source myvenv/bin/activate
3. Install these two Python packages :
3.安装以下两个Python软件包:
Twilio :
pip install twilioTwilio :
pip install twilioFlask :
pip install flask烧瓶 :
pip install flask
Flask is a micro web framework written in Python. This means flask provides you with tools, libraries and technologies that allow you to build a web application.
Flask是一个用Python编写的微型Web框架。 这意味着flask为您提供了允许您构建Web应用程序的工具,库和技术。
4. Create a Flask App :
4.创建一个Flask应用程序:
In your folder, create a file named app.py then copy&paste the following code:
在您的文件夹中,创建一个名为app.py的文件,然后复制并粘贴以下代码:
from flask import Flask, request
from twilio.twiml.messaging_response import MessagingResponseapp = Flask(__name__)@app.route("/")
def hello():
    return "Hello, World!"@app.route("/sms", methods=['POST'])
def sms_reply():
    """Respond to incoming calls with a simple text message."""
    # Fetch the message
    msg = request.form.get('Body')    # Create reply
    resp = MessagingResponse()
    resp.message("You said: {}".format(msg))    return str(resp)if __name__ == "__main__":
    app.run(debug=True)
This is a basic flask web app which enables us to get Hello, world! in / route, and get back our message if we POST it to /sms route as we can see in the following steps
这是一个基本的烧瓶网络应用程序,使我们能够获取Hello, world! 在/路由中,如果我们将其发布到/ sms路由,则返回我们的消息,如以下步骤所示
5. Run the app : python app.py
5.运行应用程序: python app.py

Your application is now running.
您的应用程序现在正在运行。
You can check that by typing http://127.0.0.1:5000/ in your browser. (You'll get Hello, world!)
您可以通过在浏览器中输入http://127.0.0.1:5000/进行检查。 (您会收到Hello, world! )
However, it wouldn’t be possible for distant machines to access your app, hence the need for Ngrok
但是,远程机器无法访问您的应用程序,因此需要Ngrok
使用Ngrok获取该应用程序的公共地址 (Get a public address to the app using Ngrok)
Ngrok will enable us to have a public URL for our application running locally.
Ngrok将使我们能够为在本地运行的应用程序提供一个公共URL。
1. Download Ngrok and unzip it
1.下载Ngrok并将其解压缩
2. Run it from the command line by executing : ./ngrok http 5000
2.通过执行以下命令从命令行运行它: ./ngrok http 5000
3. Now you can access your app running locally from a distant machine using the provided URL (something like this https://******.ngrok.io)
3.现在,您可以使用提供的URL(例如https://******.ngrok.io )从远程计算机上本地运行您的应用程序。
4. Go back to Twilio sandbox and paste it as the URL for incoming messages :
4.返回到Twilio沙箱,并将其粘贴为传入消息的URL:
5. You can now open WhatsApp in your phone, add the number you’ve got from Twilio in previous steps (+1 415 …), and start the conversation by the code they told you to start with (here join regular-syllable)
5.现在,您可以在手机中打开WhatsApp,添加之前步骤中从Twilio获得的电话号码(+1 415…),然后按照他们告诉您的代码开始通话(此处加入普通音节)
6. You can now send whatever WhatsApp message you want and the bot will reply by sending back the same message. It is kind of a parrot bot
6.现在,您可以发送所需的任何WhatsApp消息,并且机器人将通过发送回相同的消息进行回复。 这是一种鹦鹉机器人
However, we still have a major problem here, your machine should remain running all the time to allow the application to answer users’ requests.
但是,这里仍然存在一个主要问题,您的计算机应该一直保持运行状态,以允许应用程序回答用户的请求。
2.使用Heroku摆脱机器 (2. Get rid of your machine by using Heroku)
Thanks to Heroku we will be able to deploy our application, and all the requirements it needs to run effectively, in the Cloud. Hence our machine will benefit from the luxury of being turned off. To do so we need to :
感谢Heroku,我们将能够在云中部署我们的应用程序以及有效运行所需的所有需求。 因此,我们的机器将从关闭的奢华中受益。 为此,我们需要:
1. In our virtual environment, install gunicorn: pip install gunicorn
1.在我们的虚拟环境中,安装gunicorn: pip install gunicorn
2. Create these files in your folder :
2.在您的文件夹中创建以下文件:
Procfile: then save this content in it
web gunicorn app:appProcfile :然后将此内容保存在
web gunicorn app:appruntime.txt: then save this content in it
python-3.7.2runtime.txt :然后将此内容保存在其中
python-3.7.2requirements.txt: You can simply type
pip freeze > requirements.txtto fill it with all 3rd party libraries required by your app.requirements.txt :您只需键入
pip freeze > requirements.txt即可将其填充到应用所需的所有第3方库中。.gitignore: then save this content in it
.gitignore :然后将其保存在其中
myvenv/
*.pyc
3. Download & install Git; then in your virtual environment:
3.下载并安装Git ; 然后在您的虚拟环境中:
Initialize a new git repository in your project folder :
git init在您的项目文件夹中初始化一个新的git仓库:
git initAdd all untracked files to git repository :
git add .将所有未跟踪的文件添加到git存储库:
git add .Commit the changes to git repository :
git commit -m "first commit"将更改提交到git仓库:
git commit -m "first commit"
4. Create a new Heroku account if you don’t have one. Then download Heroku Command Line Interface (CLI) which makes it easy to create and manage your Heroku apps directly from the terminal.
4.如果您没有,请创建一个新的Heroku帐户 。 然后下载Heroku 命令行界面(CLI) ,可轻松从终端直接创建和管理Heroku应用。
5. Connect to your Heroku account from your virtual environment using heroku login then you will be forwarded to a web-based interface in the browser to complete the authentication phase.
5.使用heroku login从虚拟环境连接到您的Heroku帐户,然后您将被转发到浏览器中基于Web的界面以完成身份验证阶段。
6. Create a new Heroku app heroku create
6.创建一个新的Heroku应用程序heroku create
7. Deploy your app by pushing your local git repository to the remote Heroku app’s git repository : git push heroku master
7.通过将本地git存储库推送到远程Heroku应用程序的git存储库来部署应用程序: git push heroku master
Finally, when the deployment is done, you will see in the terminal the address where you can reach to your app. -something like https://- Copy it and go back to your sandbox to replace the Ngrok URL by the new Heroku one.
最后,完成部署后,您将在终端中看到可以访问应用程序的地址。 -类似于https://将其复制并返回到沙箱,以新的Heroku替换Ngrok URL。

Congratulations your parrot WhatsApp Bot is now running 24/7, it does not need assistance from your machine anymore you can turn it off.
恭喜您的鹦鹉WhatsApp Bot现在正在24/7运行,它不再需要您机器的帮助您可以将其关闭。
3.更新您的代码 (3. Update your code)
Say, you come up tomorrow with another idea rather than this parrot bot which you’ve made, all you need to do is to make the changes in your code (in the file app.py. You can also add more files if the project is complex) then:
假设您明天想出了一个新的主意,而不是您自己制作的鹦鹉机器人,那么您要做的就是在代码中进行更改(在文件app.py中 。如果该项目,您还可以添加更多文件很复杂),然后:
# connect to your virtual environment
\Scripts\activate #Windows
source /bin/activate #Linux# connect to your heroku account
heroku login# prepare all the modified files and push them to Heroku
git add .
git commit -m "first change"
git push heroku master
⚠️ In case you have installed new packages in your virtual environment, you have to tell Heroku about them by updating the file requirements.txt too: Just type pip freeze > requirements.txt before git add . to do so.
In️如果您已在虚拟环境中安装了新软件包,则也必须通过更新文件requirements.txt来告知Heroku:只需在git add .之前输入pip freeze > requirements.txt git add . 这样做。
4.使用您自己的号码 (4. Use your own number)
If you want to create a serious business WhatsApp bot, the approach I presented earlier presents two drawbacks for you :
如果您想创建一个严肃的商业WhatsApp机器人,我前面介绍的方法将给您带来两个缺点:
(1) In order to use the bot, your clients must kick off the conversation with a certain bizarre message (here join regular-syllable);
(1)为了使用漫游器,您的客户必须以某种奇怪的消息开始对话(此处加入常规音节);
(2) The bot comes up with the logo of Twilio instead of yours.
(2)该漫游器带有Twilio的徽标,而不是您的徽标。
This is due to the fact that we used the Twilio sandbox and the number we were provided with is not ours. However, Twilio offers you the possibility to own a number and consequently get rid of the aforementioned problems. To do so, here are the steps you need to follow :
这是由于我们使用了Twilio沙箱,而提供给我们的电话号码不是我们的。 但是,Twilio为您提供了拥有一些资产的可能性,因此摆脱了上述问题。 为此,这是您需要遵循的步骤:
Step 1: Buy a Twilio number
步骤1:购买Twilio号码

Step 2: Request access to enable your Twilio number for WhatsApp by filling out Twilio’s “Request Access” form (make sure you have your Facebook Business Manager ID beforehand)
第2步:通过填写Twilio的“请求访问”表格来请求为WhatsApp启用Twilio号码的访问权限 (确保您事先拥有Facebook业务经理ID)
When your request will be approved, Twilio will notify you by an email which will walk you through the next steps to follow for submitting your sender Profile and WhatsApp Message Templates, then another email will show you how to approve Twilio to send messages on your behalf and to verify your Facebook Business Manager account.
批准您的请求后,Twilio将通过电子邮件通知您,该电子邮件将引导您完成下一步以提交发件人资料和WhatsApp消息模板 ,然后另一封电子邮件将向您展示如何批准Twilio代表您发送消息并验证您的Facebook Business Manager帐户 。
So, after sending the request, make sure you check your emails frequently for the next steps. The whole process takes 2 to 3 weeks.
因此,发送请求后,请确保您经常检查电子邮件以进行下一步。 整个过程需要2至3周。
Further information about the process
有关流程的更多信息
5.使用DialogFlow的高级聊天机器人 (5. Advanced chatbots using DialogFlow)
So far, we created a chatbot which have the capability to manage simple conversations and repeat what one says isn’t that cool . Actually, what we focused on in previous sections is to have this bot working over the popular chat platform WhatsApp.
到目前为止,我们创建了一个聊天机器人,该聊天机器人具有管理简单对话并重复人们所说的“不是很酷”的功能。 实际上,我们在前几节中重点介绍的是让该机器人在流行的聊天平台WhatsApp上运行。
In fact, we didn’t use any of our data to train or personalize the bot. In this section, we will train and fine-tune our chatbot and have it interact with the backend. Let’s take a shopping/delivery store case study for instance.
实际上,我们没有使用任何数据来训练机器人或对其进行个性化设置。 在本节中,我们将训练和微调我们的聊天机器人,并使它与后端交互。 让我们以购物/送货商店案例研究为例。
设置DialogFlow代理 (Set up DialogFlow agent)
A Dialogflow agent is a virtual agent that handles conversations with your end-users. It is a natural language understanding module that understands the nuances of human language. DialogFlow’s agents use Intents to categorize end-user intentions for each conversation turn and Entities to identify and extract specific data from end-user expressions (We’ll use them to send data to the backend).
Dialogflow 代理是一个虚拟代理,用于处理与最终用户的对话。 这是一种自然语言理解模块,可以理解人类语言的细微差别。 DialogFlow的代理使用Intents对每个会话回合的最终用户意图进行分类,并使用Entities识别并从最终用户表达式中提取特定数据(我们将使用它们将数据发送到后端)。
So first things first .. Login into DialogFlow Console and create a new agent .. In the left-side menu, you can enable “Small talk”. Basically your bot is now able to automatically handle the ‘hi, hello, how are you, bye, …’-kind of things. Try it! (there is a “Try it now” section in the right)
所以首先要做的是.. 登录到 DialogFlow控制台 并创建一个新的代理 ..在左侧菜单中,您可以启用“小讲话” 。 基本上,您的机器人现在可以自动处理“嗨,你好,你好,再见……”这类事情。 试试吧! (右侧有一个“立即尝试 ”部分)
When an end-user writes or says something, Dialogflow matches the end-user expression to the best intent in your agent. In order to do that, your agent have to be trained on some training phrases (example phrases for what end-users might say). When an end-user expression resembles one of these phrases, Dialogflow matches the intent. You don’t have to define every possible example, because Dialogflow’s built-in machine learning expands on your list with other, similar phrases.
当最终用户写或说些什么时,Dialogflow会将最终用户表达式与代理中的最佳意图进行匹配。 为此,必须对您的代理进行一些培训短语的培训(例如最终用户可能说的短语)。 当最终用户表达式类似于这些短语之一时,Dialogflow会匹配意图。 您不必定义每个可能的示例,因为Dialogflow的内置机器学习功能会在列表中扩展其他相似的短语。
- In your left-hand menu, select Intent and create a new one. 在左侧菜单中,选择“意图”并创建一个新的意图。
- In the training phrases section, add some expressions that will trigger this intent. While you are adding them you will see that some entities are automatically highlighted (like location or date-time etc); you can also add custom entities if you want. 在训练短语部分中,添加一些将触发此意图的表达式。 添加它们时,您会看到某些实体会自动突出显示(如位置或日期时间等); 您还可以根据需要添加自定义实体。
Under the action and parameters section, you can mark some entities as required so that the agent will always ask for them when the intent is triggered. Note that if you mark a parameter as required you have to add the question(s) the agent will ask end users in the prompts column.
在“操作和参数”部分下,您可以根据需要标记某些实体,以便代理在触发意图时始终会要求它们。 请注意,如果您根据需要标记参数,则必须添加问题,代理将在提示列中询问最终用户。
Moreover, you have to possibility to add a default answer(s) under the Responses section or let the back-end generate custom answers.
此外,您必须在“响应”部分下添加默认答案,或者让后端生成自定义答案。
资料库 (Data Base)
We’ll be using Google’s Firebase real time database, which is a cloud-hosted NoSQL database that lets you store and sync data between you and your users in real time using JSON format.
我们将使用Google的Firebase实时数据库,它是一个由云托管的NoSQL数据库,可让您使用JSON格式在您和您的用户之间实时存储和同步数据。
1- Go to Firebase website and add a new project.
1-转到Firebase网站并添加一个新项目。
2- In the left-hand menu, select Database then choose realtime database in test mode.
2-在左侧菜单中,选择数据库,然后选择测试模式下的实时数据库。
In order to be able to access your DB, add and delete data, you have to have the DB credentials.
为了能够访问数据库,添加和删除数据,您必须具有数据库凭据。
3- Click on the gear icon next to the Project overview, then select Project settings. In the Firebase SDK snippet choose config and copy the credentials in a separate file in your computer.
3-单击项目概述旁边的齿轮图标,然后选择项目设置 。 在Firebase SDK片段中,选择“ 配置”,然后将凭据复制到计算机中的单独文件中。
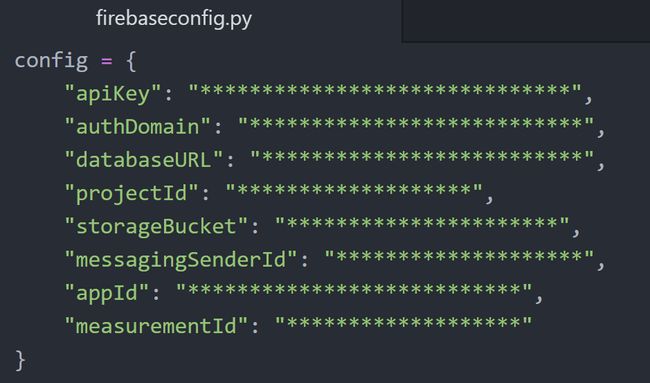
4- In your computer/virtual environment, create an app.py file and import these credentials, together with other useful libraries.
4-在您的计算机/虚拟环境中,创建一个app.py文件并导入这些凭据以及其他有用的库。
5- Add your products and their characteristics to the realtime database:
5-将您的产品及其特征添加到实时数据库中:
5.1. In a separate file configure the authentication to Firebase:
5.1。 在单独的文件中,将身份验证配置为Firebase:
import pyrebase            #install pyrebase first using pip install
from firebaseconfig import config # firebase credentialsfirebase = pyrebase.initialize_app(config)
db = firebase.database()
5.2. Prepare your products in JSON format and add them to the DB using the following commands:
5.2。 使用以下命令将产品准备为JSON格式并将其添加到数据库中:
prod1 = {
"ID":"0",
"order":"0",
"number": 10,
"color": "black",
"size":"S",
"address":"-",
"date":"-"
}# add a product
db.child("products").push({"shirt":prod1})# update a product
db.child("products").update({"shirt":prod2}) #define prod2 before# remove the whole chain of products
db.child("products").remove()
You can check (in realtime) your DB’s web interface to see the updates you are making.
您可以(实时)检查数据库的Web界面以查看正在进行的更新。
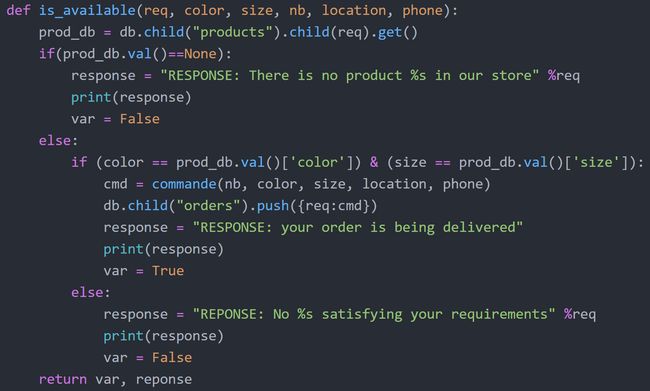
检查我们的库存中是否有可用的产品 (Check if a product is available in our stock)
In the usefulfunction.py file, we define the functions we are about to use in our implementation, among them there is the is_available() function, which checks whether a given product exists in the realtime DB
在有用的function.py文件中,我们定义将在实现中使用的函数,其中包括is_available()函数,该函数检查实时数据库中是否存在给定的产品
来自DialogFlow的过程数据 (Process data coming from DialogFlow)
The characteristics of the user’s order come from Dialogflow in a JSON format. The following function extracts these characteristics and checks whether there is a product satisfying these requirements.
用户订单的特征来自JSON格式的Dialogflow。 以下功能提取这些特征并检查是否有满足这些要求的产品。
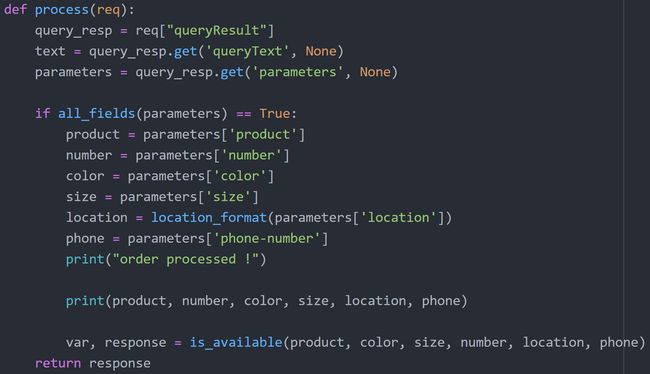
You might note the presence of two undefined functions: all_fields() function just checks if all the required fields are filled by the end user, while the location_format() function adapts the format of the location variable to a readable one.
您可能会注意到存在两个未定义的函数: all_fields()函数仅检查最终用户是否填写了所有必填字段,而location_format()函数将location变量的格式调整为可读的格式。
放在一起 (Put it all together)
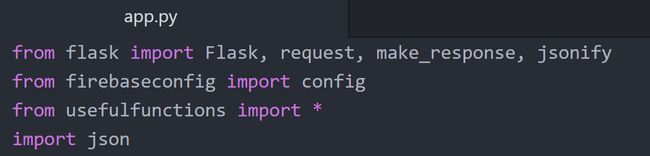
In your file app.py we set up the Flask API.
在您的文件app.py中,我们设置了Flask API。
The / main root shows just a hello world .. Professionals have standards ;)
/主根目录仅显示一个世界 。.专业人员具有标准;)
The /check path is where we receive the POST request, extract data from Dialogflow, process it, check the availability of the product in the realtime DB and reply the user always using JSON format.
/ check路径是我们接收POST请求,从Dialogflow提取数据,对其进行处理,检查实时数据库中产品可用性以及始终使用JSON格式答复用户的位置。
Now, you can run the app.py locally and use Ngrok to get a public address, or push your application to Heroku as we’ve done previously.
现在,您可以在本地运行app.py并使用Ngrok获取公共地址,或者像我们之前所做的那样将您的应用程序推送到Heroku。
履行 (Fulfillment)
In Dialogflow, by default, your agent responds to a matched intent with a static response. In order to use dynamic answers, you have to enable the fulfillment option.
默认情况下,在Dialogflow中,您的代理使用静态响应来响应匹配的意图。 为了使用动态答案,您必须启用实现选项。
Go back to your Dialogflow console, in the left-hand menu click on fulfillment, enable webhook, change the URL to the one where your app is hosted and save the changes.
返回到Dialogflow控制台,在左侧菜单中单击实现 ,启用webhook ,将URL更改为承载应用程序的URL,然后保存更改。
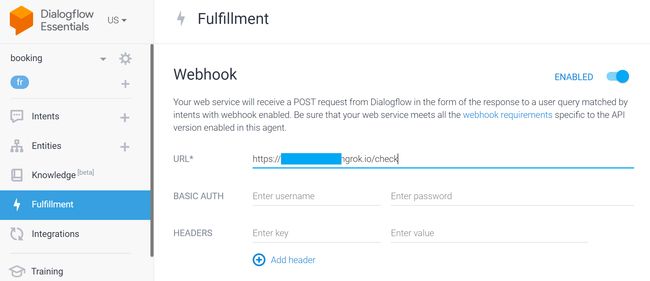
When an intent with fulfillment enabled is matched, Dialogflow sends a request to your webhook service (backend app) with information about the matched intent.
当启用了实现的意图被匹配时,Dialogflow会向您的webhook服务(后端应用)发送请求,其中包含有关匹配的意图的信息。
Now go to the intent you’ve created previously (under the Intents section), on the bottom of that page you’ll see a fulfillment section, enable webhook call for intent and for slot filling.
现在转到您先前创建的意图(在“意图”部分下),在该页面底部,您将看到一个实现部分,启用webhook调用以实现意图和插槽填充。
Congratulations .. Your chatbot is now running as expected, check it under the Try it now section.
恭喜。您的聊天机器人现在已按预期运行,请在立即尝试部分下进行检查。
结论 (Conclusion)
When an end-user starts a conversation with the chatbot, this latter tries to match the incoming expressions to one of its Intents. When it manages to do so, it will try to fill in all the required entities, and it sends all these entities (the characteristics of the product in our case) to the link we mentioned in the Fulfillment section.
当最终用户开始会话与聊天机器人 ,这后者试图进入的表达式匹配到其意图中的一个。 当它设法这样做时,它将尝试填写所有必需的实体 ,并将所有这些实体(在本例中为产品的特征)发送到我们在“ 实现”部分中提到的链接。
After our Flask web application receives the characteristics, it verifies if the requested product is available in the database, and if so, it adds the command in the Firebase RT DB. Then, an appropriate response is sent to the end-user.
在我们的Flask Web应用程序接收到特征之后,它将验证请求的产品在数据库中是否可用,如果有,则将命令添加到Firebase RT DB中 。 然后,将适当的响应发送给最终用户。
You can follow the steps mentioned in the above sections to use this chatbot on WhatsApp, just as you can use the DialogFlow’s Integration option to integrate it with Facebook Messenger, Slack, your own website and many other platforms.
您可以按照以上各节中提到的步骤在WhatsApp上使用此聊天机器人,就像可以使用DialogFlow的Integration选项将其与Facebook Messenger,Slack,您自己的网站和许多其他平台集成一样。
翻译自: https://towardsdatascience.com/a-guide-to-building-whatsapp-chatbots-using-dialogflow-and-firebase-4ff5e904ac3