OpenCV学习总结
- numpy为矩阵运算函数库
- RGB→BGR
- opencv中x轴正方向向右,y轴正方向向下
- cv2中函数均为x,y,其他均为y,x
- shape元组中包含(y,x,channels)
- Process:Image Input→Image Processing→Image Output
文章目录
- Read Images Videos and Web cam(Input & Output)
-
- Images
- Videos
- Web cam
- Basic Functions
- Resizing and Cropping(裁剪)
- Shapes and Text
- Wrap Prespective(透视变换)
- Joining Images
- Color Detection
- Contour(轮廓)/Shape Detection
- Face detection
- 应用
-
- YOLOv3物体检测
- QRcode识别
Read Images Videos and Web cam(Input & Output)
Images
import cv2

img = cv2.imread("Resources/view.jpg")

cv2.imshow("Output", img)
cv2.waitKey(0)
Videos
import cv2

cap = cv2.VideoCapture("Resources/test_video.mp4")  # 路径在python项目中

while True:
    success, img = cap.read()  # 说明成功取帧
    cv2.imshow("video", img)
    if cv2.waitKey(1) & 0xff == ord('q'):  # 一帧持续1ms或按下q键停止
        break
Web cam
import cv2

cap = cv2.VideoCapture(0)
# “0”为电脑自带摄像头,有其他摄像头可输入摄像头id

cap.set(3, 640)  # 宽
cap.set(4, 480)  # 高
cap.set(10, 100)  # 亮度

while True:
    success, img = cap.read()
    cv2.imshow("video", img)
    if cv2.waitKey(1) & 0xff == ord('q'):
        break
Basic Functions
import cv2
import numpy as np  # 矩阵运算函数库

img = cv2.imread("Resources/view.jpg")
kernel = np.ones((5, 5), np.uint8)  # 5x5均为1的矩阵,矩阵每个单元可由一个8位无符号整型数表示

imgGray = cv2.cvtColor(img, cv2.COLOR_BGR2GRAY)  # 图片转换为灰度
imgBlur = cv2.GaussianBlur(imgGray, (7, 7), 0)  # 高斯模糊
imgCanny = cv2.Canny(img, 150, 200)  # 边缘检测
imgDilation = cv2.dilate(imgCanny, kernel, iterations=1)  # 膨胀
imgEroded = cv2.erode(imgDilation, kernel, iterations=1)  # 腐蚀

cv2.imshow("Gray Image", imgGray)
cv2.imshow("Blur Image", imgBlur)
cv2.imshow("Canny Image", imgCanny)
cv2.imshow("Dilation Image", imgDilation)
cv2.imshow("Eroded Image", imgEroded)
cv2.waitKey(0)
Resizing and Cropping(裁剪)
print(img.shape)  # 输出(y,x,通道数)

imgResize = cv2.resize(img, (1000, 500))  # (x,y)
imgCropped = img[0:200, 0:400]  # [y切片,x切片]
Shapes and Text
img = np.zeros((512, 512, 3), np.unit8)  # 512x512个像素,每个像素有3个维度(GBR),每个像素的每个维度可由8位整形二进制数表示,维度为1时即为灰度显示
img[:] = 255, 0, 0  # GBR,将所有像素填充为红色
cv2.line(img, (0, 0), (img.shape[1], img.shape[0]), (0, 255, 0), 3)  # 线
cv2.rectangle(img, (0, 0), (250, 350), (0, 0, 255), 2)  # 矩形 thickness部分为cv2.FILLED函数时将填充内部
cv2.circle(img, (400, 50), 30, (255, 255, 0), 5)  # ⚪
cv2.putText(img, "OPENCV", (300, 200), cv2.FONT_HERSHEY_SIMPLEX, 1, (0, 255, 0), 1)  # 文本
Wrap Prespective(透视变换)
步骤:
- Processing
- Transform Matrix
- Warp function
import cv2
import numpy as np

img = cv2.imread("Resources/cards.jpg")

x, y = 250, 350
pts1 = np.float32([[111, 219], [287, 188], [154, 482], [352, 440]])
pts2 = np.float32([[0, 0], [x, 0], [0, y], [x, y]])
matrix = cv2.getPerspectiveTransform(pts1, pts2)
# 转换矩阵
imgOutput = cv2.warpPerspective(img, matrix, (x, y))

cv2.imshow("Image", img)
cv2.imshow("Output", imgOutput)

cv2.waitKey(0)
Joining Images
import cv2
import numpy as np


def stackimages(scale, imgarray):
    rows = len(imgarray)
    cols = len(imgarray[0])
    rowsavailable = isinstance(imgarray[0], list)
    width = imgarray[0][0].shape[1]
    height = imgarray[0][0].shape[0]
    if rowsavailable:
        for x in range(0, rows):
            for y in range(0, cols):
                if imgarray[x][y].shape[:2] == imgarray[0][0].shape[:2]:
                    imgarray[x][y] = cv2.resize(imgarray[x][y], (0, 0), None, scale, scale)
                else:
                    imgarray[x][y] = cv2.resize(imgarray[x][y], (imgarray[0][0].shape[1], imgarray[0][0].shape[0]), None, scale, scale)
                if len(imgarray[x][y].shape) == 2: imgarray[x][y] = cv2.cvtColor(imgarray[x][y], cv2.COLOR_GRAY2BGR)
        imageblank = np.zeros((height, width, 3), np.uint8)
        hor = [imageblank]*rows
        hor_con = [imageblank]*rows
        for x in range(0, rows):
            hor[x] = np.hstack(imgarray[x])
        ver = np.vstack(hor)
    else:
        for x in range(0, rows):
            if imgarray[x].shape[:2] == imgarray[0].shape[:2]:
                imgarray[x] = cv2.resize(imgarray[x], (0, 0), None, scale, scale)
            else:
                imgarray[x] = cv2.resize(imgarray[x], (imgarray[0].shape[1], imgarray[0].shape[0]), None, scale, scale)
            if len(imgarray[x].shape) == 2: imgarray[x] = cv2.cvtColor(imgarray[x], cv2.COLOR_GRAY2BGR)
        hor = np.hstack(imgarray)
        ver = hor
    return ver


img = cv2.imread('Resources/lena.png')
imgGray = cv2.cvtColor(img, cv2.COLOR_BGR2GRAY)

imgStack = stackimages(0.5, ([img, imgGray, img], [img, img, img]))

# imgHor = np.hstack((img,img))
# imgVer = np.vstack((img,img))
# cv2自带水平/垂直堆栈函数产生的图片①大小无法重新自动调整②堆栈图片通道数必须要相同
# cv2.imshow("Horizontal",imgHor)
# cv2.imshow("Vertical",imgVer)
cv2.imshow("ImageStack", imgStack)

cv2.waitKey(0)
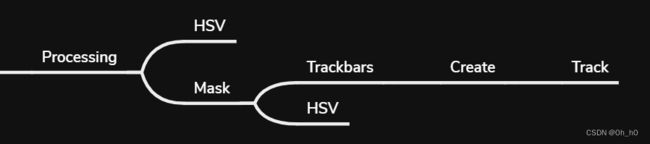
Color Detection
步骤:
import cv2
import numpy as np


def empty(a):
    pass


def stackimages(scale, imgarray):
    rows = len(imgarray)
    cols = len(imgarray[0])
    rowsavailable = isinstance(imgarray[0], list)
    width = imgarray[0][0].shape[1]
    height = imgarray[0][0].shape[0]
    if rowsavailable:
        for x in range(0, rows):
            for y in range(0, cols):
                if imgarray[x][y].shape[:2] == imgarray[0][0].shape[:2]:
                    imgarray[x][y] = cv2.resize(imgarray[x][y], (0, 0), None, scale, scale)
                else:
                    imgarray[x][y] = cv2.resize(imgarray[x][y], (imgarray[0][0].shape[1], imgarray[0][0].shape[0]), None, scale, scale)
                if len(imgarray[x][y].shape) == 2: imgarray[x][y] = cv2.cvtColor(imgarray[x][y], cv2.COLOR_GRAY2BGR)
        imageblank = np.zeros((height, width, 3), np.uint8)
        hor = [imageblank]*rows
        hor_con = [imageblank]*rows
        for x in range(0, rows):
            hor[x] = np.hstack(imgarray[x])
        ver = np.vstack(hor)
    else:
        for x in range(0, rows):
            if imgarray[x].shape[:2] == imgarray[0].shape[:2]:
                imgarray[x] = cv2.resize(imgarray[x], (0, 0), None, scale, scale)
            else:
                imgarray[x] = cv2.resize(imgarray[x], (imgarray[0].shape[1], imgarray[0].shape[0]), None, scale, scale)
            if len(imgarray[x].shape) == 2: imgarray[x] = cv2.cvtColor(imgarray[x], cv2.COLOR_GRAY2BGR)
        hor = np.hstack(imgarray)
        ver = hor
    return ver


path = 'Resources/lambo.PNG'
cv2.namedWindow("TrackBars")
cv2.resizeWindow("TrackBars", 640, 240)
cv2.createTrackbar("Hue Min", "TrackBars", 0, 179, empty)
cv2.createTrackbar("Hue Max", "TrackBars", 179, 179, empty)
cv2.createTrackbar("Sat Min", "TrackBars", 0, 255, empty)
cv2.createTrackbar("Sat Max", "TrackBars", 255, 255, empty)
cv2.createTrackbar("Val Min", "TrackBars", 0, 255, empty)
cv2.createTrackbar("Val Max", "TrackBars", 255, 255, empty)

img = cv2.imread(path)
imgHSV = cv2.cvtColor(img, cv2.COLOR_BGR2HSV)

while True:
    h_min = cv2.getTrackbarPos("Hue Min", "TrackBars")
    h_max = cv2.getTrackbarPos("Hue Max", "TrackBars")
    s_min = cv2.getTrackbarPos("Sat Min", "TrackBars")
    s_max = cv2.getTrackbarPos("Sat Max", "TrackBars")
    v_min = cv2.getTrackbarPos("Val Min", "TrackBars")
    v_max = cv2.getTrackbarPos("Val Max", "TrackBars")
    print(h_min, h_max, s_min, s_max, v_min, v_max)
    lower = np.array([h_min, s_min, v_min])
    upper = np.array([h_max, s_max, v_max])
    mask = cv2.inRange(imgHSV, lower, upper)
    imgResult = cv2.bitwise_and(img, img, mask=mask)

    # cv2.imshow("Original", img)
    # cv2.imshow("HSV", imgHSV)
    # cv2.imshow("MASK", mask)
    # cv2.imshow("Result", imgResult)

    imgStack = stackimages(0.6, ([img, imgHSV], [mask, imgResult]))
    cv2.imshow("Stacked Images", imgStack)

    cv2.waitKey(1)
Contour(轮廓)/Shape Detection
步骤:
- Processing
- Gray
- Blur
- Canny
- Contours
- ObjectCorner
import cv2
import numpy as np


def stackimages(scale, imgarray):
    rows = len(imgarray)
    cols = len(imgarray[0])
    rowsavailable = isinstance(imgarray[0], list)
    width = imgarray[0][0].shape[1]
    height = imgarray[0][0].shape[0]
    if rowsavailable:
        for x in range(0, rows):
            for y in range(0, cols):
                if imgarray[x][y].shape[:2] == imgarray[0][0].shape[:2]:
                    imgarray[x][y] = cv2.resize(imgarray[x][y], (0, 0), None, scale, scale)
                else:
                    imgarray[x][y] = cv2.resize(imgarray[x][y], (imgarray[0][0].shape[1], imgarray[0][0].shape[0]), None, scale, scale)
                if len(imgarray[x][y].shape) == 2: imgarray[x][y] = cv2.cvtColor(imgarray[x][y], cv2.COLOR_GRAY2BGR)
        imageblank = np.zeros((height, width, 3), np.uint8)
        hor = [imageblank]*rows
        hor_con = [imageblank]*rows
        for x in range(0, rows):
            hor[x] = np.hstack(imgarray[x])
        ver = np.vstack(hor)
    else:
        for x in range(0, rows):
            if imgarray[x].shape[:2] == imgarray[0].shape[:2]:
                imgarray[x] = cv2.resize(imgarray[x], (0, 0), None, scale, scale)
            else:
                imgarray[x] = cv2.resize(imgarray[x], (imgarray[0].shape[1], imgarray[0].shape[0]), None, scale, scale)
            if len(imgarray[x].shape) == 2: imgarray[x] = cv2.cvtColor(imgarray[x], cv2.COLOR_GRAY2BGR)
        hor = np.hstack(imgarray)
        ver = hor
    return ver


def getcontours(image):
    contours, hierarchy = cv2.findContours(image, cv2.RETR_EXTERNAL, cv2.CHAIN_APPROX_NONE)
    for cnt in contours:
        area = cv2.contourArea(cnt)  # 面积
        print(area)
        cv2.drawContours(imgContour, cnt, -1, (255, 0, 0), 3)  # 轮廓标识
        peri = cv2.arcLength(cnt, True)  # 轮廓长度
        # print(peri)
        approx = cv2.approxPolyDP(cnt, 0.02*peri, True)  # 角点
        print(approx)  # 角点位置坐标
        print(len(approx))
        objcor = len(approx)  # 角点数
        x, y, w, h = cv2.boundingRect(approx)  # 边界矩形框位置坐标

        if objcor == 3:
            objecttype = "Tri"
        elif objcor == 4:
            aspratio = w/float(h)
            if 0.95 < aspratio < 1.05:
                objecttype = "Square"
            else:
                objecttype = "Rectangle"
        elif objcor > 4:
            objecttype = "Circle"
        else:
            objecttype = "none"
    # 图形检测

        cv2.rectangle(imgContour, (x, y), (x+w, y+h), (0, 255, 0), 2)  # 边界矩形框生成
        cv2.putText(imgContour, objecttype, (x, y), cv2.FONT_HERSHEY_SIMPLEX, 1, (0, 0, 0), 1)  # 文本


path = 'Resources/shapes.png'
img = cv2.imread(path)
imgContour = img.copy()

imgGray = cv2.cvtColor(img, cv2.COLOR_BGR2GRAY)
imgBlur = cv2.GaussianBlur(imgGray, (7, 7), 1)
imgCanny = cv2.Canny(imgBlur, 50, 50)
getcontours(imgCanny)

imgBlank = np.zeros_like(img)  # 产生与img相同像素数的区域,且各像素的值均为0
imgStack = stackimages(0.6, ([img, imgGray, imgBlur],
                             [imgCanny, imgContour, imgBlank]))

cv2.imshow("Stack", imgStack)

cv2.waitKey(0)
Face detection
OPENCV CASCADES
import cv2

faceCascade = cv2.CascadeClassifier("Resources/haarcascade_frontalface_default.xml")
img = cv2.imread('Resources/lena.png')
imgGray = cv2.cvtColor(img, cv2.COLOR_BGR2GRAY)

faces = faceCascade.detectMultiScale(imgGray, 1.1, 4)

for(x, y, w, h) in faces:
    cv2.rectangle(img, (x, y), (x+w, y+h), (255, 0, 0), 2)

cv2.imshow("Result", img)
cv2.waitKey(0)
应用
YOLOv3物体检测
#输入图片

#yolo查找

	#重复处理


#图片输出


#视频:while循环每一帧图片

#加载yolo3模型:类型表

	classesFile = 'coco.names'

	classNames = []

	with open(classFile, 'rt') as f:

	classNames = f.read().rstrip('\n').split('\n')

#加载模型文件:1.architecture of the network 2.weights

ps.树莓派可用tiny版本

#creat network

modelConfiguration = 'yolov3-320.cfg'

modelWeights = 'yolov3-320.weights'


net = cv2.dnn.readNetFromDarknet(modelConfiguration, modelWeights)

net.setPreferableBackend(cv2.dnn.DNN_BACKEND_OPENCV)

net.setPreferableTarget(cv2.dnn.DNN_TARGET_CPU)


# input image2network(只接收blob类型图片)

  blob = cv2.dnn.blobFromImage(img, 1/255, (320, 320), [0, 0, 0], 1, crop=False)

  net.setInput(blob)


  # output

  layerNames = net.getLayerNames() # 输出坐标

  outputNames = [layerNames[i[0] - 1] for i in

          net.getUnconnectedOutLayers()] # net.getUnconnectedOutLayers()输出的坐标都以1开始,故减一

  Outputs = net.forward(outputNames) # 输出有三层,每层都是一个矩阵数组,共有85列元素,均为百分数,0为cx,1为cy,2为w,3为h,4为确定物体的概率,5到79为所有存储物体分别的概率


#findObjects

def findobjects(outputs, image):

  ht, wt, ct = image.shape

  bbox = []

  classids = []

  confs = []


  for output in outputs:

    for det in output:

      scores = det[5:]

      classid = np.argmax(scores)

      confidence = scores[classid]

      if confidence > confThreshold:

        w, h = int(det[2]*wt), int(det[3]*ht)

        x, y = int((det[0]*wt)-w/2), int((det[1]*ht)-h/2)

        bbox.append([x, y, w, h])

        classids.append(classid)

        confs.append(float(confidence))

        # 移除多余框(非极大值抑制,Non-Maximum Suppression,NMS)

        indices = cv2.dnn.NMSBoxes(bbox, confs, confThreshold, nmsThreshold)

        for i in indices:

          i = i[0]

          box = bbox[i]

          x, y, w, h = box[0], box[1], box[2], box[3]

          # 画框

          cv2.rectangle(img, (x, y), (x+w, y+h), (255, 0, 255), 2)

          # 分类标识

          cv2.putText(img, f'{classNames[classids[i]].upper()} {int(confs[i]*100)}%', (x, y-10),

                cv2.FONT_HERSHEY_SIMPLEX, 0.6, (255, 0, 255), 2)
QRcode识别
from pyzbar.pyzbar import decode

#视频:while循环每一帧图片

#decode解出码中的信息

for barcode in decode(img):

	myData = barcode.data.decode('utf-8')

#画出边框

pts = np.array([barcode.polygon], np.int32)

pts = pts.reshape((-1, 1, 2))

cv2.polylines(img, [pts], True, (255, 0, 255), 5)

#标出信息

pts2 = barcode.rect

cv2.putText(img, myData, (pts2[0], pts2[1]), cv2.FONT_HERSHEY_SIMPLEX, 0.9, (255, 0, 255), 2)

#授权信息

if myData in myDataList:

	print('Authorized')

else:

	print('Un-Authorized')