LNMP架构部署WordPress论坛
目录
- 概述
- 一、LNMP动态网站架构
-
- 1、配置Nginx服务
-
- ❶检查路径
- ❷检查端口
- ❸访问测试
- 2、配置MySQL服务
-
- ❶检查路径
- ❷检查端口
- ❸访问测试
- 3、配置PHP服务(FastCGI 方式)
-
- ⑴ lib库
-
- ❶yum安装
- ❷ 源码安装:libiconv-devel
- ❸ 扩展包安装:libmcrypt
- ⑵ 加密扩展库
-
- ❶mhash
- ❷mcrypt
- ⑶ 安装PHP
-
- ❶配置编译参数
- ❷软链接及phar文件
- ❸编译及报错解决
- ⑷ 配置PHP
-
- ❶ 引擎配置php.ini
- ❷ 服务配置php-fpm.conf(FastCGI方式)
- ⑸ 启动PHP服务(FastCGI方式)
- ⑹ Nginx支持PHP访问
- ⑺ LNMP环境测试
-
- ❶ PHP解析请求测试
- ❷ PHP连接MySQL测试
- 二、搭建WordPress论坛
-
- 1、WordPress
- 2、Mysql数据库配置
- 3、Nginx配置wordpress
- 4、安装WordPress
- 5、访问测试
- 参考
概述

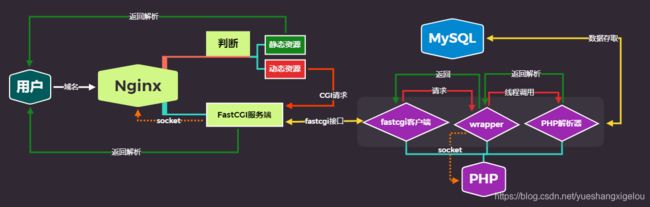
LNMP 环境的基本请求顺序流程:
当LNMP 组合工作时,首先是用户通过浏览器输入域名请求Nginx Web 服务,如果请求是静态资源,则由Nginx 解析返回给用户;如果是动态请求(.php 结尾),那么Nginx 就会把它通过FastCGI 接口发送给PHP引擎服务( FastCGI 进程php-fpm) 进行解析,如果这个动态请求要读取数据库数据,那么PHP 就会继续向后请求MySQL 数据库,以读取需要的数据,并最终通过Nginx 服务把获取的数据返回给用户。
FastCGI的运作流程:
FastCGI接口在Linux下是socket, 为了调用CGI程序,还需要一个FastCGI的wrapper (可以理解为用于启动另一个程序的程序),这个wrapper绑定在某个固定的socket 上,如端口或文件socket 。当Nginx 将CGI 请求发送给这个socket 的时候,通过FastCGI 接口,wrapper 接收到请求,然后派生出一个新的线程,这个线程调用解释器或外部程序处理脚本来读取返回的数据;接着, wrapper 再将返回的数据通过FastCGI 接口,沿着固定的socket 传递给Nginx; 最后, Nginx 将返回的数据发送给客户端。FastCGl 的主要优点是把动态语言和HTTP 服务器分离开来,使Nginx 专门处理静态请求及向后转发的动态请求,而PHP/PHP-FPM 服务器则专门解析PHP 动态请求。
说明:还差个DNS解析,后边再补充。
一、LNMP动态网站架构
1、配置Nginx服务
Nginx 编译安装到部署基于域名的虚拟主机
❶检查路径
[root@www ~]# ls -ld /application/nginx/
❷检查端口
[root@www ~]# netstat -lntup | grep 80
❸访问测试
[root@www ~]# wget 192.168.10.10
2、配置MySQL服务
MySQL二进制方式安装配置
❶检查路径
[root@www ~]# ls - ld /application/mysql/
❷检查端口
[root@www ~]# netstat -lntup | grep 3306
❸访问测试
[root@www ~]# mysql -uroot -p
3、配置PHP服务(FastCGI 方式)
PHP说明文档
⑴ lib库
❶yum安装
- PHP程序在开发及运行时会调用一些函数库如zlib、gd 等,因此需要安装lib库
zlib-devel libxml2-devel libjpeg-devel libjpeg-turbo-devel freetype-devel libpng-devel gd-devel libcurl-devel libxslt-devel- 安装
XXX-devel时,XXX会自动安装。XXX就是zlib、libxml2、libjpeg等库名。
[root@www ~]# rpm -qa zlib-devel libxml2-devel libjpeg-devel libjpeg-turbo-devel libiconv-devel freetype-devel libpng-devel gd-devel libcurl-devel libxslt-devel
zlib-devel-1.2.3-29.el6.x86_64
[root@www ~]# yum install zlib-devel libxml2-devel libjpeg-devel libjpeg-turbo-devel libiconv-devel freetype-devel libpng-devel gd-devel libcurl-devel libxslt-devel -y
[root@www ~]# rpm -qa zlib-devel libxml2-devel libjpeg-devel libjpeg-turbo-devel libiconv-devel freetype-devel libpng-devel gd-devel libcurl-devel libxslt-devel
libcurl-devel-7.19.7-40.el6_6.4.x86_64
zlib-devel-1.2.3-29.el6.x86_64
freetype-devel-2.3.11-15.el6_6.1.x86_64
libxml2-devel-2.7.6-17.el6_6.1.x86_64
libpng-devel-1.2.49-1.el6_2.x86_64
libjpeg-turbo-devel-1.2.1-3.el6_5.x86_64
libxslt-devel-1.1.26-2.el6_3.1.x86_64
gd-devel-2.0.35-11.el6.x86_64

#libiconv-devel未安装
❷ 源码安装:libiconv-devel
- 采用源码编译安装的方式
- 编译时指定了路径
./configure --prefix=/usr/local/libiconv
[root@www ~]# cd /home/centos/tools
[root@www tools]# rz
              传输libiconv-1.14.tar.gz ...
[root@www tools]# tree -L 1
.
├── libiconv-1.14.tar.gz
├── mysql-5.5.32-linux2.6-x86_64.tar.gz
└── nginx-1.6.3.tar.gz

0 directories, 3 files
[root@www tools]# tar zxf libiconv-1.14.tar.gz
[root@www tools]# cd libiconv-1.14
[root@www libiconv-1.14]# ./configure --prefix=/usr/local/libiconv
[root@www libiconv-1.14]# make
[root@www libiconv-1.14]# make install
[root@www libiconv-1.14]# make clean
[root@www libiconv-1.14]# cd ../
[root@www tools]# tree -L 1
.
├── libiconv-1.14
├── libiconv-1.14.tar.gz
├── mysql-5.5.32-linux2.6-x86_64.tar.gz
└── nginx-1.6.3.tar.gz

1 directory, 3 files
[root@www tools]# rm -rf ./libiconv-1.14
[root@www tools]# whereis /usr/local/libiconv
libiconv: /usr/local/libiconv
❸ 扩展包安装:libmcrypt
- 支持在程序运行时添加
/移除算法 - libmcrypt-devel:安装、报错、解决
[root@www tools]# yum install libmcrypt libmcrypt-devel
已安装:
  libmcrypt.x86_64 0:2.5.8-9.el6    libmcrypt-devel.x86_64 0:2.5.8-9.el6

完毕!
⑵ 加密扩展库
❶mhash
- mhash:用于创建校验数值、消息摘要、消息认证码,以及无需原文的关键信息保存(如密码)等。
❷mcrypt
- mcryp支持明文加密,以及密文还原。
[root@www tools]# yum -y install mhash
已安装:
  mhash.x86_64 0:0.9.9.9-3.el6

完毕!
[root@www tools]# yum -y install mcrypt
安装:
  mcrypt.x86_64 0:2.6.8-10.el6

完毕!
[root@www tools]#
⑶ 安装PHP
报错解决:cannot find -lltdl
❶配置编译参数
- 核心配置选项列表
- 源码编译的方式进行安装
- 重要的编译参数
| 重要参数 | 说明 |
|---|---|
| –prefix=/application/php | 指定PHP安装路径 |
| –with-mysql=/application/mysql | 指定MySQL安装路径,作为PHP安装与MySQL相关内容的依赖 |
| –enable-fpm \ | 激活PHP-FPM方式服务,即以FastCGIF方式运行PHP服务 |
| –with-fpm-user=nginx | PHP-FPM的进程管理用户为Nginx |
| –with-fpm-group=nginx | PHP-FPM的进程管理用户组为Nginx |
touch ext/phar/phar.phar
[root@www tools]# rz
[root@www tools]# tar zxf php-5.3.27.tar.gz
[root@www tools]# ./configure \
--prefix=/application/php \
--with-mysql=/application/mysql \
--with-iconv-dir=/usr/local/libiconv \
--with-freetype-dir \
--with-jpeg-dir \
--with-png-dir \
--with-zlib \
--with-libxml-dir=/usr \
--enable-xml \
--disable-rpath \
--enable-safe-mode \
--enable-bcmath \
--enable-shmop \
--enable-sysvsem \
--enable-inline-optimization \
--with-curl \
--with-curlwrappers \
--enable-mbregex \
--enable-fpm \
--enable-mbstring \
--with-mcrypt \
--with-gd \
--enable-gd-native-ttf \
--with-openssl \
--with-mhash \
--enable-pcntl \
--enable-sockets \
--with-xmlrpc \
--enable-zip \
--enable-soap \
--enable-short-tags \
--enable-zend-multibyte \
--enable-static \
--with-xsl \
--with-fpm-user=nginx \
--with-fpm-group=nginx \
--enable-ftp

略
+--------------------------------------------------------------------+
| License:                                                           |
| This software is subject to the PHP License, available in this     |
| distribution in the file LICENSE.  By continuing this installation |
| process, you are bound by the terms of this license agreement.     |
| If you do not agree with the terms of this license, you must abort |
| the installation process at this point.                            |
+--------------------------------------------------------------------+

Thank you for using PHP.

[root@www php-5.3.27]#
❷软链接及phar文件
ln -s /application/mysql/lib/libmysqlclient.so.18 /usr/lib64//lib程序使用的库文件目录/lib64是内核级的,/usr/lib64是系统级的,/usr/local/lib64是用户级的- 建立
软链接,把软件库文件连接到系统库文件,使PHP编译时可以调用与MySQL相关的部分 库文件:静态库(static library 文件后缀为.a)和共享库(shared library 文件后缀为.so)
[root@www php-5.3.27]# ln -s /application/mysql/lib/libmysqlclient.so.18 /usr/lib64/
touch ext/phar/phar.pharphar:PHP中类似Java的jar包,用来将多个PHP文件打包为一个文件。- ext文件系统
[root@www php-5.3.27]# touch ext/phar/phar.phar
❸编译及报错解决
报错解决:cannot find -lltdl
[root@www php-5.3.27]# make
crypt   -o sapi/fpm/php-fpm
/usr/bin/ld: cannot find -lltdl
collect2: ld returned 1 exit status
make: *** [sapi/fpm/php-fpm] 错误 1
### 报错解决:说明参考上边的连接###
[root@www php-5.3.27]# find / -name *libltdl.so*
[root@www php-5.3.27]# cp /usr/lib64/libltdl.so.7 /usr/lib
[root@www php-5.3.27]# cd /usr/lib64
[root@www lib64]# ln -s ./libltdl.so.7 ./libltdl.so
### 报错解决:说明参考上边的连接###
[root@www php-5.3.27]# make
略
Build complete.
Don't forget to run 'make test'.
[root@www php-5.3.27]# make install
略
/home/centos/tools/php-5.3.27/build/shtool install -c ext/phar/phar.phar /application/php/bin
ln -s -f /application/php/bin/phar.phar /application/php/bin/phar
Installing PDO headers:          /application/php/include/php/ext/pdo/
⑷ 配置PHP
❶ 引擎配置php.ini
- 查看配置模板文件
ls php.ini* - 使用生产环境的配置
cp php.ini-production /application/php/lib/php.ini php.ini-development适合开发程式使用(测试用)php.ini-recommended拥有较高的安全性设定,则适合上线当产品使用- 通常要将
php.ini-production重命名为php.ini
[root@www php-5.3.27]# ln -s /application/php /application/php5.3.27
[root@www php-5.3.27]# tree -L 1 /application/
/application/
├── html
├── mysql
├── nginx
├── php
└── php5.3.27 -> /application/php

[root@www php-5.3.27]# ls php.ini*
php.ini-development  php.ini-production

[root@www php-5.3.27]# cp php.ini-production /application/php/lib/php.ini
[root@www php-5.3.27]# ls -l /application/php/lib/php.ini
-rw-r--r--. 1 root root 69627 5月  14 10:40 /application/php/lib/php.ini
❷ 服务配置php-fpm.conf(FastCGI方式)
- FastCGI方式
php-fpm.conf.default
[root@www php-5.3.27]# cd /application/php/etc/
[root@www etc]# ls
pear.conf  php-fpm.conf.default
[root@www etc]# cp php-fpm.conf.default php-fpm.conf
[root@www etc]# ls
pear.conf  php-fpm.conf  php-fpm.conf.default
⑸ 启动PHP服务(FastCGI方式)
- 启动PHP服务
/application/php/sbin/php-fpm - 进程及端口检查
lsof -i :9000
[root@www ~]# /application/php/sbin/php-fpm
[root@www ~]# lsof -i :9000
COMMAND   PID  USER   FD   TYPE DEVICE SIZE/OFF NODE NAME
php-fpm 35444  root    7u  IPv4 197830      0t0  TCP localhost:cslistener (LISTEN)
php-fpm 35445 nginx    0u  IPv4 197830      0t0  TCP localhost:cslistener (LISTEN)
php-fpm 35446 nginx    0u  IPv4 197830      0t0  TCP localhost:cslistener (LISTEN)
⑹ Nginx支持PHP访问
- 主配置
nginx.conf与子配置blog.conf - 创建文件目录
mkdir ./blog/及首页测试文件index.html - 支持php首页文件
index index.php index.html index.htm; - 动态解析接口
fastcgi_pass 127.0.0.1:9000; - 127.0.0.1是回送地址
- 动态解析首页
fastcgi_index index.php; - 导入动态解析模块
include fastcgi.conf; - 语法检查及平滑重启
[root@www ~]# cat /application/nginx/conf/nginx.conf
worker_processes  1;
error_log       logs/error.log;
pid             logs/nginx.pid;
events {

    worker_connections  1024;
}

http {

    include       mime.types;
    default_type  application/octet-stream;
	log_format main '$remote_addr - $remote_user [$time_local] "$request" '
                    '$status $body_bytes_sent "$http_referer" '
                    '"$http_user_agent" "$http_x_forwarded_for" ';
    sendfile        on;
    keepalive_timeout  65;

include vps/status.conf;

include vps/realm_name/www.conf;
include vps/realm_name/bbs.conf;
include vps/realm_name/blog.conf;
include vps/realm_name/xyz.conf;

include vps/port/83.conf;
include vps/port/81.conf;
include vps/port/82.conf;

include vps/ip/192.168.10.10.conf;
include vps/ip/192.168.10.20.conf;
}

[root@www realm_name]# vim ./blog.conf
server {

        listen       80;
        server_name  blog.test_lnmp.org;

        location / {

            root   html/vps/realm_name/blog;
            index  index.php index.html index.htm;
        }

        location ~ .*\.(php|php5)?$ {

            root 			html/vps/realm_name/blog;
            fastcgi_pass 	127.0.0.1:9000;
            fastcgi_index 	index.php;
            include 		/application/nginx/conf/fastcgi.conf;
        }

        access_log logs/access_blog.log main gzip buffer=32k flush=5s;
    }
[root@www nginx]# cd ../html/vps/realm_name
[root@www realm_name]# mkdir ./blog/
[root@www realm_name]# cp ./www/index.html ./blog/index.html
[root@www realm_name]# tree
.
├── bbs
│   └── index.html
├── blog
│   └── index.html
├── www
│   └── index.html
└── xyz
    └── index.html

4 directories, 4 files
[root@www realm_name]# vim ./blog/index.html
<!DOCTYPE html>
<html>
<head>
<meta charset="utf-8">
<title>江雪</title>
</head>
<body>
<h1>域名</h1>
<p>blog</p>
<p>测试</p>
<p>blog.text_lnmp.org</p>
</body>
</html>
[root@www realm_name]# /application/nginx/sbin/nginx -t
nginx: the configuration file /application/nginx/conf/nginx.conf syntax is ok
nginx: configuration file /application/nginx/conf/nginx.conf test is successful
[root@www realm_name]# /application/nginx/sbin/nginx -s reload
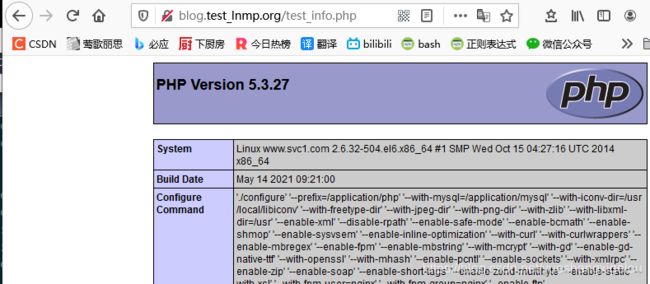
⑺ LNMP环境测试
- 目的:Nginx 请求访问PHP, PHP 连接MySQL获取数据
❶ PHP解析请求测试
- PHP测试文件
./blog/test_info.php
[root@www realm_name]# echo "" >./blog/test_info.php
[root@www realm_name]# cat ./blog/test_info.php
<?php phpinfo(); ?>

#win
C:\Windows\System32\drivers\etc\hosts
192.168.10.10 blog.test_lnmp.org
❷ PHP连接MySQL测试
- 测试文件
test_mysql.php
[root@www blog]# tree
.
├── index.html
├── test_info.php
└── test_mysql.php

0 directories, 3 files
[root@www blog]# vim test_mysql.php
<?php
    /*测试:Nginx访问PHP,PHP连接MySQL,读取数据库文件 */
    //测试读取MySQL数据库
    $link_id=mysql_connect('localhost','root','xxxx') or mysql_error();
    if ($link_id) {

        echo "Mysql connection successful!";
    }else{

        echo mysql_error();
    }
?>

二、搭建WordPress论坛
1、WordPress
- WordPress 是一套利用PHP 语言和MySQL 数据库开发的开源免费的blog(博客,网站)程序。
- 需PHP 环境和MySQL 数据库支持。
- 功能强大,插件多,易扩充。
2、Mysql数据库配置
- 创建blog专用数据库
show databases like 'firstblog'; - 给管理员授权(本机管理员)
grant all on firstblog.* to firstblog@'localhost' identified by 'abcd'; - 给管理员授权(IP段管理员)
grant all on firstblog.* to firstblog@'192.168.10.%' identified by 'abcd'; - 刷新权限
flush privileges;
[root@www ~]# mysql -uroot -p
Enter password:

mysql> create database firstblog;
Query OK, 1 row affected (0.01 sec)

mysql> show databases like 'firstblog';
+----------------------+
| Database (firstblog) |
+----------------------+
| firstblog            |
+----------------------+
1 row in set (0.00 sec)

mysql> grant all on firstblog.* to firstblog@'localhost' identified by '1234';
Query OK, 0 rows affected (0.00 sec)

mysql> grant all on firstblog.* to firstblog@'192.168.10.%' identified by '1234';
Query OK, 0 rows affected (0.00 sec)

mysql> flush privileges;
Query OK, 0 rows affected (0.00 sec)

mysql> show grants for firstblog@'localhost';
+------------------------------------------------------------------------------------------------------------------+
| Grants for firstblog@localhost                                                                                   |
+------------------------------------------------------------------------------------------------------------------+
| GRANT USAGE ON *.* TO 'firstblog'@'localhost' IDENTIFIED BY PASSWORD '*A154C52565E9E7F94BFC08A1FE702624ED8EFFDA' |
| GRANT ALL PRIVILEGES ON `firstblog`.* TO 'firstblog'@'localhost'                                                 |
+------------------------------------------------------------------------------------------------------------------+
2 rows in set (0.00 sec)

mysql> select user,host from mysql.user;
+-----------+-------------+
| user      | host        |
+-----------+-------------+
| root      | 127.0.0.1   |
| firstblog | 192.168.10.% |
| firstblog | localhost   |
| root      | localhost   |
+-----------+-------------+
4 rows in set (0.00 sec)

mysql> quit
Bye
3、Nginx配置wordpress
- 解压文件重命名为
mv ./wordpress ./blog,名称要与blog.conf中设置的一致。 - 源件备份
mv wordpress-4.1.tar.gz /home/centos/tools
[root@www tools]# cd /application/nginx/html/vps/realm_name/
[root@www realm_name]# rz
rz waiting to receive.
zmodemCtrl+Cȡ

              传输wordpress-4.1.tar.gz ...
  100%    6038 KB    6038 KB/  00:00:01       0

[root@www realm_name]# tar -xf wordpress-4.1.tar.gz
[root@www realm_name]# tree -L 1
[root@www realm_name]# mv ./wordpress ./blog
[root@www realm_name]# mv wordpress-4.1.tar.gz /home/centos/tools
[root@www realm_name]# tree -L 2
略
├── blog
│   ├── index.html
│   ├── index.php
│   ├── license.txt
│   ├── readme.html
│   ├── test_info.php
│   ├── test_mysql.php
│   ├── wp-activate.php
│   ├── wp-admin
│   ├── wp-blog-header.php
│   ├── wp-comments-post.php
│   ├── wp-config-sample.php
│   ├── wp-content
│   ├── wp-cron.php
│   ├── wp-includes
│   ├── wp-links-opml.php
│   ├── wp-load.php
│   ├── wp-login.php
│   ├── wp-mail.php
│   ├── wp-settings.php
│   ├── wp-signup.php
│   ├── wp-trackback.php
│   └── xmlrpc.php
略
[root@www realm_name]# chown -R nginx.nginx ./blog/
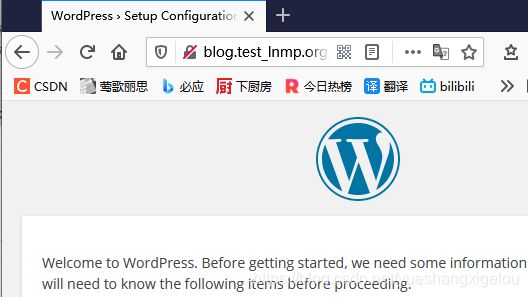
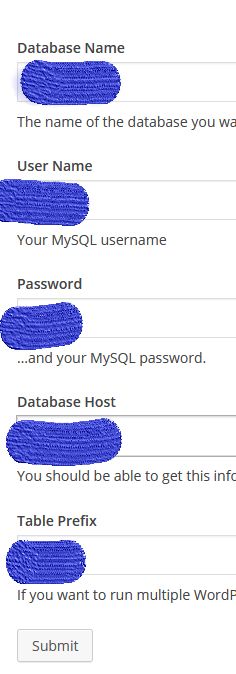
4、安装WordPress
- 浏览器访问blog.conf中设置网址
blog.test_lnmp.org,进行安装
- 数据库名称、管理员名称、密码与MySQL设置 的一致。
Table prefix用于区分不同数据库。
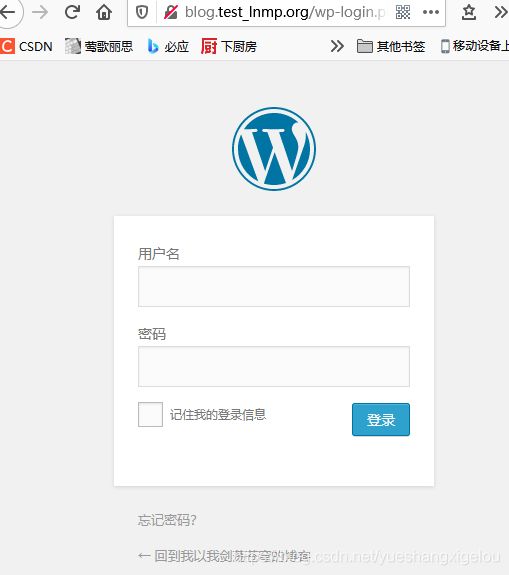
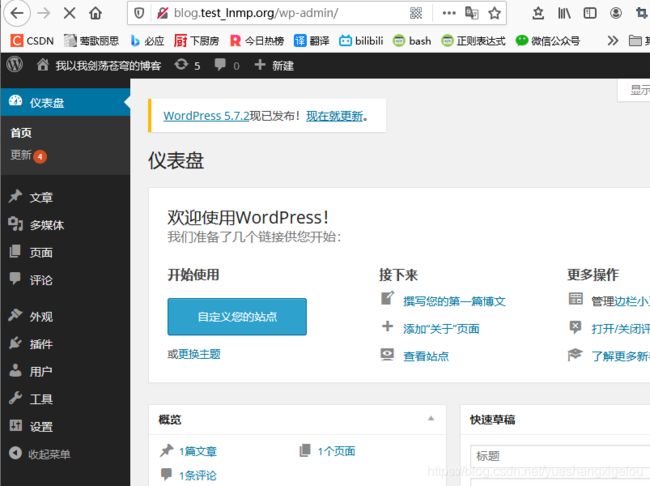
5、访问测试
- 登录
- 管理员界面
- 用户界面

参考
1、跟老男孩学Linux运维:Web集群实战
2、Nginx web服务
3、MySQL二进制方式安装配置
4、 libmcrypt-devel:安装、报错、解决
5、报错解决:cannot find -lltdl
6、Linux下lib编程详解