Harbor私有镜像仓库(上)
链接:https://pan.baidu.com/s/1MAb0dllUwmoOk7TeVCZOVQ
提取码:ldt5
复制这段内容后打开百度网盘手机App,操作更方便哦
1. Harbor简介
- VMware的开源项目https://github.com/vmware/harbor
- Harbor可帮助用户迅速搭建企业级的注册服务。它提供了管理图形界面,基于角色的访问控制(Role Based Access Control),镜像远程复制(同步),AD/LDAP集成,以及审计日志等企业用户需求的功能,同时还原生支持中文,深受中国用户的喜爱。
- 该项目自推出以来,在GitHub获得了超过3300多个star和900多个forks。
1.1 基于角色的访问控制
用户与Docker镜像仓库通过“项目”进行组织管理,一个用户可以对多个镜像仓库在同一命名空间(project)里有不同的权限。
1.2 图形化用户界面
用户可以通过浏览器来浏览,检索当前Docker镜像仓库,管理项目和命名空间
1.3 审计管理
所有针对镜像仓库的操作都可以被记录追溯,用于审计管理。
1.4 国际化
基于英文与中文语言进行了本地化。可以增加更多的语言支持。
1.5 RESTful API:
提供给管理员对于Harbor更多的操控,使得与其他管理软件集成变得更容易。
1.6 LDAP认证
1.7 镜像复制
基于策略的Docker镜像复制功能,可在不同的数据中心,不同的运行环境之间同步镜像,并提供友好的管理界面,大大简化了实际运维中的镜像管理工作。
1.8 与Clair集成
与Clair集成,添加漏洞扫描功能。Clair是coreos开源的容器漏洞扫描工具,在容器逐渐普及的今天,容器镜像安全问题日益严重。Clair是目前少数的开源安全扫描工具。
1.9 Notary签名工具
Notary是Docker镜像的签名工具,用来保证镜像在pull,push和传输工程中的一致性和完整性,避免中间人攻击,避免非法的镜像更新和运行。
2. 为Harbor签发域名证书
openssl是目前最流行的SSL密码库工具,提供了一个通用,功能完备的工具套件,用以支持SSL/TLS协议的实现。
官网:https://www.openssl.org/source/
环境准备
| 主机名 | IP | 用途 | 最小资源配比 | 最佳资源配比 |
|---|---|---|---|---|
| Harbor-master | 192.168.200.16 | harbor私有镜像仓库 | 2CPU | 4CPU |
| 4GBMEM | 8GB |
[root@Harbor-master ~]# hostname -I
192.168.200.16
[root@Harbor-master ~]# cat /etc/redhat-release
CentOS Linux release 7.6.1810 (Core)
[root@Harbor-master ~]# uname -r
3.10.0-957.12.1.el7.x86_64
官方文档:https://github.com/vmware/harbor/blob/master/docs/configure_https.md
#创建自己的CA证书
[root@Harbor-master ~]# mkdir -p /data/ssl
[root@Harbor-master ~]# cd /data/ssl/
[root@Harbor-master ssl]# which openssl
/usr/bin/openssl

[root@Harbor-master ssl]# openssl req -newkey rsa:4096 -nodes -sha256 -keyout ca.key -x509 -days 365 -out ca.crt
Generating a 4096 bit RSA private key
......++
.....................................++
writing new private key to 'ca.key'
-----
You are about to be asked to enter information that will be incorporated
into your certificate request.
What you are about to enter is what is called a Distinguished Name or a DN.
There are quite a few fields but you can leave some blank
For some fields there will be a default value,
If you enter '.', the field will be left blank.
-----
Country Name (2 letter code) [XX]:CN
State or Province Name (full name) []:Beijing
Locality Name (eg, city) [Default City]:Beijing
Organization Name (eg, company) [Default Company Ltd]:yunjisuan
Organizational Unit Name (eg, section) []:yunjisuan
Common Name (eg, your name or your server's hostname) []:www.yunjisuan.com
Email Address []:
#生成证书签名请求
[root@Harbor-master ssl]# openssl req -newkey rsa:4096 -nodes -sha256 -keyout www.yunjisuan.com.key -out www.yunjisuan.com.csr
Generating a 4096 bit RSA private key
...........................................................................................................................................................................................++
............++
writing new private key to 'www.yunjisuan.com.key'
-----
You are about to be asked to enter information that will be incorporated
into your certificate request.
What you are about to enter is what is called a Distinguished Name or a DN.
There are quite a few fields but you can leave some blank
For some fields there will be a default value,
If you enter '.', the field will be left blank.
-----
Country Name (2 letter code) [XX]:CN
State or Province Name (full name) []:Beijing
Locality Name (eg, city) [Default City]:Beijing
Organization Name (eg, company) [Default Company Ltd]:yunjisuan
Organizational Unit Name (eg, section) []:yunjisuan
Common Name (eg, your name or your server's hostname) []:www.yunjisuan.com
Email Address []:
Please enter the following 'extra' attributes
to be sent with your certificate request
A challenge password []:
An optional company name []:#生成注册表主机的证书
[root@Harbor-master ssl]# openssl x509 -req -days 365 -in www.yunjisuan.com.csr -CA ca.crt -CAkey ca.key -CAcreateserial -out www.yunjisuan.com.crt
Signature ok
subject=/C=CN/ST=Beijing/L=Beijing/O=yunjisuan/OU=yunjisuan/CN=www.yunjisuan.com
Getting CA Private Key
#查看证书情况
[root@Harbor-master ssl]# ll
总用量 24
-rw-r--r-- 1 root root 2049 7月 24 14:43 ca.crt
-rw-r--r-- 1 root root 3272 7月 24 14:43 ca.key
-rw-r--r-- 1 root root 17 7月 24 14:45 ca.srl
-rw-r--r-- 1 root root 1931 7月 24 14:45 www.yunjisuan.com.crt
-rw-r--r-- 1 root root 1716 7月 24 14:45 www.yunjisuan.com.csr
-rw-r--r-- 1 root root 3272 7月 24 14:45 www.yunjisuan.com.key3. 信任自签发的域名证书
由于CA证书是我们自己签发的Linux操作系统是不信任的,因此我们需要把证书加入到系统的信任证书里
#将自签ca证书添加到系统信任
[root@Harbor-master ssl]# pwd
/data/ssl
[root@Harbor-master ssl]# cp www.yunjisuan.com.crt /etc/pki/ca-trust/source/anchors/
[root@Harbor-master ssl]# ll /etc/pki/ca-trust/source/anchors/
总用量 4
-rw-r--r-- 1 root root 1931 7月  24 14:49 www.yunjisuan.com.crt

#让系统ca信任设置立刻生效
[root@Harbor-master ssl]# update-ca-trust enable
[root@Harbor-master ssl]# update-ca-trust extract
4.Harbor 1.4 版本配置与安装
4.1 安装docker-ce社区版
[root@Harbor-master ssl]# sestatus
SELinux status:                 disabled
[root@Harbor-master ssl]# yum -y install yum-utils device-mapper-persistent-data lvm2
[root@Harbor-master ssl]# rpm -qa yum-utils device-mapper-persistent-data lvm2
yum-utils-1.1.31-50.el7.noarch
device-mapper-persistent-data-0.7.3-3.el7.x86_64
lvm2-2.02.180-10.el7_6.8.x86_64
[root@Harbor-master ssl]# curl https://download.docker.com/linux/centos/docker-ce.repo -o /etc/yum.repos.d/docker-ce.repo
% Total % Received % Xferd Average Speed Time Time Time Current
Dload Upload Total Spent Left Speed
100 2424 100 2424 0 0 112 0 0:00:21 0:00:21 --:--:-- 686
[root@Harbor-master ssl]# yum -y install docker-ce
[root@Harbor-master ssl]# systemctl start docker
[root@Harbor-master ssl]# systemctl enable docker
Created symlink from /etc/systemd/system/multi-user.target.wants/docker.service to /usr/lib/systemd/system/docker.service.[root@Harbor-master ssl]# docker version
Client: Docker Engine - Community
Version: 19.03.0
API version: 1.40
Go version: go1.12.5
Git commit: aeac9490dc
Built: Wed Jul 17 18:15:40 2019
OS/Arch: linux/amd64
Experimental: false
Server: Docker Engine - Community
Engine:
Version: 19.03.0
API version: 1.40 (minimum version 1.12)
Go version: go1.12.5
Git commit: aeac9490dc
Built: Wed Jul 17 18:14:16 2019
OS/Arch: linux/amd64
Experimental: false
containerd:
Version: 1.2.6
GitCommit: 894b81a4b802e4eb2a91d1ce216b8817763c29fb
runc:
Version: 1.0.0-rc8
GitCommit: 425e105d5a03fabd737a126ad93d62a9eeede87f
docker-init:
Version: 0.18.0
GitCommit: fec36834.2 下载并安装harbor私有仓库
#创建harbor的证书目录,并复制
[root@Harbor-master ssl]# mkdir -p /etc/ssl/harbor
[root@Harbor-master ssl]# cp /data/ssl/www.yunjisuan.com.key /etc/ssl/harbor/
[root@Harbor-master ssl]# cp /data/ssl/www.yunjisuan.com.crt /etc/ssl/harbor/
[root@Harbor-master ssl]# ll /etc/ssl/harbor/
总用量 8
-rw-r--r-- 1 root root 1931 7月  24 15:43 www.yunjisuan.com.crt
-rw-r--r-- 1 root root 3272 7月  24 15:43 www.yunjisuan.com.key
#创建harbor下载目录并下载harbor-offline-installer-v1.5.0.tgz
[root@Harbor-master ~]# mkdir -p /data/install
[root@Harbor-master ~]# cd /data/install/
[root@Harbor-master install]# wget http://harbor.orientsoft.cn/harbor-v1.5.0/harbor-offline-installer-v1.5.0.tgz
[root@Harbor install]# ls
harbor-offline-installer-v1.5.0.tgz[root@Harbor install]# tar xf harbor-offline-installer-v1.5.0.tgz
[root@Harbor install]# ls
harbor harbor-offline-installer-v1.5.0.tgz
[root@Harbor install]# cd harbor
[root@Harbor harbor]# ll
总用量 854960
drwxr-xr-x 3 root root 23 7月 16 22:29 common #模板目录
-rw-r--r-- 1 root root 1185 5月 2 23:34 docker-compose.clair.yml
-rw-r--r-- 1 root root 1725 5月 2 23:34 docker-compose.notary.yml
-rw-r--r-- 1 root root 3596 5月 2 23:34 docker-compose.yml
drwxr-xr-x 3 root root 156 5月 2 23:34 ha #harbor高可用配置
-rw-r--r-- 1 root root 6687 5月 2 23:34 harbor.cfg #harbor配置文件
-rw-r--r-- 1 root root 875401338 5月 2 23:36 harbor.v1.5.0.tar.gz
-rwxr-xr-x 1 root root 5773 5月 2 23:34 install.sh
-rw-r--r-- 1 root root 10771 5月 2 23:34 LICENSE
-rw-r--r-- 1 root root 482 5月 2 23:34 NOTICE
-rwxr-xr-x 1 root root 27379 5月 2 23:34 prepare[root@Harbor harbor]# cp harbor.cfg{,.bak}
#修改harbor.cfg配置文件
[root@Harbor harbor]# cat -n harbor.cfg.bak | sed -n '7p;11p;23p;24p;68p'
7 hostname = reg.mydomain.com #要修改成我们证书的域名
11 ui_url_protocol = http #启用加密传输协议https
23 ssl_cert = /data/cert/server.crt #证书的位置
24 ssl_cert_key = /data/cert/server.key #证书密钥位置
68 harbor_admin_password = Harbor12345 #默认管理员及密码
#修改成如下配置
[root@Harbor harbor]# cat -n harbor.cfg | sed -n '7p;11p;23p;24p;68p'
7 hostname = www.yunjisuan.com
11 ui_url_protocol = https
23 ssl_cert = /etc/ssl/harbor/www.yunjisuan.com.crt
24 ssl_cert_key = /etc/ssl/harbor/www.yunjisuan.com.key
68 harbor_admin_password = Harbor12345#安装命令docker-compose(需要1.21版本)
[root@Harbor-master harbor]# curl -L https://github.com/docker/compose/releases/download/1.21.2/docker-compose-$(uname -s)-$(uname -m) -o /usr/local/bin/docker-compose
% Total % Received % Xferd Average Speed Time Time Time Current
Dload Upload Total Spent Left Speed
100 617 0 617 0 0 519 0 --:--:-- 0:00:01 --:--:-- 519
100 10.3M 100 10.3M 0 0 354k 0 0:00:29 0:00:29 --:--:-- 494k
[root@Harbor-master harbor]# ll /usr/local/bin/docker-compose
-rw-r--r-- 1 root root 10858808 7月 24 17:30 /usr/local/bin/docker-compose
[root@Harbor-master harbor]# chmod +x /usr/local/bin/docker-compose
[root@Harbor-master harbor]# ll /usr/local/bin/docker-compose
-rwxr-xr-x 1 root root 10858808 7月 24 17:30 /usr/local/bin/docker-compose
[root@Harbor-master harbor]# which docker-compose
/usr/local/bin/docker-compose
[root@Harbor-master harbor]# docker-compose --version
docker-compose version 1.21.2, build a133471#安装harbor私有镜像仓库
[root@Harbor-master harbor]# ./install.sh --with-notary --with-clair
#--with-notary启用镜像签名;--with-clair启用漏洞扫描
#查看harbor启动的镜像
[root@Harbor-master harbor]# docker ps -a
CONTAINER ID IMAGE COMMAND CREATED STATUS PORTS NAMES
3b0f60eb2260 vmware/harbor-jobservice:v1.5.0 "/harbor/start.sh" 23 seconds ago Up 15 seconds harbor-jobservice
005954f3ec5c vmware/nginx-photon:v1.5.0 "nginx -g 'daemon of…" 23 seconds ago Up 21 seconds (health: starting) 0.0.0.0:80->80/tcp, 0.0.0.0:443->443/tcp, 0.0.0.0:4443->4443/tcp nginx
e5a4e4d0cf56 vmware/notary-server-photon:v0.5.1-v1.5.0 "/bin/server-start.sh" 23 seconds ago Up 21 seconds notary-server
0ece0afef7a6 vmware/notary-signer-photon:v0.5.1-v1.5.0 "/bin/signer-start.sh" 24 seconds ago Up 22 seconds notary-signer
b7549c31328b vmware/clair-photon:v2.0.1-v1.5.0 "/docker-entrypoint.…" 24 seconds ago Up 18 seconds (health: starting) 6060-6061/tcp clair
1e6d6bb0bbdf vmware/harbor-ui:v1.5.0 "/harbor/start.sh" 24 seconds ago Up 22 seconds (health: starting) harbor-ui
e0fe40b6804a vmware/mariadb-photon:v1.5.0 "/usr/local/bin/dock…" 25 seconds ago Up 23 seconds 3306/tcp notary-db
30331b6c8918 vmware/postgresql-photon:v1.5.0 "/entrypoint.sh post…" 25 seconds ago Up 23 seconds (health: starting) 5432/tcp clair-db
24e4856ac9a3 vmware/harbor-adminserver:v1.5.0 "/harbor/start.sh" 25 seconds ago Up 23 seconds (health: starting) harbor-adminserver
0901a7fa027c vmware/harbor-db:v1.5.0 "/usr/local/bin/dock…" 25 seconds ago Up 23 seconds (health: starting) 3306/tcp harbor-db
1cea792c4656 vmware/redis-photon:v1.5.0 "docker-entrypoint.s…" 25 seconds ago Up 24 seconds 6379/tcp redis
7ea870371dcc vmware/registry-photon:v2.6.2-v1.5.0 "/entrypoint.sh serv…" 25 seconds ago Up 23 seconds (health: starting) 5000/tcp registry
cceb28b45a0d vmware/harbor-log:v1.5.0 "/bin/sh -c /usr/loc…" 25 seconds ago Up 24 seconds (health: starting) 127.0.0.1:1514->10514/tcp harbor-log通过浏览器进行访问测试https://192.168.200.16
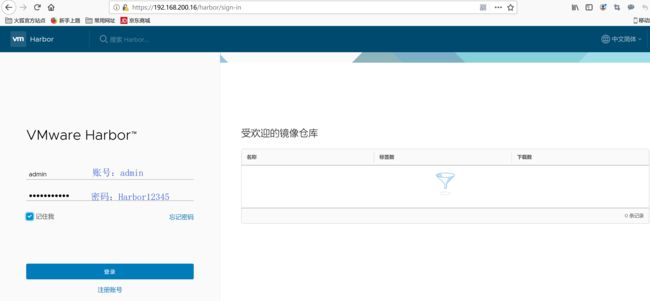
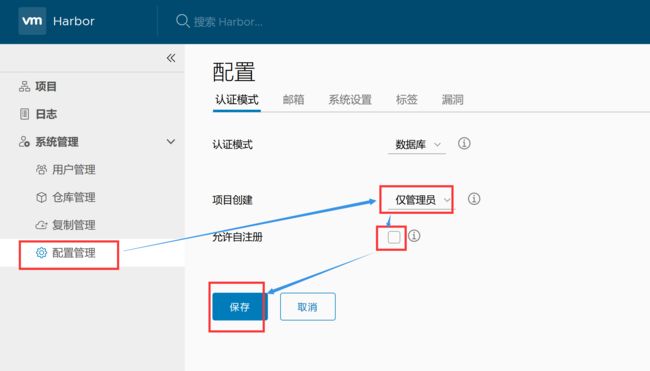
项目创建:设定为仅管理员(企业中不会让注册用户随便创建) 不允许自动注册
5.镜像管理与安全:漏洞扫描和镜像签名
5.1 添加docker国内公有镜像源
[root@Harbor-master harbor]# cat /etc/docker/daemon.json
{
  "registry-mirrors":[ "https://registry.docker-cn.com" ]
}
[root@Harbor-master harbor]# systemctl daemon-reload
[root@Harbor-master harbor]# systemctl restart docker
5.2 重新启动Harbor私有镜像仓库
#让harbor修改过的配置立刻生效
[root@Harbor-master harbor]# ./prepare
Clearing the configuration file: ./common/config/adminserver/env
Clearing the configuration file: ./common/config/ui/env
Clearing the configuration file: ./common/config/ui/app.conf
Clearing the configuration file: ./common/config/ui/private_key.pem
##以下省略若干。。。
#清理所有harbor容器进程
[root@Harbor-master harbor]# docker-compose down
Stopping harbor-jobservice ... done
Stopping nginx ... done
Stopping harbor-ui ... done
Stopping harbor-adminserver ... done
Stopping harbor-db ... done
Stopping redis ... done
Stopping registry ... done
Stopping harbor-log ... done
WARNING: Found orphan containers (notary-server, notary-signer, clair, notary-db, clair-db) for this project. If you removed or renamed this service in your compose file, you can run this command with the --remove-orphans flag to clean it up.
Removing harbor-jobservice ... done
Removing nginx ... done
Removing harbor-ui ... done
Removing harbor-adminserver ... done
Removing harbor-db ... done
Removing redis ... done
Removing registry ... done
Removing harbor-log ... done
Removing network harbor_harbor
#后台启动所有harbor容器进程
[root@Harbor-master harbor]# docker-compose up -d
Creating network "harbor_harbor" with the default driver
WARNING: Found orphan containers (clair, notary-db, clair-db) for this project. If you removed or renamed this service in your compose file, you can run this command with the --remove-orphans flag to clean it up.
Creating harbor-log ... done
Creating redis ... done
Creating registry ... done
Creating harbor-db ... done
Creating harbor-adminserver ... done
Creating harbor-ui ... done
Creating nginx ... done
Creating harbor-jobservice ... done5.3 下载一个公有镜像并上传到harbor
#harbor本地下载一个公有仓库镜像centos:7
[root@Harbor-master install]# docker pull centos:7
#本地映射私有仓库域名
[root@Harbor-master harbor]# tail -1 /etc/hosts
192.168.200.16 www.yunjisuan.com
#将centos:7镜像改名并上传私有镜像仓库
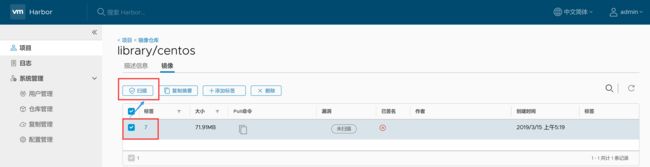
[root@Harbor-master install]# docker tag centos:7 www.yunjisuan.com/library/centos:7
[root@Harbor-master install]# docker images | grep centos
centos 7 9f38484d220f 4 months ago 202MB
www.yunjisuan.com/library/centos 7 9f38484d220f 4 months ago 202MB#登陆验证harbor私有仓库,并上传镜像
[root@Harbor-master install]# docker login www.yunjisuan.com
Username: admin
Password: Harbor12345
WARNING! Your password will be stored unencrypted in /root/.docker/config.json.
Configure a credential helper to remove this warning. See
https://docs.docker.com/engine/reference/commandline/login/#credentials-store
Login Succeeded
[root@Harbor-master install]# docker push www.yunjisuan.com/library/centos:7
The push refers to repository [www.yunjisuan.com/library/centos]
d69483a6face: Pushed
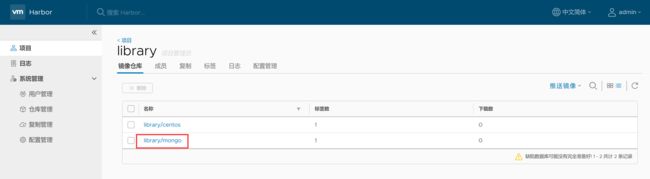
7: digest: sha256:ca58fe458b8d94bc6e3072f1cfbd334855858e05e1fd633aa07cf7f82b048e66 size: 529#重新启用漏洞扫描
[root@Harbor-master install]# cd /data/install/harbor
[root@Harbor-master harbor]# ./install.sh --with-notary --with-clair5.4 登陆浏览器查看镜像上传结果,并扫描漏洞


5.5 设置镜像仓库安全等级

5.6 为docker客户端下发域名证书
| 主机名 | IP | 用途 | 最小资源配比 | 最佳资源配比 |
|---|---|---|---|---|
| Docker-client | 192.168.200.17 | docker客户端 | ||
| Harbor-master | 192.168.200.16 | harbor私有镜像仓库 | 2CPU | 4CPU |
| 4GBMEM | 8GB |
#映射harbor私有仓库域名
[root@Docker-client ~]# cat /etc/redhat-release
CentOS Linux release 7.6.1810 (Core)
[root@Docker-client ~]# uname -r
3.10.0-957.12.1.el7.x86_64
[root@Docker-client ~]# hostname -I
192.168.200.17
[root@Docker-client ~]# tail -1 /etc/hosts
192.168.200.16 www.yunjisuan.com
#安装docker-ce社区版
[root@Docker-client ~]# sestatus
SELinux status: disabled
[root@Docker-client ~]# systemctl stop firewalld
[root@Docker-client ~]# systemctl disable firewalld
[root@Docker-client ~]# yum -y install yum-utils device-mapper-persistent-data lvm2
[root@Docker-client ~]# rpm -qa yum-utils device-mapper-persistent-data lvm2
yum-utils-1.1.31-50.el7.noarch
device-mapper-persistent-data-0.7.3-3.el7.x86_64
lvm2-2.02.180-10.el7_6.8.x86_64[root@Docker-client ~]# curl https://download.docker.com/linux/centos/docker-ce.repo -o /etc/yum.repos.d/docker-ce.repo
% Total % Received % Xferd Average Speed Time Time Time Current
Dload Upload Total Spent Left Speed
100 2424 100 2424 0 0 3925 0 --:--:-- --:--:-- --:--:-- 3922
[root@Docker-client ~]# yum -y install docker-ce
[root@Docker-client ~]# systemctl start docker
[root@Docker-client ~]# systemctl enable docker
Created symlink from /etc/systemd/system/multi-user.target.wants/docker.service to /usr/lib/systemd/system/docker.service.
[root@Docker-client ~]# docker version
Client: Docker Engine - Community
Version: 19.03.0
API version: 1.40
Go version: go1.12.5
Git commit: aeac9490dc
Built: Wed Jul 17 18:15:40 2019
OS/Arch: linux/amd64
Experimental: false
Server: Docker Engine - Community
Engine:
Version: 19.03.0
API version: 1.40 (minimum version 1.12)
Go version: go1.12.5
Git commit: aeac9490dc
Built: Wed Jul 17 18:14:16 2019
OS/Arch: linux/amd64
Experimental: false
containerd:
Version: 1.2.6
GitCommit: 894b81a4b802e4eb2a91d1ce216b8817763c29fb
runc:
Version: 1.0.0-rc8
GitCommit: 425e105d5a03fabd737a126ad93d62a9eeede87f
docker-init:
Version: 0.18.0
GitCommit: fec3683#配置国内公有镜像源
[root@Docker-client ~]# cat /etc/docker/daemon.json
{
"registry-mirrors":[ "https://registry.docker-cn.com" ]
}
[root@Docker-client ~]# systemctl daemon-reload
[root@Docker-client ~]# systemctl restart docker#下载mongo公有镜像
[root@Docker-client ~]# docker pull mongo
Using default tag: latest
latest: Pulling from library/mongo
f7277927d38a: Pull complete
8d3eac894db4: Pull complete
edf72af6d627: Pull complete
3e4f86211d23: Pull complete
5747135f14d2: Pull complete
f56f2c3793f6: Pull complete
f8b941527f3a: Pull complete
4000e5ef59f4: Pull complete
ad518e2379cf: Pull complete
919225fc3685: Pull complete
45ff8d51e53a: Pull complete
4d3342ddfd7b: Pull complete
26002f176fca: Pull complete
Digest: sha256:7df93c5e2d140beabc39ef225da618df28cc916a5f5f295a41858accc0f46a0b
Status: Downloaded newer image for mongo:latest
docker.io/library/mongo:latest
[root@Docker-client ~]# docker images
REPOSITORY TAG IMAGE ID CREATED SIZE
mongo latest 9c02a5a12c52 18 hours ago 413MB#为docker客户端下发域名(在harbor本地执行操作)
#将harbor上自签发的域名证书www.yunjisuan.com.crt复制到docker客户端对应目录下
[root@Harbor-master install]# cd /data/ssl/
[root@Harbor-master ssl]# scp www.yunjisuan.com.crt 192.168.200.17:/etc/pki/ca-trust/source/anchors/
[email protected]'s password:
www.yunjisuan.com.crt 100% 1931 1.6MB/s 00:00 #在docker客户端上执行操作,让证书立刻生效
[root@Docker-client ~]# update-ca-trust enable
[root@Docker-client ~]# update-ca-trust extract
#下发证书后必须重启动docker-client的docker服务
[root@Docker-client ~]# systemctl restart docker#docker-client登陆harbor仓库进行登陆验证
[root@Docker-client ~]# cd /etc/pki/ca-trust/source/anchors/
[root@Docker-client anchors]# ll
总用量 4
-rw-r--r-- 1 root root 1931 7月 24 19:56 www.yunjisuan.com.crt
[root@Docker-client anchors]# docker login www.yunjisuan.com
Username: admin
Password: Harbor12345
WARNING! Your password will be stored unencrypted in /root/.docker/config.json.
Configure a credential helper to remove this warning. See
https://docs.docker.com/engine/reference/commandline/login/#credentials-store
Login Succeeded#修改镜像的名字并上传harbor私有仓库
[root@Docker-client anchors]# docker tag mongo:latest www.yunjisuan.com/library/mongo
[root@Docker-client anchors]# docker images
REPOSITORY TAG IMAGE ID CREATED SIZE
mongo latest 9c02a5a12c52 18 hours ago 413MB
www.yunjisuan.com/library/mongo latest 9c02a5a12c52 18 hours ago 413MB
[root@Docker-client anchors]# docker push www.yunjisuan.com/library/mongo
The push refers to repository [www.yunjisuan.com/library/mongo]
3ea1af4d89d2: Pushed
d1badfd80c45: Pushed
be68547708c3: Pushed
26c9058be51d: Pushed
689158adef1e: Pushed
2ee7e1a20686: Pushed
6a272ecc48d7: Pushed
4ad102c46894: Pushed
b03801a3ccd1: Pushed
e79142719515: Pushed
aeda103e78c9: Pushed
2558e637fbff: Pushed
f749b9b0fb21: Pushed
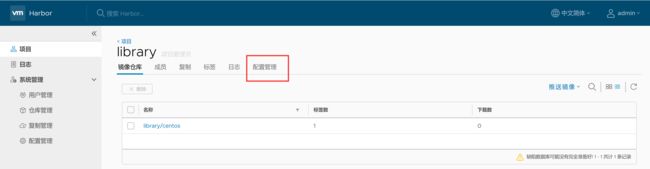
latest: digest: sha256:7328ced1dd646dd65a20dbf3ae430835ce75ad6cdbfe59c83185ddb719dd5913 size: 3030浏览器登陆harbor进行查看:https://192.168.200.16
出现漏洞的镜像截图:
5.7 FAQ:问题解答
windows10最新版本默认拒绝非认证的域名证书
如果启动harbor采用的https加密证书的方式,最新版本windows10浏览器访问的话,默认会直接说“站点不安全,拒绝连接”。 那么我们可以采用非https的方式启动harbor
[root@harbor-master ~]# sed -n '11p' /data/install/harbor/harbor.cfg
ui_url_protocol = http
但是我们要是采用非https加密方式启动harbor的话。最新版本的docker是登陆不了的。这是因为新版本docker默认是以https方式登陆harbor
[root@Harbor-Slave docker]# docker login -uadmin -pHarbor12345 www.yunjisuan.com
WARNING! Using --password via the CLI is insecure. Use --password-stdin.
Error response from daemon: Get https://www.yunjisuan.com/v2/: dial tcp 192.168.200.74:443: connect: connection refused
为了解决登陆问题,我们需要在/etc/docker/下创建一个daemon.json名字的文件,加入http方式登陆的harbor域名
[root@Harbor-Slave docker]# cat /etc/docker/daemon.json
{
    "insecure-registries":[ "www.yunjisuan.com" ]
}
[root@Harbor-Slave docker]# systemctl restart docker    #需要重启


#然后我们再次登陆harbor
[root@harbor-slave harbor]# docker login -uadmin -pHarbor12345 www.yunjisuan.com
WARNING! Using --password via the CLI is insecure. Use --password-stdin.
WARNING! Your password will be stored unencrypted in /root/.docker/config.json.
Configure a credential helper to remove this warning. See
https://docs.docker.com/engine/reference/commandline/login/#credentials-store

Login Succeeded    #登陆成功
6. Harbor镜像的复制与同步
harbor私有仓库的主从复制,类似于MySQL,属于1对多的复制
| 主机名 | IP | 用途 | 最小资源配比 | 最佳资源配比 |
|---|---|---|---|---|
| Docker-client | 192.168.200.17 | docker客户端 | ||
| Harbor-master | 192.168.200.16 | harbor私有镜像仓库 | 2CPU | 4CPU |
| 4GBMEM | 8GB | |||
| Harbor-slave | 192.168.200.18 | harbor私有镜像仓库 | 2CPU | 4CPU |
| 4GBMEM | 8GB |
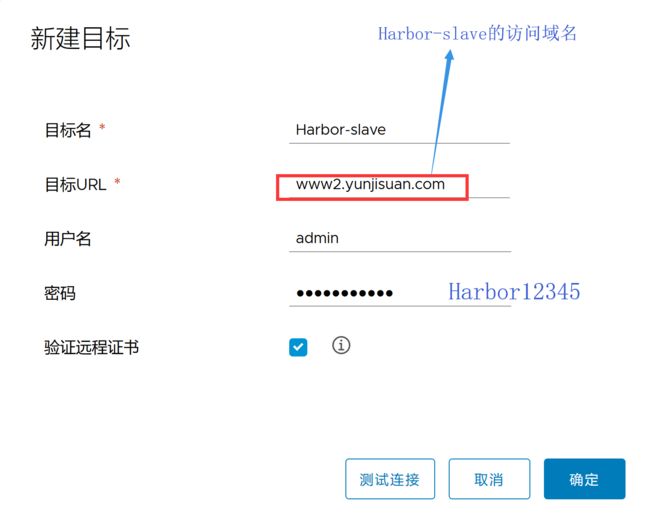
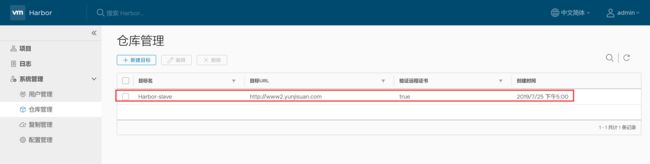
6.1 部署Habor-Slave
再安装一个harbor私有仓库作为harbor的从库,域名为www2.yunjisuan.com

在Harbor-Master和Harbor-Slave上做域名映射

#主Harbor
[root@Harbor-master ~]# tail -2 /etc/hosts
192.168.200.16 www.yunjisuan.com
192.168.200.18 www2.yunjisuan.com

#从Harbor
[root@Harbor-slave ~]# tail -2 /etc/hosts
192.168.200.16 www.yunjisuan.com
192.168.200.18 www2.yunjisuan.com
特别提示:离线方式安装的Habor容器默认会从LDNS处获取对应的域名的IP解析,并不找本地的hosts文件
由于我们是自己是自己设定的域名,因此,需要搭建用于内网解析的LDNS域名解析服务器
6.2 搭建LDNS域名解析服务器
| 主机名 | IP | 用途 | 最小资源配比 | 最佳资源配比 |
|---|---|---|---|---|
| Docker-client | 192.168.200.17 | docker客户端 | ||
| Harbor-master | 192.168.200.16 | harbor私有镜像仓库 | 2CPU | 4CPU |
| 4GBMEM | 8GB | |||
| Harbor-slave | 192.168.200.18 | harbor私有镜像仓库 | 2CPU | 4CPU |
| 4GBMEM | 8GB | |||
| LDNS | 192.168.200.19 | 本地DNS |
[root@LDNS ~]# yum -y install bind bind-chroot bind-utils
[root@LDNS ~]# rpm -qa bind bind-chroot bind-utils
bind-chroot-9.9.4-74.el7_6.1.x86_64
bind-9.9.4-74.el7_6.1.x86_64
bind-utils-9.9.4-74.el7_6.1.x86_64
[root@LDNS ~]# cd /etc/
[root@LDNS etc]# cp named.conf{,.bak}
#配置文件修改成如下所示:
[root@LDNS etc]# cat named.conf
options {
listen-on port 53 { 192.168.200.19; };
// listen-on-v6 port 53 { ::1; };
directory "/var/named";
dump-file "/var/named/data/cache_dump.db";
statistics-file "/var/named/data/named_stats.txt";
memstatistics-file "/var/named/data/named_mem_stats.txt";
allow-query { any; };
forwarders { 192.168.200.2; };
recursion yes;
dnssec-enable no;
dnssec-validation no;
/* Path to ISC DLV key */
bindkeys-file "/etc/named.iscdlv.key";
managed-keys-directory "/var/named/dynamic";
pid-file "/run/named/named.pid";
session-keyfile "/run/named/session.key";
};
logging {
channel default_debug {
file "data/named.run";
severity dynamic;
};
};
zone "." IN {
type hint;
file "named.ca";
};
zone "yunjisuan.com" IN {
type master;
file "yunjisuan.com.zone";
};
include "/etc/named.rfc1912.zones";
include "/etc/named.root.key";
#检查配置文件是否有错
[root@LDNS etc]# named-checkconf /etc/named.conf#创建正向解析文件
[root@LDNS etc]# cd /var/named
[root@LDNS named]# ls
chroot data dynamic named.ca named.empty named.localhost named.loopback slaves
[root@LDNS named]# cp -p named.empty yunjisuan.com.zone
[root@LDNS named]# vim yunjisuan.com.zone
[root@LDNS named]# cat yunjisuan.com.zone
$TTL 1D
@ IN SOA yunjisuan.com. root.ns1.yunjisuan.com. (
20190725 ; serial
1D ; refresh
1H ; retry
1W ; expire
3H ) ; minimum
NS ns1.yunjisuan.com.
ns1 A 192.168.200.19
www A 192.168.200.16
www2 A 192.168.200.18
#测试正向解析文件是否有错
[root@LDNS named]# named-checkzone yunjisuan.com yunjisuan.com.zone
zone yunjisuan.com/IN: loaded serial 20190725
OK#启动域名解析服务
[root@LDNS named]# systemctl start named
[root@LDNS named]# ss -antup | grep named
udp UNCONN 0 0 192.168.200.19:53 *:* users:(("named",pid=7085,fd=512))
tcp LISTEN 0 10 192.168.200.19:53 *:* users:(("named",pid=7085,fd=21))
tcp LISTEN 0 128 127.0.0.1:953 *:* users:(("named",pid=7085,fd=22))
tcp LISTEN 0 128 ::1:953 :::* users:(("named",pid=7085,fd=23))#将本地DNS改成自己,进行解析测试
[root@LDNS named]# cat /etc/resolv.conf
; generated by /usr/sbin/dhclient-script
search localdomain
nameserver 192.168.200.19
[root@LDNS named]# nslookup www.baidu.com
Server: 192.168.200.19
Address: 192.168.200.19#53
Non-authoritative answer:
www.baidu.com canonical name = www.a.shifen.com.
Name: www.a.shifen.com
Address: 61.135.169.125
Name: www.a.shifen.com
Address: 61.135.169.121
[root@LDNS named]# nslookup www.yunjisuan.com
Server: 192.168.200.19
Address: 192.168.200.19#53
Name: www.yunjisuan.com
Address: 192.168.200.16
[root@LDNS named]# nslookup www2.yunjisuan.com
Server: 192.168.200.19
Address: 192.168.200.19#53
Name: www2.yunjisuan.com
Address: 192.168.200.186.3 构建Harbor主从同步
提示:如果Harbor不是已经绑定的公网域名,那么必须构建自己的本地LDNS
#修改Harbor-master上的域名解析DNS服务器为本地构建的LDNS
[root@Harbor-master harbor]# cat /etc/resolv.conf
; generated by /usr/sbin/dhclient-script
search localdomain
nameserver 192.168.200.19

[root@Harbor-master harbor]# nslookup www2.yunjisuan.com
Server:     192.168.200.19
Address:    192.168.200.19#53

Name:   www2.yunjisuan.com
Address: 192.168.200.18


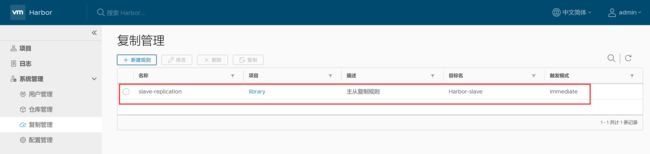
至此,Harbor仓库主从复制已经构建完毕。
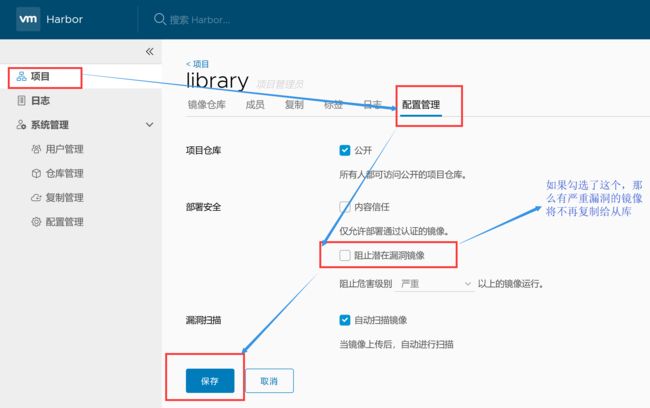
备注:如果勾选了阻止潜在漏洞的选项会影响harbor主从复制
特别提示:如果是harbor经历过vmware虚拟机的暂停和恢复。那么很可能之前能够访问的harbor仓库,恢复后却不行了。此时,需要重启dorker进程并重新harbor容器进程。