

Download source code - 1.26 MB
Download demo - 215 KB
Contents
Introduction
Implementing Tab functionality
How to get the favicon of a website
Links Bar
History & Favorites
View Source
Search
Saving Settings
Properties, Print, Print Preview, Page Setup, Save As
Cut, Copy, Paste, Select All
What can be done further
Introduction
This was my first project in C#. This article describes how to implement some of the features of a Web Browser application like managing tabs, viewing the favicon of a particular website, managing Favorites websites and Links Bar, viewing the History, searching on Google or Live Search, saving settings between application runs, viewing the source and properties of a website, printing the content of page, and others. C# has a WebBrowser control that does all the work of rendering web pages.
Implementing Tab functionality
In my main form, I added a TabControl control named browserTabControl with only one TabPage which represents the "New" tab. When the user clicks the "New" tab, then a new tab is created. The addNewTab() method shows how to add a new tab in your web browser.
privatevoid addNewTab()
{
    // create a new TabPage object    TabPage tpage = new TabPage();
    tpage.BorderStyle = BorderStyle.Fixed3D;
    //add the newly created TabPage//to the tabcontrol's collection of tab pages     browserTabControl.TabPages.Insert(
        browserTabControl.TabCount - 1, tpage);
    //create a WebBrowser objectWebBrowser browser = newWebBrowser();
    browser.Navigate(homePage);
    //add the browser object to the tab page //you created previously    tpage.Controls.Add(browser);
    browser.Dock = DockStyle.Fill;
    browserTabControl.SelectTab(tpage);
    //add some event handlers to your browser object    browser.ProgressChanged += newWebBrowserProgressChangedEventHandler(Form1_ProgressChanged);
    browser.DocumentCompleted += newWebBrowserDocumentCompletedEventHandler(Form1_DocumentCompleted);
    browser.Navigating +=
      newWebBrowserNavigatingEventHandler(Form1_Navigating);
    browser.CanGoBackChanged +=
      new EventHandler(browser_CanGoBackChanged);
    browser.CanGoForwardChanged +=
      new EventHandler(browser_CanGoForwardChanged);
}
The example below shows how to get the current tab:
privateWebBrowser getCurrentBrowser()
{
    return (WebBrowser)browserTabControl.SelectedTab.Controls[0];
}
How to get the favicon of a website
A favicon is a 16X16, 32X32, or 64X64 pixel square icon associated with a website. This icon is called favicon.ico, and can be found in in the root directory of a website. What you have to do in order to get the favicon of a particular website is to make a request to http://websitename/favicon.ico. You can get the icon from the response stream and use it in your application. For websites that don't have a favicon, I have used a default icon.
publicstatic Image favicon(String u, string file)
{
    Uri url = new Uri(u);
    String iconurl = "http://" + url.Host + "/favicon.ico";

    WebRequest request = WebRequest.Create(iconurl);
    try
    {
        WebResponse response = request.GetResponse();

        Stream s = response.GetResponseStream();
        return Image.FromStream(s);
    }
    catch (Exception ex)
    {
        //return a default icon in case //the web site doesn`t have a faviconreturn Image.FromFile(file);
    }
}
Links Bar
For the Links Bar, I used a ToolStrip control. A link button is represented by a ToolStripButton with the favicon image, and the website name as the text displayed on the button. The links are stored in an XML file that looks like this:
<favorits><linkurl="http://www.google.ro/">Google/<link><linkurl="http://www.codeproject.com/">CodeProject</link><linkurl="http://www.youtube.com/edu">Youtube/Edu</link></favorits>
The addNewLink() method shows how to add a new link. First, you open the XML file containing the links, then add a new XmlElement, setting the url attribute with the address of the website and the inner text of this element with the name you want this link to appear on the links bar. Then, you add a ToolStripButton to the links bar. The ToolStripButton control has a constructor that takes four arguments: public ToolStripButton(string text, Image image, EventHandler onClick, string name).
privatevoid addLink(Stringurl, string name)
{
   //open the xml file     XmlDocument myXml = new XmlDocument();
   //and a new element to the xml file    XmlElement el = myXml.CreateElement("link");
    el.SetAttribute("url", url);
    el.InnerText = name;

    if (!File.Exists(linksXml))
    {
        XmlElement root = myXml.CreateElement("links");
        myXml.AppendChild(root);
        root.AppendChild(el);
    }
    else
    {
        myXml.Load(linksXml);
        myXml.DocumentElement.AppendChild(el);
    }
    //if the links bar is visible then //you have to add a ToolStripButtonif (linkBar.Visible == true)
    {
       //create a new ToolStripButton object with the favicon image,//website name the click eventhandler to //navigate to the specific web site                       ToolStripButton b =
                  new ToolStripButton(el.InnerText, getFavicon(url),
                  items_Click, el.GetAttribute("url"));
        b.ToolTipText = el.GetAttribute("url");
        //the MouseUp event is used //for showing the context menu of this button         b.MouseUp += new MouseEventHandler(b_MouseUp);
        linkBar.Items.Add(b);
    }

    myXml.Save(linksXml);
}
The ToolStripButton control doesn't have a ContextMenu so if you want to add a context menu, you need to do some tricks. Here is my idea for solving this problem. In the designer view, I added a ContextMenu control named linkContextMenu and added some items on this context menu. When the user right-clicks a link, then this context menu is shown at the position where the mouse is. Then, you retain the website address and the name of this link (button that sent this event). For retaining the last address and name, I used two variables: adress and name. So, when the user clicks a context menu item, you can use these variables.

string adress, name;

privatevoid b_MouseUp(object sender, MouseEventArgs e)
{
    ToolStripButton b = (ToolStripButton)sender;
    adress = b.ToolTipText;
    name = b.Text;

    if (e.Button == MouseButtons.Right)
        linkContextMenu.Show(MousePosition);
}
Each context menu item has a click event handler. Below is an example of opening the link in a new window:
privatevoid openInNewWindowToolStripMenuItem_Click(object sender, EventArgs e)
{
    WBrowser new_form = new WBrowser();
    new_form.Show();
    new_form.getCurrentBrowser().Navigate(adress);
}
History & Favorites
For storing History and Favorites, I used two XML files:
history.xml
<history><itemurl="http://www.codeproject.com/"lastVisited="19.02.2010 12:58:03"times="6"/><itemurl="http://www.google.ro/"lastVisited="19.02.2010 12:52:09"times="2"/><itemurl="http://msdn.microsoft.com/"lastVisited="13.08.2009 20:22:52"times="1"/></history>
favorites.xml
<favorites><favoriturl="http://images.google.ro/imghp?hl=ro&tab=wi">
       Google-images</favorit><favoriturl="http://www.yahoo.com/">Yahoo!</favorit></favorites>
For showing History and Favorites, I used a TreeView control. Here is an example of showing history based on the site name:
privatevoid showHistory()
{
    historyTreeView.Nodes.Clear();
    //open the xml file    XmlDocument myXml = new XmlDocument();

    if (File.Exists(historyXml))
    {
        myXml.Load(historyXml);
        DateTime now=DateTime.Now;

        //....if (comboBox1.Text.Equals("View By Site"))
        {
          historyTreeView.ShowRootLines = true;
          foreach(XmlElement el in myXml.DocumentElement.ChildNodes)
          {
              Uri site=new Uri(el.GetAttribute("url"));

              if(!historyTreeView.Nodes.ContainsKey(site.Host.ToString()))
                  historyTreeView.Nodes.Add(site.Host.ToString(),
                                            site.Host.ToString(),0,0);
              //create a new tree node              TreeNode node =new TreeNode(el.GetAttribute("url"), 3, 3);
              //set some properties of the new tree node you created                  node.ToolTipText = el.GetAttribute("url") +
                               "\nLast Visited: " +
                               el.GetAttribute("lastVisited") +
                               "\nTimes Visited: " +
                               el.GetAttribute("times");
              node.Name = el.GetAttribute("url");
              //add a context menu to this node              node.ContextMenuStrip = histContextMenu;
              //add this node to the treeview control                  historyTreeView.Nodes[site.Host.ToString()].Nodes.Add(node);
         }
         //....    }
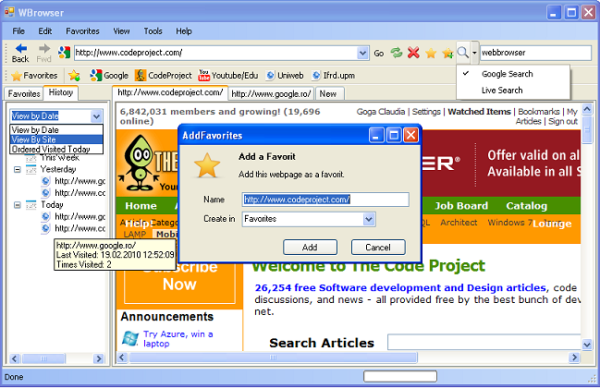
For adding a website to Favorites, I created a form named AddFovorites which will be treated as a dialog. The constructor of this class takes a string argument representing the current web address. When the user clicks the "Add to favorites" button, the AddFavorites dialog will appear. The user can choose whether to add a favorite or a link.

privatevoid toolStripButton8_Click(object sender, EventArgs e)
{
    if (getCurrentBrowser().Url != null)
    {        //show the AddFavorites dialog        AddFavorites dlg =
           new AddFavorites(getCurrentBrowser().Url.ToString());
        DialogResult res = dlg.ShowDialog();
            //if the user clicks OK   if (res == DialogResult.OK)
        {
            if (dlg.favFile == "Favorites")
                //add a favorite to xml file and in treeview                addFavorit(getCurrentBrowser().Url.ToString(),
                           dlg.favName);
            //add a link in xml file and in links bar//the addLink() method is listed//in the Links Bar section of this articleelse addLink(getCurrentBrowser().Url.ToString(),
                         dlg.favName);
        }
        dlg.Close();
    }
}
The addFavorit() method is listed below. It is similar to the addLink method, except it opens another XML file containing the favorite website, and it adds a TreeNode in favTreeView.
privatevoid addFavorit(Stringurl, string name)
{
    XmlDocument myXml = new XmlDocument();
    XmlElement el = myXml.CreateElement("favorit");
    el.SetAttribute("url", url);
    el.InnerText = name;
    if (!File.Exists(favXml))
    {
        XmlElement root = myXml.CreateElement("favorites");
        myXml.AppendChild(root);
        root.AppendChild(el);
    }
    else
    {
        myXml.Load(favXml);
        myXml.DocumentElement.AppendChild(el);
    }
    if (favoritesPanel.Visible == true)
    {
        TreeNode node = new TreeNode(el.InnerText,
          faviconIndex(el.GetAttribute("url")),
          faviconIndex(el.GetAttribute("url")));
        node.ToolTipText = el.GetAttribute("url");
        node.Name = el.GetAttribute("url");
        node.ContextMenuStrip = favContextMenu;
        favTreeView.Nodes.Add(node);
    }
    myXml.Save(favXml);
}
View Source
The WebBrowser control has a DocumentText property that represents the HTML contents of the page displayed in the control. For viewing the source of a website in Notepad, first create a temporary file, write the HTML content to this file, and then open the temporary file with Notepad.
privatevoid sourceToolStripMenuItem_Click(object sender, EventArgs e)
{
    String source=("source.txt");
    StreamWriter writer =File.CreateText(source);
    writer.Write(getCurrentBrowser().DocumentText);
    writer.Close();
    Process.Start("notepad.exe", source);
}
Search
On the address bar, I have a text box where the user can enter the keywords he wants to search. This text box has a KeyDown event. When the user presses "Enter", the result will be shown in the current tab. The user can choose between Google Search or Live Search in the dropdown button near the search bar.
privatevoid searchTextBox_KeyDown(object sender, KeyEventArgs e)
{
    if (e.KeyCode == Keys.Enter)
        if (googleSearch.Checked == true)
            getCurrentBrowser().Navigate("http://" +
              "google.com/search?q=" + searchTextBox.Text);
        else
            getCurrentBrowser().Navigate("http://search." +
              "live.com/results.aspx?q="+searchTextBox.Text);
}
Saving Settings
Sometimes a user wants to save settings between application runs. For saving settings like home page, visibility of the menu bar or links bar, I used an XML file named "settings.xml".
<settings><menuBarvisible="True"/><adrBarvisible="True"/><linkBarvisible="True"/><favoritesPanelvisible="True"/><SplashScreenchecked="False"/><homepage>about:blank</homepage><dropdown>15</dropdown></settings>
When the main form loads, these setting are read from the XML file. When the user changes a setting, the content of the XML file is changed. These changes are saved when the form is closed.
Changing the visibility of the Links Bar
In my main form, I have a context menu named toolBarContextMenu with the items in the image below. Each item has a Click event. When the user clicks one of the items in the context menu, then the visibility of that item is changed.

privatevoid linksBarToolStripMenuItem_Click(object sender, EventArgs e)
{
    linkBar.Visible = !linkBar.Visible;
    this.linksBarToolStripMenuItem.Checked = linkBar.Visible;

    //settings represents the xml file //"settings.xml" opened when the form loads    settings.DocumentElement.ChildNodes[2].Attributes[0].Value =
                             linkBar.Visible.ToString();
}
Changing the home page
I created a form named InternetOptions which will be treated as a dialog. The user can change the homepage, appearance, or the number of dropdown items in the address bar.

String homePage;

InternetOption optionDialog =
  new InternetOption(getCurrentBrowser().Url.ToString());
if (optionDialog.ShowDialog() == DialogResult.OK)
{
    //if the user setted a home page   if (!optionDialog.homepage.Text.Equals(""))
    {
        homePage = optionDialog.homepage.Text;
        //changing the setting in the xml file //settings represents the xml file//"settings.xml" opened when the form loads        settings.DocumentElement.ChildNodes[5].InnerText =
                                 optionDialog.homepage.Text;
    }
}
Properties, Print, Print Preview, Page Setup, Save As
Some of the WebBrowser control methods are listed here:
public void ShowPropertiesDialog (): Opens the Internet Explorer Properties dialog box for the current document.
privatevoid propertiesToolStripMenuItem_Click(object sender, EventArgs e)
{
    getCurrentBrowser().ShowPropertiesDialog();
}
public void ShowPageSetupDialog (): Opens the Internet Explorer Page Setup dialog box.
privatevoid pageSetupToolStripMenuItem_Click(object sender, EventArgs e)
{
    getCurrentBrowser().ShowPageSetupDialog();
}
public void ShowPrintDialog (): Opens the Internet Explorer Print dialog box without setting the header and footer values.
privatevoid printToolStripMenuItem_Click(object sender, EventArgs e)
{
    getCurrentBrowser().ShowPrintDialog();
}
public void ShowPrintPreviewDialog (): Opens the Internet Explorer Print Preview dialog box.
privatevoid printPreviewToolStripMenuItem_Click(object sender, EventArgs e)
{
    getCurrentBrowser().ShowPrintPreviewDialog();
}
public void ShowSaveAsDialog (): Opens the Internet Explorer Save Web Page dialog box, or the Save dialog box of the hosted document if it is not an HTML page.
privatevoid saveAsToolStripMenuItem_Click(object sender, EventArgs e)
{
    getCurrentBrowser().ShowSaveAsDialog();
}
Cut, Copy, Paste, Select All
The WebBrowser control has a Document property that gets an HtmlDocument representing the web page currently displayed in the control. On this HtmlDocument, you can execute specific commands like "Cut" or "Copy". The examples below show how you can do this.
//cutprivatevoid cutToolStripMenuItem_Click(object sender, EventArgs e)
{
    getCurrentBrowser().Document.ExecCommand("Cut", false, null);

}
//copyprivatevoid copyToolStripMenuItem_Click(object sender, EventArgs e)
{
    getCurrentBrowser().Document.ExecCommand("Copy", false, null);

}
//pasteprivatevoid pasteToolStripMenuItem_Click(object sender, EventArgs e)
{
    getCurrentBrowser().Document.ExecCommand("Paste", false, null);
}
//select allprivatevoid selectAllToolStripMenuItem_Click(object sender, EventArgs e)
{
    getCurrentBrowser().Document.ExecCommand("SelectAll", true, null);
}
What can be done further
There are two things that can be done further: one is to save the favicons of the favorites and links in XML files. This way, when the application loads, it doesn't have to make so many requests. Another thing that can be done is to use the App.config for saving settings.
Votes of 3 or less require a comment