AlertDialog基本用法详解
AlertDialog简单介绍:
AlertDialog可以在当前活动界面弹出一个对话框,用于提示一些重要信息或是警告内容。
AlertDialog置于所有页面元素之上,能够屏蔽其他控件的交互。
由于AlertDialog的构造方法被声明为protected,所以我们不能使用new来创建AlertDialog对象。
Android为我们提供另外一个类AlertDialog.Builder,用它可以创建AlertDialog对象实例,用show()方法显示。
AlertDialog有几个基本方法,
例如:setTitile() setMessage() setCancelable() setPositiveButton() setNegativeButton() setNeutralButton() 等等。
这些方法通过看字面意思,就差不多明白它的作用。
下面就给读者介绍AlertDialog的基本使用方法。
首先是布局文件,在布局文件中添加三个按钮分别来处理相应的三个不同的AlertDialog。
关键代码如下:
 1 <?xml version="1.0" encoding="utf-8"?>

 2 <LinearLayout xmlns:android="http://schemas.android.com/apk/res/android"

 3     android:layout_width="match_parent"

 4     android:layout_height="match_parent"

 5     android:orientation="vertical" >

 6

 7         <Button

 8             android:id="@+id/btn_confirm"

 9             android:layout_width="match_parent"

10             android:layout_height="wrap_content"

11             android:layout_marginTop="10dp"

12             android:text="@string/confirm"/>

13            <Button

14             android:id="@+id/btn_cancel"

15             android:layout_width="match_parent"

16             android:layout_height="wrap_content"

17             android:text="@string/cancel"/>

18            <Button

19                android:id="@+id/btn_search"

20                android:layout_width="match_parent"

21                android:layout_height="wrap_content"

22                android:text="@string/search"/>

23

24 </LinearLayout>
效果图如下:

下面就开始写java代码
为了便于统一管理各个活动类,创建一个基本活动类BaseActivity.java
关键代码如下:
 1 public class BaseActivity extends Activity{

 2     @Override

 3     protected void onCreate(Bundle savedInstanceState) {

 4         super.onCreate(savedInstanceState);

 5         //设置无标题 节省屏幕空间

 6         requestWindowFeature(Window.FEATURE_NO_TITLE);

 7         //打印正在运行活动的名称 调试所用

 8         Log.d("BaseActivity", getClass().getSimpleName());

 9     }

10 }
基本工作准备完毕,开始重头戏:MainActivity.java extends BaseActivity
读者也可以直接继承Activity
第一步是必要控件 视图创建 控件加载以及设置监听
 1 public class MainActivity extends BaseActivity {

 2     //创建三个按钮

 3     private Button btn_confirm;

 4     private Button btn_cancel;

 5     private Button btn_search;

 6

 7     @Override

 8     protected void onCreate(Bundle savedInstanceState) {

 9         super.onCreate(savedInstanceState);

10         setContentView(R.layout.main);

11         //加载按钮视图并添加监听事件

12         btn_confirm = (Button) findViewById(R.id.btn_confirm);

13         btn_cancel = (Button) findViewById(R.id.btn_cancel);

14         btn_search = (Button) findViewById(R.id.btn_search);

15         btn_confirm.setOnClickListener(new Listener());

16         btn_cancel.setOnClickListener(new Listener());

17         btn_search.setOnClickListener(new Listener());

18     }
第二步自定义监听类Listener 管理三个按钮 并在每个按钮的点击事件中创建AlertDialog
首先是带一个按钮的AlertDialog,只需添加一个setPositiveButton()
按钮点击直接Toast
代码如下:
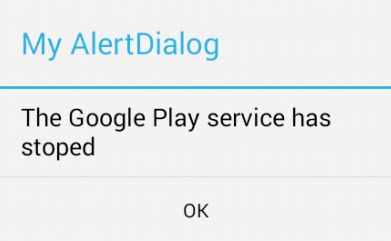
 1     private class Listener implements OnClickListener {

 2         AlertDialog.Builder dialog = null;

 3

 4         @Override

 5         public void onClick(View view) {

 6             // 利用switch对三个按钮分别进行监听

 7             switch (view.getId()) {

 8             case R.id.btn_confirm:

 9                 dialog = new AlertDialog.Builder(MainActivity.this);

10                 dialog.setTitle("My AlertDialog");

11                 dialog.setMessage("The Google Play service has stoped");

12                 dialog.setCancelable(false);

13                 dialog.setPositiveButton("OK",new DialogInterface.OnClickListener() {

14                             @Override

15                             public void onClick(DialogInterface dialog, int which) {

16                                     Toast.makeText(MainActivity.this, "You clicked OK", Toast.LENGTH_SHORT).show();

17                               }

18                          });

19                 dialog.show();

20                 break;
效果图如下:
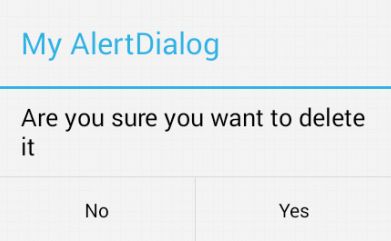
其次是带有两个按钮的AlertDialog 添加setPositiveButton()和setNegativeButton()
按钮点击依旧采用Toast处理
代码如下:
 1             case R.id.btn_cancel:

 2                 dialog = new AlertDialog.Builder(MainActivity.this);

 3                 dialog.setTitle("My AlertDialog");

 4                 dialog.setMessage("Are you sure you want to delete it");

 5                 dialog.setCancelable(false);

 6                 dialog.setPositiveButton("Yes",new DialogInterface.OnClickListener() {

 7                             @Override

 8                             public void onClick(DialogInterface dialog, int which) {

 9                                 Toast.makeText(MainActivity.this, "You clicked Yes", Toast.LENGTH_SHORT).show();

10                             }

11                         });

12                 dialog.setNegativeButton("No",new DialogInterface.OnClickListener() {

13                             @Override

14                             public void onClick(DialogInterface dialog, int which) {

15                                 Toast.makeText(MainActivity.this, "You clicked No",Toast.LENGTH_SHORT).show();

16                             }

17                         });

18                 dialog.show();

19                 break;
效果图如下:
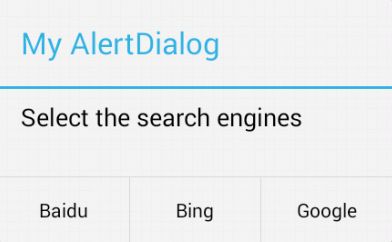
最后是带有三个按钮的AlertDialog 逻辑和前者相似,只需增加一个setNeutralButton()即可
按钮点击调用自定义方法gotoWeb()
 1             case R.id.btn_search:

 2                 dialog = new AlertDialog.Builder(MainActivity.this);

 3                 dialog.setTitle("My AlertDialog");

 4                 dialog.setMessage("Select the search engines");

 5                 dialog.setCancelable(false);

 6                 dialog.setPositiveButton("Google", new DialogInterface.OnClickListener() {

 7                             @Override

 8                             public void onClick(DialogInterface dialog, int which) {

 9                                 String URL = "http://www.google.com";

10                                 gotoWeb(URL);

11                             }

12                         });

13                 dialog.setNegativeButton("Baidu", new DialogInterface.OnClickListener() {

14                             @Override

15                             public void onClick(DialogInterface dialog, int which) {

16                                 String URL = "http://www.baidu.com";

17                                 gotoWeb(URL);

18                             }

19                         });

20                 dialog.setNeutralButton("Bing", new DialogInterface.OnClickListener() {

21                             @Override

22                             public void onClick(DialogInterface dialog, int which) {

23                                 String URL = "http://cn.bing.com";

24                                 gotoWeb(URL);

25                             }

26                         });

27                 dialog.show();

28                 break;

29             default:

30                 break;

31             }

32         }

33     }
效果图如下:
在第三个AlertDialog中调用了一个自定义方法gotoWeb(),使用意图调转到指定网站的访问
具体代码如下:
1     private void gotoWeb(String URL) {

2         Uri uri = Uri.parse(URL);

3         Intent intent = new Intent(Intent.ACTION_VIEW, uri);

4         startActivity(intent);

5         finish();

6     }
注意:MainActivity被拆分成多个部分分块解释。
大功告成,本文介绍AlertDialog最基本的用法,当然还有很多炫酷的自定义效果,有兴趣可以自行深入学习。
转载请注明出处:http://www.cnblogs.com/michaelwong/p/4114944.html