【PyTorch Ligntning】快速上手简明指南
目录
一、简介
二、安装 PyTorch Lightning
三、定义 LightningModule
3.1 SYSTEM VS MODEL
3.2 FORWARD vs TRAINING_STEP
三、配置 Lightning Trainer
四、基本特性
4.1 Manual vs automatic optimization
4.1.1 自动优化 (Automatic optimization)
4.1.1 手动优化 (Manual optimization)
4.2 Predict or Deploy
4.2.1 选项一 —— 子模型 (Sub-models)
4.2.2 选项二 —— 前馈 (Forward)
4.2.2 选项三 —— 生产 (Production)
4.3 Using CPUs/GPUs/TPUs
4.4 Checkpoints
4.5 Data flow
4.6 Logging
4.7 Optional extensions
4.7.1 回调 (Callbacks)
4.7.2 LightningDataModules
4.8 Debugging
五、其他炫酷特性
相关文章
【PyTorch Lightning】简介
【PyTorch Ligntning】如何将 PyTorch 组织为 Lightning
【PyTorch Lightning】1.0 正式发布:从 0 到 1
项目地址:https://github.com/PyTorchLightning/pytorch-lightning
一、简介
本指南将展示如何分两步将 PyTorch 代码组织成 Lightning。
使用 PyTorch Lightning 组织代码,可以使代码:
- 保留所有灵活性(这全是纯 PyTorch),但去除了大量样板(boilerplate)
- 将研究代码与工程解耦,更具可读性
- 更容易复现
- 通过自动化大多数训练循环和棘手的工程设计,减少了出错的可能性
- 可扩展到任何硬件而无需更改模型
二、安装 PyTorch Lightning
pip 安装:
pip install pytorch-lightning或 conda 安装:
conda install pytorch-lightning -c conda-forge或在 conda 虚拟环境下安装:
conda activate my_env
pip install pytorch-lightning
在新源文件中导入以下将用到的依赖:
import os
import torch
from torch import nn
import torch.nn.functional as F
from torchvision.datasets import MNIST
from torchvision import transforms
from torch.utils.data import DataLoader
import pytorch_lightning as pl
from torch.utils.data import random_split
三、定义 LightningModule
class LitAutoEncoder(pl.LightningModule):

    def __init__(self):
        super().__init__()
        self.encoder = nn.Sequential(
            nn.Linear(28*28, 64),
            nn.ReLU(),
            nn.Linear(64, 3)
        )
        self.decoder = nn.Sequential(
            nn.Linear(3, 64),
            nn.ReLU(),
            nn.Linear(64, 28*28)
        )

    def forward(self, x):
        # in lightning, forward defines the prediction/inference actions
        embedding = self.encoder(x)
        return embedding

    def training_step(self, batch, batch_idx):
        # training_step defined the train loop.
        # It is independent of forward
        x, y = batch
        x = x.view(x.size(0), -1)
        z = self.encoder(x)
        x_hat = self.decoder(z)
        loss = F.mse_loss(x_hat, x)
        # Logging to TensorBoard by default
        self.log('train_loss', loss)
        return loss

    def configure_optimizers(self):
        optimizer = torch.optim.Adam(self.parameters(), lr=1e-3)
        return optimizer
3.1 SYSTEM VS MODEL
注意,LightningModule 定义了一个系统 (system) 而不仅仅是一个模型 (model):
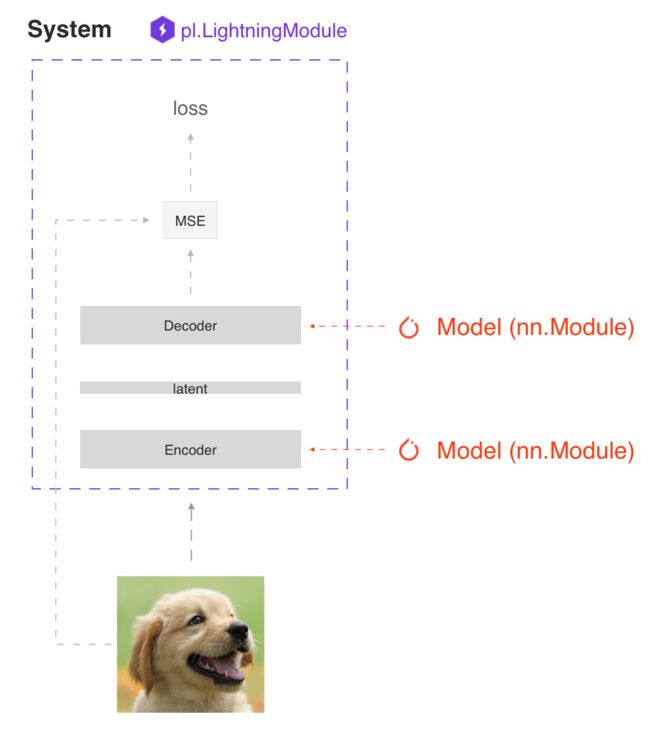
关于系统 (system) 的例子还有:
- Autoencoder
- BERT
- DQN
- GAN
- Image classifier
- Seq2seq
- SimCLR
- VAE
在内部,LightningModule 仍只是一个 torch.nn.Module,它将所有研究代码分组到一个文件中以使其自成一体:
- The Train loop
- The Validation loop
- The Test loop
- The Model or system of Models
- The Optimizer
可以通过覆盖 Available Callback hooks 中找到的 20+ 个 hooks 中的任意一个,来自定义任何训练部分 (如反向传播):
class LitAutoEncoder(pl.LightningModule):

    def backward(self, loss, optimizer, optimizer_idx):
        loss.backward()
3.2 FORWARD vs TRAINING_STEP
在 Lightning 中,我们将训练与推理分开。training_step 定义了完整的训练循环。鼓励用户用 forward 定义推理行为。
例如,在这种情况下,可以定义自动编码器以充当嵌入提取器 (embedding extractor):
def forward(self, x):
    embeddings = self.encoder(x)
    return embeddings
当然,没有什么可以阻止你在 training_step 中使用 forward:
def training_step(self, batch, batch_idx):
    ...
    z = self(x)
这确实取决于个人的应用程序,但仍建议将两个意图分开。
- 使用 forward 推理/预测
- 使用 training_step 训练
更多细节在 LightningModule 文档中。
三、配置 Lightning Trainer
首先,定义所需的数据。Lightning 只需一个 DataLoader 用于训练/验证/测试数据分片:
dataset = MNIST(os.getcwd(), download=True, transform=transforms.ToTensor())
train_loader = DataLoader(dataset)
接着,初始化 LightningModule 和 PyTorch Lightning Trainer,然后对数据和模型进行拟合。
# init model
autoencoder = LitAutoEncoder()

# most basic trainer, uses good defaults (auto-tensorboard, checkpoints, logs, and more)
# trainer = pl.Trainer(gpus=8) (if you have GPUs)
trainer = pl.Trainer()
trainer.fit(autoencoder, train_loader)
Trainer 自动化以下内容:
- Epoch and batch iteration
- Calling of optimizer.step(), backward, zero_grad()
- Calling of .eval(), enabling/disabling grads
- Saving and loading weights
- Tensorboard (see Loggers options)
- Multi-GPU training support
- TPU support
- 16-bit training support
小贴士
若希望手动管理优化器,则可使用 “手动优化” 模式 (Manual optimization mode)(即:RL, GANs 等)。
以上便是在 Lightning 中需要了解的 2 个主要概念。Lightning 的所有其他特性都是 Trainer 或 LightningModule 的特性。
四、基本特性
4.1 Manual vs automatic optimization
4.1.1 自动优化 (Automatic optimization)
使用 Lightning,无需担心何时启用/禁用梯度 (grads),进行反向传播或更新优化器,只要在 training_step 中附带图 (attached graph) 返回损失,Lightning 就会自动执行优化。
def training_step(self, batch, batch_idx):
    loss = self.encoder(batch[0])
    return loss
4.1.1 手动优化 (Manual optimization)
然而,对于某些研究,如 GAN、强化学习或带有多个优化器或内部循环的某些研究,可以关闭自动优化并完全自主控制训练循环。
首先,关闭自动优化:
trainer = Trainer(automatic_optimization=False)然后,构造自己的训练循环:
def training_step(self, batch, batch_idx, opt_idx):
    (opt_a, opt_b, opt_c) = self.optimizers()

    loss_a = self.generator(batch[0])

    # use this instead of loss.backward so we can automate half precision, etc...
    self.manual_backward(loss_a, opt_a, retain_graph=True)
    self.manual_backward(loss_a, opt_a)
    opt_a.step()
    opt_a.zero_grad()

    loss_b = self.discriminator(batch[0])
    self.manual_backward(loss_b, opt_b)
    ...
4.2 Predict or Deploy
完成训练后,可以使用 3 个选项将 LightningModule 用于预测。
4.2.1 选项一 —— 子模型 (Sub-models)
取出系统 (system) 内部的任何模型进行预测。
# ----------------------------------
# to use as embedding extractor
# ----------------------------------
autoencoder = LitAutoEncoder.load_from_checkpoint('path/to/checkpoint_file.ckpt')
encoder_model = autoencoder.encoder
encoder_model.eval()

# ----------------------------------
# to use as image generator
# ----------------------------------
decoder_model = autoencoder.decoder
decoder_model.eval()
4.2.2 选项二 —— 前馈 (Forward)
如果需要,也可以加入一个 forward 方法进行预测:
# ----------------------------------
# using the AE to extract embeddings
# ----------------------------------
class LitAutoEncoder(pl.LightningModule):
    def forward(self, x):
        embedding = self.encoder(x)
        return embedding

autoencoder = LitAutoencoder()
autoencoder = autoencoder(torch.rand(1, 28 * 28))
# ----------------------------------
# or using the AE to generate images
# ----------------------------------
class LitAutoEncoder(pl.LightningModule):
def forward(self):
z = torch.rand(1, 3)
image = self.decoder(z)
image = image.view(1, 1, 28, 28)
return image
autoencoder = LitAutoencoder()
image_sample = autoencoder(()4.2.2 选项三 —— 生产 (Production)
对于生产系统 (production systems),onnx 或 torchscript 的速度要快得多。确保已添加 forward 方法或仅跟踪所需的子模型 (sub-models)。
# ----------------------------------
# torchscript
# ----------------------------------
autoencoder = LitAutoEncoder()
torch.jit.save(autoencoder.to_torchscript(), "model.pt")
os.path.isfile("model.pt")
# ----------------------------------
# onnx
# ----------------------------------
with tempfile.NamedTemporaryFile(suffix='.onnx', delete=False) as tmpfile:
autoencoder = LitAutoEncoder()
input_sample = torch.randn((1, 28 * 28))
autoencoder.to_onnx(tmpfile.name, input_sample, export_params=True)
os.path.isfile(tmpfile.name)4.3 Using CPUs/GPUs/TPUs
在 Lightning 中使用 CPU、GPU 或 TPU 很简单。无需更改代码,只需更改 Trainer 选项 即可。
# train on CPU
trainer = pl.Trainer()
# train on 8 CPUs
trainer = pl.Trainer(num_processes=8)# train on 1024 CPUs across 128 machines
trainer = pl.Trainer(
num_processes=8,
num_nodes=128
)# train on 1 GPU
trainer = pl.Trainer(gpus=1)# train on multiple GPUs across nodes (32 gpus here)
trainer = pl.Trainer(
gpus=4,
num_nodes=8
)# train on gpu 1, 3, 5 (3 gpus total)
trainer = pl.Trainer(gpus=[1, 3, 5])# Multi GPU with mixed precision
trainer = pl.Trainer(gpus=2, precision=16)# Train on TPUs
trainer = pl.Trainer(tpu_cores=8)现在,无需更改自己代码,就可以用上述代码执行以下操作:
# train on TPUs using 16 bit precision
# using only half the training data and checking validation every quarter of a training epoch
trainer = pl.Trainer(
    tpu_cores=8,
    precision=16,
    limit_train_batches=0.5,
    val_check_interval=0.25
)
4.4 Checkpoints
Lightning 会自动地保存模型。一旦进行过训练,即可按如下方式加载检查点 (checkpoints):
model = LitModel.load_from_checkpoint(path)上面的检查点 (checkpoints) 包含 初始化模型 和 设置状态字典 (state dict) 所需的所有参数。如果希望手动进行操作,则可以使用以下等价方式:
# load the ckpt
ckpt = torch.load('path/to/checkpoint.ckpt')

# equivalent to the above
model = LitModel()
model.load_state_dict(ckpt['state_dict'])
4.5 Data flow
每个循环 (训练,验证,测试) 都有三个钩子 (hooks) 函数可以执行:
- x_step
- x_step_end
- x_epoch_end
为阐明数据如何流动,此处使用训练循环说明 (即 x=training):
outs = []
for batch in data:
    out = training_step(batch)
    outs.append(out)
training_epoch_end(outs)
这在 Lightning 中等价为:
def training_step(self, batch, batch_idx):
    prediction = ...
    return prediction

def training_epoch_end(self, training_step_outputs):
    for prediction in predictions:
        # do something with these
若使用 DP 或 DDP2 分布式模式 (即:拆分一个 batch 到各 GPUs),请使用 x_step_end 手动进行聚合 (aggregate) (或不实施以让 Lightning 自动进行聚合)。
for batch in data:
    model_copies = copy_model_per_gpu(model, num_gpus)
    batch_split = split_batch_per_gpu(batch, num_gpus)

    gpu_outs = []
    for model, batch_part in zip(model_copies, batch_split):
        # LightningModule hook
        gpu_out = model.training_step(batch_part)
        gpu_outs.append(gpu_out)

    # LightningModule hook
    out = training_step_end(gpu_outs)
这在 Lightning 中等价为:
def training_step(self, batch, batch_idx):
    loss = ...
    return loss

def training_step_end(self, losses):
    gpu_0_loss = losses[0]
    gpu_1_loss = losses[1]
    return (gpu_0_loss + gpu_1_loss) * 1/2
小贴士
验证和测试循环具有同样的结构。
4.6 Logging
为记录日志 (log) 到 Tensorboard、最喜欢的记录器 (logger) 和/或 进度条,请使用 log() 方法,该方法可以从LightningModule 中的任何方法调用:
def training_step(self, batch, batch_idx):
    self.log('my_metric', x)
log() 方法有以下几个选项:
- on_step(记录训练中该步骤的度量指标 (metric))
- on_epoch(在 epoch 结束时自动累积和记录)
- prog_bar(记录到进度栏)
- logger(像 Tensorboard 一样记录到记录器)
取决于从何处调用日志 (log),Lightning 会自动确定正确的模式。但当然,亦可通过手动设置标志来覆盖默认行为。
注意
设置 on_epoch = True 将在整个训练 epoch 内累积记录值。
def training_step(self, batch, batch_idx):
    self.log('my_loss', loss, on_step=True, on_epoch=True, prog_bar=True, logger=True)
注意
进度条中显示的损失值在最后一个值上进行了平滑 (平均),因此它不同于训练/验证步骤中返回的实际损失。
你也可以直接使用你的记录器 (loggers) 的任何方法:
def training_step(self, batch, batch_idx):
    tensorboard = self.logger.experiment
    tensorboard.any_summary_writer_method_you_want())
一旦训练开始后,就可以使用喜欢的记录器 (logger) 或启动 Tensorboard logs 来查看日志:
tensorboard --logdir ./lightning_logs注意
Lightning 会自动在进度栏中显示从 training_step 返回的损失值。因此,无需显式记录此类日志,例如像这样 self.log('loss', loss, prog_bar = True)。
阅读更多关于记录器 (Loggers) 的内容。
4.7 Optional extensions
4.7.1 回调 (Callbacks)
回调 (Callbacks) 是一个任意的独立程序,可以在训练循环的任意部分执行。
以下是添加不太理想的学习率衰减规则的示例:
class DecayLearningRate(pl.Callback)

    def __init__(self):
        self.old_lrs = []

    def on_train_start(self, trainer, pl_module):
        # track the initial learning rates
        for opt_idx in optimizer in enumerate(trainer.optimizers):
            group = []
            for param_group in optimizer.param_groups:
                group.append(param_group['lr'])
            self.old_lrs.append(group)

    def on_train_epoch_end(self, trainer, pl_module, outputs):
        for opt_idx in optimizer in enumerate(trainer.optimizers):
            old_lr_group = self.old_lrs[opt_idx]
            new_lr_group = []
            for p_idx, param_group in enumerate(optimizer.param_groups):
                old_lr = old_lr_group[p_idx]
                new_lr = old_lr * 0.98
                new_lr_group.append(new_lr)
                param_group['lr'] = new_lr
             self.old_lrs[opt_idx] = new_lr_group
可以通过回调执行的操作:
- 在训练的某个时间点发送电子邮件
- 增长模型
- 更新学习率
- 可视化梯度
- …
- 仅受你想象力所限
了解更多关于自定义回调 (custom callbacks) 的内容。
4.7.2 LightningDataModules
DataLoader 和数据处理代码趋向于四处分散。通过将其组织到 LightningDataModule 中,使数据代码可重用。
class MNISTDataModule(pl.LightningDataModule):

      def __init__(self, batch_size=32):
          super().__init__()
          self.batch_size = batch_size

      # When doing distributed training, Datamodules have two optional arguments for
      # granular control over download/prepare/splitting data:

      # OPTIONAL, called only on 1 GPU/machine
      def prepare_data(self):
          MNIST(os.getcwd(), train=True, download=True)
          MNIST(os.getcwd(), train=False, download=True)

      # OPTIONAL, called for every GPU/machine (assigning state is OK)
      def setup(self, stage):
          # transforms
          transform=transforms.Compose([
              transforms.ToTensor(),
              transforms.Normalize((0.1307,), (0.3081,))
          ])
          # split dataset
          if stage == 'fit':
              mnist_train = MNIST(os.getcwd(), train=True, transform=transform)
              self.mnist_train, self.mnist_val = random_split(mnist_train, [55000, 5000])
          if stage == 'test':
              self.mnist_test = MNIST(os.getcwd(), train=False, transform=transform)

      # return the dataloader for each split
      def train_dataloader(self):
          mnist_train = DataLoader(self.mnist_train, batch_size=self.batch_size)
          return mnist_train

      def val_dataloader(self):
          mnist_val = DataLoader(self.mnist_val, batch_size=self.batch_size)
          return mnist_val

      def test_dataloader(self):
          mnist_test = DataLoader(self.mnist_test, batch_size=self.batch_size)
          return mnist_test
LightningDataModule 旨在支持在不同项目之间共享和重用数据分片和转换 (splits and transforms)。它封装了处理数据所需的所有步骤:下载、标记化、处理 (downloading, tokenizing, processing) 等。
现在,只需将 LightningDataModule 传递给 Trainer:
# init model
model = LitModel()

# init data
dm = MNISTDataModule()

# train
trainer = pl.Trainer()
trainer.fit(model, dm)

# test
trainer.test(datamodule=dm)
DataModules 对于基于数据构建模型特别有用。阅读更多关于 LightningDataModule 的内容。
4.8 Debugging
Lightning 有许多调试工具。这是其中一些示例:
# use only 10 train batches and 3 val batches
trainer = pl.Trainer(limit_train_batches=10, limit_val_batches=3)
# Automatically overfit the sane batch of your model for a sanity test
trainer = pl.Trainer(overfit_batches=1)# unit test all the code- hits every line of your code once to see if you have bugs,
# instead of waiting hours to crash on validation
trainer = pl.Trainer(fast_dev_run=True)# train only 20% of an epoch
trainer = pl. Trainer(limit_train_batches=0.2)# run validation every 25% of a training epoch
trainer = pl.Trainer(val_check_interval=0.25)# Profile your code to find speed/memory bottlenecks
Trainer(profiler=True)五、其他炫酷特性
定义并训练了第一个 Lightning 模型后,你可能想尝试其他出色的功能,例如:
- Automatic early stopping
- Automatic truncated-back-propagation-through-time
- Automatically scale your batch size
- Automatically find a good learning rate
- Load checkpoints directly from S3
- Scale to massive compute clusters
- Use multiple dataloaders per train/val/test loop
- Use multiple optimizers to do reinforcement learning or even GANs
或者阅读 Step-by-step walk-through 以了解更多。
参考文献
https://pytorch-lightning.readthedocs.io/en/stable/new-project.html#