承上启下,接下来进行自动化IP管理模块的开发
按照传统模式的话,新增了一台server如果在Excel表(或者其他类似的)对IP进行管理的话很麻烦,因为稍不注意就忘记了进行新增IP的操作了,开发一个自动化的IP管理网页就很有必要了
首先新建一个app
python manage.py startapp ipmanage设置模型
进入ipmanage/models.py文件,
from django.db import models
#from django.contrib.auth.models import Ipmanager
# Create your models here.

class Ipmanage(models.Model):
    id = models.IntegerField('序号', primary_key=True)
    team = models.CharField('部门',max_length=255)
    useable_officeip=models.CharField('可用officeip',max_length=255)
    officeip = models.CharField('已用officeip', max_length=255)
    officeip_hostname=models.CharField('officeip主机名',max_length=255)
    officeip_ostype=models.CharField('officeip操作系统',max_length=255)
    useable_sfcip = models.CharField('可用sfc_ip', max_length=255)
    sfcip = models.CharField('已用sfc_ip', max_length=255)
    sfcip_hostname = models.CharField('sfcip主机名', max_length=255)
    sfcip_ostype = models.CharField('sfcip操作系统', max_length=255)
    useable_pdcaip = models.CharField('可用pdca_ip', max_length=255)
    pdcaip= models.CharField('已用pdca_ip', max_length=255)
    pdcaip_hostname = models.CharField('pdcaip主机名', max_length=255)
    pdcaip_ostype = models.CharField('pdcaip操作系统', max_length=255)
    useable_iloip=models.CharField('可用iloip',max_length=255)
    iloip=models.CharField('已用iloip',max_length=255)
    iloip_hostname=models.CharField('iloip主机名',max_length=255)
    iloip_ostype=models.CharField('iloip操作系统',max_length=255)
    class Meta:
        ordering = ['useable_officeip']
        db_table = 'ipmanage'
        verbose_name = "IP管理"
        verbose_name_plural = "IP管理"
数据库用之前的就行
此处不需要在进行更改
然后注册app
在settings的下面部分添加‘login’,建议在最后添加个逗号。
# Application definition

INSTALLED_APPS = [
    'django.contrib.admin',
    'django.contrib.auth',
    'django.contrib.contenttypes',
    'django.contrib.sessions',
    'django.contrib.messages',
    'django.contrib.staticfiles',
    'login',
    'ipmanage'
]
然后创建记录和数据表
执行下面两个命令
python manage.py makemigrations
python manage.py migrate
D:\aworkstation\sams>python manage.py makemigrations
Migrations for 'ipmanage':
ipmanage\migrations\0001_initial.py
- Create model Ipmanage
Migrations for 'login':
login\migrations\0002_auto_20191004_1716.py
- Change Meta options on user
D:\aworkstation\sams>python manage.py migrate
System check identified some issues:
WARNINGS:
?: (mysql.W002) MySQL Strict Mode is not set for database connection 'default'
HINT: MySQL's Strict Mode fixes many data integrity problems in MySQL, such as data truncation upon insertion, by escalating warnings into errors. It is strongly recommended you activate it. See: https://docs.djangoproject.c
om/en/2.2/ref/databases/#mysql-sql-mode
Operations to perform:
Apply all migrations: admin, auth, contenttypes, ipmanage, login, sessions
Running migrations:
Applying ipmanage.0001_initial... OK
Applying login.0002_auto_20191004_1716... OK
然后在sams新建一个information文件夹,新建一个insert_useableip.py文件
import pymysql
import IPy

officefrontips=['10.244.220.','10.244.221.']
for officefrontip in officefrontips:
    for lastip in range(21,255):
        if officefrontip=='10.244.220.':
            sfcfrontip='172.18.240.'
            pdcaip='172.28.8.'+str(lastip)
            iloip=''
            if lastip in range(21,91):
                theteam="SFC"
            elif lastip in range(91,146):
                theteam="WEB"
            elif lastip in range(146, 156):
                theteam = "ERP"
            elif lastip in range(156,255):
                theteam="ITIC"
        elif officefrontip=='10.244.221.':
            sfcfrontip='172.18.241.'
            pdcaip=''
            iloip='192.166.6.'+str(lastip)
            if lastip in range(21, 61):
                theteam = "DCS"
            elif lastip in range(61, 71):
                theteam = "B2B"
            elif lastip in range(71, 140):
                theteam = "DBA"
            elif lastip in range(141, 255):
                theteam = "Server"
        officeip = officefrontip + str(lastip)
        sfcip=sfcfrontip+str(lastip)
        db = pymysql.connect('10.244.220.220', 'root', 'password', 'sams')
        cursor = db.cursor()
        sql = "INSERT INTO ipmanage (team,useable_officeip,useable_sfcip,useable_pdcaip,useable_iloip) VALUE ('%s','%s','%s','%s','%s')" % (theteam, officeip,sfcip,pdcaip,iloip)
        try:
            cursor.execute(sql)
            db.commit()
        except:
            # 如果发生异常,则回滚
            db.rollback()

        db.close()
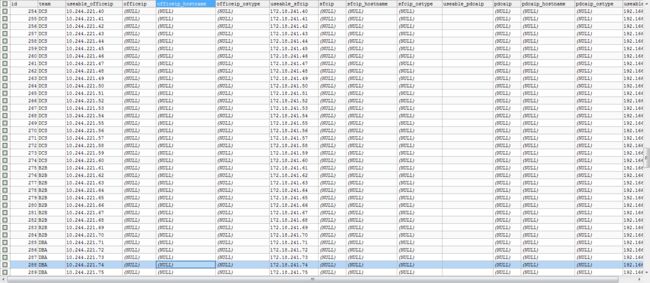
用于在数据库中插入相关的值(规划的使用部门以及非交换机/路由器保留的IP),然后就可以通过sqlyog或者直接select * from ipmanage就可看到表已经更新了
然后新建一个officeip.py通过nmap判断所属ip的操作系统,然后通过snmpwalk判断所属ip的文件名
import sys
import nmap
import os
import csv
import pymysql
import time
from multiprocessing import  Process

def scanip(allhost):
    print("此时正在调用这个")
    port='22,443,3389,3011,5900,8100,17988,5001,8443,3031,3128'
    print("allhost: %s"%(allhost))
    for hosts in allhost:
        print("hosts: %s"%(hosts))
        try:
            #创建端口扫描对象
            nm = nmap.PortScanner()
        except nmap.PortScannerError:
            print('Nmap not found', sys.exc_info()[0])
            sys.exit(0)
        except Exception as e:
            print("Unexpected error:", sys.exc_info()[0])
            print(str(e))
            sys.exit(0)

        try:
            #调用扫描方法,参数指定扫描主机hosts,nmap扫描命令行参数arguments
            nm.scan(hosts=hosts, arguments=' -v -sS -p ' + port)
        except Exception as e:
            print("Scan error:" + str(e))

        for host in nm.all_hosts():
            print("host " + host)
            #print('---------------------------------------------------------------------')
            #输出主机状态,如up、down
            #print('%s : %s' % (host,nm[host].state()))
            usedip=nm[host].state()
            if usedip=='up':
                #print(host)
                #print("22 : "+nm[host]['tcp'][22]['state'])
                itswindows=nm[host]['tcp'][3389]['state']
                itsilo=nm[host]['tcp'][17988]['state']
                itsesxi=nm[host]['tcp'][8100]['state']
                itsidrac=nm[host]['tcp'][5900]['state']
                itscitrix=nm[host]['tcp'][3011]['state']
                its3par=nm[host]['tcp'][5001]['state']
                itslinux=nm[host]['tcp'][22]['state']
                itshttps=nm[host]['tcp'][443]['state']
                its8443 = nm[host]['tcp'][8443]['state']
                itstape = nm[host]['tcp'][3031]['state']
                itspve = nm[host]['tcp'][3128]['state']
                if itswindows=='open' :
                    ostype="windows"
                elif itsilo=='open':
                    ostype='ilo'
                elif itsesxi=='open':
                    ostype='esxi'
                elif itsidrac=='open' and itshttps=='open':
                    ostype='idrac'
                elif itscitrix=='open':
                    ostype='load balance'
                elif its3par=='open':
                    ostype='3par'
                elif itstape == 'open':
                    ostype = '磁带管理机'
                elif itspve == 'open':
                    ostype = 'PVE'
                elif itslinux=='open' or itslinux=='filtered':
                    ostype='linux'
                else:
                    ostype='otheros'
                #print(ostype)
                #print(host+" : "+ostype)
                if ostype=='windows' or ostype=='linux':
                    oidname = "sysname"
                    sysname_snmp = os.popen('snmpwalk -v 2c -r 9 -c public ' + host + ' ' + oidname).read()
                    osname_snmp = sysname_snmp.split(" ")[-1]
                    if osname_snmp=="":
                        osname_snmp='unknow'
                        print(ostype)
                        print(osname_snmp)
                else:
                    osname_snmp=ostype
                #print(osname_snmp)
                #print(host+" : " +osname_snmp)
                """
                rows=[]
                rows.append(host)
                rows.append(osname_snmp)
                out=open('snmperror.csv','a',newline='')
                csv_write = csv.writer(out,dialect='excel')
                csv_write.writerow(rows)
                # print(host)
                """
                db = pymysql.connect('10.244.220.220', 'root', 'password', 'sams')
                cursor = db.cursor()
                sql = "UPDATE ipmanage i SET i.officeip='%s' WHERE i.useable_officeip='%s'" % (host, host)
                sqlname = "UPDATE ipmanage i SET i.officeip_hostname='%s' WHERE i.officeip='%s'" % (osname_snmp, host)
                sqlostype= "UPDATE ipmanage i SET i.officeip_ostype='%s' WHERE i.officeip='%s'" % (ostype, host)
                # print(sql)
                try:
                    cursor.execute(sql)
                    cursor.execute(sqlname)
                    cursor.execute(sqlostype)
                    db.commit()
                except:
                    db.rollback()
                db.close()
def main():
    starttime = time.clock()


    allofficehost=['10.244.220.21-150']
    allofficehost2=['10.244.220.151-254']
    allofficehost3 = ['10.244.221.21-150']
    allofficehost4 = ['10.244.221.151-254']
    son_p1 = Process(target=scanip, args=[allofficehost],)
    son_p2 = Process(target=scanip, args=[allofficehost2],)
    son_p3 = Process(target=scanip, args=[allofficehost3], )
    son_p4 = Process(target=scanip, args=[allofficehost4], )
    print("----开始----")
    # 开启子进程
    son_p1.start()
    son_p2.start()
    son_p3.start()
    son_p4.start()
    # 等待子进程结束
    son_p1.join()
    son_p2.join()
    son_p3.join()
    son_p4.join()

    endtime = time.clock()
    print('Running time: %s Seconds' % (endtime - starttime))
    print("----结束----")
if __name__ == '__main__':
    main()
记得把没有的包pip install 一下,再然后开始执行
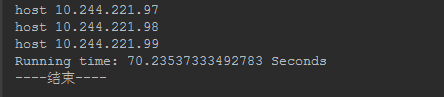
然后查看获取到的内容
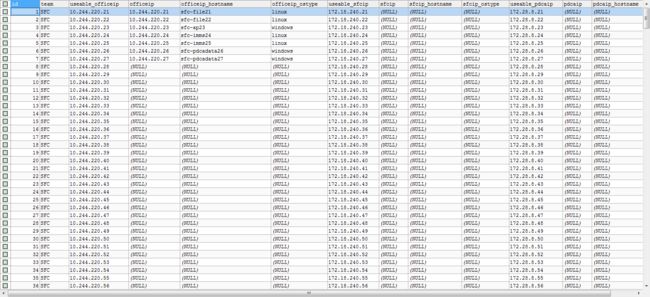
至此,数据的获取已完成.现在开始进行网站前端的搭建
选择开源的adminLTE 下载地址https://github.com/ColorlibHQ/AdminLTE/releases/tag/v3.0.0-rc.5
在项目的ipmanage下新建static目录,然后在settings文件的最后中添加下面的配置:
STATICFILES_DIRS = [
    os.path.join(BASE_DIR, "static"),
]
为了以后扩展的方便,在ipmanage/static/目录下再创建一级目录adminlte,将 AdminLTE源文件包里的所有文件夹,全部拷贝到adminlte目录中,这样做的话文件会比较大,比较多,但可以防止出现引用文件找不到、插件缺失等情况的发生,等以后对AdminLTE非常熟悉了,可以对其中无用的文件进行删减。
然后在ipmanage目录下新建templates/ipmanage目录,然后在之下新建base.html文件,将AdminLTE源文件包中的starter.html中的内容拷贝过去。然后,根据我们项目的具体情况修改文件引用、页面框架、title、CSS、主体和script块。
现在我们开始边测试,边修改base文件,首先加一个到base.html的路由
新建ipmanage/urls.py
from django.urls import path
from ipmanage import views
app_name='ipmanage'
urlpatterns=[
    path('base/',views.base)
]
修改ipmanage.py
from django.shortcuts import render
from django.shortcuts import redirect
# Create your views here.
def base(request):
    pass
    return render(request, 'ipmanage/base.html')
然后在sams下修改urls
from django.contrib import admin
from django.urls import path
from login import views
from django.conf.urls import include,url
appname='ipmanage'
urlpatterns = [
url(r'^', include('ipmanage.urls')),
path('admin/', admin.site.urls),
path('index/', views.index),
path('login/', views.login),
path('register/', views.register),
path('logout/', views.logout),
path('',views.login),
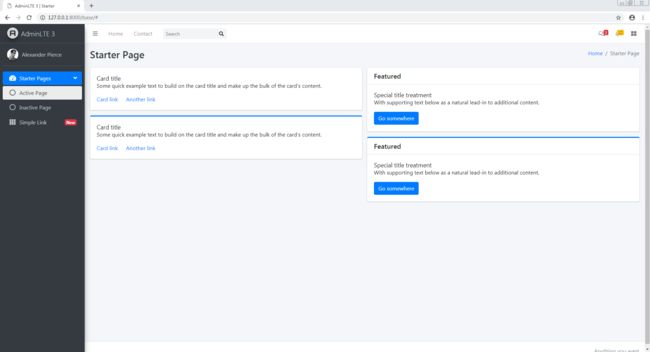
]现在我们执行python manage.py runserver 打开网页 127.0.0.1:8000/base,发现是乱码的

接下来我们开始修改base.html
{% load static %}
AdminLTE 3 | Starter
Starter Page
Card title
Some quick example text to build on the card title and make up the bulk of the card's
content.
Card link
Another link
Card title
Some quick example text to build on the card title and make up the bulk of the card's
content.
Card link
Another link
Featured
Special title treatment
With supporting text below as a natural lead-in to additional content.
Go somewhere
Featured
Special title treatment
With supporting text below as a natural lead-in to additional content.
Go somewhere
就是把所有静态引用js,css,jpg等都改成django的格式,然后我们打开127.0.0.1:8000/base即可查看效果
然后修改base,修改成我们想要的样子
{% load static %}
DBA/SM资产管理
详细信息
{% block content %}
{% endblock %}
{% block script %}
{% endblock %}
效果如下图(注,之前的base文件里我改了两处图片,一个是qszy.jpg,还有个是tuzi.jpg,选择自己喜欢的就好)

再然后编辑views.py
from django.shortcuts import render
from django.http import HttpResponse
from django.core.paginator import Paginator,EmptyPage,PageNotAnInteger
from .models import Ipmanage

def indexIpmanage(request):
    list = Ipmanage.objects.all()
    context = {"ipmanagelist": list}
    return render(request, "ipmanage/index.html", context)

def base(request):
    return  render(request,'ipmanage/base.html')
在templates/ipmanage下新建index.html
{% extends 'ipmanage/base.html' %}
{% load static %}
{% block headcontent %}
IP管理
{% endblock %}
{% block content %}
IP管理
部门
可用officeip
已用officeip
officeip主机名
可用sfcip
已用sfcip
sfcip主机名
可用pdcaip
已用pdcaip
pdcaip主机名
可用iloip
已用iloip
ilo主机名
{% for ipmanage in ipmanagelist %}
{{ ipmanage.team }}
{{ ipmanage.useable_officeip }}
{{ ipmanage.officeip }}
{{ ipmanage.officeip_hostname }}
{{ ipmanage.useable_sfcip }}
{{ ipmanage.sfcip }}
{{ ipmanage.sfcip_hostname }}
{{ ipmanage.useable_pdcaip }}
{{ ipmanage.pdcaip }}
{{ ipmanage.pdcaip_hostname }}
{{ ipmanage.useable_iloip }}
{{ ipmanage.iloip }}
{{ ipmanage.iloip_hostname }}
{% endfor %}
{% endblock %}
{% block script %}
{% endblock %}
再编辑urls.py
from django.urls import path
from ipmanage import views
app_name='ipmanage'
urlpatterns=[
path('base/',views.base),
path('index/',views.indexIpmanage),
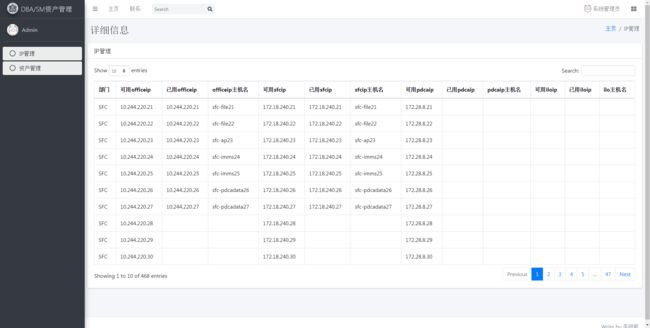
]打开网站效果如图所示
暂时完成大体框架,若还需要小功能,我想起来再写,接下来回到最开始把它部署在服务器上