《尚硅谷Redis7教程》笔记(小白篇)
视频链接
1、2:Redis入门概述
常用网站汇总
官方网站: https://redis.io/
Redis中文文档 https://www.redis.com.cn/documentation.html
作者 Git Hub https://github.com/antirez
Redis GitHub 源码 https://github.com/redis/redis
Github releases 新特性https://github.com/redis/redis/releases
Redis 在线测试 https://try.redis.io/
Redis 命令参考 https://redis.io/commands/
3:Redis安装配置
https://redis.io/download/

10 安装
第一步:查询 Linux系统位数
[root@localhost redis-one]# getconf LONG_BIT
64
第二步:准备系统环境
gcc -v
yum -y install gcc-c++
[root@localhost redis-one]# gcc -v
......省略部分代码
gcc 版本 4.8.5 20150623 (Red Hat 4.8.5-44) (GCC)
[root@localhost redis-one]#
第三步:上传并解压 Redis压缩包
tar -zxvf redis-7.0.8.tar.gz
第四步:在Redis目录安装 Redis
cd redis-7.0.8
make && make install
安装后效果
[root@localhost redis-7.0.8]# cd /usr/local/bin/
[root@localhost bin]# ll
总用量 21524
-rwxr-xr-x. 1 root root  5197776 2月  22 16:32 redis-benchmark
lrwxrwxrwx. 1 root root       12 2月  22 16:32 redis-check-aof -> redis-server
lrwxrwxrwx. 1 root root       12 2月  22 16:32 redis-check-rdb -> redis-server
-rwxr-xr-x. 1 root root  5411112 2月  22 16:32 redis-cli
lrwxrwxrwx. 1 root root       12 2月  22 16:32 redis-sentinel -> redis-server
-rwxr-xr-x. 1 root root 11426784 2月  22 16:32 redis-server
[root@localhost bin]#
第五步:备份配置文件 redis.conf
cp redis.conf redis-bf.conf
第六步:打开配置文件并修改redis-bf.conf,对照修改配置
daemonize yes
protected-mode no
#bind 127.0.0.1 -::1
requirepass 123456
第七步:启动 redis-server
redis-server redis-bf.conf
ps -ef|grep redis 或者
ps -ef|grep redis|grep -v grep
[root@localhost bin]# ps -ef|grep redis
root       2129      1  0 14:43 ?        00:00:11 redis-server 0.0.0.0:6379
root       3461   1947  0 16:24 pts/0    00:00:00 grep --color=auto redis
[root@localhost bin]# ^C
[root@localhost bin]# ps -ef|grep redis|grep -v grep
root       2129      1  0 14:43 ?        00:00:11 redis-server 0.0.0.0:6379
[root@localhost bin]#
第八步:连接服务
redis-cli -a 123456 -p 6379
[root@localhost bin]# redis-cli -a 123456 -p 6379
Warning: Using a password with '-a' or '-u' option on the command line interface may not be safe.
127.0.0.1:6379>
第九步:测试 ping 命令
127.0.0.1:6379> ping
PONG
Redis-cli命令:
quit:退出客户端连接
[root@localhost bin]# redis-cli -a 123456 -p 6379
Warning: Using a password with '-a' or '-u' option on the command line interface may not be safe.
127.0.0.1:6379> quit
[root@localhost bin]#
shutdown:关闭 Redis 服务。
[root@localhost bin]# redis-cli -a 123456 -p 6379
Warning: Using a password with '-a' or '-u' option on the command line interface may not be safe.
127.0.0.1:6379> shutdown
not connected>
删除 redis
rm -rf /usr/local/bin/redis-*
4:Redis 10大数据类型
https://redis.io/docs/data-types/
常见:String、List、Hash、set、Zset
高级:Geo(经纬度)、HyperLogLog(基数统计)、bitmap(位图)、bitfield(位域)、Stream(流)
11 redis数据类型
12 命令查阅
官网命令 https://redis.io/commands/
中文命令 https://www.redis.com.cn/commands.html
13 key常用命令介绍
https://redis.io/commands/?group=generic
拷贝key
copy

删除key
del key...

序列化key
dump key

存在key
EXISTS key...

给key一个过期时间
EXPIRE key seconds [NX | XX | GT | LT]

给key一个unix时间
EXPIREAT key unix-time-seconds [NX | XX | GT | LT]

以秒为单位返回unix时间戳
EXPIRETIME key

返回所有匹配的key,*name*,a??,*
KEYS pattern

迁移key,从一个redis实例迁移到另一个redis实例
MIGRATE

将一个key移动到其他的库
MOVE key db

返回key的internal encoding(内部编码)
OBJECT ENCODING key

返回  the logarithmic access frequency counter (对数访问频率计数器)
OBJECT FREQ key

返回上次访问到现在的时间
OBJECT IDLETIME key

返回 reference count (引用计数)
OBJECT REFCOUNT key

删除过期时间变为永久key
PERSIST key

同EXPIRE毫秒为单位
PEXPIRE key milliseconds [NX | XX | GT | LT]


keys *
EXISTS key
type key
del key
unlike key
ttl key
expire key
move key 0-15 //key迁移别的库
select 0-15 //切换数据库
dbsize //当前的数据库key数量
flushdb
flushall
14 类型大小写和帮助命令
Tips:命令不区分大小写,key 区分大小写。
help @类型,查看内部手册,截图待补充。
15 String 命令(上)
https://redis.io/docs/data-types/strings/
https://redis.io/commands/?group=string
set k1 v1 nx
set k1 v1 xx

set k1 v1 get //返回旧的

set k1 v1 ex 10
set k1 v1 px 8000

set k1 v1 exat + unix时间戳
set k1 v1 pxat + unix时间戳

//续接上一次过期时间,默认会覆盖,keepttl只替换值。
set k1 v1 keepttl
16 String 命令(下)
同时设置多个 kv
mset k1 v1 k2 v2 ...

msetnx k1 v1 k4 v4 //类似于事务全部成功或者失败
获取指定范围值
getrange k1 0 3
setrange k1 1 xxyy
数值增减
incr k1
incrby k1 3
decr k1
decrby k1 3
获取字符串长度和内容追加
strlen k1
append k1 xxx
分布式锁
setex k1 10 v1 //原子设置
获取并设置
getset k1 v1 //相当于
set k1 v1 get //返回旧的
17 List
https://redis.io/docs/data-types/lists/
https://redis.io/commands/?group=list
面试题:Redis list 可以存放的最大长度是多少?
Tips:The max length of a Redis list is 2^32 - 1 (4,294,967,295) elements.
数据结构:双向链表
l = left 左 , r = right 右
队列:Treat a list like a queue (first in, first out): 左边进,右边出,先进先出。
//从左边进入一个元素101
> LPUSH work:queue:ids 101
(integer) 1
//从左边进入一个元素237
> LPUSH work:queue:ids 237
(integer) 2
//从右边删除元素101
> RPOP work:queue:ids
"101"
//从右边删除第二个元素237
> RPOP work:queue:ids
"237"
栈:Treat a list like a stack (first in, last out): 左边进,左边出,先进后出。
//左边进101
> LPUSH work:queue:ids 101
(integer) 1
//左边进237
> LPUSH work:queue:ids 237
(integer) 2
//左边出237
> LPOP work:queue:ids
"237"
//左边出237
> LPOP work:queue:ids
"101"
Check the length of a list 检查列表的长度
LLEN work:queue:ids
lpop list
rpop list
lindex list1 0 | 1 | 2 | 3
18 hash
https://redis.io/docs/data-types/hashes/
https://redis.io/commands/?group=hash
HSET、HGET、HGETALL
> HSET user:123 username martina firstName Martina lastName Elisa country GB
(integer) 4
> HGET user:123 username
"martina"
> HGETALL user:123
1) "username"
2) "martina"
3) "firstName"
4) "Martina"
5) "lastName"
6) "Elisa"
7) "country"
8) "GB"
HLEN
HEXISTS
HKEYS
HVALS
Hincyby
HincybyFloat
HsetNX
19 set
https://redis.io/docs/data-types/sets/
https://redis.io/commands/?group=set
20 zset
https://redis.io/docs/data-types/#sorted-sets
https://redis.io/commands/?group=sorted-set
21 bitmap
https://redis.io/docs/data-types/bitmaps/
https://redis.io/commands/?group=bitmap
Redis bitmaps are an extension of the string data type that lets you treat a string like a bit vector.
bitmaps 是 string 数据类型的扩展,使你像对待 bit 向量一样对待字符串。
You can also perform bitwise operations on one or more strings.
你可以对一个或者多个字符串执行按位操作。
是什么:每一位记录0或者1的bit数组(位数组)。
有什么用:记录是与否的需求,例如:统计用户的考勤或者签到的需求。
包含命令:
127.0.0.1:6379> SETBIT k1 0 0
(integer) 1
127.0.0.1:6379> GETBIT k1 0
(integer) 0
BITCOUNT :Starting with Redis version 7.0.0: Added the BYTE|BIT option.
22 hyperloglog
https://redis.io/docs/data-types/hyperloglogs/
https://redis.io/commands/?group=hyperloglog
HyperLogLog is a data structure that estimates the cardinality of a set.
As a probabilistic data structure, HyperLogLog trades perfect accuracy for efficient space utilization.
用精确度换空间的思想
The Redis HyperLogLog implementation uses uses up to 12 KB and provides a standard error of 0.81%.
The HyperLogLog can estimate the cardinality of sets with up to 18,446,744,073,709,551,616 (2^64) members.
最大使用12KB的内存可以统计2^64次个基数(不重复的数)误差率0.81。
适用场景:统计 uv,去重后的真实个数。
特点:非精确数据结构,
PFADD
redis> PFADD hll a b c d e f g
(integer) 1
redis> PFCOUNT hll
(integer) 7
redis>
PFCOUNT
PFCOUNT key [key ...]

redis> PFADD hll foo bar zap
(integer) 1
redis> PFADD hll zap zap zap
(integer) 0
redis> PFADD hll foo bar
(integer) 0
redis> PFCOUNT hll
(integer) 3
redis> PFADD some-other-hll 1 2 3
(integer) 1
redis> PFCOUNT hll some-other-hll
(integer) 6
redis>
PFMERGE
PFMERGE destkey [sourcekey [sourcekey ...]]

redis> PFADD hll1 foo bar zap a
(integer) 1
redis> PFADD hll2 a b c foo
(integer) 1
redis> PFMERGE hll3 hll1 hll2
"OK"
redis> PFCOUNT hll3
(integer) 6
redis>
23 geo
https://redis.io/docs/data-types/geospatial/
https://redis.io/commands/?group=geo
地理坐标
24 25 26 stream
https://redis.io/commands/?group=stream
https://redis.io/docs/data-types/streams/
redis 版本的 MQ
Redis 消息队列的方案:
- List:点对点,不支持一对多。
- Pub / Sub:无法持久化
底层结构:
27 bitfield
了解即可
https://redis.io/docs/data-types/bitfields/
ascii 字节码对照表:https://ascii.org.cn/
溢出控制
5:Redis持久化
28 理论介绍
https://redis.io/docs/management/persistence/
redis持久化的几种方案
- RDB (Redis Database)
- AOF (Append Only File)
- No persistence:
- RDB + AOF
29 RDB 简介
RDB (Redis Database): RDB persistence performs point-in-time snapshots of your dataset at specified intervals.
rdb保存的文件:dump.rdb或者XXXX.rdb文件,
默认配置:save 3600 1 300 100 60 10000
默认情况一个小时(3600秒)至少一个 key 变更就记录RDB。
30 RDB配置说明
第一步:配置文件写入以下内容
daemonize yes
protected-mode no
#bind 127.0.0.1 -::1
requirepass 123456

save 5 2
dir /root/redis-dump
dbfilename 6379.rdb
第二步:启动服务
第三步:获取配置 CONFIG GET xxxxx
127.0.0.1:6379> CONFIG GET requirepass
1) "requirepass"
2) "123456"
127.0.0.1:6379> CONFIG GET save
1) "save"
2) "5 2"
127.0.0.1:6379> CONFIG GET dir
1) "dir"
2) "/root/redis-dump"
127.0.0.1:6379> CONFIG GET dbfilename
1) "dbfilename"
2) "6379.rdb"
127.0.0.1:6379>
31 RDB 自动触发
验证 5秒2个key是否可以保存文件
在 set k3 后稍等5s后设置 k4

可以看到 RDB 文件变大了

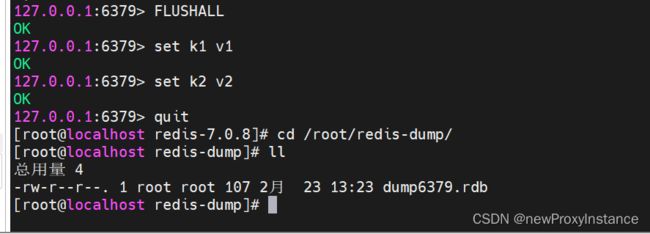
如何恢复数据
第一步:备份RDB文件,然后执行 FLUSHALL 命令清空数据。

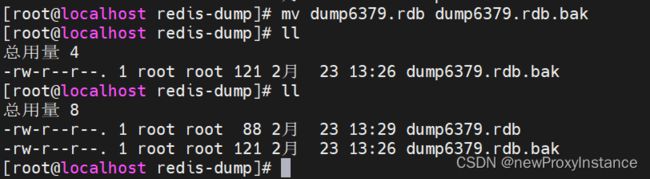
第二步:执行 SHUTDOWN 命令,也会产生一个 RDB 文件。

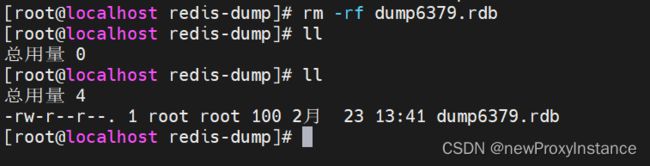
删除关机时的RDB

第三步:将备份的RDB文件名称改回去,同时重启Redis服务,验证 key 是否恢复。


总结:物理恢复,一定要服务和备份分机隔离。
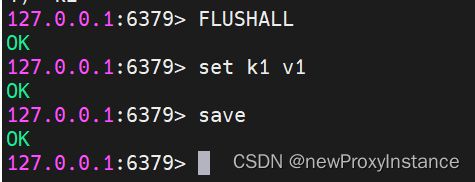
32 RDB 手动触发
Tips:生产环境不能使用 save 命令,会阻塞主线程。
save演示
bgsave 演示


LASTSAVE:获取最近一次RDB的时间戳
![]()
date -d @时间戳

33 RDB 优缺点
优点:https://redis.io/docs/management/persistence/#rdb-advantages
缺点:https://redis.io/docs/management/persistence/#rdb-disadvantages
- 快照之间的数据会丢失。
- fork() can be time consuming,fork可能会很耗时。
数据丢失案例


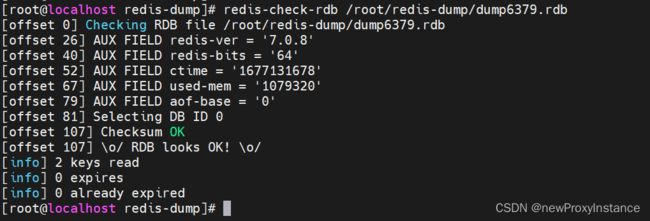
34 RDB 修复命令
redis-check-rdb /root/redis-dump/dump6379.rdb
35 RDB 触发情况
- 手动 save 、bgsave
- flushall 、flushdb,但里面是空的。
- 执行shutdown,
RDB禁用
- config set save “”,命令级别
- save “” ,配置文件
36 RDB 优化参数
stop-writes-on-bgsave-error

# However if you have setup your proper monitoring of the Redis server
# and persistence, you may want to disable this feature so that Redis will
# continue to work as usual even if there are problems with disk,
# permissions, and so forth.
stop-writes-on-bgsave-error yes
rdbcompression

# Compress string objects using LZF when dump .rdb databases?
# By default compression is enabled as it's almost always a win.
# If you want to save some CPU in the saving child set it to 'no' but
# the dataset will likely be bigger if you have compressible values or keys.
rdbcompression yes
rdbchecksum

# RDB files created with checksum disabled have a checksum of zero that will
# tell the loading code to skip the check.
rdbchecksum yes
rdb-del-sync-files

# An alternative (and sometimes better) way to obtain the same effect is
# to use diskless replication on both master and replicas instances. However
# in the case of replicas, diskless is not always an option.
rdb-del-sync-files no
37 AOF 简介
AOF (Append Only File): AOF persistence logs every write operation received by the server. These operations can then be replayed again at server startup, reconstructing the original dataset. Commands are logged using the same format as the Redis protocol itself.
38 AOF 工作流程和写回策略
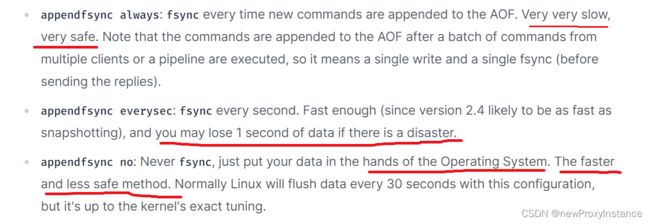
# appendfsync always
appendfsync everysec
# appendfsync no
安全性:always > everysec > no
性能:no > everysec > always
39 AOF 案例演示
如何开启 AOF

#appendonly no
appendonly yes
redis6:RDB和AOF,dir目录共享同一个dir。且 AOF 文件只有一个。
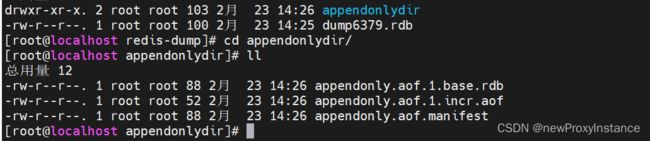
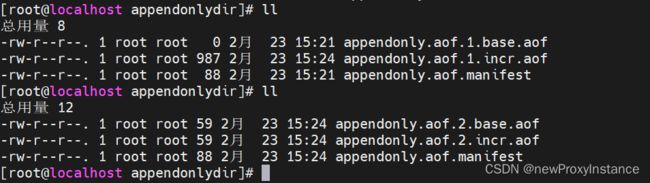
redis7:三个AOF文件,
appendfilename "appendonly.aof"

# For convenience, Redis stores all persistent append-only files in a dedicated
# directory. The name of the directory is determined by the appenddirname
# configuration parameter.

appenddirname "appendonlydir"
Muti-part AOF
# - appendonly.aof.1.base.rdb as a base file.
# - appendonly.aof.1.incr.aof, appendonly.aof.2.incr.aof as incremental files.
# - appendonly.aof.manifest as a manifest file.
base表示基础AOF,INCR表示增量AOF,manifest
40 AOF 恢复案例

41 AOF 异常情况恢复
故意乱写 AOF 模拟错误情况
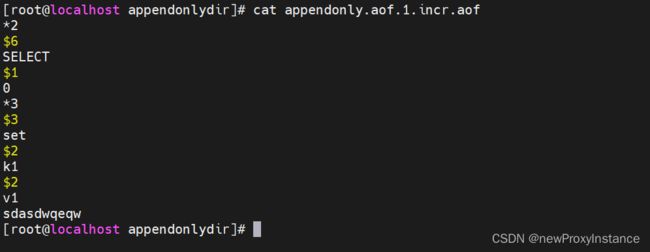
修改文件后重启 redis 发现启动错误


redis-check-aof appendonly.aof.1.incr.aof
redis-check-aof --fix appendonly.aof.1.incr.aof

修复后重新启动

42 AOF优缺点
AOF优点:https://redis.io/docs/management/persistence/#aof-advantages
AOF缺点:https://redis.io/docs/management/persistence/#aof-disadvantages
简单说:AOF更安全,更慢,
43 AOF重写机制(Log rewriting)
是什么: 让 AOF 文件瘦身,更精简。
手动触发命令
BGREWRITEAOF
自动触发默认配置
# Automatic rewrite of the append only file.
# Redis is able to automatically rewrite the log file implicitly calling
# BGREWRITEAOF when the AOF log size grows by the specified percentage.
#
# This is how it works: Redis remembers the size of the AOF file after the
# latest rewrite (if no rewrite has happened since the restart, the size of
# the AOF at startup is used).
#
# This base size is compared to the current size. If the current size is
# bigger than the specified percentage, the rewrite is triggered. Also
# you need to specify a minimal size for the AOF file to be rewritten, this
# is useful to avoid rewriting the AOF file even if the percentage increase
# is reached but it is still pretty small.
#
# Specify a percentage of zero in order to disable the automatic AOF
# rewrite feature.

auto-aof-rewrite-percentage 100
auto-aof-rewrite-min-size 64mb
案例验证
将文件改为1k
auto-aof-rewrite-min-size 1k

将 aof-use-rdb-preamble 改为 no ,默认为 yes
# Redis can create append-only base files in either RDB or AOF formats. Using
# the RDB format is always faster and more efficient, and disabling it is only
# supported for backward compatibility purposes.
#aof-use-rdb-preamble yes
aof-use-rdb-preamble no
删除之前的 AOF 后启动

不断执行写入命令,
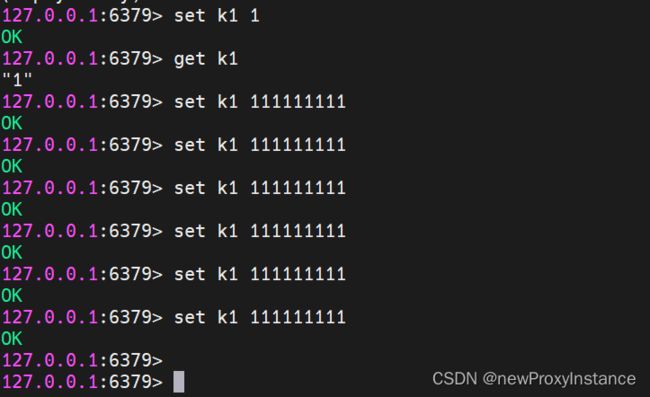
写入操作会持续增大 aof 文件大小

当到达 1k的时候,
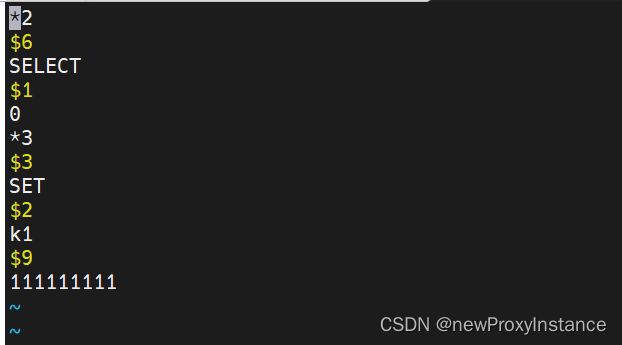
vim appendonly.aof.2.base.aof
手动触发


44 AOF 小总结
#appendonly no
appendonly yes

appendfilename "appendonly.aof"

appenddirname "appendonlydir"

# appendfsync always
appendfsync everysec
# appendfsync no

no-appendfsync-on-rewrite no

auto-aof-rewrite-percentage 100
#auto-aof-rewrite-min-size 64mb
auto-aof-rewrite-min-size 1k

aof-load-truncated yes
45 混合持久化
https://redis.io/docs/management/persistence/#ok-so-what-should-i-use
同时开启 rdb 和 aof ,aof 优先级高于 rdb
开启
#aof-use-rdb-preamble yes
46 纯缓存模式
是什么:不进行持久化
save ""
appendonly no
禁用自动触发,仍然可以使用命令保存 RDB 和 AOF 文件。
6:Redis事务
https://redis.io/docs/manual/transactions/
一次性执行一组命令。
一定程度的原子性,不能保证同时成功或者失败。
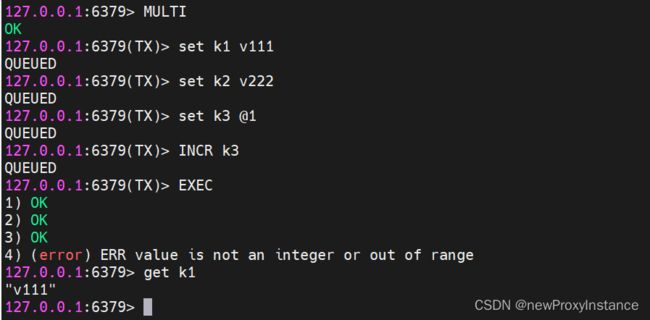
48 事务实际操作
正常执行

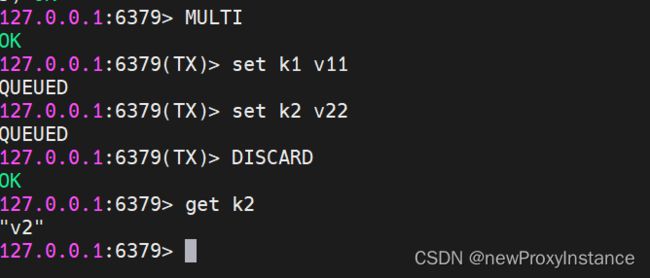
事务放弃(DISCARD)
全体连坐(故意写错k3,事务整体被打回)

冤头债主(未检测的错误),对 email 进行自增
watch
初始化数据
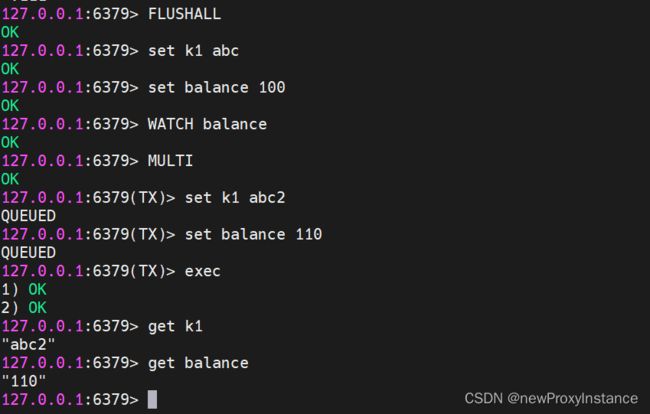
如果监控的key已经被修改,整个事务被取消。
unwatch 取消监控。
7:Redis管道
49 管道简介
https://redis.io/docs/manual/pipelining/
面试题:如何优化频繁命令往返造成的性能瓶颈?
mset 有点类似于 管道,将三条set变为一条mset
如何理解:三次搬家路程合并为一次路程。
50 管道实际操作
mset 局限性:跨数据类型命令。
vim cmd.txt

set k1 v1
set k2 v2
hset k3 a abc
hset k3 b bcd
hset k3 age 30

cat cmd.txt | redis-cli -a 123456 --pipe


51 管道小总结
与原生批量命令对比(mset、mget):
与事务对比:
注意事项:
8:Redis(pub、sub)发布订阅
53 简介
https://redis.io/docs/manual/pubsub/
pub sub 命令https://redis.io/commands/?group=pubsub
54 发布订阅实际操作
待完善
9:Redis复制(replica)
55 简介
https://redis.io/docs/management/replication/
56 57 案例演示
架构说明
由于内存原因,这里我采用一台虚拟机安装3台redis。
主机:6379,从机:6380、6381。
配置文件准备
#1:守护模式
daemonize yes
#2:绑定ip
#bind 127.0.0.1 -::1
#3:保护模式
protected-mode no
#4:指定端口
port 6380
#5:指定工作目录
dir ./
#6:指定pid
pidfile /var/run/redis_6380.pid
#7:指定log文件名字和目录
logfile "/root/redis-conf/6379/6379.log"
#8:指定密码
requirepass 123456
#9:指定RDB名字
dbfilename 6379.rdb
#10:AOF 可选非必须
#11 从机配置主机的认证密码,建议主机也配,因为在哨兵切换时,主机会变为从机
masterauth 123456
Diskless replication(无盘复制)(知识点补充)
# Replication SYNC strategy: disk or socket.
#
# New replicas and reconnecting replicas that are not able to continue the
# replication process just receiving differences, need to do what is called a
# "full synchronization". An RDB file is transmitted from the master to the
# replicas.
#
# The transmission can happen in two different ways:
#
# 1) Disk-backed: The Redis master creates a new process that writes the RDB
#                 file on disk. Later the file is transferred by the parent
#                 process to the replicas incrementally.
# 2) Diskless: The Redis master creates a new process that directly writes the
#              RDB file to replica sockets, without touching the disk at all.
#
# With disk-backed replication, while the RDB file is generated, more replicas
# can be queued and served with the RDB file as soon as the current child
# producing the RDB file finishes its work. With diskless replication instead
# once the transfer starts, new replicas arriving will be queued and a new
# transfer will start when the current one terminates.
#
# When diskless replication is used, the master waits a configurable amount of
# time (in seconds) before starting the transfer in the hope that multiple
# replicas will arrive and the transfer can be parallelized.
#
# With slow disks and fast (large bandwidth) networks, diskless replication
# works better.
repl-diskless-sync yes
默认开启无盘模式,这个模式在慢硬盘或者快速网络情况下性能会更好。
其他参数
repl-diskless-sync-delay 5
repl-diskless-sync-max-replicas 0
58 主从复制之一主二仆
从机额外配置
在上面我们准备好了通用的配置文件,从机需要额外修改 replicaof
replicaof 127.0.0.1 6379
Tips:写入配置文件是永久有效,如果想要临时设置可以采用 config set + 命令的方式
配置后启动从机 redis 服务即可。
主从关系查看的两种方式
通过日志
主机日志
Synchronization with replica 192.168.139.137:6380 succeeded
Synchronization with replica 127.0.0.1:6381 succeeded
从机日志
MASTER <-> REPLICA sync: Finished with success
通过命令
#命令
info relication
主机信息
127.0.0.1:6379> info replication
# Replication
role:master
connected_slaves:2
slave0:ip=192.168.139.137,port=6380,state=online,offset=1497,lag=1
slave1:ip=127.0.0.1,port=6381,state=online,offset=1497,lag=1
从机信息
127.0.0.1:6380> info replication
# Replication
role:slave
master_host:192.168.139.137
master_port:6379
master_link_status:up
从机可以执行写命令吗?
不可以,配置文件默认主机只读。
# Since Redis 2.6 by default replicas are read-only.
#
# Note: read only replicas are not designed to be exposed to untrusted clients
# on the internet. It's just a protection layer against misuse of the instance.
# Still a read only replica exports by default all the administrative commands
# such as CONFIG, DEBUG, and so forth. To a limited extent you can improve
# security of read only replicas using 'rename-command' to shadow all the
# administrative / dangerous commands.
replica-read-only yes

从机切入点问题?
- 从机晚于主机启动
- 从机shutdown关闭一会后启动
在上面这两种情况下,从机会获取master的全量数据。
主机 shutdown
主机关闭后查看从机状态
	127.0.0.1:6381> info replication
# Replication
role:slave
master_host:127.0.0.1
master_port:6379
master_link_status:down
master_link_status变为 down,身份role不会改变。
master_link_status:up
重新启动后状态变回 up 。
Tips:如果主机没有开启 RDB,主机重启后数据丢失,从库数据丢失也为空。
59 薪火相传(SLAVEOF)
基本关系:6379作为主机,6380是6379的从机,6381是6380的从机,形成一个串型结构。
如何操作:6381 在一主二从的基础上使用 SLAVEOF 命令重定向到 6380。
写入问题:6380对上是从机,对下是主机,但是仍然不能写入。
127.0.0.1:6381> SLAVEOF 127.0.0.1 6380
OK
127.0.0.1:6381> info replication
# Replication
role:slave
master_host:127.0.0.1
master_port:6380
6379 的 connected_slaves 变为 1
127.0.0.1:6379> info replication
# Replication
role:master
connected_slaves:1
60 反客为主(SLAVEOF no one)
使用 SLAVEOF no one 命令升级为 master
127.0.0.1:6381> SLAVEOF no one
OK
127.0.0.1:6381> info replication
# Replication
role:master
connected_slaves:0
master_failover_state:no-failover
master_replid:f4029b340ab6291cf553d6e14e74524bf6fccb48
master_replid2:cbfda3355c0b49c7d2e3c86a1ebfe97358916d53
master_repl_offset:9226
second_repl_offset:9227
repl_backlog_active:1
repl_backlog_size:1048576
repl_backlog_first_byte_offset:1
repl_backlog_histlen:9226
127.0.0.1:6381>
61 总结
从机启动,数据覆盖。
首次连接,全量复制。
心跳持续,保持通讯。
进入平稳,增量复制。
从机下线,重连续传。
主节点默认情况每间隔10s向从机发送PINGs
# Master send PINGs to its replicas in a predefined interval. It's possible to
# change this interval with the repl_ping_replica_period option. The default
# value is 10 seconds.
#
# repl-ping-replica-period 10
62 主从复制痛点和改进需求
最大的问题:master(主)节点挂了。
10:Redis哨兵(Sentinel)
63 哨兵简介
官网:https://redis.io/docs/management/sentinel/
作用:监控 redis 运行状态,当 master 挂了自动将 slave 升级为主机。
Redis Sentinel provides high availability for Redis when not using Redis Cluster.
Fundamental things to know about Sentinel before deploying(部署Sentinel前的一些知识)
You need at least three Sentinel instances for a robust deployment. 至少3个实例。
The three Sentinel instances should be placed into computers or virtual machines that are believed to fail in an independent way. So for example different physical servers or Virtual Machines executed on different availability zones. 哨兵实例应该放在不同的物理机或者虚拟机上。
Sentinel + Redis distributed system does not guarantee that acknowledged writes are retained during failures, 不保证故障期间写入
客观下线(Objectively Down)):投票投下线的成为客观下线。
# sentinel monitor <master-name> <ip> <redis-port> <quorum>
#
# Tells Sentinel to monitor this master, and to consider it in O_DOWN
# (Objectively Down) state only if at least <quorum> sentinels agree.
主观下线(Subjectively Down):
# sentinel down-after-milliseconds <master-name> <milliseconds>
#
# Number of milliseconds the master (or any attached replica or sentinel) should
# be unreachable (as in, not acceptable reply to PING, continuously, for the
# specified period) in order to consider it in S_DOWN state (Subjectively
# Down).
#
# Default is 30 seconds.
sentinel down-after-milliseconds mymaster 30000
两种启动方式
redis-sentinel /path/to/sentinel.conf
redis-server /path/to/sentinel.conf --sentinel
64 - 67 实际操作
架构:3台哨兵+3台Redis(1主2从)
哨兵的配置文件:sentinel.conf
第一步:拷贝出三个配置文件
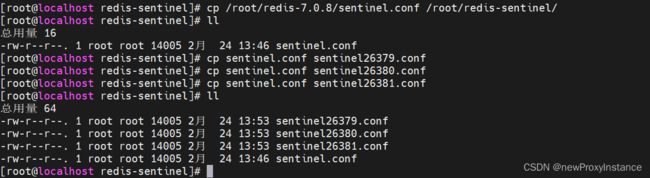
第二步:配置文件写入以下三个参数。
protected-mode no
port 26379
daemonize yes
pidfile /var/run/redis-sentinel-26379.pid
logfile "/root/redis-sentinel/26379/sentinel.log"
dir /root/redis-sentinel/26379
sentinel monitor master-redis 127.0.0.1 6379 2
sentinel auth-pass master-redis 123456
第三步:给 6380 修改配置文件master-auth,由于主机切换会后变成从机,后续访问主机需要密码。
masterauth 123456
第四步:启动三台redis服务

第五步:启动一个 sentinel,并查看日志输出
# 启动命令
redis-sentinel sentinel-26379.conf
第六步:启动剩余两个
redis-sentinel /root/redis-sentinel/26380/sentinel-26380.conf
redis-sentinel /root/redis-sentinel/26381/sentinel-26381.conf
此时后台进程如下,三台 redis服务,三台 sentinel 服务。

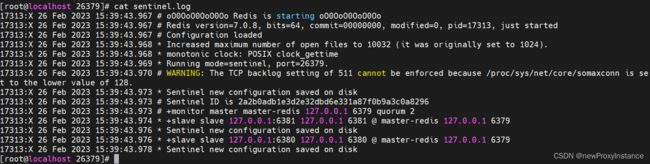
68 异常情况
26379 的日志
17313:X 26 Feb 2023 15:39:43.973 * Sentinel new configuration saved on disk
17313:X 26 Feb 2023 15:39:43.973 # Sentinel ID is 2a2b0adb1e3d2e32dbd6e331a87f0b9a3c0a8296
17313:X 26 Feb 2023 15:39:43.973 # +monitor master master-redis 127.0.0.1 6379 quorum 2
17313:X 26 Feb 2023 15:39:43.974 * +slave slave 127.0.0.1:6381 127.0.0.1 6381 @ master-redis 127.0.0.1 6379
17313:X 26 Feb 2023 15:39:43.976 * Sentinel new configuration saved on disk
17313:X 26 Feb 2023 15:39:43.976 * +slave slave 127.0.0.1:6380 127.0.0.1 6380 @ master-redis 127.0.0.1 6379
17313:X 26 Feb 2023 15:39:43.978 * Sentinel new configuration saved on disk
17313:X 26 Feb 2023 15:42:16.097 * +sentinel sentinel c5bcda82431d98d016b35c30285a8e0f5f96c53c 127.0.0.1 26380 @ master-redis 127.0.0.1 6379
17313:X 26 Feb 2023 15:42:16.099 * Sentinel new configuration saved on disk
17313:X 26 Feb 2023 15:42:23.348 * +sentinel sentinel c4e537f0ca663cbbae42408a62de2f2e22ed8dd5 127.0.0.1 26381 @ master-redis 127.0.0.1 6379
17313:X 26 Feb 2023 15:42:23.350 * Sentinel new configuration saved on disk
配置文件新增部分内容
关闭主节点

是否会从剩下的两台选举出 master ?
127.0.0.1:6380> info replication
# Replication
role:slave
master_host:127.0.0.1
master_port:6381
master_link_status:up

sentinel 日志
17313:X 26 Feb 2023 15:51:30.956 # +sdown master master-redis 127.0.0.1 6379
17313:X 26 Feb 2023 15:51:31.002 * Sentinel new configuration saved on disk
17313:X 26 Feb 2023 15:51:31.002 # +new-epoch 1
17313:X 26 Feb 2023 15:51:31.008 * Sentinel new configuration saved on disk
17313:X 26 Feb 2023 15:51:31.008 # +vote-for-leader c4e537f0ca663cbbae42408a62de2f2e22ed8dd5 1
17313:X 26 Feb 2023 15:51:31.023 # +odown master master-redis 127.0.0.1 6379 #quorum 3/2
17313:X 26 Feb 2023 15:51:31.023 # Next failover delay: I will not start a failover before Sun Feb 26 15:57:31 2023
17313:X 26 Feb 2023 15:51:31.442 # +config-update-from sentinel c4e537f0ca663cbbae42408a62de2f2e22ed8dd5 127.0.0.1 26381 @ master-redis 127.0.0.1 6379
17313:X 26 Feb 2023 15:51:31.442 # +switch-master master-redis 127.0.0.1 6379 127.0.0.1 6381
17313:X 26 Feb 2023 15:51:31.442 * +slave slave 127.0.0.1:6380 127.0.0.1 6380 @ master-redis 127.0.0.1 6381
17313:X 26 Feb 2023 15:51:31.442 * +slave slave 127.0.0.1:6379 127.0.0.1 6379 @ master-redis 127.0.0.1 6381
17313:X 26 Feb 2023 15:51:31.449 * Sentinel new configuration saved on disk
17313:X 26 Feb 2023 15:52:01.514 # +sdown slave 127.0.0.1:6379 127.0.0.1 6379 @ master-redis 127.0.0.1 6381
将 6379 连回
17313:X 26 Feb 2023 15:59:25.835 # -sdown slave 127.0.0.1:6379 127.0.0.1 6379 @ master-redis 127.0.0.1 6381
17313:X 26 Feb 2023 15:59:35.857 * +convert-to-slave slave 127.0.0.1:6379 127.0.0.1 6379 @ master-redis 127.0.0.1 6381

两个小问题
可能会遇到 Server closed the connection 或者 broken pipe 。
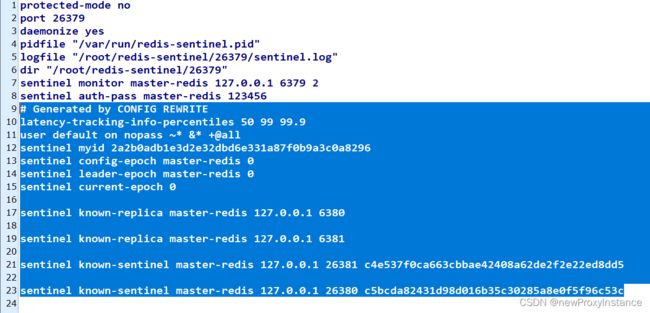
哨兵的配置文件写入
配置文件会在哨兵的运行中进行文件写入
6379(原主)
# Generated by CONFIG REWRITE
latency-tracking-info-percentiles 50 99 99.9
replicaof 127.0.0.1 6381
user default on #8d969eef6ecad3c29a3a629280e686cf0c3f5d5a86aff3ca12020c923adc6c92 ~* &* +@all
会写入 replicaof 127.0.0.1 6381,认 6381 做 master
6381(新主)同样会将 replicaof 去除。
71 哨兵运行流程
单个
sentinel down-after-milliseconds mymaster 30000
多个哨兵打达到一致意见才可以认为某一个 master 节点宕机。
# Note that whatever is the ODOWN quorum, a Sentinel will require to
# be elected by the majority of the known Sentinels in order to
# start a failover, so no failover can be performed in minority.
为了防止在少数情况进行故障转移,哨兵集群需要选举出一个领导者。
具体的选举信息可以在 sentinel.log中查看
+vote-for-leader c4e537f0ca663cbbae42408a62de2f2e22ed8dd5 1
选举算法:Raft 算法,基本思想:先到先得。
72 选举算法
权限
replica offset
run ID
新主登基
群臣俯首
旧主俯首
73 哨兵使用建议
- 节点数量为奇数,起步三个。
- 各个节点配置相同。
- 如果哨兵部署在Docker应该注意端口映射。
- 哨兵+主从复制在主从切换的过程中不可避免的产生数据丢失。
所以我们引入集群。
11:Redis集群(cluster)
74 75 是什么,能干什么
https://redis.io/docs/reference/cluster-spec/
熟悉 复制 -》哨兵 -》集群的演进过程。
High performance and linear scalability up to 1000 nodes.
Tips:1000个节点
76 77 78 集群算法-分片-槽位
https://redis.io/docs/reference/cluster-spec/#key-distribution-model
Redis没有使用一致性Hash,而是使用Slot槽位。每一个 key 经过 CRC16算法取模后落到某一个具体的槽位。
HASH_SLOT = CRC16(key) mod 16384
分片:每个实例都是集群的一个分片。
如何找到给定key的分片?给定的key会被映射到同一个slot。
slot 易于扩容和
79 哈希取余分区算法
普通 hash 取余最大的问题就集群节点扩容的时候,取模公式会发生变化。
80 一致性hash算法
目的:当服务器的个数发生变化,尽可能减少
三大步骤:算法构建hash环,节点映射,落key规则。
hash环,
节点映射:
82 优缺点
容错性:当环上的节点宕机后,沿着圆环移动到下一个节点。
扩展性:当环上加节点后,
缺点:数据倾斜(数据分布不均匀)问题。
83 hash slot 分区
在数据和节点中间加一层 slot,
2^14 = 16384
HASH_SLOT = CRC16(key) mod 16384
84 经典面试题:为什么 slot 最大数是 16384?
why redis-cluster use 16384 slots? https://github.com/redis/redis/issues/2576
提问:
why redis-cluster use 16384 slots? crc16() can have 2^16 -1=65535 different remainders。
作者回答:
The reason is:
//心跳包携带完整的节点配置信息
Normal heartbeat packets carry the full configuration of a node, that can be replaced in an idempotent way with the old in order to update an old config.
//使用65k slots 会导致包变为 8k,
This means they contain the slots configuration for a node, in raw form, that uses 2k of space with16k slots, but would use a prohibitive 8k of space using 65k slots.
//基于
At the same time it is unlikely that Redis Cluster would scale to more than 1000 mater nodes because of other design tradeoffs.

So 16k was in the right range to ensure enough slots per master with a max of 1000 maters, but a small enough number to propagate the slot configuration as a raw bitmap easily. Note that in small clusters the bitmap would be hard to compress because when N is small the bitmap would have slots/N bits set that is a large percentage of bits set.
prohibitive :过高的,负担不起的。
- 原因1:使用更多数量的slot会导致心跳包变为8k,作者认为这个代价是 prohibitive(过高的)。
基于 1000个节点,16384个 slot 已经够用,
85 不保证强一致性
集群并不能保证数据的一个强一致。
86 87 环境搭建
目标:三主三从搭建。
第一步:准备集群配置文件。
bind 0.0.0.0
protected-mode no
daemonize yes
port 6379
logfile "/root/redis-cluster/6379.log"
pidfile /root/redis-cluster/redis_6379.pid
dir /root/redis-cluster/
dbfilename 6379.rdb
appendonly yes
appendfilename "6379.aof"
requirepass 123456
masterauth 123456

cluster-enabled yes
cluster-config-file nodes-6379.conf
cluster-node-timeout 5000
其他5台将 6379 改为对应端口。
第二步:启动 6台 Redis 实例。
Tips:因为内存原因,这里放在一台机器上启动6个实例,生产环境务必拆分。

第三步:通过 redis-cli 构建集群关系。
redis-cli -a 123456 --cluster create --cluster-replicas 1 127.0.0.1:6379 127.0.0.1:6380 127.0.0.1:6381 127.0.0.1:6382 127.0.0.1:6383 127.0.0.1:6384
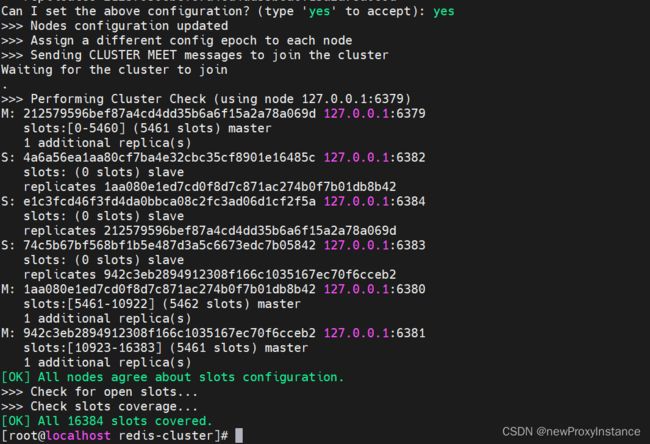
redis-cli -a 123456 --cluster create --cluster-replicas 1 192.168.139.140:6379 192.168.139.140:6380 192.168.139.140:6381 192.168.139.140:6382 192.168.139.140:6383 192.168.139.140:6384
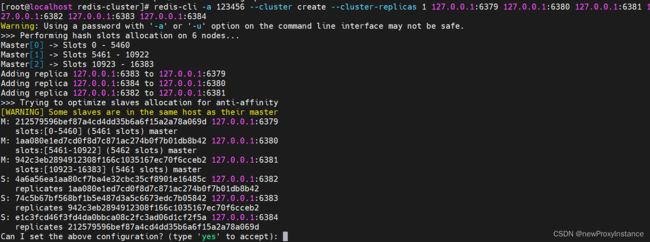
分配结果
Tips:实际主从实例分配会有不同,以实际为准,如果使用127.0.0.1可能会在SpringBoot连接过程中报错,参考最后
第四步:连接任一实例查看集群信息
redis-cli -p 6379 -a 123456
CLUSTER NODES 命令类似于 INFO replication
127.0.0.1:6379> CLUSTER NODES
4a6a56ea1aa80cf7ba4e32cbc35cf8901e16485c 127.0.0.1:6382@16382 slave 1aa080e1ed7cd0f8d7c871ac274b0f7b01db8b42 0 1677650172000 2 connected
212579596bef87a4cd4dd35b6a6f15a2a78a069d 127.0.0.1:6379@16379 myself,master - 0 1677650171000 1 connected 0-5460
e1c3fcd46f3fd4da0bbca08c2fc3ad06d1cf2f5a 127.0.0.1:6384@16384 slave 212579596bef87a4cd4dd35b6a6f15a2a78a069d 0 1677650171616 1 connected
74c5b67bf568bf1b5e487d3a5c6673edc7b05842 127.0.0.1:6383@16383 slave 942c3eb2894912308f166c1035167ec70f6cceb2 0 1677650171000 3 connected
1aa080e1ed7cd0f8d7c871ac274b0f7b01db8b42 127.0.0.1:6380@16380 master - 0 1677650172000 2 connected 5461-10922
942c3eb2894912308f166c1035167ec70f6cceb2 127.0.0.1:6381@16381 master - 0 1677650172657 3 connected 10923-16383
127.0.0.1:6379>
[root@localhost redis-cluster]
CLUSTER INFO 某一个节点信息
127.0.0.1:6379> CLUSTER INFO
cluster_state:ok
cluster_slots_assigned:16384
cluster_slots_ok:16384
cluster_slots_pfail:0
cluster_slots_fail:0
cluster_known_nodes:6
cluster_size:3
cluster_current_epoch:6
cluster_my_epoch:1
cluster_stats_messages_ping_sent:694
cluster_stats_messages_pong_sent:700
cluster_stats_messages_sent:1394
cluster_stats_messages_ping_received:695
cluster_stats_messages_pong_received:694
cluster_stats_messages_meet_received:5
cluster_stats_messages_received:1394
total_cluster_links_buffer_limit_exceeded:0
88 集群读写
默认情况下,连某一台实例只能操作管理的 slot
127.0.0.1:6379> set k1 v1
(error) MOVED 12706 127.0.0.1:6381
127.0.0.1:6379> set k2 v2
OK
127.0.0.1:6379> keys *
1) "k2"
127.0.0.1:6379>
使用 -c 路由
[root@localhost redis-cluster]# redis-cli -p 6379 -a 123456 -c
Warning: Using a password with '-a' or '-u' option on the command line interface may not be safe.
127.0.0.1:6379> set k1 v1
-> Redirected to slot [12706] located at 127.0.0.1:6381
OK
127.0.0.1:6381>
CLUSTER KEYSLOT 命令查看某个key属于某个slot
127.0.0.1:6379> CLUSTER KEYSLOT k1
(integer) 12706
127.0.0.1:6379> CLUSTER KEYSLOT k2
(integer) 449
127.0.0.1:6379> CLUSTER KEYSLOT k3
(integer) 4576
127.0.0.1:6379>
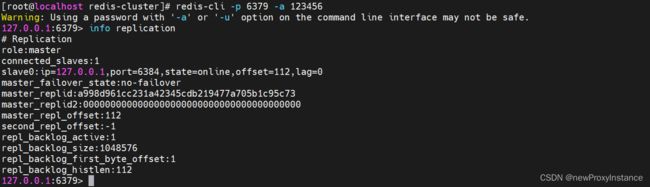
89主从容错切换
127.0.0.1:6379> info replication
# Replication
role:master
connected_slaves:1
slave0:ip=127.0.0.1,port=6384,state=online,offset=1592,lag=1
已知 6379 的 slave 是 6384,我们手动将 6379 停机观察集群情况。
[root@localhost redis-cluster]# redis-cli -p 6379 -a 123456 -c
Warning: Using a password with '-a' or '-u' option on the command line interface may not be safe.
127.0.0.1:6379> shutdown
not connected> quit
[root@localhost redis-cluster]# redis-cli -p 6380 -a 123456 -c
Warning: Using a password with '-a' or '-u' option on the command line interface may not be safe.
127.0.0.1:6380> CLUSTER nodes
74c5b67bf568bf1b5e487d3a5c6673edc7b05842 127.0.0.1:6383@16383 slave 942c3eb2894912308f166c1035167ec70f6cceb2 0 1677651252784 3 connected
942c3eb2894912308f166c1035167ec70f6cceb2 127.0.0.1:6381@16381 master - 0 1677651252000 3 connected 10923-16383
4a6a56ea1aa80cf7ba4e32cbc35cf8901e16485c 127.0.0.1:6382@16382 slave 1aa080e1ed7cd0f8d7c871ac274b0f7b01db8b42 0 1677651253300 2 connected
212579596bef87a4cd4dd35b6a6f15a2a78a069d 127.0.0.1:6379@16379 master,fail - 1677651241588 1677651239000 1 disconnected
1aa080e1ed7cd0f8d7c871ac274b0f7b01db8b42 127.0.0.1:6380@16380 myself,master - 0 1677651252000 2 connected 5461-10922
e1c3fcd46f3fd4da0bbca08c2fc3ad06d1cf2f5a 127.0.0.1:6384@16384 master - 0 1677651251000 7 connected 0-5460
127.0.0.1:6380>
可以看到 6384 变为了 master,如果 6379 回到集群呢 ?
[root@localhost redis-cluster]# redis-server 6379.conf
[root@localhost redis-cluster]# redis-cli -p 6380 -a 123456 -c
Warning: Using a password with '-a' or '-u' option on the command line interface may not be safe.
127.0.0.1:6380> CLUSTER nodes
74c5b67bf568bf1b5e487d3a5c6673edc7b05842 127.0.0.1:6383@16383 slave 942c3eb2894912308f166c1035167ec70f6cceb2 0 1677651325594 3 connected
942c3eb2894912308f166c1035167ec70f6cceb2 127.0.0.1:6381@16381 master - 0 1677651323577 3 connected 10923-16383
4a6a56ea1aa80cf7ba4e32cbc35cf8901e16485c 127.0.0.1:6382@16382 slave 1aa080e1ed7cd0f8d7c871ac274b0f7b01db8b42 0 1677651325000 2 connected
212579596bef87a4cd4dd35b6a6f15a2a78a069d 127.0.0.1:6379@16379 slave e1c3fcd46f3fd4da0bbca08c2fc3ad06d1cf2f5a 0 1677651323779 7 connected
1aa080e1ed7cd0f8d7c871ac274b0f7b01db8b42 127.0.0.1:6380@16380 myself,master - 0 1677651322000 2 connected 5461-10922
e1c3fcd46f3fd4da0bbca08c2fc3ad06d1cf2f5a 127.0.0.1:6384@16384 master - 0 1677651325090 7 connected 0-5460
127.0.0.1:6380>
6379 变为了 slave
CLUSTER FAILOVER
将 slave 提升为 master ,原来的 master 降级为 slave
[root@localhost redis-cluster]# redis-cli -p 6380 -a 123456 -c
Warning: Using a password with '-a' or '-u' option on the command line interface may not be safe.
127.0.0.1:6380> CLUSTER FAILOVER
(error) ERR You should send CLUSTER FAILOVER to a replica
127.0.0.1:6380> quit
[root@localhost redis-cluster]# redis-cli -p 6379 -a 123456 -c
Warning: Using a password with '-a' or '-u' option on the command line interface may not be safe.
127.0.0.1:6379> CLUSTER FAILOVER
OK
127.0.0.1:6379>
[root@localhost redis-cluster]# redis-cli -p 6379 -a 123456 -c
Warning: Using a password with '-a' or '-u' option on the command line interface may not be safe.
127.0.0.1:6379> CLUSTER nodes
942c3eb2894912308f166c1035167ec70f6cceb2 127.0.0.1:6381@16381 master - 0 1677651638599 3 connected 10923-16383
4a6a56ea1aa80cf7ba4e32cbc35cf8901e16485c 127.0.0.1:6382@16382 slave 1aa080e1ed7cd0f8d7c871ac274b0f7b01db8b42 0 1677651638000 2 connected
1aa080e1ed7cd0f8d7c871ac274b0f7b01db8b42 127.0.0.1:6380@16380 master - 0 1677651638287 2 connected 5461-10922
212579596bef87a4cd4dd35b6a6f15a2a78a069d 127.0.0.1:6379@16379 myself,master - 0 1677651637000 8 connected 0-5460
74c5b67bf568bf1b5e487d3a5c6673edc7b05842 127.0.0.1:6383@16383 slave 942c3eb2894912308f166c1035167ec70f6cceb2 0 1677651639337 3 connected
e1c3fcd46f3fd4da0bbca08c2fc3ad06d1cf2f5a 127.0.0.1:6384@16384 slave 212579596bef87a4cd4dd35b6a6f15a2a78a069d 0 1677651638000 8 connected
127.0.0.1:6379>
[root@localhost redis-cluster]#
90 集群扩容
口诀:加主,分配,加从
第一步:新建两个配置文件,端口号改为6385和6386,启动服务
[root@localhost redis-cluster]# cp 6379.conf 6385.conf
[root@localhost redis-cluster]# cp 6379.conf 6386.conf
[root@localhost redis-cluster]# redis-server 6385.conf
[root@localhost redis-cluster]# redis-server 6386.conf
[root@localhost redis-cluster]# ps -ef|grep redis
root      85927      1  0 13:47 ?        00:00:04 redis-server 0.0.0.0:6380 [cluster]
root      85957      1  0 13:48 ?        00:00:04 redis-server 0.0.0.0:6381 [cluster]
root      85981      1  0 13:48 ?        00:00:05 redis-server 0.0.0.0:6382 [cluster]
root      86001      1  0 13:48 ?        00:00:05 redis-server 0.0.0.0:6383 [cluster]
root      86023      1  0 13:48 ?        00:00:05 redis-server 0.0.0.0:6384 [cluster]
root      96087      1  0 14:15 ?        00:00:01 redis-server 0.0.0.0:6379 [cluster]
root      99298      1  0 14:23 ?        00:00:00 redis-server 0.0.0.0:6385 [cluster]
root      99332      1  0 14:23 ?        00:00:00 redis-server 0.0.0.0:6386 [cluster]
root      99398   4969  0 14:24 pts/0    00:00:00 grep --color=auto redis
第二步:加入集群
[root@localhost redis-cluster]# redis-cli -a 123456 --cluster add-node 127.0.0.1:6385 127.0.0.1:6379
相当于6385通过6379(介绍人)加入集群(组织)。
第三步:重新分配 slot, 16384 / 4 = 4096
redis-cli -a 123456 --cluster reshard 127.0.0.1:6379
What is the receiving node ID? 填第四个 master 的ID
Source node #1: 填 all
–cluster check 检查集群命令
[root@localhost redis-cluster]# redis-cli -a 123456 --cluster check 127.0.0.1:6379
Warning: Using a password with '-a' or '-u' option on the command line interface may not be safe.
127.0.0.1:6379 (21257959...) -> 0 keys | 4096 slots | 1 slaves.
127.0.0.1:6381 (942c3eb2...) -> 1 keys | 4096 slots | 1 slaves.
127.0.0.1:6380 (1aa080e1...) -> 0 keys | 4096 slots | 1 slaves.
127.0.0.1:6385 (49356d9d...) -> 1 keys | 4096 slots | 0 slaves.
[OK] 2 keys in 4 masters.
0.00 keys per slot on average.
>>> Performing Cluster Check (using node 127.0.0.1:6379)
M: 212579596bef87a4cd4dd35b6a6f15a2a78a069d 127.0.0.1:6379
   slots:[1365-5460] (4096 slots) master
   1 additional replica(s)
M: 942c3eb2894912308f166c1035167ec70f6cceb2 127.0.0.1:6381
   slots:[12288-16383] (4096 slots) master
   1 additional replica(s)
S: 4a6a56ea1aa80cf7ba4e32cbc35cf8901e16485c 127.0.0.1:6382
   slots: (0 slots) slave
   replicates 1aa080e1ed7cd0f8d7c871ac274b0f7b01db8b42
M: 1aa080e1ed7cd0f8d7c871ac274b0f7b01db8b42 127.0.0.1:6380
   slots:[6827-10922] (4096 slots) master
   1 additional replica(s)
M: 49356d9d1c0c8fd1dc7b0d3a29371f032f5b1afa 127.0.0.1:6385
   slots:[0-1364],[5461-6826],[10923-12287] (4096 slots) master
S: 74c5b67bf568bf1b5e487d3a5c6673edc7b05842 127.0.0.1:6383
   slots: (0 slots) slave
   replicates 942c3eb2894912308f166c1035167ec70f6cceb2
S: e1c3fcd46f3fd4da0bbca08c2fc3ad06d1cf2f5a 127.0.0.1:6384
   slots: (0 slots) slave
   replicates 212579596bef87a4cd4dd35b6a6f15a2a78a069d
[OK] All nodes agree about slots configuration.
>>> Check for open slots...
>>> Check slots coverage...
[OK] All 16384 slots covered.
[root@localhost redis-cluster]#
可以看到每一个master都是4096个slot
第四步:给6385添加 slave 6386
redis-cli -a 123456 --cluster add-node 127.0.0.1:6386 127.0.0.1:6385 --cluster-slave --cluster-master-id 49356d9d1c0c8fd1dc7b0d3a29371f032f5b1afa
cluster-master-id 填 master 6385 的 ID
[root@localhost redis-cluster]# redis-cli -a 123456 --cluster check 127.0.0.1:6379
Warning: Using a password with '-a' or '-u' option on the command line interface may not be safe.
127.0.0.1:6379 (21257959...) -> 0 keys | 4096 slots | 1 slaves.
127.0.0.1:6381 (942c3eb2...) -> 1 keys | 4096 slots | 1 slaves.
127.0.0.1:6380 (1aa080e1...) -> 0 keys | 4096 slots | 1 slaves.
127.0.0.1:6385 (49356d9d...) -> 1 keys | 4096 slots | 1 slaves.
[OK] 2 keys in 4 masters.
0.00 keys per slot on average.
>>> Performing Cluster Check (using node 127.0.0.1:6379)
M: 212579596bef87a4cd4dd35b6a6f15a2a78a069d 127.0.0.1:6379
   slots:[1365-5460] (4096 slots) master
   1 additional replica(s)
M: 942c3eb2894912308f166c1035167ec70f6cceb2 127.0.0.1:6381
   slots:[12288-16383] (4096 slots) master
   1 additional replica(s)
S: 4a6a56ea1aa80cf7ba4e32cbc35cf8901e16485c 127.0.0.1:6382
   slots: (0 slots) slave
   replicates 1aa080e1ed7cd0f8d7c871ac274b0f7b01db8b42
M: 1aa080e1ed7cd0f8d7c871ac274b0f7b01db8b42 127.0.0.1:6380
   slots:[6827-10922] (4096 slots) master
   1 additional replica(s)
M: 49356d9d1c0c8fd1dc7b0d3a29371f032f5b1afa 127.0.0.1:6385
   slots:[0-1364],[5461-6826],[10923-12287] (4096 slots) master
   1 additional replica(s)
S: 74c5b67bf568bf1b5e487d3a5c6673edc7b05842 127.0.0.1:6383
   slots: (0 slots) slave
   replicates 942c3eb2894912308f166c1035167ec70f6cceb2
S: 3ef2ce807bdd74f767033e1fb33c5c4f3d28ea60 127.0.0.1:6386
   slots: (0 slots) slave
   replicates 49356d9d1c0c8fd1dc7b0d3a29371f032f5b1afa
S: e1c3fcd46f3fd4da0bbca08c2fc3ad06d1cf2f5a 127.0.0.1:6384
   slots: (0 slots) slave
   replicates 212579596bef87a4cd4dd35b6a6f15a2a78a069d
[OK] All nodes agree about slots configuration.
>>> Check for open slots...
>>> Check slots coverage...
[OK] All 16384 slots covered.
[root@localhost redis-cluster]#
91 缩容
口诀:删从,重分配,删主。
第一步:删除从节点 6386
[root@localhost redis-cluster]# redis-cli -a 123456 --cluster del-node 127.0.0.1:6386 3ef2ce807bdd74f767033e1fb33c5c4f3d28ea60
Warning: Using a password with '-a' or '-u' option on the command line interface may not be safe.
>>> Removing node 3ef2ce807bdd74f767033e1fb33c5c4f3d28ea60 from cluster 127.0.0.1:6386
>>> Sending CLUSTER FORGET messages to the cluster...
>>> Sending CLUSTER RESET SOFT to the deleted node.
[root@localhost redis-cluster]#
删除后 check 命令可以看到少了一台 6386
第二步:重新分配槽位
redis-cli -a 123456 --cluster reshard 127.0.0.1:6379
What is the receiving node ID? 填想要接收 slot 的ID,填 6379 的ID。
Source node #1: 填 slot 来源的 ID,填 6385 的ID。
Source node #2:done
M: 212579596bef87a4cd4dd35b6a6f15a2a78a069d 127.0.0.1:6379
   slots:[0-6826],[10923-12287] (8192 slots) master
   2 additional replica(s)
第三步:删除节点
redis-cli -a 123456 --cluster del-node 127.0.0.1:6385 49356d9d1c0c8fd1dc7b0d3a29371f032f5b1afa
第四步:check
127.0.0.1:6379 (21257959...) -> 1 keys | 8192 slots | 1 slaves.
127.0.0.1:6381 (942c3eb2...) -> 1 keys | 4096 slots | 1 slaves.
127.0.0.1:6380 (1aa080e1...) -> 0 keys | 4096 slots | 1 slaves.
92 小总结
不在一个slot下的多key操作支持不好,通识占位符
[root@localhost redis-cluster]# redis-cli -a 123456 -p 6379 -c
Warning: Using a password with '-a' or '-u' option on the command line interface may not be safe.
127.0.0.1:6379> mget k1 k2
(error) CROSSSLOT Keys in request don't hash to the same slot
127.0.0.1:6379> mset k1{z} v1 k2{z} v2 k3{z} v3
-> Redirected to slot [8157] located at 127.0.0.1:6380
OK
127.0.0.1:6380> mget k1{z} k2{z} k3{z}
1) "v1"
2) "v2"
3) "v3"
127.0.0.1:6380>
不在同一个 slot 无法使用 mset mget,可以使用{}定义一个组的概念,使 key 中{}相同内容的放到一个slot 中。
slot(槽)常用配置和命令:
配置文件参数:cluster-require-full-coverage yes :要求集群完整性设置为yes,否则设置为no。
命令1:CLUSTER COUNTKEYSINSLOT slotNum :统计某个 slot key 的数量
key会落到那个 slot。
命令2:CLUSTER KEYSLOT key :计算key会落到哪一个slot。
12:SpringBoot集成Redis
93 94 jedis
        <!-- https://mvnrepository.com/artifact/redis.clients/jedis -->
        <dependency>
            <groupId>redis.clients</groupId>
            <artifactId>jedis</artifactId>
            <version>4.3.1</version>
        </dependency>
95 lettuce
<!-- https://mvnrepository.com/artifact/io.lettuce/lettuce-core -->
<dependency>
    <groupId>io.lettuce</groupId>
    <artifactId>lettuce-core</artifactId>
    <version>6.2.3.RELEASE</version>
</dependency>
96 97 RedisTemplate
        <dependency>
            <groupId>org.springframework.boot</groupId>
            <artifactId>spring-boot-starter-data-redis</artifactId>
        </dependency>
默认情况下会为我们提供下面两个bean对象,我更推荐使用StringRedisTemplate原因如下
RedisTemplate<Object, Object>
StringRedisTemplate
98 连接集群
spring:
  redis:
    password: 123456
    lettuce:
      pool:
        max-idle: 32
        max-active: 32
        min-idle: 8
        max-wait: -1
    cluster:
      nodes:
        - 192.168.139.140:6379
        - 192.168.139.140:6380
        - 192.168.139.140:6381
        - 192.168.139.140:6382
        - 192.168.139.140:6383
        - 192.168.139.140:6384
      max-redirects: 3
99 连接集群可能存在的问题
问题复现:
选择一台主节点宕机,这里选择 6379,首先找到一个会落到6379节点的key
127.0.0.1:6379> CLUSTER KEYSLOT k2
(integer) 449
127.0.0.1:6379>
i.l.core.protocol.ConnectionWatchdog : Cannot reconnect to [192.168.139.140:6379]: Connection refused: no further information: /192.168.139.140:6379
问题的原因:服务没有感受到集群的变化。
Lettuce 不会刷新拓扑图。
解决方案:
方案一:使用 jedis(不推荐)
方案二:重写连接工厂实例(不推荐)
方案三:刷新节点集群拓扑动态感应(官网)
spring:
  redis:
    password: 123456
    lettuce:
      cluster:
        # 刷新集群拓扑
        refresh:
          adaptive: true
          period: 2000
错误输出集群节点和配置不一致的情况
错误输出
  WARN 15204 --- [ioEventLoop-4-8] i.l.c.c.t.DefaultClusterTopologyRefresh  : Unable to connect to [127.0.0.1:6380]: Connection refused: no further information: /127.0.0.1:6380
  WARN 15204 --- [ioEventLoop-4-7] i.l.c.c.t.DefaultClusterTopologyRefresh  : Unable to connect to [127.0.0.1:6379]: Connection refused: no further information: /127.0.0.1:6379
参考链接 http://www.wityx.com/post/17240_1_1.html
排查思路:127.0.0.1这个ip首先可以认为是本机,由于没有在本机配置redis所以排除,另外我启动redis集群的时候使用过这个ip。

重新启动集群,修改启动时 ip,替换为实际 ip。