iTop-4412 裸机程序(十一)- DRAM初始化
目录
- 源码
- DRAM 初始化的 21 个步骤
- 寄存器
- DRAM 初始化
源码
GitHub:https://github.com/Kilento/4412NoOS
DRAM 初始化的 21 个步骤
查看数据手册《SEC_Exynos4412_Users Manual_Ver.1.00.00》18.3 可知 LPDDR2 的初始化过程,DDR3 的初始化过程和它一致,我们可以使用以下的步骤来初始化我们设备上的 DRAM。
- DMC must assert and hold CKE to a logic low level to provide stable power for memory device and then apply stable clock.
- Set the PhyControl0.ctrl_start_point and PhyControl0.ctrl_inc bit-fields to a correct value according to clock frequency. Set the PhyControl0.ctrl_dll_on bit-field to “1” to activate the PHY DLL.
- DQS cleaning: Set the Phy Control1.ctrl_shiftc and PhyControl1.ctrl_offsetc bit-fields to the appropriate value according to clock frequency, board delay, and memory tDQSCK parameter.
- Set the PhyControl0.ctrl_start bit-field to “1”.
- Set the ConControl. At this moment, an auto-refresh counter should be disabled.
- Set the MemControl. At this moment, all power down modes should be disabled.
- Set the MemConfig0 register. When there are two external memory chips, set the MemConfig1 register.
- Set the PrechConfig and PwrdnConfig registers.
- Set the TimingAref, TimingRow, TimingData, and TimingPower registers according to memory AC
parameters. - Set the QosControl0 to 15 and QosConfig0 to 15 registers when a certain bus master requires QoS scheme.
- Wait for the PhyStatus0.ctrl_locked bit-fields to change to “1”. Verify whether PHY DLL is locked. PHY DLL compensates the changes of delay amount that pressure, volume, and temperature variation causes during memory operation. Therefore, you should not power off PHY DLL for reliable operation. It can be in power-off mode except when it runs at low frequency. When you use the power-off mode, set the PhyControl0.ctrl_force bit-field to the correct value according to the PhyStatus0.ctrl_lock_value[9:2] bit-field for fix delay amount. Clear the PhyControl0.ctrl_dll_on bit-field to turn off PHY DLL.
- Set the PhyControl1.fp_resync bit-field to “1” to update DLL information.
- Confirm that Clock Enable (CKE) is in a logic low level at least 100ns after power on.
- Issue a NOP command by using the DirectCmd register to assert and hold CKE to a logic high level.
- Wait for a minimum of 200 μs.
- Issue a MRS command by using the DirectCmd register to reset memory devices and program the operating
parameters. - Wait for minimum of 1 μs.
- Issue a MRR command by using the DirectCmd register to poll the DAI bit of the MRStatus register.
This is to know whether or not Device Auto-Initialization is complete. - If there are two external memory chips, execute step 14 to 19 for chip1 memory device.
- Set the ConControl to turn on an auto-refresh counter.
- Set MemControl register when you require power-down modes.
对应翻译如下:
- DMC功能必须设置,并且要保持CKE为低电平,以便可以提供稳定的电源和时钟给DDR。
- 根据时钟频率设置PhyControl0.ctrl_start_point 和 PhyControl0.ctrl_inc bit-fields,并且设置PhyControl0.ctrl_dll_on bit-field 为 “1” 已启动PHY DLL。
- DQS 清除,根据时钟频率、板子延时和芯片的 tDQSCK 参数设置PhyControl1.ctrl_shiftc 和 PhyControl1.ctrl_offsetcbit-fields。
- 设置 PhyControl0.ctrl_start bit-field 为"1"。
- 设置ConControl,此时,不能使能自动刷新计数器(auto-refresh counter )。
- 设置MemControl,此时,所有的power down模式应关闭。
- 设置MemConfig0 寄存器,当外面有两片存储芯片时,设置MemConfig1寄存器。
- 设置 PrechConfig和 PwrdnConfig寄存器。
- 根据DDR3的 AC参数设置TimingAref, TimingRow, TimingData, 和 TimingPower寄存器。
- 当总线主控者需要QoS时序参数时,设置QosControl0 到15寄存器和QosConfig0 到 15 寄存器。
- 等待 PhyStatus0.ctrl_locked bit-fields 变成 “1”,以确定 PHY DLL 是否锁定。PHY DLL 可以补偿压力、体积?和温度等环境的变化,因为在芯片工作期间,我们不能关闭了PHY DLL的电源,只有当他在低的时钟频率时才可以切换到Power-off 模式,当我们用power-off 模式,参考PhyStatus0.ctrl_lock_value[9:2]的延时参数来设置PhyControl0.ctrl_forcebit-field,清楚PhyControl0.ctrl_dll_on bit-field来关闭 PHY DLL。
- 设置PhyControl1.fp_resync bit-field 为 “1” 来更新 DLL的设置。
- 确保在电源上电后至少保持Clock Enable (CKE)在低电平100ns。
- 用 DirectCmd 寄存器来执行一条 NOP 指令且保持CKE 为高电平。
- 至少等待200us。
- 发出MRS指令来重新设置存储芯片的操作参数。
- 至少等待1us。
- 用MRR指令来查询MRStatus的寄存器的DAI位,用这们来确定自动初始化过程是否完成。
- 如果外部有别的存储芯片,重复执行14到19步来设置芯片1。
- 设置 ConControl 来启动自动刷新计数器
- 当需要节能模式时设置 MemControl 寄存器。
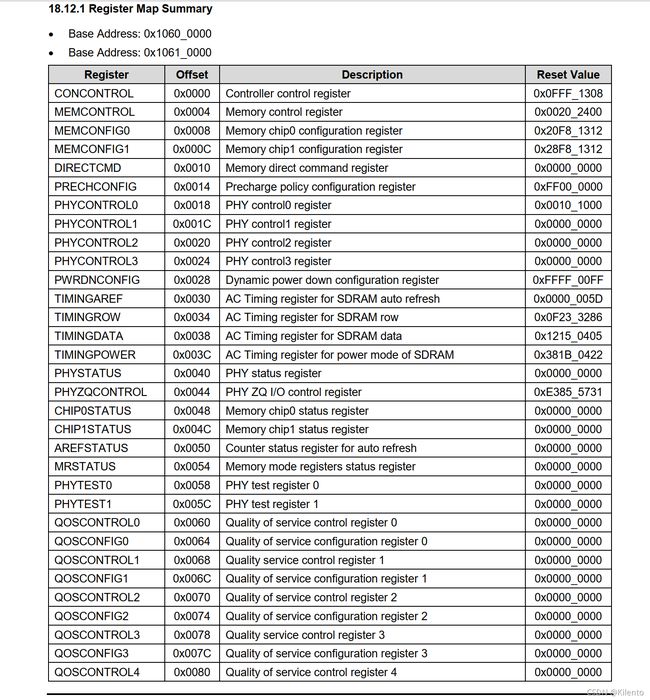
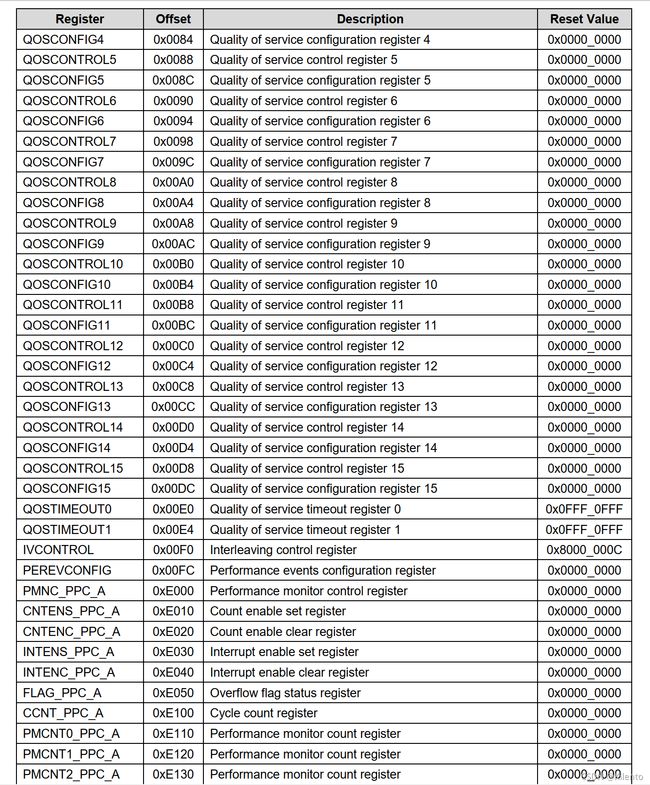
寄存器
由数据手册可知 DRAM 控制寄存器地址如下:
DRAM 初始化
DARM的初始化比较复杂,这段代码是DARM0的初始化,我是直接从官方的iTop-4412 uboot 源码当中抠出来的。有兴趣的同学可以自行分析下。
/*****************************************************************/
/*DREX0***********************************************************/
/*****************************************************************/

	ldr	r0, =APB_DMC_0_BASE

	ldr	r1, =0x0
	str	r1, [r0, #DMC_PHYCONTROL2]

	ldr	r1, =0x0
	str	r1, [r0, #0x24]

	ldr	r1, =0xE3855503
	str	r1, [r0, #DMC_PHYZQCONTROL]

	ldr	r1, =0x71101008
	str	r1, [r0, #DMC_PHYCONTROL0]

	ldr	r1, =0x7110100A
	str	r1, [r0, #DMC_PHYCONTROL0]

	ldr	r1, =0x20000086
	str	r1, [r0, #DMC_PHYCONTROL1]

	ldr	r1, =0x71101008
	str	r1, [r0, #DMC_PHYCONTROL0]

	ldr	r1, =0x2000008E
	str	r1, [r0, #DMC_PHYCONTROL1]

	ldr	r1, =0x20000086
	str	r1, [r0, #DMC_PHYCONTROL1]

	ldr	r1, =0x2000008E
	str	r1, [r0, #DMC_PHYCONTROL1]

	ldr	r1, =0x20000086
	str	r1, [r0, #DMC_PHYCONTROL1]

	ldr	r1, =0x0FFF30CA
	str	r1, [r0, #DMC_CONCONTROL]

	ldr	r1, =0x00302600
	str	r1, [r0, #DMC_MEMCONTROL]
#if 0
	ldr	r1, =0x40C01323
	str	r1, [r0, #DMC_MEMCONFIG0]
#else
	/* 4Gb * 4 */
	/*
	ldr r1, =0x40801323
	str	r1, [r0, #DMC_MEMCONFIG0]
	*/

	/* 2Gb * 8 */

	ldr r1, =0x40801333
	str	r1, [r0, #DMC_MEMCONFIG0]

#endif
	ldr	r1, =(0x80000000 | CONFIG_IV_SIZE)
	str	r1, [r0, #DMC_IVCONTROL]

	ldr	r1, =0x64000000
	str	r1, [r0, #DMC_PRECHCONFIG]

	ldr	r1, =0x9C4000FF
	str	r1, [r0, #DMC_PHYCONTROL0]

	ldr	r1, =0x000000BB
	str	r1, [r0, #DMC_TIMINGAREF] @TimingAref

#ifdef CONFIG_EVT0_RECOMMEND
	ldr	r1, =0x34A98691
#else
	ldr	r1, =0x34498691
#endif

	ldr	r1, =0x7846654F/*0x4046654F*/
	str	r1, [r0, #DMC_TIMINGROW] @TimingRow
	ldr	r1, =0x46400506
	str	r1, [r0, #DMC_TIMINGDATA] @TimingData
	ldr	r1, =0x52000A3C
	str	r1, [r0, #DMC_TIMINGPOWER] @TimingPower

	/* minimum wait time is 100 nano seconds */
	/* 0x64: wait 250 nano seconds at ARMCLK 1.5 Ghz */
	mov	r2, #0x64
	bl dmc_delay

	ldr	r1, =0x07000000
	str	r1, [r0, #DMC_DIRECTCMD]

	/* minimum wait time is 200 micro seconds */
	/* 0x19000: wait 250 micro seconds at ARMCLK 1.5 Ghz */
	mov	r2, #0x19000
	bl dmc_delay

	ldr	r1, =0x00020000
	str	r1, [r0, #DMC_DIRECTCMD]

	/* minimum wait time is 20 micro seconds */
	/* 0x2700: wait 25 micro seconds at ARMCLK 1.5 Ghz */
	mov	r2, #0x2700
	bl dmc_delay

	ldr	r1, =0x00030000
	str	r1, [r0, #DMC_DIRECTCMD]

	/* minimum wait time is 1 micro seconds */
	/* 0x3f0: wait 2.5 micro seconds at ARMCLK 1.5 Ghz */
	mov	r2, #0x3f0
	bl dmc_delay

	ldr	r1, =0x00010000
	str	r1, [r0, #DMC_DIRECTCMD]
	ldr	r1, =0x00000100
	str	r1, [r0, #DMC_DIRECTCMD]

	mov	r2, #0x3f0
	bl dmc_delay

	ldr	r1, =0x00000420
	str	r1, [r0, #DMC_DIRECTCMD]

	mov	r2, #0x3f0
	bl dmc_delay

	ldr	r1, =0x0A000000
	str	r1, [r0, #DMC_DIRECTCMD]

	mov	r2, #0x3f0
	bl dmc_delay
2021年10月7日
Kilento