【Chrono Engine学习总结】5-sensor-5.1-sensor基础并创建一个lidar
由于Chrono的官方教程在一些细节方面解释的并不清楚,自己做了一些尝试,做学习总结。
1、Sensor模块
Sensor模块是附加模块,需要单独安装。参考:【Chrono Engine学习总结】1-安装配置与程序运行
Sensor Module Tutorial
Sensor Overview
Sensor模块包括的内容如下:
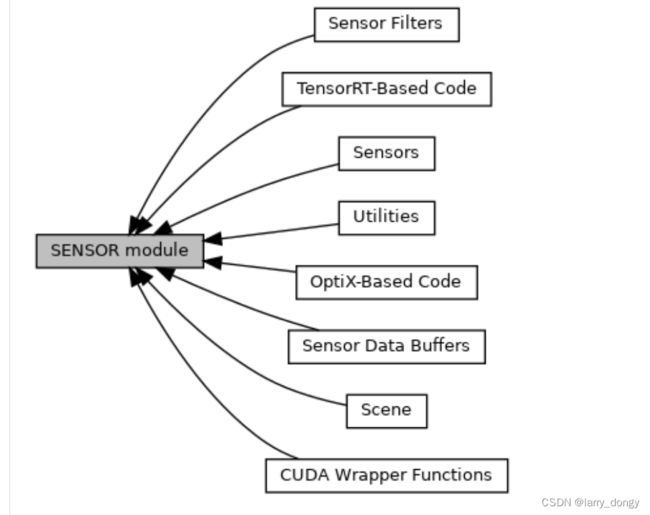
其中:
- Sensors模块是核心,包括各种传感器(IMU、GPS、相机、Lidar、Radar等),以及传感器管理器等;
- Sensor Filters是对sensor原始数据进行滤波(我认为更准确说应该是“处理方式”),即从原始数据得到我们想要的数据。https://api.projectchrono.org/group__sensor__filters.html
- Scene是和camera相关的场景设置,例如背景色、光照等;
- 其他内容不展开介绍。
传感器当中,“光学”传感器,例如相机、lidar、radar等,依赖OptiX这个库。具体的依赖关系如下:

2、创建Sensor的流程
这里全部以lidar为例,进行介绍。
2.0 创建传感器管理器
在chrono中,所有传感器需要注册在sensor manager当中,由其统一进行管理。
管理器的创建、添加一个具体的sensor、仿真时数据更新,3行代码如下:
// 创建管理器
auto manager = chrono_types::make_shared<ChSensorManager>(&sys);
// 添加一个sensor:AddSensor(std::shared_ptr sensor)
manager->AddSensor(lidar);
// 在仿真循环中,更新所有传感器数据:
manager->Update();
2.1 从JSON文件载入预定义好的sensor
官方提供了一些已经定义好的sensor,包括:通用相机、VLP16雷达、HDL32雷达、通用GPS、通用IMU等,这些的调用只需要一行代码即可实现创建。例如,直接创建一个VLP16的雷达:
auto vlp16 = Sensor::CreateFromJSON(GetChronoDataFile("sensor/json/Velodyne/VLP-16.json"), box_body, offset_pose);
manager->AddSensor(vlp16);
我们可以打开这个JSON文件,查看VLP16的具体参数:

2.2 通过代码方式逐步创建一个sensor
通过代码方式创建,就是通过代码将JSON中的格式,完全自己配置一遍,例如:
auto lidar =
    chrono_types::make_shared<ChLidarSensor>(box_body,                               // body lidar is attached to
        update_rate,                            // scanning rate in Hz
        offset_pose,                            // offset pose
        900,                                    // number of horizontal samples
        30,                                     // number of vertical channels
        horizontal_fov,                         // horizontal field of view
        max_vert_angle, min_vert_angle, 100.0f  // vertical field of view
    );
lidar->SetName("Lidar Sensor 1");
lidar->SetLag(lag);
lidar->SetCollectionWindow(collection_time);

lidar->PushFilter(chrono_types::make_shared<ChFilterDIAccess>());			// 允许后续获取depth和intensity的filter
lidar->PushFilter(chrono_types::make_shared<ChFilterVisualize>(horizontal_samples / 2, vertical_samples * 5, "Raw Lidar Depth Data"));			// 将雷达数据可视化为深度图像的可视化filter
lidar->PushFilter(chrono_types::make_shared<ChFilterPCfromDepth>());		// 通过深度获取点云的filter
lidar->PushFilter(chrono_types::make_shared<ChFilterLidarNoiseXYZI>(0.01f, 0.001f, 0.001f, 0.01f));	// 对XYZI增加噪声的filter
lidar->PushFilter(chrono_types::make_shared<ChFilterVisualizePointCloud>(640, 480, 2, "Lidar Point Cloud"));		// 点云可视化的filter
lidar->PushFilter(chrono_types::make_shared<ChFilterXYZIAccess>());		// 获取XYZI数据的filter
manager->AddSensor(lidar);		// 添加lidar到管理器
可以看出,设置了一些列的filter。当然,在上面的JSON中,也有许多filter,有些filter有参数,例如ChFilterLidarNoiseXYZI,有些没有例如ChFilterPCfromDepth。这些filter是干什么的呢?我个人理解,这些光学传感器获得的原始数据,需要加上这些filter之后,才具备我们平常使用这些sensor的数据格式。
例如,对于lidar来说,设置了ChFilterXYZIAccess后,才可以获取XYZI的数据;设置ChFilterLidarNoiseXYZI后,可以对XYZI增加高斯噪声;设置ChFilterVisualizePointCloud和ChFilterVisualize后,会出现三维点云和二位深度图的可视化(如下图)。所以,filter认为是“功能实现途径”比较合适。

所以:sensor的原始数据只是从光学系统中获得的特性,并没有转化成我们希望的“传感器数据格式”,需要通过filter进行实现。这些filter(对于lidar)负责添加噪声、二维图像可视化、三维点云可视化、获取点云XYZI格式、获取深度信息,(对于camera)转灰度图、像素噪声等。详细参考:【chrono::sensor::ChFilter Class Reference】
2.3 通过JSON方式自定义创建sensor
除了官方自定义的两个lidar的JSON外,还可以自定义lidar的配置。就创建对应的JSON并修改配置即可,无需多言。
3、参考代码
#include