Android TextView
Android TextView is one of the very basic components and used a lot. Let’s have a deep look into TextView today.
Android TextView是非常基本的组件之一,并且使用很多。 今天让我们深入研究TextView。
According to the Google Documentation:
根据Google文档:
1. Android TextView (1. Android TextView)
Android TextView class is a subclass of View class and is designed to hold and display text. It can be used in the code by importing the package android.widget.TextView. Typically, a TextView isn’t meant for editing. For editing we use EditText.
Android TextView类是View类的子类,旨在保存和显示文本。 通过导入包android.widget.TextView ,可以在代码中使用它。 通常,TextView不适用于编辑。 为了进行编辑,我们使用EditText 。
1.1)在布局中创建TextView (1.1) Creating a TextView in Layout)
Following is the way to define a TextView in the layout file.
以下是在布局文件中定义TextView的方法。
android:textattribute holds the string that’s to be displayed.android:text属性保存要显示的字符串。android:idattribute stores the unique identifier of the TextView. We retrieve the TextView in our Java Activity using this id.android:id属性存储TextView的唯一标识符。 我们使用此ID在Java活动中检索TextView。- In the respective activity/fragment, we call the above TextView using findViewById
在各自的活动/片段中,我们使用findViewById调用上述TextViewTextView textView = findViewById(R.id.textView); - In the present Android SDK versions, the type TextView is inferred on the right hand side. In Android SDK < 25, we have to explicitly cast the
findViewByIdto(TextView)在当前的Android SDK版本中,右侧会推断出TextView类型。 在Android SDK <25中,我们必须将findViewById显式转换为(TextView) - Ideally, instead of hardcoding the string in the above xml code, we should set it in the
strings.xmlfile and use it as :android:text="@string/app_name"理想情况下,我们不应该在上面的xml代码中对字符串进行硬编码,而应该在strings.xml文件中进行设置并将其用作:android:text="@string/app_name"
1.2)TextView的重要属性 (1.2) Important Attributes of TextView)
Some commonly used attributes of a TextView are listed below.
下面列出了TextView的一些常用属性。
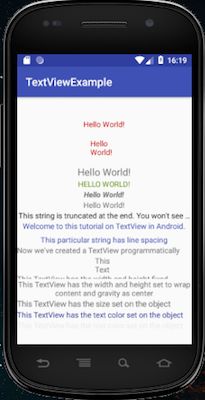
android:textColor: To set the color of the text. Can be set as #rgb #rrggbb #aarrggbb. (aa represents the transparency, opacity. We can also set the color fromcolors.xml. Example :@color/colorPrimaryDarkor@android:color/whiteandroid:textColor:设置文本的颜色。 可以设置为#rgb #rrggbb #aarrggbb。 (aa表示透明度,不透明度。我们还可以从colors.xml设置颜色。例如:@color/colorPrimaryDark或@android:color/whiteandroid:textSize: To set the size of the textView. Generally, it’s set in sp(scaled pixels). Example: 18sp.android:textSize:设置android:textSize的大小。 通常,将其设置为sp(缩放的像素)。 示例:18sp。android:textAllCaps: Set the boolean value. Setting true would capitalize the string.android:textAllCaps:设置布尔值。 设置为true将大写字符串。android:textStyle: By default the style is normal. You can set it tobold,italic. To set one or more together use|.android:textStyle:默认情况下,样式为普通样式。 您可以将其设置为bold,italic。 设置一个或多个在一起使用|。android:maxLines: Set the maximum number of lines you want the text to be in. Setting this to 1 would make it a single line TextView.android:maxLines:设置您希望文本进入的最大行数。将其设置为1将使其成为一行TextView。android:ellipsize: This is used for truncating the text which are longer than the view rather than being broken.startadds a .. in place of the starting characters of the string.endadds them for the remaining characters.middleadds it for the middle ones. Settingmarqueemakes the textview slide left right continously. For marquee to work, setandroid:textIsSelected="true"andandroid:scrollHorizontally="true"android:ellipsize:用于截断长于视图而不是被破坏的文本。start添加一个..代替字符串的起始字符。end将它们添加为剩余字符。middle添加它为中间的。 设置marquee可使textview连续左右滑动。 为了使选取框正常工作,请设置android:textIsSelected="true"和android:scrollHorizontally="true"android:gravity: Specifies the alignment of the text by the view’s x- and/or y-axis when the string is smaller than the TextView width/height.android:gravity:当字符串小于TextView的宽度/高度时,指定文本在视图的x轴和/或y轴上的对齐方式。android:lineSpacingMultiplier: Extra spacing between lines of text, as a multiplier. Setting 1.5 makes the spacing 1.5 times larger than the current spacing.android:lineSpacingMultiplier:文本行之间的额外间隔,作为一个乘数。 设置1.5将使间距比当前间距大1.5倍。android:textAppearance: Sets a style for the text which includes it’s own color, size, font etc. We can use built-in styles or create our own in thestyles.xmlfile.android:textAppearance:设置文本的样式,包括其自身的颜色,大小,字体等。我们可以使用内置样式,也可以在styles.xml文件中创建自己的样式。android:typeface: is used to set the typeface of the text among:monospace,serif,sans,normal.android:typeface:用于在以下字体中设置文本的字体:monospaceserif,sansserif,sans和normal。android:visibility: is used to set the visibility of the TextView among:visible,invisible,gone.goneis different frominvisible. gone makes the TextView inivisible and makes it vanish from the layout. In invisible the TextView is still at exactly the same place.android:visibility:用于在以下范围内设置TextView的可见性:visible,invisible,gone。gone与invisible是不同的。 消失使TextView不可见,并使其从布局中消失。 在不可见的情况下,TextView仍然位于同一位置。
Let’s try setting these in our activity_main.xml file in our Android Studio Project.
让我们尝试在Android Studio项目中的activity_main.xml文件中进行设置。
We’ve set a few texts in the strings.xml file in order to avoid keeping long hardcoded strings in the layout file.
为了避免在布局文件中保留较长的硬编码字符串,我们在strings.xml文件中设置了一些文本。
Instead of hardcoding the textSize, we can set the same in the dimens.xml file in the values folder under the resource directory.
无需对textSize进行硬编码,我们可以在资源目录下values文件夹中的dimens.xml文件中设置相同的值。
The output of the activity with the updated layout as shown above is:
具有更新的布局的活动的输出如下所示:
Note: The strings.xml and dimens.xml files hold the values in the form of key-value pairs – Dictionary.
Note : strings.xml和dimens.xml文件以键值对形式-字典保存值。
2.以编程方式创建TextView (2. Creating a TextView Programmatically)
We can create a TextView in our activity directly. We just need to initialize it, set the attributes using methods and add the TextView object into the parent layout as shown below.
我们可以直接在活动中创建TextView。 我们只需要初始化它,使用方法设置属性,然后将TextView对象添加到父布局中,如下所示。
package com.journaldev.textviewexample;

import android.support.v7.app.AppCompatActivity;
import android.os.Bundle;
import android.widget.LinearLayout;
import android.widget.TextView;

public class MainActivity extends AppCompatActivity {

    @Override
    protected void onCreate(Bundle savedInstanceState) {
        super.onCreate(savedInstanceState);
        setContentView(R.layout.activity_main);

        LinearLayout linearLayout = findViewById(R.id.linearLayout);

        TextView textView = new TextView(this);
        textView.setText("Now we've created a TextView programmatically");
        linearLayout.addView(textView);
    }
}
To set the visibility of the TextView programmatically, we use setVisibility() and pass either View.VISIBLE or VIEW.INVISIBLE or VIEW.GONE
若要以编程方式设置TextView的可见性,我们使用setVisibility()并传递View.VISIBLE或VIEW.INVISIBLE或VIEW.GONE
2.1)设置TextView的宽度和高度 (2.1) Setting TextView Width and Height)
We can set the TextView width and height programmatically as shown below.
我们可以通过编程设置TextView的宽度和高度,如下所示。
textView = new TextView(this);
textView.setText("This TextView has the width and height fixed");
textView.setLayoutParams(new LinearLayout.LayoutParams(50, 50));
linearLayout.addView(textView);

//set gravity too
textView = new TextView(this);
textView.setText("This TextView has the width and height set to wrap content and gravity as center");
textView.setLayoutParams(new LinearLayout.LayoutParams(ViewGroup.LayoutParams.WRAP_CONTENT, ViewGroup.LayoutParams.WRAP_CONTENT));
textView.setGravity(Gravity.CENTER);
linearLayout.addView(textView);
2.2)DP中的缩放宽度高度 (2.2) Scaling Width Height in DP)
In the above code, we’d set the values as an int which calculates the width and height in pixels.
Pixels can vary from screen to screen, hence we need to use density independency pixels (dp).
To set the accurate dimensions in dp as we did in xml, we need to do scaling as shown below.
在上面的代码中,我们将值设置为一个int值,以像素为单位计算宽度和高度。
像素因屏幕而异,因此我们需要使用密度独立像素(dp)。
要像在xml中一样在dp设置准确的尺寸,我们需要进行缩放,如下所示。
final float scale = getContext().getResources().getDisplayMetrics().density;
int pixels = (int) (dps * scale + 0.5f);
Eventually the pixels value should be used in the above code by passing 50 into dps
最终,应在上述代码中使用像素值,方法是将50传递给dps
TextView textView = new TextView(this);
textView.setText("This TextView has the width and height fixed");
textView.setLayoutParams(new LinearLayout.LayoutParams(ViewGroup.LayoutParams.MATCH_PARENT, pixels));
linearLayout.addView(textView);
2.3)设置TextView大小 (2.3) Setting TextView Size)
We can set the size on a TextView programmatically in the following way:
我们可以通过以下方式以编程方式在TextView上设置大小:
final float scale = getBaseContext().getResources().getDisplayMetrics().density;
int pixels = (int) (10 * scale + 0.5f);

TextView textView = new TextView(this);
textView.setText("This TextView has the size set on the object");
textView.setTextSize(TypedValue.COMPLEX_UNIT_SP,15);
Since the TextView height in the above code is set to 10dp, the TextView displayed would be cut.
由于上述代码中的TextView高度设置为10dp,因此将剪切显示的TextView。
2.4)以编程方式设置TextView颜色 (2.4) Setting TextView color Programmatically)
TextView textView = new TextView(this);
textView.setText("This TextView has the text color set on the object");
textView.setTextColor(ContextCompat.getColor(this, R.color.colorPrimaryDark));
linearLayout.addView(textView);

textView = new TextView(this);
textView.setText("This TextView has the text color set on the object");
textView.setTextColor(Color.parseColor("#20808080")); //or
linearLayout.addView(textView);
To get a color from the colors.xml we use ContextCompat(Since API>23).
为了从colors.xml获取颜色,我们使用ContextCompat(Since API> 23)。
To set the rgb value we use Color.parseColor()
要设置rgb值,我们使用Color.parseColor()
In the above code, we’ve set transparency to 20 percent on the second TextView.
在上面的代码中,我们在第二个TextView上将透明度设置为20%。
Note: We can also set textView.setTextColor(Color.RED);
注意:我们还可以设置textView.setTextColor(Color.RED);
The code with the above TextViews initialized in the MainActivity.java is:
在MainActivity.java中初始化了具有上述TextViews的代码是:
package com.journaldev.textviewexample;

import android.graphics.Color;
import android.support.v4.content.ContextCompat;
import android.support.v7.app.AppCompatActivity;
import android.os.Bundle;
import android.util.TypedValue;
import android.view.Gravity;
import android.view.ViewGroup;
import android.widget.LinearLayout;
import android.widget.TextView;

public class MainActivity extends AppCompatActivity {

    @Override
    protected void onCreate(Bundle savedInstanceState) {
        super.onCreate(savedInstanceState);
        setContentView(R.layout.activity_main);

        LinearLayout linearLayout = findViewById(R.id.linearLayout);

        TextView textView = new TextView(this);
        textView.setText("Now we've created a TextView programmatically");
        linearLayout.addView(textView);

        textView = new TextView(this);
        textView.setText("This TextView has the width and height fixed");
        textView.setLayoutParams(new LinearLayout.LayoutParams(50, 50));
        linearLayout.addView(textView);

        final float scale = getBaseContext().getResources().getDisplayMetrics().density;
        int pixels = (int) (10 * scale + 0.5f);

        textView = new TextView(this);
        textView.setText("This TextView has the width and height fixed");
        textView.setLayoutParams(new LinearLayout.LayoutParams(ViewGroup.LayoutParams.MATCH_PARENT, pixels));
        linearLayout.addView(textView);

        textView = new TextView(this);
        textView.setText("This TextView has the width and height set to wrap content and gravity as center");
        textView.setLayoutParams(new LinearLayout.LayoutParams(ViewGroup.LayoutParams.WRAP_CONTENT, ViewGroup.LayoutParams.WRAP_CONTENT));
        textView.setGravity(Gravity.CENTER);
        linearLayout.addView(textView);

        textView = new TextView(this);
        textView.setText("This TextView has the size set on the object");
        textView.setTextSize(TypedValue.COMPLEX_UNIT_SP, 15);
        linearLayout.addView(textView);
        //or
        //textView.setTextSize(TypedValue.COMPLEX_UNIT_PX,getResources().getDimension(R.dimen.textSize));

        textView = new TextView(this);
        textView.setText("This TextView has the text color set on the object");
        textView.setTextColor(ContextCompat.getColor(this, R.color.colorPrimaryDark));
        linearLayout.addView(textView);

        textView = new TextView(this);
        textView.setText("This TextView has the text color set on the object");
        textView.setTextColor(Color.parseColor("#20808080"));
        linearLayout.addView(textView);
    }

}
The output when the above code was run is :
运行上述代码时的输出为:
The programmatically created TextViews are added beneath the xml ones in the LinearLayout since the orientation was vertical.
由于方向是垂直的,因此以编程方式创建的TextView被添加到LinearLayout的xml中。
3.使用TextView可绘制 (3. Drawable With TextView)
We can define a TextView with a drawable to it’s left/right/top/bottom.
我们可以定义一个TextView,其左/右/上/下可绘制。
4.在TextView上设置自定义字体 (4. Setting a Custom Font on TextView)
We can set a custom font .ttf or .otf typeface file on the TextView by first creating an assets directory under src | main folder in our Android Studio Project.
通过首先在src | main下创建资源目录,可以在TextView上设置自定义字体.ttf或.otf字体文件。 Android Studio项目中的src | main文件夹。
Now we’ve added a .ttf file in the assets folder. Our project structure looks like this:
现在,我们在资产文件夹中添加了一个.ttf文件。 我们的项目结构如下所示:
textView = new TextView(this);
textView.setText("This TextView has Roboto font");
textView.setTypeface(Typeface.createFromAsset(getAssets(),"Roboto-Bold.ttf"));
textView.setTextSize(TypedValue.COMPLEX_UNIT_SP, 18);
linearLayout.addView(textView);
setTypeface() is used to set the custom font, it takes the getAssets() folder to invoke the assets directory.
setTypeface()用于设置自定义字体,它使用getAssets()文件夹来调用资产目录。
The second parameter is the path to the font file. Since in our case it is present in the root directory, the path is simply the filename.
第二个参数是字体文件的路径。 因为在我们的例子中,它存在于根目录中,所以路径只是文件名。
The output looks like this:

输出看起来像这样:
Notice the latter TextView with a custom font!
注意后者带有自定义字体的TextView!
5.在TextView上单击Listener (5. Click Listener on TextView)
We can trigger something when the TextView is click using the setOnClickListener on the TextView object.
当使用TextView对象上的setOnClickListener单击TextView时,我们可以触发某些操作。
For a TextView to have click functionality, we need to add the android:clickable as true in the xml.
为了使TextView具有单击功能,我们需要在xml中将android:clickable添加为true。
In the MainActivity.java onCreate method we do the following.
在MainActivity.java的onCreate方法中,我们执行以下操作。
@Override
protected void onCreate(Bundle savedInstanceState) {
super.onCreate(savedInstanceState);
setContentView(R.layout.activity_main);

final TextView textViewClickable = findViewById(R.id.textViewClickable);
textViewClickable.setOnClickListener(new OnClickListener() {
            @Override
            public void onClick(View v) {
               textViewClickable.setTextColor(Color.ORANGE);
            }
        });

}
Alternative method using xml attribute android:onClick
使用xml属性android:onClick替代方法
Using onClick we set the method name to be invoked in the Java class whenever the TextView is clicked.
使用onClick我们设置了每当单击TextView时在Java类中调用的方法名称。
@Override
protected void onCreate(Bundle savedInstanceState) {
super.onCreate(savedInstanceState);
setContentView(R.layout.activity_main);

final TextView textViewClickable = findViewById(R.id.textViewClickable);

}

public void methodName(){
textViewClickable.setTextColor(Color.ORANGE);
}
6.在TextView中显示HTML (6. Displaying Html in a TextView)
We can display html code in a TextView as shown below.
我们可以在TextView中显示html代码,如下所示。
textView.setText(Html.fromHtml(
"JournalDev.com Android TextView Tutorial
"));7. TextView自动链接属性 (7. TextView autoLink attribute)
The autoLink attribute is used to detect a certain pattern in the TextView among the following:
autoLink属性用于检测TextView中的以下特定模式:
- web 网路
- map address 地图地址
- email address 电子邮件地址
- phone 电话
- all 所有
It converts the matched pattern string into a link. And on clicking the link the relevant behavior happens(opens browser for web, calling for phone, gmail for email, google maps for maps)
它将匹配的模式字符串转换为链接。 然后单击链接,就会发生相关行为(打开web浏览器,拨打phone , email gmail,谷歌maps )
Let’s replace one of our TextViews to the following:
让我们将其中一个TextView替换为以下内容:
The output with above TextView in the layout is given below:
在布局中具有上述TextView的输出如下:
This brings an end to Android TextView tutorial. You can download the project from the link below.
这结束了Android TextView教程。 您可以从下面的链接下载项目。
翻译自: https://www.journaldev.com/19490/android-textview