BIO、NIO、Netty演化总结
关于BIO(关于Java NIO的的思考-CSDN博客)和NIO(关于Java NIO的的思考-CSDN博客)在之前的博客里面已经有详细的讲解,这里再总结一下最近学习netty源码的的心得体会
在之前的NIO博客中我们知道接受客户端连接和IO事件的线程是同一个线程,那么就会存在一个问题,就是如果某一个socket连接在读完数据之后,写数据之前,有比较耗时的逻辑,在这个逻辑执行完成之前,都会导致线程无法继续接受客户端请求以及处理其他socket的io事件,那么就会导致整个应用程序性能下降,于是我们可以做进一步的优化,把接受客户端请求和读写时间的处理分开为两组线程来处理,彼此不会相互影响,通常接受客户端的请求时间是一个很快的操作,这样就可以提高应用程序的连接数量,将之前NIO的代码进步一改进如下:
public class AsyncNonBlockingServerWithThreadPool {
    private Selector selector;
    private ServerSocketChannel serverChannel;
    private ByteBuffer buffer;
    private ExecutorService executorService;

    public AsyncNonBlockingServerWithThreadPool(int port) throws IOException {
        // 创建选择器和服务器通道
        selector = Selector.open();
        serverChannel = ServerSocketChannel.open();
        serverChannel.bind(new InetSocketAddress(port));
        serverChannel.configureBlocking(false);
        // 注册服务器通道到选择器,并注册接收连接事件
        serverChannel.register(selector, SelectionKey.OP_ACCEPT);
        buffer = ByteBuffer.allocate(1024);
        // 创建线程池,用于处理事件
        executorService = Executors.newFixedThreadPool(10);
    }

    public void start() throws IOException {
        System.out.println("Server started.");
        while (true) {
            // 阻塞等待事件发生
            selector.select();
            // 处理事件
            Iterator keyIterator = selector.selectedKeys().iterator();
            while (keyIterator.hasNext()) {
                SelectionKey key = keyIterator.next();
                keyIterator.remove();
                if (key.isAcceptable()) {
                    // 接收连接事件
                    handleAccept(key);
                } else if (key.isReadable()) {
                    // 可读事件
                    handleRead(key);
                }
            }
        }
    }

    private void handleAccept(SelectionKey key) throws IOException {
        ServerSocketChannel serverChannel = (ServerSocketChannel) key.channel();
        SocketChannel clientChannel = serverChannel.accept();
        clientChannel.configureBlocking(false);
        clientChannel.register(selector, SelectionKey.OP_READ);
        System.out.println("New client connected: " + clientChannel.getRemoteAddress());
    }

    private void handleRead(SelectionKey key) throws IOException {
        // 将事件处理的代码提交到线程池中
        executorService.submit(() -> {
            SocketChannel clientChannel = (SocketChannel) key.channel();
            buffer.clear();
            int bytesRead = 0;
            try {
                bytesRead = clientChannel.read(buffer);
            } catch (IOException e) {
                e.printStackTrace();
            }
            if (bytesRead == -1) {
                // 客户端关闭连接
                key.cancel();
                try {
                    clientChannel.close();
                } catch (IOException e) {
                    e.printStackTrace();
                }
                try {
                    System.out.println("Client disconnected: " + clientChannel.getRemoteAddress());
                } catch (IOException e) {
                    e.printStackTrace();
                }
                return;
            }
            buffer.flip();
            byte[] data = new byte[buffer.remaining()];
            buffer.get(data);
            System.out.println("Received message from client: " + new String(data));
        });
    }

    public static void main(String[] args) {
        try {
            AsyncNonBlockingServerWithThreadPool server = new AsyncNonBlockingServerWithThreadPool(8080);
            server.start();
        } catch (IOException e) {
            e.printStackTrace();
        }
    }
}
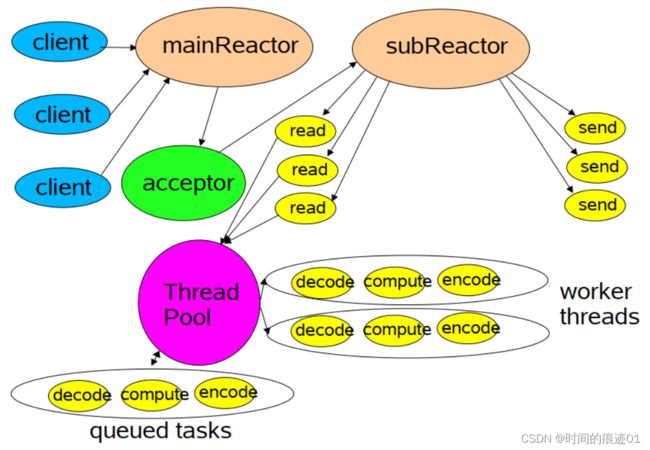
这里可以看到在读取完数据之后,将数据交给另外一个线程池去执行其他的业务逻辑,这样就不会影响主线程接受客户端的请求了,这个代码也是一个最简单的Reactor模式的实现,甚至可以说是一个简单的Netty实现(雏形),也就是下面这张图: mainreactor负责接收客户端连接,然后将连接交给subreactor作进一步的数据读写操作
这个模型也是实现netty的基石,只是netty在次基础上做了很多进一步的优化,我们来看看一个简单的netty实现的程序:
public class NettyServer {
    public static void main(String[] args) throws InterruptedException {
        // 创建 BossGroup 和 WorkerGroup
        // 说明
        // 1.创建两个线程组 BossGroup 和 WorkerGroup
        // 2. BossGroup 只是处理连接请求,真正的和客户端业务处理,会交给 WorkerGroup 完成
        // 3. 两个都是无线循环
        EventLoopGroup bossGroup = new NioEventLoopGroup();
        EventLoopGroup workerGroup = new NioEventLoopGroup();
        try {
            // 创建服务器端的启动对象,配置启动参数
            ServerBootstrap bootstrap = new ServerBootstrap();
            // 使用链式编程进行设置
            bootstrap.group(bossGroup, workerGroup) // 设置两个线程组
                    .channel(NioServerSocketChannel.class) // 使用 ioServerSocketChannel 作为服务器通道实现
                    .option(ChannelOption.SO_BACKLOG, 128) // 设置线程队列等待连接个数
                    .childOption(ChannelOption.SO_KEEPALIVE, true)  // 设置保持活动连接状态
                    .childHandler(new ChannelInitializer() {// 创建一个通道初始化对象(匿名对象)
                        // 给 pipeline 设置处理器
                        @Override
                        protected void initChannel(SocketChannel socketChannel) throws Exception {
                            socketChannel.pipeline().addLast(new NettyServerHandler());
                        }
                    });  // 给我们的WorkerGroup 的 EventLoop 对应的管道设置处理器
            System.out.println(".....服务器 is ready.....");

            // 绑定一个端口,并且同步,生成一个ChannelFuture对象
            // 启动服务器
            ChannelFuture cf = bootstrap.bind(6668).sync();
// 给 cf 注册监听器,监控我们关心的事件
            cf.addListener(new ChannelFutureListener() {
                @Override
                public void operationComplete(ChannelFuture future) throws Exception {
                    if (cf.isSuccess()) {
                        System.out.println("监听端口 6668 成功");
                    } else {
                        System.out.println("监听端口 6668 失败");
                    }
                }
            });
            // 对关闭通道进行监听
            cf.channel().closeFuture().sync();
        }finally {
            bossGroup.shutdownGracefully();
            workerGroup.shutdownGracefully();
        }
    }
}
其中bossGroup就是mainreactor,也就是负责接收客户端的连接的,workerGroup就是subreactor,也就是专门负责读写数据的。
netty的源码很多很长,但是我们要有一个清晰的认知:
1、netty是基于Jdk原生的NIO来实现的(封装了原生NIO),并不是重新实现了一套IO框架
2、NIO网络编程关键的三个组件:
多路复用器(selector):负责挑选出就绪的事件对应的channe
通道(channel):包括服务端的Serversocketchannel和客户端的socketchannel
缓冲区(bytebuff):读写数据,socket数据的都是通过channe向缓冲区读写
netty相比于原生NIO的优势:
1、采用reactor模型,所有的操作均采用事件通知机制来实现(包括连接和读写数据,基于jdk的future之上做了封装,运用观察者模式和装饰器模式,避免future.get带来的程序阻塞)
2、缓冲区的操作不需要手动反转,并且在申请内存时会根据上一次申请的内存大小动态调整
3、在从线程池中挑选线程处理任务时的算法优化
4、一个EventLoop(可以理解为其实就是一个线程),可以绑定多个socketchannel,也就是一个线程可以同时处理多个连接的数据的读写
5、一个socketchannel只会与一个EventLoop绑定,这样就避免了多线程之间的竞争