【SpringBoot】SpringBoot+mysql+thymeleaf+mybatis实现一个Demo
SpringBoot的数据库连接配置已经在上一篇博客说完啦,现在我们来进行一个Demo的实现,我们使用到的是SpringBoot+mysql+thymeleaf+mybatis
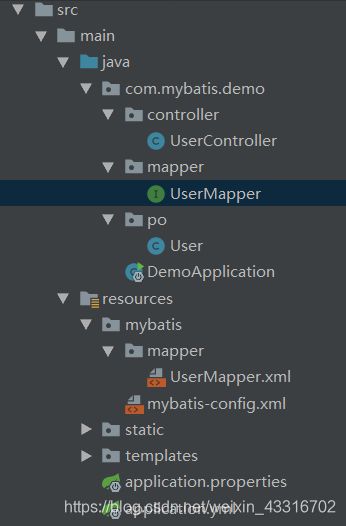
首先先看一下我Demo程序的格局:
我们逐步来看,首先要在数据库建表,这就不用多说了,我的user表对应的是User类属性
package com.mybatis.demo.po;

public class User {
    private int id;
    private String username;
    private String password;

    public int getId() {
        return id;
    }

    public void setId(int id) {
        this.id = id;
    }

    public String getUsername() {
        return username;
    }

    public void setUsername(String username) {
        this.username = username;
    }

    public String getPassword() {
        return password;
    }

    public void setPassword(String password) {
        this.password = password;
    }
}
UserMapper接口是用于mapper的,学过mybatis的也知道,我之前demo是用注解的mybatis做的也可以看一下(注释掉的那部分)
package com.mybatis.demo.mapper;

import com.mybatis.demo.po.User;
import org.apache.ibatis.annotations.Insert;
import org.apache.ibatis.annotations.Mapper;
import org.apache.ibatis.annotations.Select;

import java.util.List;

//这是一个操作数据库的mapper
//@Mapper
public interface UserMapper {

//    @Select("select count(*) from user where username = #{username} and password = #{password}")
//    int isUser(String username,String password);
//
//    @Insert("insert into user (username,password) values (#{username},#{password})")
//    void insertUser(User user);

    int isUser(User user);

    List<User> disUser();

    void insertUser(User user);
}
UserMapper.xml:
(注意一些对应问题,namespace、id、xml名称都必须对应类路径、方法、接口名称相等)
insert into user (username,password) values (#{username},#{password})
yml配置:(注意 mybatis配置要左顶格)
spring:
  datasource:
    username: root
    password: 123
    url: jdbc:mysql://127.0.0.1:3306/springboot_db?useUnicode=true&characterEncoding=UTF-8&useJDBCCompliantTimezoneShift=true&useLegacyDatetimeCode=false&serverTimezone=UTC
    driver-class-name: com.mysql.cj.jdbc.Driver
    type: com.alibaba.druid.pool.DruidDataSource
    initialSize: 5
    minIdle: 5
    maxActive: 20
    maxWait: 60000
    timeBetweenEvictionRunsMillis: 60000
    minEvictableIdleTimeMillis: 300000
    validationQuery: SELECT 1 FROM DUAL
    testWhileIdle: true
    testOnBorrow: false
    testOnReturn: false
    poolPreparedStatements: true
    #   配置监控统计拦截的filters,去掉后监控界面sql无法统计,'wall'用于防火墙
    filters: stat,wall,log4j
    maxPoolPreparedStatementPerConnectionSize: 20
    useGlobalDataSourceStat: true
    connectionProperties: druid.stat.mergeSql=true;druid.stat.slowSqlMillis=500
    thymeleaf:
      prefix: classpath:/templates/
      cache: false
mybatis:
  config-location: classpath:/mybatis/mybatis-config.xml
  mapper-locations: classpath*:/mybatis/mapper/*.xml
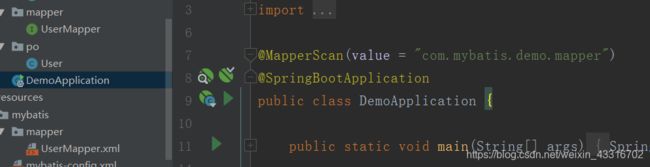
添加扫描:
UserController:(为了简便就没有写service)
package com.mybatis.demo.controller;

import com.mybatis.demo.mapper.UserMapper;
import com.mybatis.demo.po.User;
import org.springframework.beans.factory.annotation.Autowired;
import org.springframework.stereotype.Controller;
import org.springframework.ui.Model;
import org.springframework.web.bind.annotation.GetMapping;
import org.springframework.web.bind.annotation.PathVariable;
import org.springframework.web.bind.annotation.RequestMapping;
import org.springframework.web.bind.annotation.RestController;

import javax.servlet.http.HttpServletRequest;
import javax.servlet.http.HttpServletResponse;
import java.io.IOException;
import java.util.List;

@Controller
public class UserController {

    @Autowired
    UserMapper userMapper;

    @RequestMapping("/h1")
    public String hello(){
        return "hello,springboot";
    }

    @RequestMapping("/log")
    public String login(Model model){
        model.addAttribute("username","默认账号");
        model.addAttribute("password","默认密码");
        return "login";
    }

    @RequestMapping("/res")
    public String loginResult(Model model, HttpServletRequest request){
        String zh = request.getParameter("zh");
        String mm = request.getParameter("mm");
        User u = new User();
        u.setUsername(zh);
        u.setPassword(mm);
        List<User> userList = userMapper.disUser();
        int co = userMapper.isUser(u);
        if (co>0){
            model.addAttribute("result","登录成功");
        }else{
            model.addAttribute("result","登录失败...");
        }
        model.addAttribute("user",userList);
        return "result";
    }

    @RequestMapping("/reg")
    public void register(HttpServletRequest request, HttpServletResponse response) throws IOException {
        request.setCharacterEncoding("utf-8");
        response.setCharacterEncoding("utf-8");
        response.setContentType("text/html;charset=UTF-8");
        String zh = request.getParameter("username");
        String mm = request.getParameter("password");
        User u = new User();
        u.setUsername(zh);
        u.setPassword(mm);
        userMapper.insertUser(u);
        response.getWriter().write("注册成功!");
    }
}
页面:(都放在templates文件下)
login.html:
<html lang="en" xmlns:th="http://www.thymeleaf.org">
<head>
    <meta charset="UTF-8">
    <title>logintitle>
head>
<style>
    .txt{padding: 5px;
        width: 150px;}
    .btn{padding: 2px;
        margin-left: 50px;
        margin-right: 20px;}
style>
<script src="https://code.jquery.com/jquery-3.3.1.min.js">script>
<script>
    function denglu() {
        var username = document.getElementById("zh").value;
        var password = document.getElementById("mm").value;
        if (username!="" && password!="") {
            document.getElementById("loginForm").submit();
        }else{
            alert("内容不能为空!");
        }
    }

    function zhuce() {
        var username = document.getElementById("zh").value;
        var password = document.getElementById("mm").value;
        if (username!="" && password!="") {
            $.ajax({
                url:"/reg",
                async:true,
                type:"POST",
                data:{"username":username,"password":password},
                success:function (data) {
                    alert(data);
                },
                error:function () {
                    alert("请求失败");
                },
                dataType:"text"
            });
        }else{
            alert("内容不能为空!");
        }
    }
script>
<body>
<h3>Demoh3><br>
<form action="/res" method="post" id="loginForm">
    <div>账号:<input type="text" name="zh" class="txt" id="zh"/>div><br>
    <div>密码:<input type="text" name="mm" class="txt" id="mm"/>div><br>
    <input type="button" value="Login" class="btn" id="btn1" onclick="denglu()">
    <input type="button" value="Regist" class="btn" id="btn2" onclick="zhuce()">
form>
body>
html>
result.html:
<html lang="en" xmlns:th="http://www.thymeleaf.org">
<head>
    <meta charset="UTF-8">
    <title>Resulttitle>
head>
<script>
    function disUser() {
        if (document.getElementById("hb").innerText=="登录成功") {
            document.getElementById("tb").style.display = "inline-block";
        }else{
            alert("登录成功才能访问!");
        }
    }
script>
<body>
<h4 th:text="${result}" id="hb">h4>
<a href="/log" style="text-decoration: none;font-weight: bold;font-size: 15px;">返回Demoa><br><br>
<button style="text-decoration: none;font-weight: bold;font-size: 15px;" onclick="disUser()" >查看用户button><br>
<hr>
<table style="display: none;" id="tb">
    <thead>
    <tr>
        <th>序号th>
        <th>用户名th>
        <th>密码th>
    tr>
    <tr th:each="user:${user}">
        <td th:text="${user.id}">td>
        <td th:text="${user.username}">td>
        <td th:text="${user.password}">td>
    tr>
    thead>
table>
body>
html>
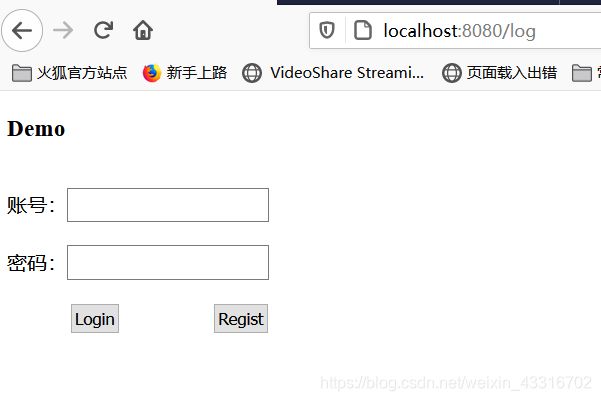
结果显示:
初始页:
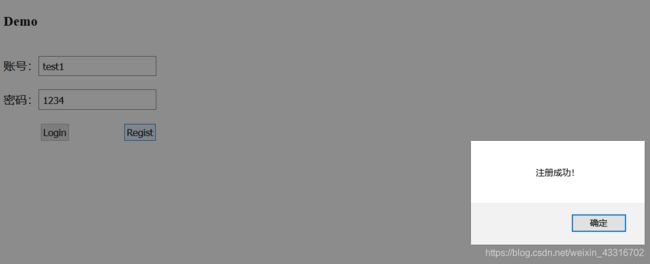
 先注册,输入账号密码后点击regist:
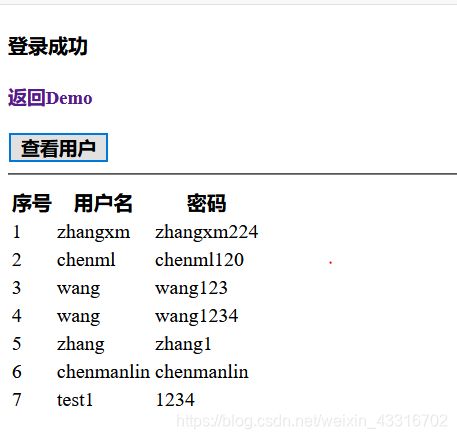
 登录账号,登录成功后可以点击查看用户显示用户:
感谢学习(❛ᴗ❛)
上一篇博客:【SpringBoot】快速创建环境及配置连接数据库