计算机视觉 | OpenCV 实现手势虚拟控制亮度和音量
Hi,大家好,我是半亩花海。在当今科技飞速发展的时代,我们身边充斥着各种智能设备,然而,如何更便捷地与这些设备进行交互却是一个不断被探索的课题。本文将主要介绍一个基于 OpenCV 的手势识别项目,通过手势来控制电脑屏幕亮度和音量大小,为用户提供了一种全新的交互方式。
目录
一、代码拆解
1. 导入必要库
2. 手部关键点类
3. 数据格式转换
4. 画手势关键点
5. 手势状态缓冲处理
6. 画直线
7. 屏幕亮度和音量控制
8. 初始化摄像头和手部关键点识别器
9. Pygame 界面初始化和事件监听
二、实战演示
1. 亮度——light
2. 音量——voice
三、完整代码
一、代码拆解
1. 导入必要库
在开始介绍项目的实现细节之前,我们首先需要导入项目所需的必要库。这些库包括:
- OpenCV:用于处理图像和视频数据。
- Mediapipe:提供了对手部关键点的识别和跟踪功能。
- Pygame:用于创建图形界面和显示摄像头捕获的图像。
- WMI:用于调节电脑屏幕亮度。
- pycaw:用于控制电脑的音量。
# 导入必要库
import math
import sys
import numpy as np
import cv2
import pygame
import wmi
import mediapipe as mp
from ctypes import cast, POINTER
from comtypes import CLSCTX_ALL
from pycaw.pycaw import AudioUtilities, IAudioEndpointVolume
import warnings  # 忽略警告
warnings.filterwarnings("ignore")
2. 手部关键点类
首先创建一个 HandKeyPoint 类,用于初始化手部关键点检测器,并提供对图像进行处理的方法。
# 手部关键点类
class HandKeyPoint:
    def __init__(self,
                 static_image_mode=False,
                 max_num_hands=2,
                 model_complexity=1,
                 min_detection_confidence=0.5,
                 min_tracking_confidence=0.5):
        # 手部识别api
        self.mp_hands = mp.solutions.hands
        # 获取手部识别类
        self.hands = self.mp_hands.Hands(static_image_mode=static_image_mode,
                                         max_num_hands=max_num_hands,
                                         model_complexity=model_complexity,
                                         min_detection_confidence=min_detection_confidence,
                                         min_tracking_confidence=min_tracking_confidence)

    def process(self, image):
        # 将BGR转换为RGB
        img = cv2.cvtColor(image, cv2.COLOR_BGR2RGB)
        # 识别图像中的手势,并返回结果
        results = self.hands.process(img)
        # numpy格式的数据
        np_arr = landmarks_to_numpy(results)
        return results, np_arr
3. 数据格式转换
将手部关键点的检测结果(将 landmarks 格式的数据)转换为 numpy 数组,以便后续的处理和分析。
# 将landmarks格式的数据转换为numpy格式的数据
def landmarks_to_numpy(results):
    """
    将landmarks格式的数据转换为numpy格式的数据
    numpy shape:(2, 21, 3)
    :param results:
    :return:
    """
    shape = (2, 21, 3)
    landmarks = results.multi_hand_landmarks
    if landmarks is None:
        # 没有检测到手
        return np.zeros(shape)
    elif len(landmarks) == 1:
        # 检测出一只手,先判断是左手还是右手
        label = results.multi_handedness[0].classification[0].label
        hand = landmarks[0]
        # print(label)
        if label == "Left":
            return np.array(
                [np.array([[hand.landmark[i].x, hand.landmark[i].y, hand.landmark[i].z] for i in range(21)]),
                 np.zeros((21, 3))])
        else:
            return np.array([np.zeros((21, 3)),
                             np.array(
                                 [[hand.landmark[i].x, hand.landmark[i].y, hand.landmark[i].z] for i in range(21)])])
    elif len(landmarks) == 2:
        # print(results.multi_handedness)
        lh_idx = 0
        rh_idx = 0
        for idx, hand_type in enumerate(results.multi_handedness):
            label = hand_type.classification[0].label
            if label == 'Left':
                lh_idx = idx
            if label == 'Right':
                rh_idx = idx

        lh = np.array(
            [[landmarks[lh_idx].landmark[i].x, landmarks[lh_idx].landmark[i].y, landmarks[lh_idx].landmark[i].z] for i
             in range(21)])
        rh = np.array(
            [[landmarks[rh_idx].landmark[i].x, landmarks[rh_idx].landmark[i].y, landmarks[rh_idx].landmark[i].z] for i
             in range(21)])
        return np.array([lh, rh])
    else:
        return np.zeros((2, 21, 3))
4. 画手势关键点
# 画手势关键点
def draw_landmark(img, results):
    if results.multi_hand_landmarks:
        for hand_landmark in results.multi_hand_landmarks:
            mp.solutions.drawing_utils.draw_landmarks(img,
                                                      hand_landmark,
                                                      mp.solutions.hands.HAND_CONNECTIONS,
                                                      mp.solutions.drawing_styles.get_default_hand_landmarks_style(),
                                                      mp.solutions.drawing_styles.get_default_hand_connections_style())

    return img
5. 手势状态缓冲处理
为了平滑处理手势状态的变化,我们实现了一个 Buffer 类,用于缓存手势状态的变化,并提供了添加正例和负例的方法。
# 缓冲区类
class Buffer:
    def __init__(self, volume=20):
        self.__positive = 0
        self.state = False
        self.__negative = 0
        self.__volume = volume
        self.__count = 0

    def add_positive(self):
        self.__count += 1
        if self.__positive >= self.__volume:
            # 如果正例个数大于容量,将状态定为True
            self.state = True
            self.__negative = 0
            self.__count = 0
        else:
            self.__positive += 1

        if self.__count > self.__volume:
            # 如果大于容量次操作后还没有确定状态
            self.__positive = 0
            self.__count = 0

    def add_negative(self):
        self.__count += 1
        if self.__negative >= self.__volume:
            # 如果负例个数大于容量,将状态定为False
            self.state = False
            self.__positive = 0
        else:
            self.__negative += 1

        if self.__count > self.__volume:
            # 如果大于容量次操作后还没有确定状态
            self.__positive = 0
            self.__count = 0
        # print(f"pos:{self.__positive} neg:{self.__negative} count:{self.__count}")

    def clear(self):
        self.__positive = 0
        self.state = False
        self.__negative = 0
        self.__count = 0
6. 画直线
# 画线函数
def draw_line(frame, p1, p2, color=(255, 127, 0), thickness=3):
    """
    画一条直线
    :param p1:
    :param p2:
    :return:
    """
    return cv2.line(frame, (int(p1[0] * CAM_W), int(p1[1] * CAM_H)), (int(p2[0] * CAM_W), int(p2[1] * CAM_H)), color,
                    thickness)
7. 屏幕亮度和音量控制
# 控制屏幕亮度
def screen_change(percent):  # percent/2即为亮度百分比
    SCREEN = wmi.WMI(namespace='root/WMI')
    a = SCREEN.WmiMonitorBrightnessMethods()[0]
    a.WmiSetBrightness(Brightness=percent, Timeout=500)

# 初始化音量控制
def init_voice():
    devices = AudioUtilities.GetSpeakers()
    interface = devices.Activate(
        IAudioEndpointVolume._iid_, CLSCTX_ALL, None)
    volume = cast(interface, POINTER(IAudioEndpointVolume))
    volume.SetMute(0, None)
    volume_range = volume.GetVolumeRange()
    min_volume = volume_range[0]
    max_volume = volume_range[1]
    return (min_volume, max_volume), volume
8. 初始化摄像头和手部关键点识别器
在项目的初始化阶段,我们需要加载摄像头实例和手部关键点识别实例,以便后续对手势进行识别和处理。
# 加载摄像头实例
cap = cv2.VideoCapture(0)
CAM_W = 640
CAM_H = 480
CAM_SCALE = CAM_W / CAM_H

# 加载手部关键点识别实例
hand = HandKeyPoint()
9. Pygame 界面初始化和事件监听
为了展示手势控制效果,并提供交互界面,我们使用了 Pygame 库。在初始化阶段,我们创建了一个窗口,并设置了标题。同时,我们实现了事件监听功能,以便在需要时退出程序。
具体来说,我们使用 Pygame 创建了一个窗口,并将摄像头捕获的图像显示在窗口中。同时,我们利用 Pygame 的事件监听功能,监听用户的键盘事件,例如按下"q"键时退出程序。这样,用户就可以通过手势控制屏幕亮度和音量大小,同时在 Pygame 窗口中观察手势识别效果。
# 初始化pygame
pygame.init()
# 设置窗口全屏
screen = pygame.display.set_mode((800, 600))
pygame.display.set_caption("virtual_control_screen")
# 获取当前窗口大小
window_size = list(screen.get_size())

# 主循环
while True:
······
    # 事件监听 若按q则退出程序
    for event in pygame.event.get():
        if event.type == pygame.KEYDOWN:
            if event.key == pygame.K_q:
                sys.exit(0)
二、实战演示
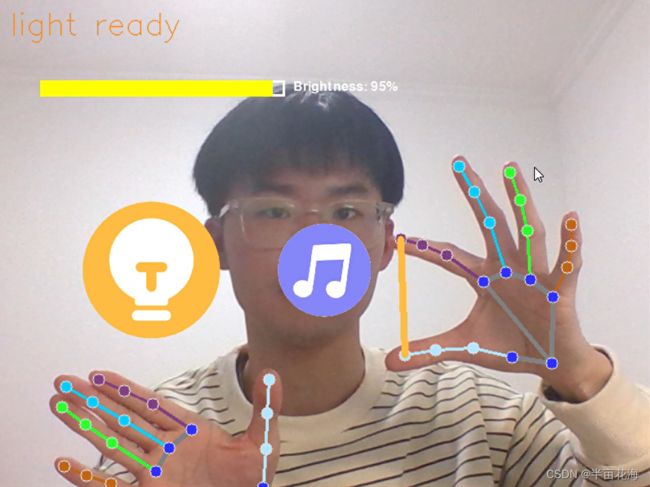
1. 亮度——light
如果 20 < angle < 90,那么“light ready”即手势控制亮度。
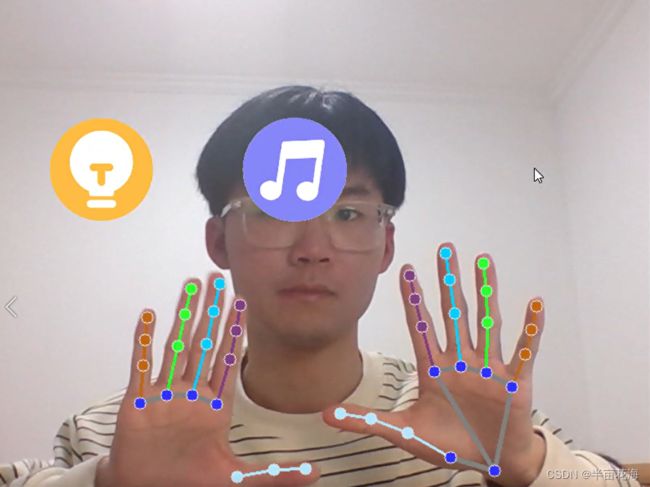
2. 音量——voice
如果 -20 > angle > -50,那么“voice ready”即手势控制音量。

3. 菜单——menu
上述两种情况除外,那么处于“menu”状态即进入菜单。
通过演示可以发现,食指与大拇指在屏幕中的距离越远,亮度越高(音量越大),反之越小,实现了通过手势对亮度和音量的控制。
三、完整代码
#!/usr/bin/env python
# -*- coding:utf-8 -*-
"""
@Project : virtual
@File    : virtual_control.py
@IDE     : PyCharm
@Author  : 半亩花海
@Date    : 2024:02:06 18:01
"""
# 导入模块
import math
import sys
import numpy as np
import cv2
import pygame
import wmi
import mediapipe as mp
from ctypes import cast, POINTER
from comtypes import CLSCTX_ALL
from pycaw.pycaw import AudioUtilities, IAudioEndpointVolume
import warnings  # 忽略警告
warnings.filterwarnings("ignore")


# 手部关键点类
class HandKeyPoint:
    def __init__(self,
                 static_image_mode=False,
                 max_num_hands=2,
                 model_complexity=1,
                 min_detection_confidence=0.5,
                 min_tracking_confidence=0.5):
        # 手部识别api
        self.mp_hands = mp.solutions.hands
        # 获取手部识别类
        self.hands = self.mp_hands.Hands(static_image_mode=static_image_mode,
                                         max_num_hands=max_num_hands,
                                         model_complexity=model_complexity,
                                         min_detection_confidence=min_detection_confidence,
                                         min_tracking_confidence=min_tracking_confidence)

    def process(self, image):
        # 将BGR转换为RGB
        img = cv2.cvtColor(image, cv2.COLOR_BGR2RGB)
        # 识别图像中的手势,并返回结果
        results = self.hands.process(img)
        # numpy格式的数据
        np_arr = landmarks_to_numpy(results)
        return results, np_arr


# 将landmarks格式的数据转换为numpy格式的数据
def landmarks_to_numpy(results):
    """
    将landmarks格式的数据转换为numpy格式的数据
    numpy shape:(2, 21, 3)
    :param results:
    :return:
    """
    shape = (2, 21, 3)
    landmarks = results.multi_hand_landmarks
    if landmarks is None:
        # 没有检测到手
        return np.zeros(shape)
    elif len(landmarks) == 1:
        # 检测出一只手,先判断是左手还是右手
        label = results.multi_handedness[0].classification[0].label
        hand = landmarks[0]
        # print(label)
        if label == "Left":
            return np.array(
                [np.array([[hand.landmark[i].x, hand.landmark[i].y, hand.landmark[i].z] for i in range(21)]),
                 np.zeros((21, 3))])
        else:
            return np.array([np.zeros((21, 3)),
                             np.array(
                                 [[hand.landmark[i].x, hand.landmark[i].y, hand.landmark[i].z] for i in range(21)])])
    elif len(landmarks) == 2:
        # print(results.multi_handedness)
        lh_idx = 0
        rh_idx = 0
        for idx, hand_type in enumerate(results.multi_handedness):
            label = hand_type.classification[0].label
            if label == 'Left':
                lh_idx = idx
            if label == 'Right':
                rh_idx = idx

        lh = np.array(
            [[landmarks[lh_idx].landmark[i].x, landmarks[lh_idx].landmark[i].y, landmarks[lh_idx].landmark[i].z] for i
             in range(21)])
        rh = np.array(
            [[landmarks[rh_idx].landmark[i].x, landmarks[rh_idx].landmark[i].y, landmarks[rh_idx].landmark[i].z] for i
             in range(21)])
        return np.array([lh, rh])
    else:
        return np.zeros((2, 21, 3))


# 画手势关键点
def draw_landmark(img, results):
    if results.multi_hand_landmarks:
        for hand_landmark in results.multi_hand_landmarks:
            mp.solutions.drawing_utils.draw_landmarks(img,
                                                      hand_landmark,
                                                      mp.solutions.hands.HAND_CONNECTIONS,
                                                      mp.solutions.drawing_styles.get_default_hand_landmarks_style(),
                                                      mp.solutions.drawing_styles.get_default_hand_connections_style())

    return img


# 缓冲区类
class Buffer:
    def __init__(self, volume=20):
        self.__positive = 0
        self.state = False
        self.__negative = 0
        self.__volume = volume
        self.__count = 0

    def add_positive(self):
        self.__count += 1
        if self.__positive >= self.__volume:
            # 如果正例个数大于容量,将状态定为True
            self.state = True
            self.__negative = 0
            self.__count = 0
        else:
            self.__positive += 1

        if self.__count > self.__volume:
            # 如果大于容量次操作后还没有确定状态
            self.__positive = 0
            self.__count = 0

    def add_negative(self):
        self.__count += 1
        if self.__negative >= self.__volume:
            # 如果负例个数大于容量,将状态定为False
            self.state = False
            self.__positive = 0
        else:
            self.__negative += 1

        if self.__count > self.__volume:
            # 如果大于容量次操作后还没有确定状态
            self.__positive = 0
            self.__count = 0
        # print(f"pos:{self.__positive} neg:{self.__negative} count:{self.__count}")

    def clear(self):
        self.__positive = 0
        self.state = False
        self.__negative = 0
        self.__count = 0


# 画线函数
def draw_line(frame, p1, p2, color=(255, 127, 0), thickness=3):
    """
    画一条直线
    :param p1:
    :param p2:
    :return:
    """
    return cv2.line(frame, (int(p1[0] * CAM_W), int(p1[1] * CAM_H)), (int(p2[0] * CAM_W), int(p2[1] * CAM_H)), color,
                    thickness)


# 控制屏幕亮度
def screen_change(percent):  # percent/2即为亮度百分比
    SCREEN = wmi.WMI(namespace='root/WMI')
    a = SCREEN.WmiMonitorBrightnessMethods()[0]
    a.WmiSetBrightness(Brightness=percent, Timeout=500)


# 初始化音量控制
def init_voice():
    devices = AudioUtilities.GetSpeakers()
    interface = devices.Activate(
        IAudioEndpointVolume._iid_, CLSCTX_ALL, None)
    volume = cast(interface, POINTER(IAudioEndpointVolume))
    volume.SetMute(0, None)
    volume_range = volume.GetVolumeRange()
    min_volume = volume_range[0]
    max_volume = volume_range[1]
    return (min_volume, max_volume), volume


# 加载摄像头实例
cap = cv2.VideoCapture(0)
CAM_W = 640
CAM_H = 480
CAM_SCALE = CAM_W / CAM_H

# 加载手部关键点识别实例
hand = HandKeyPoint()

# 初始化pygame
pygame.init()
# 设置窗口全屏
screen = pygame.display.set_mode((800, 600))
pygame.display.set_caption("virtual_control_screen")
# 获取当前窗口大小
window_size = list(screen.get_size())

# 设置缓冲区
buffer_light = Buffer(10)
buffer_voice = Buffer(10)

last_y = 0
last_2_y = 1
last_2_x = 0

# 初始化声音控制
voice_range, volume = init_voice()

# 设置亮度条参数
bright_bar_length = 300
bright_bar_height = 20
bright_bar_x = 50
bright_bar_y = 100

# 设置音量条参数
vol_bar_length = 300
vol_bar_height = 20
vol_bar_x = 50
vol_bar_y = 50

# 主循环 每次循环就是对每帧的处理
while True:
    img_menu = None
    lh_index = -1
    # 读取摄像头画面
    success, frame = cap.read()

    # 将opencv中图片格式的BGR转换为常规的RGB
    frame = cv2.cvtColor(frame, cv2.COLOR_BGR2RGB)
    # 镜面反转
    frame = cv2.flip(frame, 1)

    # 处理图像
    res, arr = hand.process(frame)
    frame = draw_landmark(frame, res)

    scale = math.hypot((arr[0, 7, 0] - arr[0, 8, 0]),
                       (arr[0, 7, 1] - arr[0, 8, 1]),
                       (arr[0, 7, 2] - arr[0, 8, 2]))

    # 计算tan值
    tan = (arr[0, 0, 1] - arr[0, 12, 1]) / (arr[0, 0, 0] - arr[0, 12, 0])
    # 计算角度
    angle = np.arctan(tan) * 180 / np.pi
    # print(angle)

    if 20 < angle < 90:
        path = 'resources/menu/light.png'
        buffer_light.add_positive()
        buffer_voice.add_negative()
        # 显示亮度条和亮度刻度值
        show_brightness = True
        show_volume = False
    elif -20 > angle > -50:
        path = 'resources/menu/voice.png'
        buffer_voice.add_positive()
        buffer_light.add_negative()
        # 显示音量条和音量刻度值
        show_brightness = False
        show_volume = True
    else:
        path = 'resources/menu/menu.png'
        buffer_light.add_negative()
        buffer_voice.add_negative()
        # 不显示刻度值和百分比
        show_brightness = False
        show_volume = False

    # 计算拇指与食指之间的距离
    dis = math.hypot(int((arr[1, 4, 0] - arr[1, 8, 0]) * CAM_W), int((arr[1, 4, 1] - arr[1, 8, 1]) * CAM_H))
    # 右手映射时的缩放尺度
    s = math.hypot((arr[1, 5, 0] - arr[1, 9, 0]), (arr[1, 5, 1] - arr[1, 9, 1]), (arr[1, 5, 2] - arr[1, 9, 2]))

    # 调节亮度
    if buffer_light.state:
        frame = cv2.putText(frame, 'light ready', (10, 35), cv2.FONT_HERSHEY_SIMPLEX, 1, (255, 127, 0))
        frame = draw_line(frame, arr[1, 4], arr[1, 8], thickness=5, color=(255, 188, 66))
        if dis != 0:
            # 线性插值,可以理解为将一个区间中的一个值映射到另一区间内
            light = np.interp(dis, [int(500 * s), int(3000 * s)], (0, 100))
            # 调节亮度
            screen_change(light)
    # 调节声音
    elif buffer_voice.state:
        frame = cv2.putText(frame, 'voice ready', (10, 35), cv2.FONT_HERSHEY_SIMPLEX, 1, (255, 127, 0))
        frame = draw_line(frame, arr[1, 4], arr[1, 8], thickness=5, color=(132, 134, 248))
        if dis != 0:
            vol = np.interp(dis, [int(500 * s), int(3000 * s)], voice_range)
            # 调节音量
            volume.SetMasterVolumeLevel(vol, None)

    # 将图片改为与窗口一样的大小
    frame = cv2.resize(frame, (int(window_size[1] * CAM_SCALE), window_size[1]))
    frame = cv2.transpose(frame)
    # 渲染图片
    frame = pygame.surfarray.make_surface(frame)
    screen.blit(frame, (int(0.5 * (CAM_W - CAM_H * CAM_SCALE)), 0))

    img_menu = pygame.image.load(path).convert_alpha()
    img_w, img_h = img_menu.get_size()
    img_menu = pygame.transform.scale(img_menu, (int(img_w * scale * 5), int(img_h * scale * 5)))
    x = (arr[0][9][0] + arr[0][13][0] + arr[0][0][0]) / 3
    y = (arr[0][9][1] + arr[0][13][1] + arr[0][0][1]) / 3
    x = int(x * window_size[0] - window_size[0] * scale * 3.5)
    y = int(y * window_size[1] - window_size[1] * scale * 12)
    # print(x, y)
    screen.blit(img_menu, (x, y))

    # 绘制音量条和亮度条的外框
    if show_volume:
        pygame.draw.rect(screen, (255, 255, 255), (vol_bar_x, vol_bar_y, vol_bar_length, vol_bar_height), 3)
    elif show_brightness:
        pygame.draw.rect(screen, (255, 255, 255), (bright_bar_x, bright_bar_y, bright_bar_length, bright_bar_height),
                         3)

    # 计算当前音量和亮度在条上的位置和大小,并绘制已填充的条
    if show_volume:
        vol = volume.GetMasterVolumeLevel()
        vol_range = voice_range[1] - voice_range[0]
        vol_bar_fill_length = int((vol - voice_range[0]) / vol_range * vol_bar_length)
        pygame.draw.rect(screen, (0, 255, 0), (vol_bar_x, vol_bar_y, vol_bar_fill_length, vol_bar_height))
        # 显示音量刻度值和当前音量大小
        vol_text = f"Volume: {int((vol - voice_range[0]) / vol_range * 100)}%"
        vol_text_surface = pygame.font.SysFont(None, 24).render(vol_text, True, (255, 255, 255))
        screen.blit(vol_text_surface, (vol_bar_x + vol_bar_length + 10, vol_bar_y))
    elif show_brightness:
        brightness = wmi.WMI(namespace='root/WMI').WmiMonitorBrightness()[0].CurrentBrightness
        bright_bar_fill_length = int(brightness / 100 * bright_bar_length)
        pygame.draw.rect(screen, (255, 255, 0), (bright_bar_x, bright_bar_y, bright_bar_fill_length, bright_bar_height))
        # 显示亮度刻度值和当前亮度大小
        bright_text = f"Brightness: {brightness}%"
        bright_text_surface = pygame.font.SysFont(None, 24).render(bright_text, True, (255, 255, 255))
        screen.blit(bright_text_surface, (bright_bar_x + bright_bar_length + 10, bright_bar_y))

    pygame.display.flip()

    # 事件监听 若按q则退出程序
    for event in pygame.event.get():
        if event.type == pygame.KEYDOWN:
            if event.key == pygame.K_q:
                sys.exit(0)