Ubuntu22.04安装cuda,cudnn, 编译darknet
一,安装cuda:
1,下载及安装cuda
官网:https://developer.nvidia.com/cuda-toolkit-archive
wget https://developer.download.nvidia.com/compute/cuda/11.8.0/local_installers/cuda_11.8.0_520.61.05_linux.run
sudo sh cuda_11.8.0_520.61.05_linux.run`


因为之前已经安装过显卡驱动了,所以这里需要取消Driver(光标移动到Driver,然后按enter即可取消,不取消会导致安装终止),然后移动光标到Install,按enter执行安装

安装成功:
===========
= Summary =
===========

Driver:   Not Selected
Toolkit:  Installed in /usr/local/cuda-11.8/

Please make sure that
 -   PATH includes /usr/local/cuda-11.8/bin
 -   LD_LIBRARY_PATH includes /usr/local/cuda-11.8/lib64, or, add /usr/local/cuda-11.8/lib64 to /etc/ld.so.conf and run ldconfig as root

To uninstall the CUDA Toolkit, run cuda-uninstaller in /usr/local/cuda-11.8/bin
***WARNING: Incomplete installation! This installation did not install the CUDA Driver. A driver of version at least 520.00 is required for CUDA 11.8 functionality to work.
To install the driver using this installer, run the following command, replacing <CudaInstaller> with the name of this run file:
    sudo <CudaInstaller>.run --silent --driver

Logfile is /var/log/cuda-installer.log
2,设置环境变量
vim ~/.bashrc
export PATH=$PATH:/usr/local/cuda/bin
export LD_LIBRARY_PATH=$LD_LIBRARY_PATH:/usr/local/cuda/lib64
source ~/.bashrc
nvcc -V
二,安装cudnn
下载CUDA版本对应的cuDNN版本:
https://developer.nvidia.com/rdp/cudnn-archive#a-collapse805-111
相关文件复制到cuda目录下对应的文件夹:
tar -xvf cudnn-linux-x86_64-8.9.4.25_cuda11-archive.tar.xz

cd cudnn-linux-x86_64-8.9.4.25_cuda11-archive/
sudo cp include/cudnn*.h /usr/local/cuda-11.8/include
sudo cp lib/lib* /usr/local/cuda-11.8/lib64/
cat /usr/local/cuda/include/cudnn_version.h | grep CUDNN_MAJOR -A 2
MAJOR -A 2
#define CUDNN_MAJOR 8
#define CUDNN_MINOR 9
#define CUDNN_PATCHLEVEL 4
--
#define CUDNN_VERSION (CUDNN_MAJOR * 1000 + CUDNN_MINOR * 100 + CUDNN_PATCHLEVEL)

/* cannot use constexpr here since this is a C-only file */
三,编译darknet
1,下载
git: https://github.com/pjreddie/darknet
git clone https://github.com/pjreddie/darknet.git
cd darknet
2,修改makefile
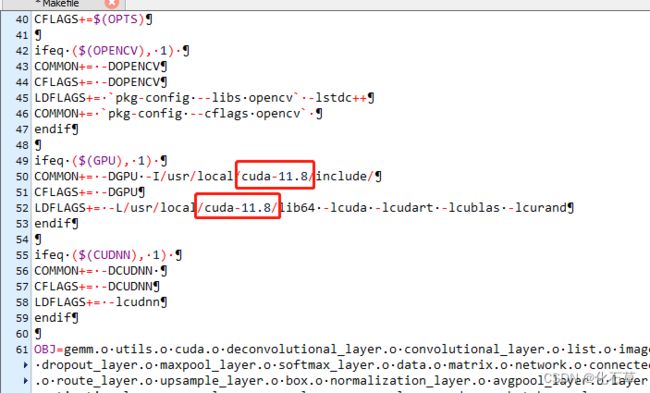
GPU 是否启用GPU1
CUDNN 是否启用CUDNN加速,若GPU = 1则CUDNN可选1或0;GPU=0则CUDNN=0
OPENCV 是否启用OpenCV,启用的话需先编译安装好,启用可支持对视频和图像流文件处理
OPENMP 是否启动多核CPU来加速Yolo,如果是用CPU训练,建议开启=1
DEBUG 表示编译的Yolo版本为是否为DEBUG版

安装的cuda路径要对应:
3,编译:
make
报错1:
./src/convolutional_layer.c:153:13: error: ‘CUDNN_CONVOLUTION_FWD_SPECIFY_WORKSPACE_LIMIT’ undeclared (first use in this function)
  153 |             CUDNN_CONVOLUTION_FWD_SPECIFY_WORKSPACE_LIMIT,
      |             ^~~~~~~~~~~~~~~~~~~~~~~~~~~~~~~~~~~~~~~~~~~~~
compilation terminated due to -Wfatal-errors.
make: *** [Makefile:89:obj/convolutional_layer.o] 错误 1
解决:
参考的https://blog.csdn.net/LHX19971114/article/details/126229887
使用https://github.com/arnoldfychen/darknet/tree/master/src代码中的convolutional_layer.c文件替换,解决
报错2:
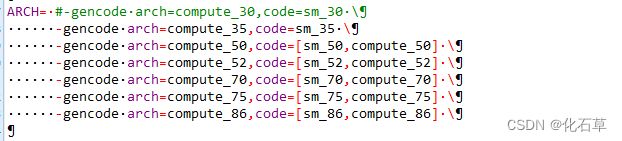
nvcc fatal   : Unsupported gpu architecture 'compute_30'
make: *** [Makefile:92:obj/convolutional_kernels.o] 错误 1
解决方法:修改Makefile配置
#去掉
#-gencode arch=compute_30,code=sm_30 \
#增加
-gencode arch=compute_70,code=[sm_70,compute_70]
-gencode arch=compute_75,code=[sm_75,compute_75]
-gencode arch=compute_86,code=[sm_86,compute_86]
测试
./darknet detect cfg/yolov3.cfg yolov3.weights data/dog.jpg
报错
CUDA Error: unknown error
darknet: ./src/cuda.c:36: check_error: Assertion `0' failed.
已放弃 (核心已转储)
参考:https://blog.csdn.net/weixin_47667342/article/details/111470019
均失败,觉得重装驱动,使用cuda上指定的驱动
重装cuda,(勾选驱动)
报错:
(Answer: Continue installation)
ERROR: The Nouveau kernel driver is currently in use by your system. This driver is incompatible with the NVIDIA driver, and must be disabled before proceeding. Please consult the NVIDIA driver README and your Linux distribution’s documentation for details on how to correctly disable the Nouveau kernel driver.
-> For some distributions, Nouveau can be disabled by adding a file in the modprobe configuration directory. Would you like nvidia-installer to attempt to create this modprobe file for you? (Answer: Yes)
-> One or more modprobe configuration files to disable Nouveau have been written. For some distributions, this may be sufficient to disable Nouveau; other distributions may require modification of the initial ramdisk. Please r@@@
解决:
这个错误提示表明 Nouveau 内核驱动程序与 NVIDIA 驱动程序不兼容,需要在继续安装之前禁用它
echo "blacklist nouveau" >> /etc/modprobe.d/blacklist-nouveau.conf
echo "options nouveau modeset=0" >> /etc/modprobe.d/blacklist-nouveau.conf
update-initramfs -u
reboot
重新编译:
测试ok
...
   97 upsample            2x    38 x  38 x 128   ->    76 x  76 x 128
   98 route  97 36
   99 conv    128  1 x 1 / 1    76 x  76 x 384   ->    76 x  76 x 128  0.568 BFLOPs
  100 conv    256  3 x 3 / 1    76 x  76 x 128   ->    76 x  76 x 256  3.407 BFLOPs
  101 conv    128  1 x 1 / 1    76 x  76 x 256   ->    76 x  76 x 128  0.379 BFLOPs
  102 conv    256  3 x 3 / 1    76 x  76 x 128   ->    76 x  76 x 256  3.407 BFLOPs
  103 conv    128  1 x 1 / 1    76 x  76 x 256   ->    76 x  76 x 128  0.379 BFLOPs
  104 conv    256  3 x 3 / 1    76 x  76 x 128   ->    76 x  76 x 256  3.407 BFLOPs
  105 conv    255  1 x 1 / 1    76 x  76 x 256   ->    76 x  76 x 255  0.754 BFLOPs
  106 yolo
Loading weights from models/yolov3.weights...Done!
data/dog.jpg: Predicted in 0.023867 seconds.
dog: 100%
truck: 91%
bicycle: 100%