springboot2.x集成websocket,Vue2.x使用websocket,完整前后分离通信demo
前言
什么是websocket
websocket协议
WebSocket protocol 是HTML5一种新的协议。它实现了浏览器与服务器全双工通信(full-duple)。一开始的握手需要借助HTTP请求完成。
通俗的来讲,websocket是客户端与服务端建立连接之后,客户端可以监听到服务端发来的消息,服务端也可以监听到客户端发来的消息。
java后端构建websocket服务
1.依赖引入
        <dependency>
            <groupId>org.springframework.bootgroupId>
            <artifactId>spring-boot-starter-websocketartifactId>
        dependency>
2.启动类开启websocket支持
@SpringBootApplication
@EnableWebSocket
public class WebSocketApplication extends SpringBootServletInitializer {
	// code...
}
3.websocket配置类
import org.springframework.context.annotation.Bean;
import org.springframework.context.annotation.Configuration;
import org.springframework.web.socket.server.standard.ServerEndpointExporter;

@Configuration
public class WebSocketConfig {

    /**
     * 初始化Bean,它会自动注册使用了 @ServerEndpoint 注解声明的 WebSocket endpoint
     * @return
     */
    @Bean
    public ServerEndpointExporter serverEndpointExporter() {
        return new ServerEndpointExporter();
    }
}
4.websocket服务端
注意此处的Session是websocket包下的session
import com.deepocean.device.websocket.utils.WsSessionUtils;
import org.springframework.stereotype.Controller;

import javax.websocket.*;
import javax.websocket.server.PathParam;
import javax.websocket.server.ServerEndpoint;

@Controller
@ServerEndpoint("/webSocket/{deviceId}")
public class WebSocketController {


    /**
     * 连接建立成功调用的方法
     *
     */
    @OnOpen
    public void onOpen(@PathParam("deviceId")String deviceId, Session session) {
        WsSessionUtils.putSession(deviceId, session);
        System.out.println("连接加入");
    }

    /**
     * 关闭连接的方法
     */
    @OnClose
    public void onClose(Session session) {
        WsSessionUtils.sessionMap.remove(session);
        System.out.println("连接关闭");
    }

    /**
     * 接受到消息的方法
     */
    @OnMessage
    public void onMessage(String message, Session session) {}

    @OnError
    public void onError(Session session, Throwable error) {

    }
}
5.websocket的session操作、存储工具类
import org.springframework.util.StringUtils;

import javax.websocket.Session;
import java.util.Map;
import java.util.concurrent.ConcurrentHashMap;

public class WsSessionUtils {
    public static Map<String, Session> sessionMap = new ConcurrentHashMap<>();

    public static Session getSession(String deviceId) {
        if (StringUtils.isEmpty(deviceId)) {
            return null;
        }
        return sessionMap.get(deviceId);
    }
    public static boolean putSession(String deviceId, Session session) {
        if (StringUtils.isEmpty(deviceId) || null == session) {
            return false;
        }
        sessionMap.put(deviceId, session);
        return true;
    }

    public static boolean removeSession(String deviceId) {
        if (StringUtils.isEmpty(deviceId)) {
            return false;
        }
        sessionMap.remove(deviceId);
        return true;
    }
}
VUE前端构建Websocket连接组件
注意:如何后端tomcat配置了 servelet.context-path,那么前端发起连接的时候也应该带上,如下面代码的url中的 /WebSocketService就是context-path
<template>
  <div>
      <h2 style="color: white">websocket测试</h2>
      <ul style="color: white; font-size: 20px">
        <li v-for="(value, index) in list" :key="index">{{value}}</li>
      </ul>
  </div>

</template>

<script>
export default {
    name: "DeviceWebSocket",
    data() {
        return {
            websocket: "",
            list: []
        }
    },
    methods: {
        initWebSocket() {
          let url = "ws://127.0.0.1:8088/WebSocketService/webSocket/dfsaf44";
          this.websocket = new WebSocket(url);
          // 监听socket连接
           this.websocket.onopen = this.open
          // 监听socket错误信息
          this.websocket.onerror = this.error
          // 监听socket消息
          this.websocket.onmessage = this.getMessage
        },
        open() {
          console.log("socket连接成功")
        },
        getMessage(msg) {
          this.list.push(msg.data)
          console.log(msg.data)
        },
        error() {
          console.log("连接错误")
        },
        sendMsg() {
          this.websocket.send("123")
          console.log("发送消息")
        },
    },
    mounted() {
        this.initWebSocket();

    },
    destroyed () {
        // 关闭连接
        this.socket.close();
    }
}
</script>

<style>

</style>
效果
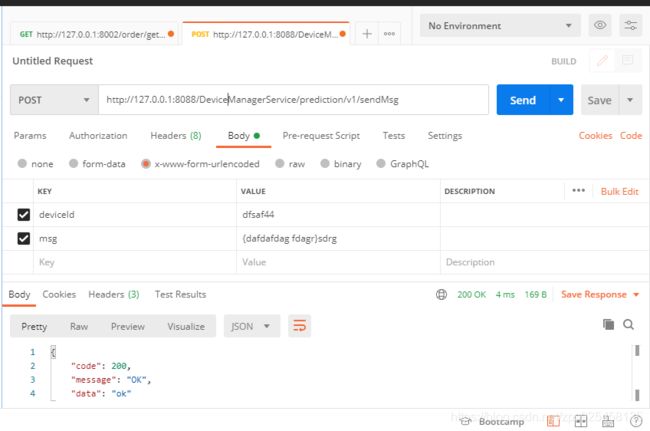
postman发送数据,后端接收数据之后,通过deviceId获取对应websocket连接的session;并调用send方法。

前端会实时的接受到后端推送过来的消息,并展示