跳表详解和实现|深挖Redis底层数据结构
文章目录
- 跳表
-
- 前言
- 项目代码仓库
- 认识跳表
- 跳表的实现思路
- 跳表性能分析
- 对比平衡树(avl和红黑树)和哈希表
- 使用手册
-
- 成员变量
- 成员函数
-
- 构造
- 析构
- 迭代器
- `size`
- `clear`
- `empty`
- `operator=`
- `find`
- `insert`
- `erase`
- 跳表细节实现
-
- 节点定义
- 跳表结构定义
- 构造、析构、拷贝构造和赋值重载
- `size()`
- 查找接口
- `insert`接口
- `erase`接口
- 迭代器设计
跳表
前言
博主在这边博客,会带着大家实现跳表。我是按照stl容器的格式和风格来进行设计的,实现的是一个类模版,支持迭代器遍历等stl风格的功能,支持跳表的增删查功能。
这里分享我的一些博客专栏,都是干货满满的。
- 手撕数据结构专栏
- 高质量博客专栏
项目代码仓库
- CPlusPlus-review-main/tree/master/skip_list
认识跳表
增加了向前指针的链表叫作跳表。跳表全称叫做跳跃表,简称跳表。跳表是一个随机化的数据结构,实质就是一种可以进行二分查找的有序链表。跳表在原有的有序链表上面增加了多级索引,通过索引来实现快速查找。跳表不仅能提高搜索性能,同时也可以提高插入和删除操作的性能。
跳表是一个随机化的数据结构,可以被看做二叉树的一个变种,它在性能上和红黑树,AVL树不相上下,但是跳表的原理非常简单,目前在Redis和LeveIDB中都有用到。
它采用随机技术决定链表中哪些节点应增加向前指针以及在该节点中应增加多少个指针。跳表结构的头节点需有足够的指针域,以满足可能构造最大级数的需要,而尾节点不需要指针域。
采用这种随机技术,跳表中的搜索、插入、删除操作的时间均为O(logn),然而,最坏情况下时间复杂性却变成O(n)。相比之下,在一个有序数组或链表中进行插入/删除操作的时间为O(n),最坏情况下为O(n)。
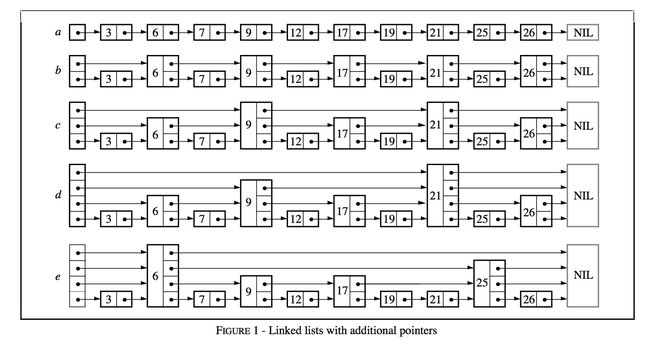
跳表的结构如图所示。
跳表的实现思路
- 假如我们每相邻两个节点升高一层,增加一个指针,让指针指向下下个节点,如下图所示。这样所有新增加的指针连成了一个新的链表,但它包含的节点个数只有原来的一半。由 于新增加的指针,我们不再需要与链表中每个节点逐个进行比较了,需要比较的节点数大概 只有原来的一半。
- 以此类推,我们可以在第二层新产生的链表上,继续为每相邻的两个节点升高一层,增加一个指针,从而产生第三层链表。如下图c,这样搜索效率就进一步提高了。
- 跳表正是受这种多层链表的想法的启发而设计出来的。实际上,按照上面生成链表的方 式,上面每一层链表的节点个数,是下面一层的节点个数的一半,这样查找过程就非常类似 二分查找,使得查找的时间复杂度可以降低到O(log n)。但是这个结构在插入删除数据的时 候有很大的问题,插入或者删除一个节点之后,就会打乱上下相邻两层链表上节点个数严格 的2:1的对应关系。如果要维持这种对应关系,就必须把新插入的节点后面的所有节点(也 包括新插入的节点)重新进行调整,这会让时间复杂度重新蜕化成O(n)。
- 跳表的设计为了避免这种问题,做了一个大胆的处理,不再严格要求对应比例关系,而是 插入一个节点的时候随机出一个层数。这样每次插入和删除都不需要考虑其他节点的层数, 这样就好处理多了。
跳表性能分析
上面我们说到,skiplist插入一个节点时随机出一个层数,听起来怎么这么随意,如何保证搜索时的效率呢?
这里首先要细节分析的是这个随机层数是怎么来的。一般跳表会设计一个最大层数maxLevel的限制,其次会设置一个多增加一层的概率p。那么计算这个随机层数的伪代码如下:
randomLevel()
	|v| := 1
	-- random() that returns a random value in [0,1)
	while random() < p and |v| < MaxLevel do
		|v| := |v| + 1
	return |v|
根据前面randomLevel()的伪码,我们很容易看出,产生越高的节点层数,概率越低。定量的分析如下可以算出定量的式子。
根据前面randomLevel()的伪码,我们很容易看出,产生越高的节点层数,概率越低。定量的分析如下:
- 节点层数至少为1。而大于1的节点层数,满足一个概率分布。
- 节点层数恰好等于1的概率为1-p。
- 节点层数大于等于2的概率为p,而节点层数恰好等于2的概率为p(1-p)。
- 节点层数大于等于3的概率为p2,而节点层数恰好等于3的概率为p2(1-p)。
- 节点层数大于等于4的概率为p3,而节点层数恰好等于4的概率为p3(1-p)。
- ……
因此,一个节点的平均层数(也即包含的平均指针数目),计算如下:
1 × ( 1 − p ) + 2 p ( 1 − p ) + 3 p 2 ( 1 − p ) + 4 p 3 ( 1 − p ) + … = ( 1 − p ) ∑ k = 1 + ∞ k p k − 1 = ( 1 − p ) ⋅ 1 ( 1 − p ) 2 = 1 1 − p 1 \times(1-p)+2 p(1-p)+3 p^{2}(1-p)+4 p^{3}(1-p)+\ldots=(1-p) \sum_{k=1}^{+\infty} k p^{k-1}=(1-p) \cdot \frac{1}{(1-p)^{2}}=\frac{1}{1-p} 1×(1−p)+2p(1−p)+3p2(1−p)+4p3(1−p)+…=(1−p)k=1∑+∞kpk−1=(1−p)⋅(1−p)21=1−p1
在Redis的跳表实现中,这两个参数的取值如下。(Redis是nosql数据库,不是常规关系型的,而是kv类型的数据库,一般用来做缓存)
p = 1/4
maxLevel = 32
跳表的平均时间复杂度为O(logN),这个推导的过程较为复杂,需要有一定的数学功底。
对比平衡树(avl和红黑树)和哈希表
跳表相比平衡搜索树(AVL树和红黑树)对比,都可以做到遍历数据有序,时间复杂度也差不多。
跳表的优势是:
- 跳表实现简单,容易控制。平衡树增删查改遍历都更复杂。
- 跳表的额外空间消耗更低。平衡树节点存储每个值有三叉链,平衡因子/颜色等消耗。跳表中p=1/2时,每个节点所包含的平均指针数目为2;跳表中p=1/4时,每个节点所包 含的平均指针数目为1.33。
跳表相比哈希表而言,就没有那么大的优势了。相比而言
- 哈希表冲突不严重的时候,哈希表平均时间复杂度是O(1),比跳表快。
- 哈希表空间消耗略多一点。
- 但跳表遍历数据有序
- 跳表空间消耗略小一点,哈希表存在链接指针和表空间消耗。
- 哈希表扩容有性能损耗
- 哈希表再极端场景下哈希冲突高,效率下降厉害,需要红黑树补足接力。
Redis为什么用skiplist而不用平衡树?
在前面我们对于skiplist和平衡树、哈希表的比较中,其实已经不难看出Redis里使用skiplist而不用平衡树的原因了。现在我们看看,对于这个问题,Redis的作者 @antirez 是怎么说的:
There are a few reasons: (cited from https://news.ycombinator.com/item?id=1171423)
- They are not very memory intensive. It’s up to you basically. Changing parameters about the probability of a node to have a given number of levels will make then less memory intensive than btrees.
- A sorted set is often target of many ZRANGE or ZREVRANGE operations, that is, traversing the skip list as a linked list. With this operation the cache locality of skip lists is at least as good as with other kind of balanced trees.
- They are simpler to implement, debug, and so forth. For instance thanks to the skip list simplicity I received a patch (already in Redis master) with augmented skip lists implementing ZRANK in O(log(N)). It required little changes to the code.

使用手册
template <class key_type, class value_type> class skip_list;
跳表中的元素不允许重复。
成员变量
| 成员变量名 | 成员变量定义 | note |
|---|---|---|
key_type |
第一个模版参数 | key-value数据中的key |
value_type |
第二个模版参数 | key-value数据中的value |
iterator |
一个单向迭代器 | |
const_iterator |
const单向迭代器 |
成员函数
构造
skip_list();
template <class InputIterator>
skip_list(InputIterator first, InputIterator last);
skip_list(const std::initializer_list<std::pair<key_type, value_type>> &init_list);
skip_list(const skip_list<key_type, value_type> &lst)
三种构造方式:
- 无参数构造
- 迭代器区间构造
- 初始化列表构造
- 拷贝构造
析构
~skip_list();
析构时释放所有节点。
迭代器
iterator begin(); // 返回第一个元素的迭代器
iterator end();		// 返回最后一个元素的下一个位置的迭代器
const_iterator begin() const // 返回第一个元素的const迭代器
const_iterator end() const	 // 返回最后一个元素的下一个位置的const迭代器
size
size_t size() const;
返回跳表元素个数。
clear
void clear();
清除跳表中所有元素。
empty
bool empty() const;
判断跳表是否为空,如果为空,返回true,否则返回false。
operator=
skip_list<key_type, value_type> &operator=(const skip_list<key_type, value_type> &lst);
赋值重载,把另一个跳表的值复制到当前跳表中。
find
std::pair<value_type, bool> find(key_type target);
在跳表中查找键为target的元素,查找的平均效率为O(logn)。
返回找到的键为target的元素对应的值和表示查找是否成功的bool值所构成的pair。
insert
bool insert(std::pair<key_type, value_type> kv);
插入一个kv结构,返回值表示是否插入成功。
erase
bool erase(key_type key);
删除键为key的节点,返回值表示是否删除成功。
跳表细节实现
这一部分是我对跳表的实现细节。
节点定义
template <class key_type, class value_type>
struct __skip_list_node
{
public:
    std::pair<key_type, value_type> __kv;
    std::vector<__skip_list_node *> __next_vector;

public:
    __skip_list_node(const std::pair<key_type, value_type> &kv, int level)
        : __kv(kv), __next_vector(level, nullptr) {}
};
两个字段,一个就是数据,是kv结构,用pair来存,第二个就是指针的数组,用vector来存放。
这个节点具体有几层,通过上层封装来决定。
跳表结构定义
template <class key_type, class value_type>
class skip_list
{
private:
    typedef __skip_list_node<key_type, value_type> Node;
    Node *__head;
    size_t __max_level = 32; // 就按照redis的给吧,给个32,概率给个0.25
    double __p = 0.25;
    size_t __size = 0;
public:
  	// ...
}
__max_level和__p分别代表跳表的最大层数和增加一层的概率,这里的设计我是按照redis来做的。
__size用来控制跳表元素的个数,在insert和erase中去设置就行了。
然后要设置头节点__head。
构造、析构、拷贝构造和赋值重载
构造提供了三种形式:
- 无参的
default构造 - 迭代器区间构造
- 初始化列表构造
skip_list() { __empty_initialize(); }
template <class InputIterator>
skip_list(InputIterator first, InputIterator last)
{
    __empty_initialize();
    __iterator_initialize(first, last);
}
skip_list(const std::initializer_list<std::pair<key_type, value_type>> &init_list)
{
    __empty_initialize();
    __iterator_initialize(init_list.begin(), init_list.end());
}
这三个函数涉及到__empty_initialize()和__iterator_initialize()这两个函数,作用分别为,空初始化(初始化头节点)和用迭代器区间的初始化。
实现如下所示,实现很简单。
void __empty_initialize() { __head = new Node({-1, -1}, 1); }
template <class iterator_type>
void __iterator_initialize(iterator_type first, iterator_type last)
{
    while (first != last)
        insert(*first++);
}
析构函数如下所示,要调用clear()接口,清除所有的节点,最后再释放头节点即可。
~skip_list()
{
    clear();
    delete __head;
}
clear()的作用是释放头节点。
void clear()
{
    Node *cur = __head->__next_vector[0]; // 指向第一个节点
    while (cur)
    {
        Node *node_to_free = cur;
        cur = cur->__next_vector[0];
        delete node_to_free;
    }
    // 这几步记得弄一下
    __size = 0;
    __head->__next_vector.resize(1);
    __head->__next_vector[0] = nullptr;
}
遍历跳表的时候只需要遍历最下面一层即可,最下面一层上遍历才能保证遍历到所有的节点。
拷贝构造和赋值重载都是复用前面的__empty_initialize()和__iterator_initialize()就行了。
skip_list(const skip_list<key_type, value_type> &lst)
{
    __empty_initialize();
    __iterator_initialize(lst.begin(), lst.end());
}
skip_list<key_type, value_type> &operator=(const skip_list<key_type, value_type> &lst)
{
    clear();
    __iterator_initialize(lst.begin(), lst.end());
    return *this;
}
size()
size_t size() const { return __size; }
查找接口
查找接口就是两个原则:
- 从左上角开始查找,如果本层的next存在,而且target还比这个next的值还大,继续向右走
- 如果本层的next不存在,或者target比较小,那么要向下跳了
std::pair<value_type, bool> find(key_type target)
{
    Node *cur = __head;
    int level = __head->__next_vector.size() - 1; // 这个就是最高层数
    /* 这个level不要用 size_t 因为有可能减到 -1 去 */
    while (level >= 0)
    {
        // 下一个位置存在 && target比下一个位置要大,继续跳,向右走
        if (cur->__next_vector[level] && cur->__next_vector[level]->__kv.first < target)
            cur = cur->__next_vector[level]; // 向右走
        // 下一个位置不存在 || target比下一个位置要小,不跳了,向下走
        else if (cur->__next_vector[level] == nullptr || cur->__next_vector[level]->__kv.first > target)
            --level; // 向下走
        else
            return {cur->__next_vector[level]->__kv.second, true};
    }
    return {value_type(), false};
}
insert接口
insert接口的关键,就是找到prev_vector指针向量,这个非常重要,我封装到了__find_prev_vector接口里面。
这个接口:寻找待插入数据的前驱指针,这个这个向量里面的指针不一定是同一个Node里面的指针,有可能是不同Node里面的,如图所示。

如果找到prev_vector指针数组后,还有三个步骤:
- 确认插入的值在跳表中还没有
- 生成随机层数
- 更改链接关系
bool insert(std::pair<key_type, value_type> kv)
{
    __size++; // 计数器++
    /*
        关键是:要找到插入位置的每一层的前面的一系列指针
        但是注意,这一系列指针不一定在同一个vector里面
        因为层数是不知道的,所以这个prev_vector的高度一定先初始化为最高(当前最高,不是只maxLevel)
    */
    std::vector<Node *> prev_vector = __find_prev_vector(kv.first);
    if (prev_vector[0]->__next_vector[0] && prev_vector[0]->__next_vector[0]->__kv.first == kv.first)
        return false; // 说明已经有这个key了
    int n = __random_level();
    Node *newnode = new Node(kv, n);
    // 如果 n 比 head 高,head层数不够怎么办
    if (n > __head->__next_vector.size())
    {
        __head->__next_vector.resize(n, nullptr); // 如果n比head高才升高
        prev_vector.resize(n, __head);
    }
    // 连接前后节点
    for (size_t i = 0; i < n; i++)
    {
        newnode->__next_vector[i] = prev_vector[i]->__next_vector[i];
        prev_vector[i]->__next_vector[i] = newnode;
    }
    return true;
}
__find_prev_vector如下所示。
std::vector<Node *> __find_prev_vector(key_type key)
{
    Node *cur = __head;
    int level = __head->__next_vector.size() - 1;
    std::vector<Node *> prev_vector(level + 1, __head);
    while (level >= 0)
    {
        if (cur->__next_vector[level] && cur->__next_vector[level]->__kv.first < key)
            cur = cur->__next_vector[level];
        else if (cur->__next_vector[level] == nullptr || cur->__next_vector[level]->__kv.first >= key)
        {
            // 不仅要向下走,还要更新prev_vector
            prev_vector[level] = cur;
            --level;
        }
    }
    return prev_vector;
}
erase接口
同样也要调用__find_prev_vector来找到prev_vector。
找到之后,检查元素在不在,然后更新链接关系就可以了
bool erase(key_type key)
{
    // 同样也是找到每一层的前一个
    // 删掉之后链接起来就可以了,不用考虑别人
    std::vector<Node *> prev_vector = __find_prev_vector(key);
    // 看最下面的这一层就行了,如果最下面的prev_vector指向空,说明找到最右边也没找到
    // 如果最下面这一层的下一个的val不是对应的值,也不对了,说明找不到了
    // 而且最下面这一层的下一个的val一定是大于num的,如果找不到的话
    if (prev_vector[0]->__next_vector[0] == nullptr || prev_vector[0]->__next_vector[0]->__kv.first != key)
        return false;
    Node *del = prev_vector[0]->__next_vector[0]; // 最下面这一层的下一个
    for (size_t i = 0; i < del->__next_vector.size(); i++)
        prev_vector[i]->__next_vector[i] = del->__next_vector[i];
    // 这样就可以了
    delete del;
    // 检查一下是否删除的是最高的节点
    /* 如果头节点的最高层指向的是空,那么这一层就可以删掉了 */
    while (__head->__next_vector.size() > 1 && __head->__next_vector[__head->__next_vector.size() - 1] == nullptr)
        __head->__next_vector.pop_back();
    --__size;
    return true;
}
迭代器设计
迭代器设计是按照stl的风格来进行设计的,思路也是比较简单的。
template <class key_type, class value_type, class pair_type> /*有可能是const的也有可能不是const的*/
struct __skip_list_iterator
{
public:
    typedef __skip_list_node<key_type, value_type> Node;
    typedef __skip_list_iterator<key_type, value_type, pair_type> self;
    Node *__node;
    __skip_list_iterator(Node *node)
        : __node(node) {}
    // key肯定是不能改的,一定要const
    // value可以改, 假设是int, 那么这个value_type可能是int, 也可能是const int
public:
    bool operator!=(const self &it) const { return __node != it.__node; }
    bool operator==(const self &it) const { return __node == it.__node; }

public:
    pair_type &operator*() { return __node->__kv; }
    pair_type *operator->() { return &(operator*()); }
    // 只有单向迭代器
    self operator++()
    {
        // 注意,这个是前置++
        // ++ 返回的还是一个迭代器
        __node = __node->__next_vector[0];
        return *this;
    }
    self operator++(int)
    {
        self tmp(*this);
        __node = __node->__next_vector[0];
        return tmp;
    }
};
template <class key_type, class value_type>
class skip_list
{
public:
    typedef __skip_list_iterator<key_type, value_type, std::pair<key_type, value_type>> iterator; // key要带上const,因为key是不能改的!
    typedef __skip_list_iterator<key_type, value_type, const std::pair<key_type, value_type>> const_iterator;
    iterator begin() { return iterator(__head->__next_vector[0]); }
    iterator end() { return iterator(nullptr); }
    const_iterator begin() const { return const_iterator(__head->__next_vector[0]); }
    const_iterator end() const { return const_iterator(nullptr); }
public:
  	// ...
};