Sharding-JDBC之RangeShardingAlgorithm(范围分片算法)
目录
-
- 一、简介
- 二、maven依赖
- 三、数据库
-
- 3.1、创建数据库
- 3.2、创建表
- 四、配置(二选一)
-
- 4.1、properties配置
- 4.2、yml配置
- 五、范围分片算法
- 六、实现
-
- 6.1、实体层
- 6.2、持久层
- 6.3、服务层
- 6.4、测试类
-
- 6.4.1、保存订单数据
- 6.4.2、根据时间范围查询订单
一、简介
在我之前的文章里,实际工作中,数据量都不是很好去预估,采用取模等方式非常不好扩展,比如增加服务器,数据得重新迁移。只有采用时间分片时会稍微比较好管理数据,使用时间分片,所以要用到这里的范围分片算法: RangeShardingAlgorithm 。
我们就以订单时间分片,按月分表。本文示例大概架构如下图:

二、maven依赖
pom.xml
<project xmlns="http://maven.apache.org/POM/4.0.0" xmlns:xsi="http://www.w3.org/2001/XMLSchema-instance"
         xsi:schemaLocation="http://maven.apache.org/POM/4.0.0 https://maven.apache.org/xsd/maven-4.0.0.xsd">
    <modelVersion>4.0.0modelVersion>
    <parent>
        <groupId>org.springframework.bootgroupId>
        <artifactId>spring-boot-starter-parentartifactId>
        <version>2.6.0version>
        <relativePath/>
    parent>
    <groupId>com.aliangroupId>
    <artifactId>sharding-jdbcartifactId>
    <version>0.0.1-SNAPSHOTversion>
    <name>sharding-jdbcname>
    <description>sharding-jdbcdescription>

    <properties>
        <java.version>1.8java.version>
    properties>

    <dependencies>
        <dependency>
            <groupId>org.springframework.bootgroupId>
            <artifactId>spring-boot-starter-webartifactId>
        dependency>

        <dependency>
            <groupId>org.springframework.bootgroupId>
            <artifactId>spring-boot-starter-data-jpaartifactId>
        dependency>

        <dependency>
            <groupId>org.apache.shardingspheregroupId>
            <artifactId>sharding-jdbc-spring-boot-starterartifactId>
            <version>4.1.1version>
        dependency>

        <dependency>
            <groupId>com.alibabagroupId>
            <artifactId>druidartifactId>
            <version>1.2.15version>
        dependency>

        <dependency>
            <groupId>mysqlgroupId>
            <artifactId>mysql-connector-javaartifactId>
            <version>8.0.26version>
            <scope>runtimescope>
        dependency>

        <dependency>
            <groupId>org.springframework.bootgroupId>
            <artifactId>spring-boot-starter-testartifactId>
            <scope>testscope>
        dependency>

        <dependency>
            <groupId>org.projectlombokgroupId>
            <artifactId>lombokartifactId>
            <version>1.18.20version>
        dependency>

        <dependency>
            <groupId>junitgroupId>
            <artifactId>junitartifactId>
            <version>4.12version>
            <scope>testscope>
        dependency>

    dependencies>

    <build>
        <plugins>
            <plugin>
                <groupId>org.springframework.bootgroupId>
                <artifactId>spring-boot-maven-pluginartifactId>
            plugin>
        plugins>
    build>

project>
有些小伙伴的 druid 可能用的是 druid-spring-boot-starter
<dependency>
    <groupId>com.alibabagroupId>
    <artifactId>druid-spring-boot-starterartifactId>
    <version>1.2.6version>
dependency>
然后出现可能使用不了的各种问题,这个时候你只需要在主类上添加 @SpringBootApplication(exclude = {DruidDataSourceAutoConfigure.class}) 即可
package com.alian.shardingjdbc;

import com.alibaba.druid.spring.boot.autoconfigure.DruidDataSourceAutoConfigure;
import org.springframework.boot.SpringApplication;
import org.springframework.boot.autoconfigure.SpringBootApplication;

@SpringBootApplication(exclude = {DruidDataSourceAutoConfigure.class})
@SpringBootApplication
public class ShardingJdbcApplication {

    public static void main(String[] args) {
        SpringApplication.run(ShardingJdbcApplication.class, args);
    }

}
三、数据库
3.1、创建数据库
CREATE DATABASE `sharding_8` DEFAULT CHARACTER SET utf8mb4 COLLATE utf8mb4_general_ci;
3.2、创建表
在数据库sharding_8创建表:tb_order_202301、tb_order_202302、tb_order_202303、tb_order_202304、tb_order_202305、tb_order_202306、tb_order_202307、tb_order_202308、tb_order_202309、tb_order_202310、tb_order_202311、tb_order_202312的结构是一样的
tb_order_202301
CREATE TABLE `tb_order_202301` (
  `order_id` bigint(20) NOT NULL COMMENT '主键',
  `user_id` int unsigned NOT NULL DEFAULT '0' COMMENT '用户id',
  `price` int unsigned NOT NULL DEFAULT '0' COMMENT '价格(单位:分)',
  `order_status` tinyint unsigned NOT NULL DEFAULT '1' COMMENT '订单状态(1:待付款,2:已付款,3:已取消)',
  `order_time` datetime NOT NULL DEFAULT CURRENT_TIMESTAMP COMMENT '创建时间',
  `title` varchar(100)  NOT NULL DEFAULT '' COMMENT '订单标题',
  PRIMARY KEY (`order_id`),
  KEY `idx_user_id` (`user_id`),
  KEY `idx_order_time` (`order_time`)
) ENGINE=InnoDB DEFAULT CHARSET=utf8mb4 COMMENT='订单表';
其他表的创建就省略了。
四、配置(二选一)
4.1、properties配置
application.properties
server.port=8899
server.servlet.context-path=/sharding-jdbc

# 允许定义相同的bean对象去覆盖原有的
spring.main.allow-bean-definition-overriding=true
# 数据源名称,多数据源以逗号分隔
spring.shardingsphere.datasource.names=ds1
# sharding_1数据库连接池类名称
spring.shardingsphere.datasource.ds1.type=com.alibaba.druid.pool.DruidDataSource
# sharding_1数据库驱动类名
spring.shardingsphere.datasource.ds1.driver-class-name=com.mysql.cj.jdbc.Driver
# sharding_1数据库url连接
spring.shardingsphere.datasource.ds1.url=jdbc:mysql://192.168.0.129:3306/sharding_8?serverTimezone=GMT%2B8&characterEncoding=utf8&useUnicode=true&useSSL=false&zeroDateTimeBehavior=CONVERT_TO_NULL&autoReconnect=true&allowMultiQueries=true&failOverReadOnly=false&connectTimeout=6000&maxReconnects=5
# sharding_1数据库用户名
spring.shardingsphere.datasource.ds1.username=alian
# sharding_1数据库密码
spring.shardingsphere.datasource.ds1.password=123456

# 指定库分片策略
spring.shardingsphere.sharding.default-data-source-name=ds1
# 指定tb_order表的数据分布情况,配置数据节点,使用Groovy的表达式
spring.shardingsphere.sharding.tables.tb_order.actual-data-nodes=ds1.tb_order_$->{2023..2023}0$->{1..9},ds1.tb_order_$->{2023..2023}1$->{0..2}

# 采用标准分片策略:StandardShardingStrategy
# 指定tb_order表的分片策略中的分片键
spring.shardingsphere.sharding.tables.tb_order.table-strategy.standard.sharding-column=order_time
# 指定tb_order表的分片策略中的分片算法全类路径的名称
spring.shardingsphere.sharding.tables.tb_order.table-strategy.standard.precise-algorithm-class-name=com.alian.shardingjdbc.algorithm.OrderTimeShardingAlgorithm
spring.shardingsphere.sharding.tables.tb_order.table-strategy.standard.range-algorithm-class-name=com.alian.shardingjdbc.algorithm.OrderTimeShardingAlgorithm

# 指定tb_order表的主键为order_id
spring.shardingsphere.sharding.tables.tb_order.key-generator.column=order_id
# 指定tb_order表的主键生成策略为SNOWFLAKE
spring.shardingsphere.sharding.tables.tb_order.key-generator.type=SNOWFLAKE
# 指定雪花算法的worker.id
spring.shardingsphere.sharding.tables.tb_order.key-generator.props.worker.id=100
# 指定雪花算法的max.tolerate.time.difference.milliseconds
spring.shardingsphere.sharding.tables.tb_order.key-generator.props.max.tolerate.time.difference.milliseconds=20

# 打开sql输出日志
spring.shardingsphere.props.sql.show=true
4.2、yml配置
application.yml
server:
  port: 8899
  servlet:
    context-path: /sharding-jdbc

spring:
  main:
    # 允许定义相同的bean对象去覆盖原有的
    allow-bean-definition-overriding: true
  shardingsphere:
    props:
      sql:
       # 打开sql输出日志
       show: true
    datasource:
      # 数据源名称,多数据源以逗号分隔
      names: ds1
      ds1:
        # 数据库连接池类名称
        type: com.alibaba.druid.pool.DruidDataSource
        # 数据库驱动类名
        driver-class-name: com.mysql.cj.jdbc.Driver
        # 数据库url连接
        url: jdbc:mysql://192.168.0.129:3306/sharding_8?serverTimezone=GMT%2B8&characterEncoding=utf8&useUnicode=true&useSSL=false&zeroDateTimeBehavior=CONVERT_TO_NULL&autoReconnect=true&allowMultiQueries=true&failOverReadOnly=false&connectTimeout=6000&maxReconnects=5
        # 数据库用户名
        username: alian
        # 数据库密码
        password: 123456
    sharding:
      # 未配置分片规则的表将通过默认数据源定位
      default-data-source-name: ds1
      tables:
        tb_order:
          # 由数据源名 + 表名组成,以小数点分隔。多个表以逗号分隔,支持inline表达式
          actual-data-nodes: ds1.tb_order_$->{2023..2023}0$->{1..9},ds1.tb_order_$->{2023..2023}1$->{0..2}
          # 分表策略
          table-strategy:
            # 行表达式分片策略
            standard:
              # 分片键
              sharding-column: order_time
              # 精确分片算法类名称,用于=和IN
              precise-algorithm-class-name: com.alian.shardingjdbc.algorithm.OrderTimeShardingAlgorithm
              # 范围分片算法类名称,用于BETWEEN
              range-algorithm-class-name: com.alian.shardingjdbc.algorithm.OrderTimeShardingAlgorithm
          # key生成器
          key-generator:
            # 自增列名称,缺省表示不使用自增主键生成器
            column: order_id
            # 自增列值生成器类型,缺省表示使用默认自增列值生成器(SNOWFLAKE/UUID)
            type: SNOWFLAKE
            # SnowflakeShardingKeyGenerator
            props:
              # SNOWFLAKE算法的worker.id
              worker:
                id: 100
              # SNOWFLAKE算法的max.tolerate.time.difference.milliseconds
              max:
                tolerate:
                  time:
                    difference:
                      milliseconds: 20
- 通过范围分片算法完成分表,分片键是: order_time
- table-strategy 采用的是 精确分片策略 和 范围分片策略 ,算法实现类是我们自定义的类 com.alian.shardingjdbc.algorithm.OrderTimeShardingAlgorithm ;数据插入时是 精确分片策略 ,数据查询时是采用 范围分片策略
- actual-data-nodes 使用Groovy的表达式 就是表示2023年每个月一个表
- key-generator :key生成器,需要指定字段和类型,比如这里如果是SNOWFLAKE,最好也配置下props中的两个属性: worker.id 与 max.tolerate.time.difference.milliseconds 属性
五、范围分片算法
在行表示式分片策略中,基本上只需要配置行表示即可,不需要我们开发java,如果有一些比较特殊的要求,表达式很复杂或者是没办法使用表达式,假设我要求根据 userId 进行分库,要满足:
使用行表示就很复杂,我们就可以使用自定义分片算法,这里采用精确分片算法。
DatabasePreciseShardingAlgorithm.java
Slf4j
public class OrderTimeShardingAlgorithm implements PreciseShardingAlgorithm<Date>, RangeShardingAlgorithm<Date> {

    private static final DateTimeFormatter FORMATTER = DateTimeFormatter.ofPattern("yyyyMM");

    public OrderTimeShardingAlgorithm() {
    }

    /**
     * 精确分片(数据插入时)
     *
     * @param collection
     * @param shardingValue
     * @return
     */
    @Override
    public String doSharding(Collection<String> collection, PreciseShardingValue<Date> shardingValue) {
        // 获取分片键值,时间类型的值(LocalDateTime等)会自动转为java.sql.Timestamp,可以直接用java.util.Date接收
        Date date = shardingValue.getValue();
        // 转为LocalDateTime
        LocalDateTime dateTime = Instant.ofEpochMilli(date.getTime()).atZone(ZoneId.systemDefault()).toLocalDateTime();
        // 逻辑表名
        String logicTableName = shardingValue.getLogicTableName();
        // 获取分片的表
        String table = buildTable(logicTableName, dateTime);
        log.info("数据插入时最后要操作的表名:{}", table);
        if (collection.contains(table)) {
            return table;
        }
        // 分片的表不存在抛出异常(后续可以自动创建表)
        throw new UnsupportedOperationException();
    }

    /**
     * 范围分片(数据查询)
     *
     * @param collection
     * @param shardingValue
     * @return
     */
    @Override
    public Collection<String> doSharding(Collection<String> collection, RangeShardingValue<Date> shardingValue) {
        // 获取分片键值,时间类型的值(LocalDateTime等)会自动转为java.sql.Timestamp,可以直接用java.util.Date接收
        Range<Date> valueRange = shardingValue.getValueRange();
        // 获取范围小值
        Date lowerEndpoint = valueRange.lowerEndpoint();
        // 获取范围大值
        Date upperEndpoint = valueRange.upperEndpoint();
        // 转为LocalDateTime
        LocalDateTime startTime = Instant.ofEpochMilli(lowerEndpoint.getTime()).atZone(ZoneId.systemDefault()).toLocalDateTime();
        LocalDateTime endTime = Instant.ofEpochMilli(upperEndpoint.getTime()).atZone(ZoneId.systemDefault()).toLocalDateTime();
        // 逻辑表名
        String logicTableName = shardingValue.getLogicTableName();
        Collection<String> tables = new ArrayList<>();
        // 比较两个时间
        while (startTime.compareTo(endTime) <= 0) {
            // 添加到集合
            tables.add(buildTable(logicTableName, startTime));
            // 往后加一个月
            startTime = startTime.plusMonths(1);
        }
        // retainAll方法:仅保留或保留该集合(collection)中包含在调用集合中(tables)的元素,并删除所有未包含在指定集合(tables)中的元素
        collection.retainAll(tables);
        if (collection.isEmpty()) {
            // 分片的表不存在抛出异常(后续可以自动创建表)
            throw new UnsupportedOperationException();
        }
        log.info("数据查询时最后要操作的表名:{}", collection);
        return collection;
    }

    private String buildTable(String logicTableName, LocalDateTime dateTime) {
        return logicTableName + "_" + dateTime.format(FORMATTER);
    }

}
我们是按照订单时间进行分表的,实际使用也很简单,插入数据时实现接口 PreciseShardingAlgorithm
按照订单时间查询数据时,我们要实现接口 RangeShardingValue
六、实现
6.1、实体层
Order.java
@Data
@Entity
@Table(name = "tb_order")
public class Order implements Serializable {

    @Id
    @GeneratedValue(strategy = GenerationType.IDENTITY)
    @Column(name = "order_id")
    private Long orderId;

    @Column(name = "user_id")
    private Integer userId;

    @Column(name = "price")
    private Integer price;

    @Column(name = "order_status")
    private Integer orderStatus;

    @Column(name = "title")
    private String title;

    @JsonFormat(pattern = "yyyy-MM-dd HH:mm:ss")
    @Column(name = "order_time")
    private LocalDateTime orderTime;

}
6.2、持久层
OrderRepository.java
public interface OrderRepository extends PagingAndSortingRepository<Order, Long> {

    /**
     * 根据订单时间查询订单
     *
     * @param startTime
     * @param endTime
     * @return
     */
    List<Order> findAllByOrderTimeBetween(LocalDateTime startTime, LocalDateTime endTime);
}
6.3、服务层
OrderService.java
@Slf4j
@Service
public class OrderService {

    @Autowired
    private OrderRepository orderRepository;

    public void saveOrder(Order order) {
        orderRepository.save(order);
    }

    public List<Order> findAllByOrderTimeBetween(LocalDateTime startTime, LocalDateTime endTime) {
        return orderRepository.findAllByOrderTimeBetween(startTime,endTime);
    }
}
6.4、测试类
OrderTests.java
@Slf4j
@RunWith(SpringJUnit4ClassRunner.class)
@SpringBootTest
public class OrderTests {

    @Autowired
    private OrderService orderService;

    @Test
    public void saveOrder() {
        LocalDate startDate = LocalDate.of(2023, 1, 1);
        LocalDate endDate = LocalDate.of(2023, 12, 31);
        LocalTime startTime = LocalTime.of(0, 0, 0);
        LocalTime endTime = LocalTime.of(23, 59, 59);

        for (int i = 0; i < 20; i++) {
            Order order = new Order();
            // 随机生成1000到1006的用户id
            int userId = (int) Math.round(Math.random() * (1009 - 1000) + 1000);
            order.setUserId(userId);
            // 随机生成50到100的金额
            int price = (int) Math.round(Math.random() * (10000 - 5000) + 5000);
            order.setPrice(price);
            order.setOrderStatus(2);

            LocalDateTime orderTime = getRandomLocalDateTime(startDate, endDate, startTime, endTime);
            order.setOrderTime(orderTime);
            order.setTitle("");
            orderService.saveOrder(order);
        }
    }

    @Test
    public void queryOrder() {
        LocalDateTime startTime=LocalDateTime.of(2023,8,2,0,0,0);
        LocalDateTime endTime=LocalDateTime.of(2023,9,12,0,0,0);
        List<Order> order = orderService.findAllByOrderTimeBetween(startTime,endTime);
        log.info("查询的结果:{}", order);
    }

    private LocalDateTime getRandomLocalDateTime(LocalDate startDate, LocalDate endDate, LocalTime startTime, LocalTime endTime) {
        LocalDate localDate = getRandomLocalDate(startDate, endDate);
        LocalTime localTime = getRandomLocalTime(startTime, endTime);
        return LocalDateTime.of(localDate, localTime);
    }

    private LocalDate getRandomLocalDate(LocalDate startDate, LocalDate endDate) {
        Random random = new Random();
        int minDay = (int) startDate.toEpochDay();
        int maxDay = (int) endDate.toEpochDay();
        long randomDay = minDay + random.nextInt(maxDay - minDay);
        return LocalDate.ofEpochDay(randomDay);
    }

    private LocalTime getRandomLocalTime(LocalTime startTime, LocalTime endTime) {
        int randomTime = ThreadLocalRandom.current().nextInt(startTime.toSecondOfDay(), endTime.toSecondOfDay());
        return LocalTime.ofSecondOfDay(randomTime);
    }

}
我们插入数据时,采用随机时间插入,具体时间生成见测试类。
6.4.1、保存订单数据
通过语句查询:
SELECT *,'tb_order_202301' as 'table' FROM sharding_8.tb_order_202301
union all
SELECT *,'tb_order_202302' FROM sharding_8.tb_order_202302
union all
SELECT *,'tb_order_202303' FROM sharding_8.tb_order_202303
union all
SELECT *,'tb_order_202304' FROM sharding_8.tb_order_202304
union all
SELECT *,'tb_order_202305' FROM sharding_8.tb_order_202305
union all
SELECT *,'tb_order_202306' FROM sharding_8.tb_order_202306
union all
SELECT *,'tb_order_202307' FROM sharding_8.tb_order_202307
union all
SELECT *,'tb_order_202308' FROM sharding_8.tb_order_202308
union all
SELECT *,'tb_order_202309' FROM sharding_8.tb_order_202309
union all
SELECT *,'tb_order_202310' FROM sharding_8.tb_order_202310
union all
SELECT *,'tb_order_202311' FROM sharding_8.tb_order_202311
union all
SELECT *,'tb_order_202312' FROM sharding_8.tb_order_202312
效果图:
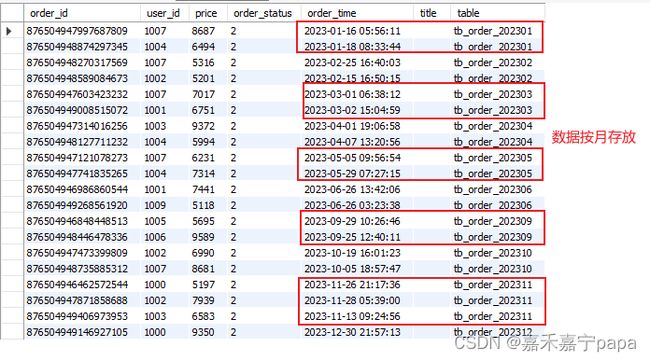
从上面的数据来看,满足我们分库分表的要求的,实现都是基于我们自定义的算法实现。
6.4.2、根据时间范围查询订单
16:45:29 049 INFO [main]:数据查询时最后要操作的表名:[tb_order_202309, tb_order_202310]
16:45:29 068 INFO [main]:Logic SQL: select order0_.order_id as order_id1_0_, order0_.order_status as order_st2_0_, order0_.order_time as order_ti3_0_, order0_.price as price4_0_, order0_.title as title5_0_, order0_.user_id as user_id6_0_ from tb_order order0_ where order0_.order_time between ? and ?
16:45:29 068 INFO [main]:SQLStatement: SelectStatementContext(super=CommonSQLStatementContext(sqlStatement=org.apache.shardingsphere.sql.parser.sql.statement.dml.SelectStatement@62e586a6, tablesContext=org.apache.shardingsphere.sql.parser.binder.segment.table.TablesContext@64908ab9), tablesContext=org.apache.shardingsphere.sql.parser.binder.segment.table.TablesContext@64908ab9, projectionsContext=ProjectionsContext(startIndex=7, stopIndex=200, distinctRow=false, projections=[ColumnProjection(owner=order0_, name=order_id, alias=Optional[order_id1_0_]), ColumnProjection(owner=order0_, name=order_status, alias=Optional[order_st2_0_]), ColumnProjection(owner=order0_, name=order_time, alias=Optional[order_ti3_0_]), ColumnProjection(owner=order0_, name=price, alias=Optional[price4_0_]), ColumnProjection(owner=order0_, name=title, alias=Optional[title5_0_]), ColumnProjection(owner=order0_, name=user_id, alias=Optional[user_id6_0_])]), groupByContext=org.apache.shardingsphere.sql.parser.binder.segment.select.groupby.GroupByContext@1b06dc57, orderByContext=org.apache.shardingsphere.sql.parser.binder.segment.select.orderby.OrderByContext@5af641d3, paginationContext=org.apache.shardingsphere.sql.parser.binder.segment.select.pagination.PaginationContext@14e83c9d, containsSubquery=false)
16:45:29 069 INFO [main]:Actual SQL: ds1 ::: select order0_.order_id as order_id1_0_, order0_.order_status as order_st2_0_, order0_.order_time as order_ti3_0_, order0_.price as price4_0_, order0_.title as title5_0_, order0_.user_id as user_id6_0_ from tb_order_202309 order0_ where order0_.order_time between ? and ? ::: [2023-09-01 00:00:00.0, 2023-10-20 00:00:00.0]
16:45:29 069 INFO [main]:Actual SQL: ds1 ::: select order0_.order_id as order_id1_0_, order0_.order_status as order_st2_0_, order0_.order_time as order_ti3_0_, order0_.price as price4_0_, order0_.title as title5_0_, order0_.user_id as user_id6_0_ from tb_order_202310 order0_ where order0_.order_time between ? and ? ::: [2023-09-01 00:00:00.0, 2023-10-20 00:00:00.0]
16:45:29 148 INFO [main]:查询的结果:[Order(orderId=876504948446478336, userId=1006, price=9589, orderStatus=2, title=, orderTime=2023-09-25T12:40:11), Order(orderId=876504946848448513, userId=1005, price=5695, orderStatus=2, title=, orderTime=2023-09-29T10:26:46), Order(orderId=876504948735885312, userId=1007, price=8681, orderStatus=2, title=, orderTime=2023-10-05T18:57:47), Order(orderId=876504947473399809, userId=1002, price=6990, orderStatus=2, title=, orderTime=2023-10-19T16:01:23)]
通过语句查询:
(SELECT *,'tb_order_202309' FROM sharding_8.tb_order_202309
where order_time between '2023-09-01 00:00:00' and '2023-10-20 00:00:00')
union all
(SELECT *,'tb_order_202310' FROM sharding_8.tb_order_202310
where order_time between '2023-09-01 00:00:00' and '2023-10-20 00:00:00');
数据库校验:
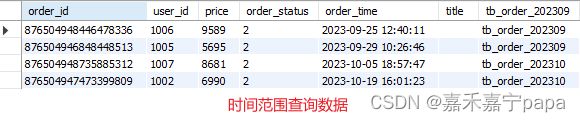
从上面的结果我们可以看到当我们查询时间范围为 2023-09-01 00:00:00 到 2023-10-20 00:00:00 ,因为我们之前是按 order_time 分片的,最终我们并没有全表联查,而是直接计算到了范围内的表 tb_order_202309 和 tb_order_202310 ,然后查询这个两个表的结果再合并。