Vue3.0(一):Vue的引入-options api-模板语法
Vue的引入方式
CDN方式进行引入
- 将以下
script标签引入即可
<script src="https://unpkg.com/vue@3/dist/vue.global.js">script>
DOCTYPE html>
<html lang="en">
<head>
<meta charset="UTF-8" />
<meta name="viewport" content="width=device-width, initial-scale=1.0" />
<title>Documenttitle>
<script src="https://unpkg.com/vue@3/dist/vue.global.js">script>
head>
<body>
<div id="app">div>
<script>
//使用Vue
const app = Vue.createApp({
template: `hello
`,
});
//挂载
app.mount("#app");
script>
body>
html>
本地引入
- 可以将CDN中地址中的代码,拷贝到一个 vue.js文件中
- 之后引入该js文件即可
<script src="./vue.js">script>
命令式编程和声明式编程的区别
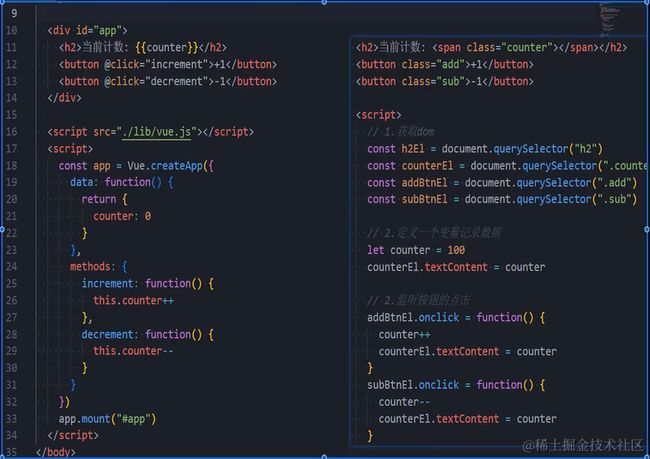
- 以上案例是实现了一个计数器的功能
- 左边是Vue实现
- 右边是原生实现
- 原生js实现—命令式编程
- 需要将每一步操作,都转化为代码,告诉计算机要怎么实现
- 相当于每一步操作都告诉计算机执行什么命令
- Vue实现—声明式编程
- 在vue实现中,只需要声明要展示什么数据,展示的具体内容,以及用到的方法
- 而Vue内部会将这些内容进行关联
- 命令式编程:how to do,自己完成整个how的过程
- 声明式编程:what to do,由框架完成 how的过程
MVVM模型
Model-View-ViewMode的简称
- Vue不完全遵循MVVM模型,但是受到了启发

- View相当于html代码,Model是声明变量,方法;ViewModel就是Vue框架
- Vue框架会将数据与View进行绑定,当View发生了点击等事件,会交由Vue处理,找到对应的Model中的方法
options api(部分)
data属性
//使用Vue
const app = Vue.createApp({
    data(){
        return{
            title:"Vue3.0"
        }
    }
});
//挂载
app.mount("#app");
- data属性是传入一个函数,并返回一个对象
- data中返回的对象,会被Vue的响应式系统劫持(通过 Proxy方式实现)
methods属性
//使用Vue
const app = Vue.createApp({
    methods:{
        myClick(){
            //可以通过this访问data中声明的变量
            console.log(123)
        }
    }
});
//挂载
app.mount("#app");
- 在 methods中通常是用于声明函数方法的
- 在 声明函数的时候,不能使用箭头函数
- 因为使用了箭头函数,会找到上一层作用域中的this,导致无法访问到data中的变量
computed计算属性
有些数据需要进行处理之后,再将其显示到页面中
- 对于响应式数据的复杂逻辑,都应该使用计算属性
- 在computed中可以使用this访问data中的变量
<div id="app">
    <div>{{numStr}}div>
div>
<script>
    //使用Vue
    const app = Vue.createApp({
        data() {
            return {
                arr: [1, 2, 3],
            };
        },
        computed: {
            //计算属性的值都是函数
            numStr() {
                return this.arr.join("");
            },
        },
    });
    //挂载
    app.mount("#app");
script>
- 计算属性是有缓存的
- 因为计算属性会基于它的依赖关系进行缓存(上面的例子中,numStr计算属性的依赖关系就是arr)
- 当依赖关系不发生变化的时候,计算属性是不需要重新计算的(arr不变,则numStr不重新计算)
- 若 arr发生了变化,则numStr会重新进行计算
watch侦听器
用于侦听数据的变化,当数据发生变化的时候,需要执行特定的逻辑
<div id="app">
    <div v-for="(item,index) in arr" :key="index">{{item}}div>
    <button @click="arrChange">changebutton>
div>
<script>
    //使用Vue
    const app = Vue.createApp({
        data() {
            return {
                arr: [1, 2, 3],
            };
        },
        watch: {
            //监听的变量
            //传入两个参数,newValue和oldValue
            arr(newValue, oldValue) {
                //对于对象的侦听,newValue, oldValue实际上是Proxy对象
                console.log(newValue, oldValue);
                //若想获取Proxy的原始数据,可以使用Vue.toRaw
                console.log(Vue.toRaw(newValue));
            },
        },
        methods: {
            arrChange() {
                this.arr = [1, 2, 3, 4];
            },
        },
    });
    //挂载
    app.mount("#app");
侦听器的配置选项
修改对象的某个属性,需要进行特殊的配置,才可以侦听到,需要进行深度侦听
<div id="app">
    <div v-for="(item,index) in arr" :key="index">{{item}}div>
    <button @click="arrChange">changebutton>
div>
<script>
    //使用Vue
    const app = Vue.createApp({
        data() {
            return {
                arr: [1, 2, 3],
            };
        },
        //进行监听
        watch: {
            arr: {
                handler(newValue, oldValue) {
                    //此时你会发现,newValue和oldValue是一样的
                    //这是因为内存地址没有发生过变化,所以是一样的
                    console.log(newValue, oldValue);
                },
                //开启深度侦听
                deep: true,
            },
        },
        methods: {
            arrChange() {
                this.arr.push(4);
            },
        },
    });
    //挂载
    app.mount("#app");
script>
第一次渲染的时候,默认是不会进行侦听的,可以通过immediate进行配置
<div id="app">
    <div v-for="(item,index) in arr" :key="index">{{item}}div>
    <button @click="arrChange">changebutton>
div>
<script>
    //使用Vue
    const app = Vue.createApp({
        data() {
            return {
                arr: [1, 2, 3],
            };
        },
        watch: {
            arr: {
                handler(newValue, oldValue) {
                    //此时你会发现,newValue和oldValue是一样的
                    //这是因为内存地址没有发生过变化,所以是一样的
                    console.log(newValue, oldValue);
                },
                //开启深度侦听
                deep: true,
                //首次加载是否侦听
                immediate: true,
            },
        },
        methods: {
            arrChange() {
                this.arr.push(4);
            },
        },
    });
    //挂载
    app.mount("#app");
script>
v-model双向数据绑定
- v-model指令可以在表单input textarea等元素上创建双向数据绑定
- 它会根据控件类型自动选取正确的方式来更新元素
- v-model本质上就是语法糖,负责监听用户的输入事件来更新数据
<div id="app">

    <input type="text" :value="message" @input="inputChange" />
    <h2>{{message}}h2>
div>
<script>
    //使用Vue
    const app = Vue.createApp({
        data() {
            return {
                message: "123",
            };
        },
        methods: {
            inputChange(event) {
                this.message = event.target.value;
            },
        },
    });
    //挂载
    app.mount("#app");
script>
- 通过 v-bind指令绑定message,当用户在输入框中输入内容,会触发 inputChange事件,从而将this.message进行更改
<div id="app">

    <input type="text" v-model="message" />
    <h2>{{message}}h2>
div>
<script>
    //使用Vue
    const app = Vue.createApp({
        data() {
            return {
                message: "123",
            };
        },
    });
    //挂载
    app.mount("#app");
script>
修饰符
- lazy:v-model默认触发的是input事件,而该修饰符是将input事件转成change事件,只有当光标离开才会触发
<input type="text" v-model.lazy="message" />
- number:默认是字符串类型,该修饰符是将内容自动转成数字
<input type="text" v-model.number="num" />
- trim:去除首尾的空格
<input type="text" v-model.trim="message" />
模板语法
Vue中特定的语法
Mustache双括号语法
<div id="app">

	{{title}}

    {{counter * 2}}

    {{flag?true:false}}

    {{myClick()}}
div>
v-once指令(了解)
只会渲染一次
<div id="app">
   <div v-once>{{message}}div>
div>
- div标签只会渲染一次,即使message被改变了,也不会重新渲染
- 可以用于性能优化
- 同时使用了v-once指令的元素,其子元素也只会渲染一次
v-text指令(了解)
用于更新元素的textContent
<div id="app">
   <div>{{message}}div>

    <div v-text="message">div>
div>
v-html(了解)
用于将html字符串转成相应的样式
<div id="app">
    <div v-html="message">div>
div>

message = `<h2>hahahah2>`
v-pre(了解)
用于跳过元素和子元素的编译过程,显示原始的Mustache标签

v-bind的绑定属性
可以绑定一个或者多个属性值,或者向另外一个组件传递props值
- 前面的属性主要是将内容插入到元素中
- 而某些元素的属性也希望动态绑定
- 比如图片、连接、动态绑定一些类,样式等
<div id="app">
    基本使用
    <img v-bind:src="url">
    简写
    <img :src="url">
div>
绑定class属性
- 动态class通过对象语法绑定
- key:代表类名、
- value:传入一个boolean值
- 可以传入多个
<style>
    .titleClass {
    }
    .textClass {
    }
    .abc{}
style>
<div id="app">
    <div :class="{titleClass:true,textClass:flag}">div>
    //会将普通的class进行合并
     <div class="abc" :class="{titleClass:true,textClass:flag}">div>
div>
- 动态class通过数组语法绑定
<style>
    .titleClass {
    }
    .textClass {
    }
    .abc{}
style>
<div id="app">
    <div :class="['titleClass','textClass']">div>
div>
绑定style属性
- 使用 v-bind绑定style,后面要跟着对象
- 对于 font-size中间带 **-**的属性,需要用引号包起来或者写成驼峰形式
<div id="app">
    //普通写法
    <div style="color:red">div>
    <div :style="{color:textRed,fontSize:'30px'}">div>
div>
- 同时也有数组写法
- 通常是多个对象联合使用
<div id="app">
    <div :style="[colorObject,fontSizeObject]">div>
div>
绑定属性名
<div id="app">
    <div :[className]="[colorObject,fontSizeObject]">div>
div>

data(){
	return{
		className:"style"
	}
}
直接绑定对象
- 在元素中,直接通过
v-bind = 'obj'即可- 会自动遍历obj中的key,将key添加到元素上面
- 通常用于组件间传值
<div id="app">
    <div v-bind="infos">hellodiv>
div>
![]()
v-on绑定事件
基本使用方法
<div id="app">

    <div v-on:click="divClick">hellodiv>

    <div @click="divClick">hello2div>

    <div @click="console.log(456)">hello3div>

    <div @mousemove="divClick">hello4div>

    <div @click="divClick" @mousemove="divMove">hello5div>
div>
<script>
    //使用Vue
    const app = Vue.createApp({
        methods: {
            divClick() {
                console.log("click");
            },
            divMove() {
                console.log("move");
            },
        },
    });
    //挂载
    app.mount("#app");
script>
参数传递
- 没有传递参数,默认会传递一个 event参数
<div id="app">
    <button @click="divClick">123button>
div>
<script>
    //使用Vue
    const app = Vue.createApp({
        methods: {
            divClick(event) {
                //默认参数event
                console.log(event);
            },
        },
    });
    //挂载
    app.mount("#app");
script>
- 有明确的参数,会将 默认参数event覆盖
<div id="app">
    <button @click="divClick('zhangcheng')">123button>
div>
<script>
    //使用Vue
    const app = Vue.createApp({
        methods: {
            divClick(data) {
                //默认参数event
                console.log(data);
            },
        },
    });
    //挂载
    app.mount("#app");
script>
- 自己的参数和默认参数event
- 通过 $event
<div id="app">
    <button @click="divClick('zhangcheng',$event)">123button>
div>
<script>
    //使用Vue
    const app = Vue.createApp({
        methods: {
            divClick(data, event) {
                //默认参数event
                console.log(data, event);
            },
        },
    });
    //挂载
    app.mount("#app");
script>
修饰符
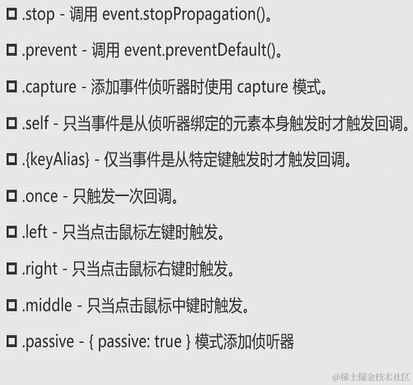
- 通过
@click.stop="divClick"进行使用
条件渲染
在某些情况下,一些元素需要根据特定的条件进行显示
v-if v-else v-else-if v-show
<div id="app">
    <div v-if="flag">flag为true显示div>
    <div v-else>flag为false显示div>
div>
<script>
    //使用Vue
    const app = Vue.createApp({
        data() {
            return {
                flag: true,
            };
        },
    });
    //挂载
    app.mount("#app");
script>
- template元素的使用(Vue3提出来的)
- 该元素通常配合v-if使用
- 且该元素可以包含多个子元素
- 该元素不会渲染到DOM树上
<template v-if="flag">
    <div>flag为true显示div>
    <div>flag为false显示div>
template>
v-if与v-show的区别是v-if条件不成立的时候,DOM不会渲染或者被销毁掉v-show的元素会被渲染,只是通过CSS的display进行控制v-if支持template,但是v-show不能
v-for列表渲染
可以遍历可迭代对象
- 在真实开发中,我们通常从服务器中获取一组数据
- 而要将这一组数据,都展示在页面中,就需要使用
v-for进行遍历
基本使用
<div id="app">

    <div v-for="item in arr">{{item}}div>

    <div v-for="(item,index) in arr">item:{{item}};index:{{index}}div>
div>
<script>
    //使用Vue
    const app = Vue.createApp({
        data() {
            return {
                arr: [1, 2, 3],
            };
        },
    });
    //挂载
    app.mount("#app");
script>
支持的类型
- v-for不仅支持遍历数组
- 同样也支持遍历对象
<div id="app">

    <div v-for="value in obj">{{value}}div>

    <div v-for="(value,key,index) in obj">{{value}}-{{key}}-{{index}}div>
div>
<script>
    //使用Vue
    const app = Vue.createApp({
        data() {
            return {
                obj: {
                    name: "zhangcheng",
                    age: "18",
                },
            };
        },
    });
    //挂载
    app.mount("#app");
script>
- 遍历字符串(可迭代对象)
<div id="app">
    <div v-for="value in str">{{value}}div>
div>
<script>
    //使用Vue
    const app = Vue.createApp({
        data() {
            return {
                str:"abcsde"
            };
        },
    });
    //挂载
    app.mount("#app");
script>
- 可以遍历数字
<div id="app">
    <div v-for="value in 10">{{value}}div>
div>
<script>
    //使用Vue
    const app = Vue.createApp({
    });
    //挂载
    app.mount("#app");
script>
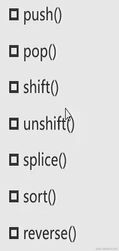
数组更新检测
- Vue中对一些数组的方法进行了包裹,这些方法在对数组进行操作的时候,可以更新视图
- 这些方法对原数组进行了改变
<div id="app">
    <div v-for="item in arr">{{item}}div>
    <button @click="arrChange">changebutton>
div>
<script>
    //使用Vue
    const app = Vue.createApp({
        data() {
            return {
                arr: [1, 2, 3],
            };
        },
        methods: {
            arrChange() {
                this.arr.push(4);
            },
        },
    });
    //挂载
    app.mount("#app");
script>
- 而针对于不改变原数组,且生成新数组的方法,不可以更新视图
- 需要重新赋值
<div id="app">
    <div v-for="item in arr">{{item}}div>
    <button @click="arrChange">changebutton>
div>
<script>
    //使用Vue
    const app = Vue.createApp({
        data() {
            return {
                arr: [1, 2, 3],
            };
        },
        methods: {
            arrChange() {
               this.arr = this.arr.map(item=>item+"zc")
            },
        },
    });
    //挂载
    app.mount("#app");
script>
v-for中的key作用是什么
通常在使用v-for的时候,需要搭配key一同使用
- key的要求是唯一的
- key属性主要用在 Vue的虚拟DOM算法,在新旧nodes对比辨识 VNodes
- 有 key存在的时候,对元素进行了改变,会尽可能地复用相同地节点
- 没有 **key存在的时候,**不会对元素进行复用
<div id="app">
    <div v-for="item in arr" :key="item">{{item}}div>
div>
<script>
    //使用Vue
    const app = Vue.createApp({
        data() {
            return {
                arr: [1, 2, 3],
            };
        },
    });
    //挂载
    app.mount("#app");
script>
认识VNode
- VNode是虚拟节点
- 在 Vue中无论是组件还是元素都是VNode(虚拟节点)
- 本质就是一个JS对象


虚拟DOM
方便对代码进行跨平台操作以及diff算法
- 如果我们不仅仅只有一个div,而是复杂的嵌套元素
- 这些会生成一个 VNode Tree
- 即为虚拟 DOM