BiliBili评论案例
文章目录
- 前言
- 一、准备工作
-
-
-
- 1.环境准备
- 2.数据准备
- 3.定义接口
-
-
- 二、功能实现
-
-
-
- 1.获取数据
- 2.渲染评论数据(点赞,删除)
- 3.用户发表评论(自动排序)
- 4.最新最热列表渲染切换
- 5.启动项目
-
-
- 总结
前言
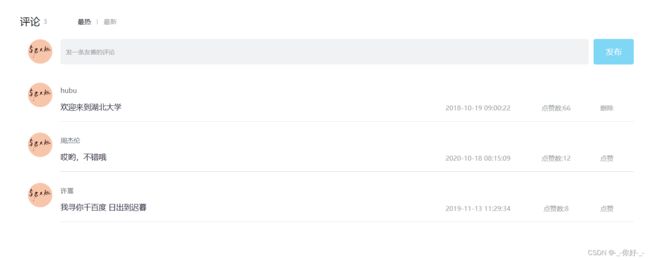
本次案例是基于react和typescript的项目实现,项目的实现步骤本文中有详细的讲解,在本文最后附有项目完整代码的github连接可供参考
项目所实现的核心功能:
1.渲染评论数据
2.根据评论时间排序
3.根据点赞数量排序
4.当前用户发表评论
5.当前用户删除评论以及点赞他人评论
一、准备工作
1.环境准备
使用react脚手架进行项目的初始化
npx create-react-app bilibili --template typescript
安装项目所需要的的库,包括json-server(模拟后端服务器)、lodash(对数组进行便捷操作)、classnames(方便使用css类名)、axios(前后端数据进行交互)、dayjs(方便对时间进行操作)、uuid(生成唯一标识id)
npm install json-server lodash classnames axios dayjs uuid
2.数据准备
首先需要在项目根目录下创建一个db.json的文件来存放所需要的的数据,数据示例如下:
{
  "list": [
    {
      "rpid": 3,
      "user": {
        "uid": "13258165",
        "avatar": "http://toutiao.itheima.net/resources/images/98.jpg",
        "uname": "周杰伦"
      },
      "content": "哎哟,不错哦",
      "ctime": "2020-10-18 08:15:09",
      "like": 12
    }
  ]
}
数据对象里有一个list对象数组,包括rpid(标识ID),user(包括uid:区分当前用户,avatar:用户头像,uname:用户名),content(评论内容),ctime(评论时间),like(点赞数)
3.定义接口
根据准备的数据字段可以先定义两个接口在src/component/Binterface.ts中写入
export interface Comment {
    rpid: string
    user: User,
    content: string,
    ctime: string,
    like: number,
}
export interface User {
    uid: string,
    avatar: string,
    uname: string,
}
export interface li {
    user: User
    item: Comment
    handleDelete: (id: string) => void
}//后面组件接收父组件传递过来的数据时定义的接口
二、功能实现
1.获取数据
Bilibilicomment.tsx
封装一个useGetlist函数使用usestate存放获取的数据数组,利用useEffect函数在渲染开始时通过异步函数获取后端接口的数据,并且利用_.orderBy函数根据like字段进行降序排序,并且返回状态和状态函数,在之后使用时解构
function useGetlist() {
    const [commentList, setCommentList] = useState<Comment[]>([])
    useEffect(() => {
        async function getList() {
            const res = await axios.get('http://localhost:3001/list')
            setCommentList(_.orderBy(res.data, 'like', 'desc'))
        }
        getList()
    }, [])
    return { commentList, setCommentList }
}
在主函数中解构评论数组,传递给子组件Bilibiliitem.tsx,遍历渲染子组件评论列表
const { commentList, setCommentList } = useGetlist()
{commentList.map(item => (<BilibiliItem key={item.rpid} user={user} item={item} handleDelete={handleDelete} />))}
2.渲染评论数据(点赞,删除)
Bilibiliitem.tsx
使用usestate管理两个状态,第一个为点赞数,第二个为点赞状态
    const [count, setCount] = useState(item.like)
    const [isClicked, setIsClicked] = useState(true);
根据父组件中传来的user和item判断当前用户和遍历的评论用户是否是同一个,如果相同,则展示删除标志,如果不同则展示点赞标志,分别绑定删除函数和点赞函数
return (<div className="reply-item">
        <div className="root-reply-avatar">
            <div className="bili-avatar">
                <img className="bili-avatar-img" src={item.user.avatar} alt="用户头像" />
            </div>
        </div>
        <div className="content-wrap">
            <div className="user-info">
                <div className="user-name">{item.user.uname}</div>
            </div>
            <div className="root-reply">
                <span className="reply-content">{item.content}</span>
                <div className="reply-info">
                    <span className="reply-time">{item.ctime}</span>
                    <span className="reply-time">点赞数:{count}</span>
                    {user.uid === item.user.uid ? <span className="delete-btn" onClick={() => handleDelete(item.rpid)}>删除</span> : <span className='support-btn' onClick={newcount}>点赞</span>
                    }
                </div>
            </div>
        </div>
    </div>)
删除函数(根据id值利用setCommentList对数组进行过滤操作):
const handleDelete = (id: string) => {
        setCommentList(commentList.filter(item => item.rpid !== id))
    }
点赞函数(根据isClicked判断是否点击过,没点击过则更新状态+1,并将isClicked置为false)
const newcount = () => {
        if(isClicked){
            setCount(count + 1)
            setIsClicked(!isClicked)
        }
    }
3.用户发表评论(自动排序)
Bilibilicomment.tsx
将输入框的值与 value 变量绑定,将 inputRef 引用绑定到输入框元素
const [value, setValue] = useState<string>('')
const inputRef = useRef<HTMLInputElement>(null)
<div className="reply-box-wrap">
                        <input
                            className="reply-box-textarea"
                            placeholder="发一条友善的评论"
                            value={value}
                            ref={inputRef}
                            onChange={(e) => setValue(e.target.value)}
                            onKeyDown={handleKeyDown}
                        />
                        <div className="reply-box-send">
                            <div className="send-text" onClick={handleComment} >发布</div>
                        </div>
                    </div>
定义一个更新函数,在函数里定义一个newComment对象,rpid用uuid生成,user为当前用户,content的内容为输入框的值,发布时间通过dayjs进行格式化赋值,点赞数为0
const update=()=>{
        const newComment={
            rpid: uuidV4(),
            user:user,
            content: value,
            ctime: dayjs(new Date()).format('YYYY-MM-DD hh:mm:ss'),
            like: 0,
        }
        setValue('');//将输入框置为空
        inputRef.current?.focus();//输入框聚焦
        const sortedCommentList = _.orderBy([...commentList, newComment],type === 'hot' ? 'like' : 'ctime','desc');
        //解构原来对象数组,将新对象放入数组中,并且根据当前type对新对象数组进行排序
        setCommentList(sortedCommentList);//更新状态
    }
用户提交的两个函数,一个键盘监听事件,一个为发布按钮的点击事件
const handleKeyDown = (event: React.KeyboardEvent<HTMLInputElement>) => {
        if (event.key === 'Enter') {
           update()
        }
    };//当键盘按下的键为回车时执行更新函数

    const handleComment = () => {
        if (value !== '') {
            update()
        }
    }//当输入的值不为空时执行更新函数
4.最新最热列表渲染切换
给最新最热绑定点击事件,根据当前的type对状态里的评论对象数组进行字段排序
const tabs = [
    { type: 'hot', text: '最热' },
    { type: 'time', text: '最新' },
]
const handleClick = (type: string) => {
        setType(type)
        if (type === 'hot') {
            setCommentList(_.orderBy(commentList, 'like', 'desc'))
        } else if (type === 'time') {
            setCommentList(_.orderBy(commentList, 'ctime', 'desc'))
        }
    }
5.启动项目
项目根目录下(两个终端分别执行命令,需要在package.json的script中添加 “serve”: “json-server _db.json --port 3001”)
npm run serve
npm start
总结
本次哔哩哔哩评论案例是使用react和typescript操作数组的基础实现,使用了axios获取数据,以及第三方库的使用,hook函数的使用,在此附上源码地址github(第一个bilibili就是)

