计算图的概念
文章目录
-
- 计算图的概念
- ONNX的诟病
- PNNX算子
- PNNX 模型优化
- pnnx.param的格式
- pnnx.bin的格式
- 辅助类
-
- 取消字节对齐
- 相关结构体
- CRC循环冗余校验
- StoreZipReader
-
- 回顾C语言文件处理函数
- 一些标志位的含义
- StoreZipWriter
- PNNX中的图结构(Graph)
-
- 代码解读
- PNNX中的运算符结构(Operator)
- PNNX中的操作数(Operand)结构
- PNNX中的Attribute和Param结构
-
- 代码解读
-
- 回顾C++std::string相关操作
- 几个静态函数
- 参考
计算图的概念
PNNX是PyTorchNeural Network Exchange的缩写,其愿景是能够将PyTorch模型文件直接导出为高效、简洁的计算图。
- Operator: 深度学习计算图中的计算节点。
- Graph: 有多个Operator串联得到的有向无环图,规定了各个计算节点(Operator)执行的流程和顺序。
- Layer: 计算节点中运算的具体执行者,Layer类先读取输入张量中的数据,然后对输入张量进行计算,得到的结果存放到计算节点的输出张量中,当然,不同的算子中Layer的计算过程会不一致。
- Tensor: 用于存放多维数据的数据结构,方便数据在计算节点之间传递,同时该结构也封装矩阵乘、点积等与矩阵相关的基本操作。
ONNX的诟病
- ONNX不具有良好的可读性和编辑性,让用户很难修改计算图和自定义相关算子
- ONNX定义的算子和Pytorch并不是保持一致的,当把Pytorch模型导出为ONNX时,会出现很多额外的琐碎的算子,这无疑增加了推理的成本
- ONNX中有大堆额外的参数用来和众多的机器学习框架相适应,这无疑增加了模型推理时的软硬件成本
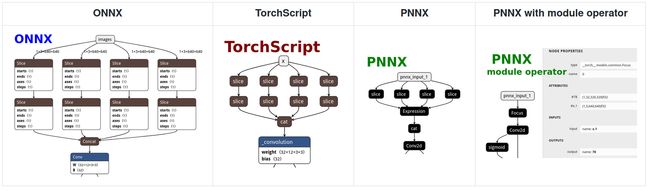
PNNX算子
可视化ONNX,TorchScript,PNNX导出的算子,Pytorch源码如下
import torch
import torch.nn as nn

class Focus(nn.Module):
    # Focus wh information into c-space
    def __init__(self, c1, c2, k=1, s=1, p=None, g=1, act=True):  # ch_in, ch_out, kernel, stride, padding, groups
        super().__init__()
        self.conv = Conv(c1 * 4, c2, k, s, p, g, act)

    def forward(self, x):  # x(b,c,w,h) -> y(b,4c,w/2,h/2)
        return self.conv(torch.cat([x[..., ::2, ::2], x[..., 1::2, ::2], x[..., ::2, 1::2], x[..., 1::2, 1::2]], 1))
PNNX 模型优化

pnnx.param的格式
7767517
4 3#操作符个数 操作数个数
pnnx.Input               pnnx_input_0             0 1 0 #0=(1,32)f32
nn.Linear                linear                   1 1 0 1 bias=True in_features=32 out_features=128 @bias=(128)f32 @weight=(128,32)f32 #0=(1,32)f32 #1=(1,128)f32
F.sigmoid                F.sigmoid_0              1 1 1 2 $input=1 #1=(1,128)f32 #2=(1,128)f32
pnnx.Output              pnnx_output_0            1 0 2 #2=(1,128)f32

[type] [name] [input count] [output count] [input operands] [output operands] [operator params]
- 类型:类型名称,例如Conv2d、ReLU等
- 名称:此运算符的名称
- 输入计数:此运算符需要的输入操作数的数量
- 输出计数:此运算符产生的输出操作数的数量
- 输入操作数:所有输入blob名称的名称列表,用空格分隔
- 输出操作数:所有输出blob名称的名称列表,用空格分隔
- 运算符参数:键值对列表,用空格分隔,运算符权重以@符号为前缀,张量形状以#符号为前缀,输入参数键以$符号为前缀
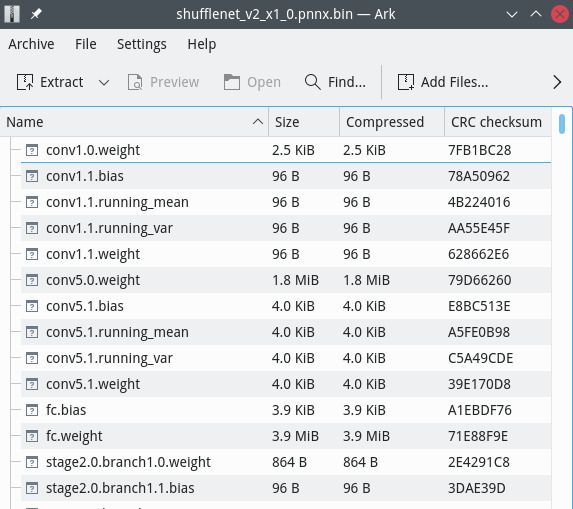
pnnx.bin的格式
二进制权重文件是由相应的算子名称和权重名称构成
举例来说, nn.Conv2d conv_0 1 1 0 1 bias=1 dilation=(1,1) groups=1 in_channels=12 kernel_size=(3,3) out_channels=16 padding=(0,0) stride=(1,1) @bias=(16) @weight=(16,12,3,3) 会将 conv_0.weight 和 conv_0.bias 放到 pnnx.bin zip 压缩包中
辅助类
先介绍两个辅助类:StoreZipReader,StoreZipWriter分别用于压缩文件的读取和写入
取消字节对齐
// https://stackoverflow.com/questions/1537964/visual-c-equivalent-of-gccs-attribute-packed
#ifdef _MSC_VER
#define PACK(__Declaration__) __pragma(pack(push, 1)) __Declaration__ __pragma(pack(pop))
#else
#define PACK(__Declaration__) __Declaration__ __attribute__((__packed__))
#endif
__attribute__ ((__packed__))关键字,它可以做到让我们的结构体,按照紧凑排列的方式,占用内存。
#include
#include

using namespace std;

struct test1 {
    char c;
    int i;
};

struct __attribute__ ((__packed__)) test2 {
    char c;
    int i;
};

int main()
{
    cout << "size of test1:" << sizeof(struct test1) << endl;
    cout << "size of test2:" << sizeof(struct test2) << endl;
}

/*
运行结果:
size of test1:8
size of test2:5
*/
显而易见,test1结构体里面没有加关键字,它采用了4字节对齐的方式,即使是一个char变量,也占用了4字节内存,int占用4字节,共占用了8字节内存,这在64位机器当中将会更大。
而test2结构体,再加上关键字之后,结构体内的变量采用内存紧凑的方式排列,char类型占用1字节,int占用4字节,总共占用了5个字节的内存。
为了让数据结构以最优的方式存储,处理,保证读写数据结构都一一对齐,我们往往采用3种方式:
1.程序作者,手动对齐,将数据按从小到大的顺序排列,尽量凑齐。
2.使用#pragma pack (n)来指定数据结构的对齐值。
3.使用 __attribute__ ((packed)) ,让编译器取消结构在编译过程中的优化对齐,按照实际占用字节数进行对齐,这样子两边都需要使用 __attribute__ ((packed))取消优化对齐,就不会出现对齐的错位现象。
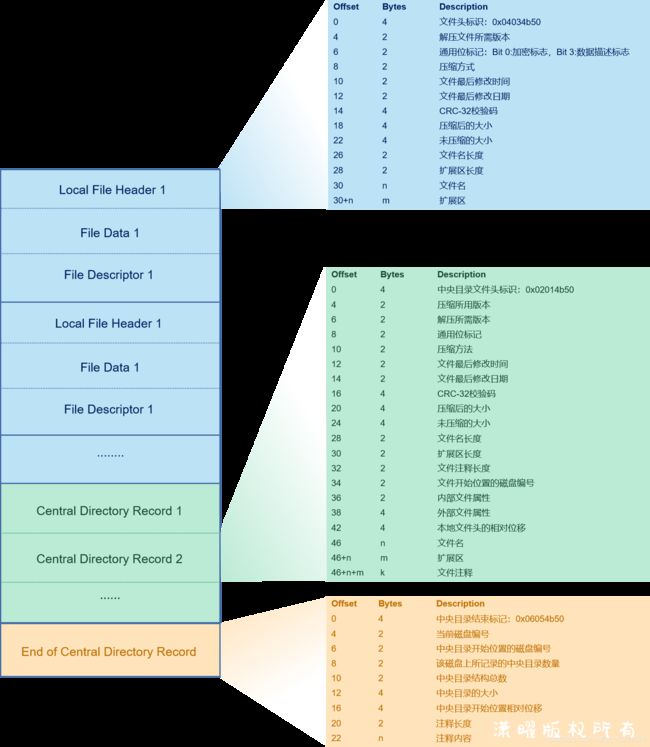
相关结构体
zip格式压缩包主要由三大部分组成:数据区、中央目录记录区(也有叫核心目录记录)、中央目录记录尾部区
PACK(struct local_file_header {// 数据区
       uint16_t version;
       uint16_t flag;
       uint16_t compression;
       uint16_t last_modify_time;
       uint16_t last_modify_date;
       uint32_t crc32;
       uint32_t compressed_size;
       uint32_t uncompressed_size;
       uint16_t file_name_length;
       uint16_t extra_field_length;
     });

PACK(struct central_directory_file_header {// 中央目录记录区(也有叫核心目录记录)
       uint16_t version_made;
       uint16_t version;
       uint16_t flag;
       uint16_t compression;
       uint16_t last_modify_time;
       uint16_t last_modify_date;
       uint32_t crc32;
       uint32_t compressed_size;
       uint32_t uncompressed_size;
       uint16_t file_name_length;
       uint16_t extra_field_length;
       uint16_t file_comment_length;
       uint16_t start_disk;
       uint16_t internal_file_attrs;
       uint32_t external_file_attrs;
       uint32_t lfh_offset;
     });

PACK(struct end_of_central_directory_record {// 中央目录记录尾部区
       uint16_t disk_number;
       uint16_t start_disk;
       uint16_t cd_records;
       uint16_t total_cd_records;
       uint32_t cd_size;
       uint32_t cd_offset;
       uint16_t comment_length;
     });
Zip格式结构图总览
CRC循环冗余校验
static uint32_t CRC32_TABLE[256];

static void CRC32_TABLE_INIT()
{
  for (int i = 0; i < 256; i++)
  {
    uint32_t c = i;
    for (int j = 0; j < 8; j++)
    {
      if (c & 1)
        c = (c >> 1) ^ 0xedb88320;//执行右移一位并与 CRC32 多项式 0xEDB88320 异或操作
      else
        c >>= 1;
    }
    CRC32_TABLE[i] = c;
  }
}

static uint32_t CRC32(uint32_t x, unsigned char ch)
{
  return (x >> 8) ^ CRC32_TABLE[(x ^ ch) & 0xff];
}

static uint32_t CRC32_buffer(const unsigned char* data, int len)
{
  uint32_t x = 0xffffffff;

  for (int i = 0; i < len; i++)
    x = CRC32(x, data[i]);

  return x ^ 0xffffffff;
}
CRC 算法的基本思想是将传输的数据当做一个位数很长的数。将这个数除以另一个数。得到的余数作为校验数据附加到原数据后面。

实际应用时,发送方和接收方按以下方式通信:
- 发送方和接收方在通信前,约定好一个预设整数作为除数。
- 发送方在发送前根据原始数据和约定好的除数进行模二除法(按位异或)运算生成余数(即CRC码),然后将其附加到原始数据后面一起发送给接收方。
- 接收方收到后将其模二除以约定好的除数,当且仅当余数为0时接收方认为没有差错。
- 示例
假设要传输的原始数据为1101011011B,发送方和接收方在通信前约定好的除数为10011B。由于除数10011B是五位数(5bit),那么假设余数(即CRC码)为四位数(4bit)。因为现在余数未知,所以在进行模二除法运算前先将余数设为0000B,即待发送的数据为11010110110000B。下面开始进行模二除法运算来确定余数(即CRC码):

可见余数(即CRC码)为1110B,因此发送方实际发送的是11010110111110B。接收方在接收后需要将其模二除以10011B来进行CRC校验:

可见余数为0,因此本次通信没有差错。
StoreZipReader
class StoreZipReader
{
 public:
  StoreZipReader();
  ~StoreZipReader();

  int open(const std::string& path);

  size_t get_file_size(const std::string& name);//通过name获取压缩包中某个文件的大小

  int read_file(const std::string& name, char* data);//通过name获取压缩包中某个文件,并将其存入data

  int close();

 private:
  FILE* fp;

  struct StoreZipMeta
  {
    size_t offset;
    size_t size;
  };

  std::map filemetas;
};
重点说下open这个函数
int StoreZipReader::open(const std::string& path)
{
  close();

  fp = fopen(path.c_str(), "rb");
  if (!fp)
  {
    fprintf(stderr, "open failed\n");
    return -1;
  }

  while (!feof(fp))
  {
    // peek signature
    uint32_t signature;
    int nread = fread((char*)&signature, sizeof(signature), 1, fp);
    if (nread != 1)
      break;

    if (signature == 0x04034b50)
    {
      local_file_header lfh;
      fread((char*)&lfh, sizeof(lfh), 1, fp);

      if (lfh.flag & 0x08)
      {
        fprintf(stderr, "zip file contains data descriptor, this is not supported yet\n");
        return -1;
      }
	// lfh.compression=0代表不采取压缩
      if (lfh.compression != 0 || lfh.compressed_size != lfh.uncompressed_size)
      {
        fprintf(stderr, "not stored zip file %d %d\n", lfh.compressed_size, lfh.uncompressed_size);
        return -1;
      }

      // file name
      std::string name;
      name.resize(lfh.file_name_length);
      fread((char*)name.data(), name.size(), 1, fp);

      // skip extra field
      fseek(fp, lfh.extra_field_length, SEEK_CUR);

      StoreZipMeta fm;
      fm.offset = ftell(fp);
      fm.size = lfh.compressed_size;

      filemetas[name] = fm;

      //             fprintf(stderr, "%s = %d  %d\n", name.c_str(), fm.offset, fm.size);

      fseek(fp, lfh.compressed_size, SEEK_CUR);
    }
    else if (signature == 0x02014b50)
    {
      central_directory_file_header cdfh;
      fread((char*)&cdfh, sizeof(cdfh), 1, fp);

      // skip file name
      fseek(fp, cdfh.file_name_length, SEEK_CUR);

      // skip extra field
      fseek(fp, cdfh.extra_field_length, SEEK_CUR);

      // skip file comment
      fseek(fp, cdfh.file_comment_length, SEEK_CUR);
    }
    else if (signature == 0x06054b50)
    {
      end_of_central_directory_record eocdr;
      fread((char*)&eocdr, sizeof(eocdr), 1, fp);

      // skip comment
      fseek(fp, eocdr.comment_length, SEEK_CUR);
    }
    else
    {
      fprintf(stderr, "unsupported signature %x\n", signature);
      return -1;
    }
  }

  return 0;
}
回顾C语言文件处理函数
- fread函数的原型如下:
size_t fread(void *ptr, size_t size, size_t count, FILE *stream);
其中,ptr是指向缓冲区的指针,size是要读取的每个元素的大小(以字节为单位),count是要读取的元素个数,stream是文件指针。例如,要读取一个包含100个int类型变量的数据块,可以这样调用fread函数:
fread(buffer, sizeof(int), 100, fp);
这将从文件中读取100个int类型变量到缓冲区中。
-
ftell函数用于获取文件指针的当前位置。它的原型如下:long int ftell(FILE *stream);stream:文件指针,是一个指向FILE对象的指针,通常通过fopen函数获得。
ftell函数返回当前文件指针的位置作为一个长整数(long int)。一般情况下,返回值表示从文件的起始位置到当前文件指针的字节数偏移量。 -
fseek函数用于设置文件指针的位置,即将文件流中的读/写位置设置到指定的位置。它的原型如下:int fseek(FILE *stream, long int offset, int origin);stream:文件指针,是一个指向FILE对象的指针,通常通过fopen函数获得。offset:偏移量,即要设置的相对位置。正值表示向文件末尾方向移动,负值表示向文件开始方向移动。origin:起始位置,可以是以下值之一:SEEK_SET:从文件开始位置计算偏移,offset必须是非负值。SEEK_CUR:从当前位置计算偏移,offset可以是负值。SEEK_END:从文件末尾位置计算偏移,offset可以是