yolov4 训练自己的数据集--人头识别
0、实验环境
ubuntu 16.04
opencv 3.4.10
cuda 10.1
1、yolov4安装
1.1、下载编译darknet
darknet下载地址
git clone https://github.com/AlexeyAB/darknet
cd darknet
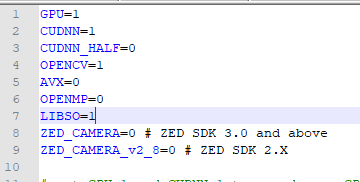
darknet 默认编译是不带cuda与opencv,而且不会编译so文件。如果想编译带有cuda与opencv,并编译so文件的需要修改Makefile
进行编译
make -j8
2、准备数据集
数据集我是从此处下载的(谢谢分享)。为了方便下载我也留一下下载地址 Images -Annotations - 这些标签是xml的不是yolov4格式需要变成yolov4格式。于是从网上找到了一个脚本文件(谢谢网友的分享)。这个脚本文件要求数据的目录格式是VOC可是的。如下图
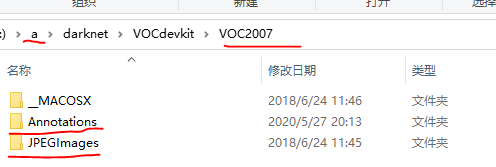
把脚本放在darknet目录下与VOCdevkit同级目录。脚本如下
import xml.etree.ElementTree as ET
import pickle
import os
from os import listdir, getcwd
from os.path import join
import random

classes=["head"]   #此处要改成自己的标签类别名称


def clear_hidden_files(path):
    dir_list = os.listdir(path)
    for i in dir_list:
        abspath = os.path.join(os.path.abspath(path), i)
        if os.path.isfile(abspath):
            if i.startswith("._"):
                os.remove(abspath)
        else:
            clear_hidden_files(abspath)

def convert(size, box):
    dw = 1./size[0]
    dh = 1./size[1]
    x = (box[0] + box[1])/2.0
    y = (box[2] + box[3])/2.0
    w = box[1] - box[0]
    h = box[3] - box[2]
    x = x*dw
    w = w*dw
    y = y*dh
    h = h*dh
    return (x,y,w,h)

def convert_annotation(image_id):
    in_file = open('VOCdevkit/VOC2007/Annotations/%s.xml' %image_id)
    out_file = open('VOCdevkit/VOC2007/labels/%s.txt' %image_id, 'w')
    tree=ET.parse(in_file)
    root = tree.getroot()
    size = root.find('size')
    w = int(size.find('width').text)
    h = int(size.find('height').text)

    for obj in root.iter('object'):
        difficult = obj.find('difficult').text
        cls = obj.find('name').text
        if cls not in classes or int(difficult) == 1:
            continue
        cls_id = classes.index(cls)
        xmlbox = obj.find('bndbox')
        b = (float(xmlbox.find('xmin').text), float(xmlbox.find('xmax').text), float(xmlbox.find('ymin').text), float(xmlbox.find('ymax').text))
        #print("image_id = %s\n" %image_id)
        bb = convert((w,h), b)
        out_file.write(str(cls_id) + " " + " ".join([str(a) for a in bb]) + '\n')
    in_file.close()
    out_file.close()

wd = os.getcwd()
wd = os.getcwd()
work_sapce_dir = os.path.join(wd, "VOCdevkit/")
if not os.path.isdir(work_sapce_dir):
    os.mkdir(work_sapce_dir)
work_sapce_dir = os.path.join(work_sapce_dir, "VOC2007/")
if not os.path.isdir(work_sapce_dir):
    os.mkdir(work_sapce_dir)
annotation_dir = os.path.join(work_sapce_dir, "Annotations/")
if not os.path.isdir(annotation_dir):
        os.mkdir(annotation_dir)
clear_hidden_files(annotation_dir)
image_dir = os.path.join(work_sapce_dir, "JPEGImages/")
if not os.path.isdir(image_dir):
        os.mkdir(image_dir)
clear_hidden_files(image_dir)
VOC_file_dir = os.path.join(work_sapce_dir, "ImageSets/")
if not os.path.isdir(VOC_file_dir):
        os.mkdir(VOC_file_dir)
VOC_file_dir = os.path.join(VOC_file_dir, "Main/")
if not os.path.isdir(VOC_file_dir):
        os.mkdir(VOC_file_dir)

train_file = open(os.path.join(wd, "2007_train.txt"), 'w')
test_file = open(os.path.join(wd, "2007_test.txt"), 'w')
train_file.close()
test_file.close()
VOC_train_file = open(os.path.join(work_sapce_dir, "ImageSets/Main/train.txt"), 'w')
VOC_test_file = open(os.path.join(work_sapce_dir, "ImageSets/Main/test.txt"), 'w')
VOC_train_file.close()
VOC_test_file.close()
if not os.path.exists('VOCdevkit/VOC2007/labels'):
    os.makedirs('VOCdevkit/VOC2007/labels')
train_file = open(os.path.join(wd, "2007_train.txt"), 'a')
test_file = open(os.path.join(wd, "2007_test.txt"), 'a')
VOC_train_file = open(os.path.join(work_sapce_dir, "ImageSets/Main/train.txt"), 'a')
VOC_test_file = open(os.path.join(work_sapce_dir, "ImageSets/Main/test.txt"), 'a')
list = os.listdir(image_dir) # list image files
probo = random.randint(1, 100)
print("Probobility: %d" % probo)
for i in range(0,len(list)):
    path = os.path.join(image_dir,list[i])
    if os.path.isfile(path):
        image_path = image_dir + list[i]
        voc_path = list[i]
        (nameWithoutExtention, extention) = os.path.splitext(os.path.basename(image_path))
        (voc_nameWithoutExtention, voc_extention) = os.path.splitext(os.path.basename(voc_path))
        annotation_name = nameWithoutExtention + '.xml'
        annotation_path = os.path.join(annotation_dir, annotation_name)
    probo = random.randint(1, 100)
    print("Probobility: %d" % probo)
    if(probo < 80):
        if os.path.exists(annotation_path):
            train_file.write(image_path + '\n')
            VOC_train_file.write(voc_nameWithoutExtention + '\n')
            convert_annotation(nameWithoutExtention)
    else:
        if os.path.exists(annotation_path):
            test_file.write(image_path + '\n')
            VOC_test_file.write(voc_nameWithoutExtention + '\n')
            convert_annotation(nameWithoutExtention)
train_file.close()
test_file.close()
VOC_train_file.close()
VOC_test_file.close()
执行完以后,在darknet目录中有2007_train.txt和2007_test.txt.。VOC2007文件夹中有labels与ImageSets两个文件夹
注意:需要修改代码中 classes
3、下载预训练权重
此处使用的实在coco数据集上面训练的预训练权重(可在官网下载其他的权重文件)
链接: https://pan.baidu.com/s/1QxAJEHMVTEvul7_B08CPXA 提取码: z2up
4、修改配置文件
4.1、data/voc.names==》data/voc-head.names
里面主要放置类别标签名
原来内容如图
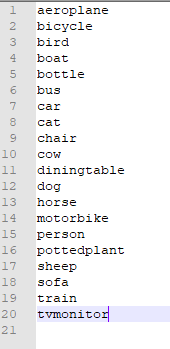
可以先保留原来文本,重新复制重命名一份voc-head.names.内容如下
![]()
自己的类别标签名。
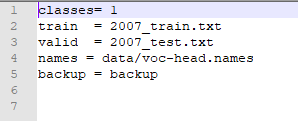
4.2、cfg/voc.data==》cfg/voc-head.data
里面主要放置:类别数目,生成的2007_train.txt与2007_test.txt位置,上面修改的voc.names位置,以及backup的位置。
原内容如下

注意:一定要按照自己的修改
voc-head.data 修改后的内容如下图
4.3、cfg/yolov4-custom.cfg==》cfg/yolov4-head.cfg
主要是训练的一些配置
主要修改的地方如下
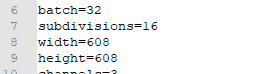
- 如下1 会影响内存的哦,内存不够就该改改也行可以跑
batch=32
subdivisions=16
width=608
height=608
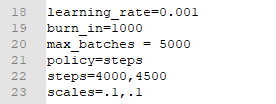
- 如下2 最大的batches
max_batches = 5000 (一般是类别数*2000 最好不低于4000)
policy=steps
steps=4000,4500 (学习率的变化一般是总batches的80%与90%进行学习率的调整)
scales=.1,.1
- 如下3 调整yolo标签下的classes数与上面的convolutional标签的filters
[convolutional]
size=1
stride=1
pad=1
filters=18 (类别数目+5)*3
activation=linear
[yolo]
mask = 3,4,5
anchors = 12, 16, 19, 36, 40, 28, 36, 75, 76, 55, 72, 146, 142, 110, 192, 243, 459, 401
classes=1 (自己的类别数)
num=9
jitter=.3
ignore_thresh = .7
truth_thresh = 1
scale_x_y = 1.1
iou_thresh=0.213
cls_normalizer=1.0
iou_normalizer=0.07
iou_loss=ciou
nms_kind=greedynms
beta_nms=0.6
max_delta=5
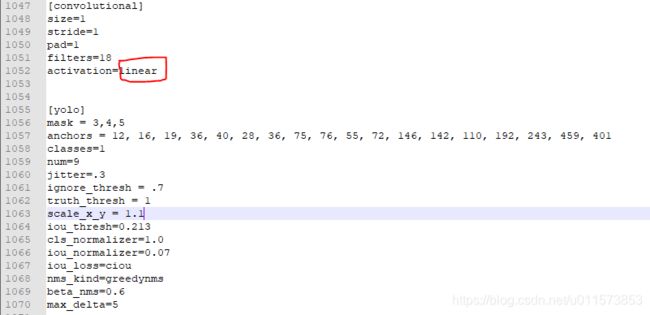
敲黑板:一共有三处yolo需要修改,切记、切记
5、进行训练
确认上面的修改完成后就可以训练了
./darknet detector train cfg/voc-head.data cfg/yolov4-head.cfg yolov4.conv.137
或 可以显示训练变化的map
./darknet detector train cfg/voc-head.data cfg/yolov4-head.cfg yolov4.conv.137 -map
6、测试
6.1、修改cfg/yolov4-custom.cfg==》cfg/yolov4-head-test.cfg
修改
batch=1
subdivisions=1
6.2、进行测试
- 图片测试
./darknet detector test cfg/voc-head.data cfg/yolov4-head-test.cfg backup/yolov4-head_final.weights img1.jpg
- 视频测试
./darknet detector demo cfg/voc-head.data cfg/yolov4-head-test.cfg backup/yolov4-head_final.weights ship.mp4
7、代码测试
C++使用YOLOv4简单案例
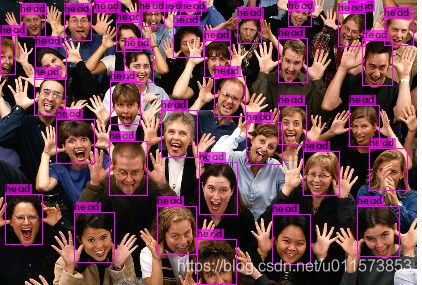
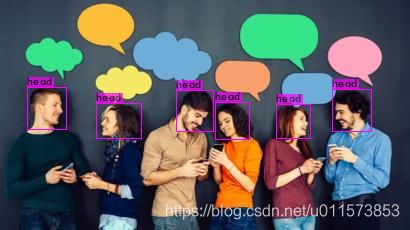
8、检测结果
yolov4的结果
模型下载地址
训练数据下载地址
学习的简单记录,方面下次使用