SpringBoot+Shiro+JWT+Mybatis-Plus搭建admin-shiro管理系统
1、项目背景
从零开始搭建一个项目骨架,最好选择合适,熟悉的技术,并且在未来易拓展,适合微服务化体系等。所以一般以Springboot作为我们的框架基础,这是离不开的了。
然后数据层,我们常用的是Mybatis,易上手,方便维护。但是单表操作比较困难,特别是添加字段或减少字段的时候,比较繁琐,所以这里我推荐使用Mybatis Plus,(为简化开发而生,只需简单配置,即可快速进行) CRUD 操作,从而节省大量时间。
作为一个项目骨架,权限也是我们不能忽略的,Apache Shiro 是一款强大易用的 Java 安全框架,Java 官方推荐使用 Shiro,它比 Spring Security 更简单易用,Spring 自己的系列 Spring side4 也把权限扩建换成 Shiro 了,所以使用Shiro作为我们的的权限。
Redis是现在主流的缓存中间件,也适合我们的项目。
现在 API 越来越流行,如何安全保护这些 API?JSON Web Tokens(JWT) 能提供基于 JSON 格式的安全认证。JWT 可以跨不同语言,自带身份信息,并且非常容易传递。
ok,我们现在就开始搭建我们的项目脚手架!
前端代码:https://blog.csdn.net/qq_45660133/article/details/128498333
技术栈:
- SpringBoot
- mybatis plus
- shiro
- lombok
- redis
- hibernate validatior
- jwt
2、项目基本构建
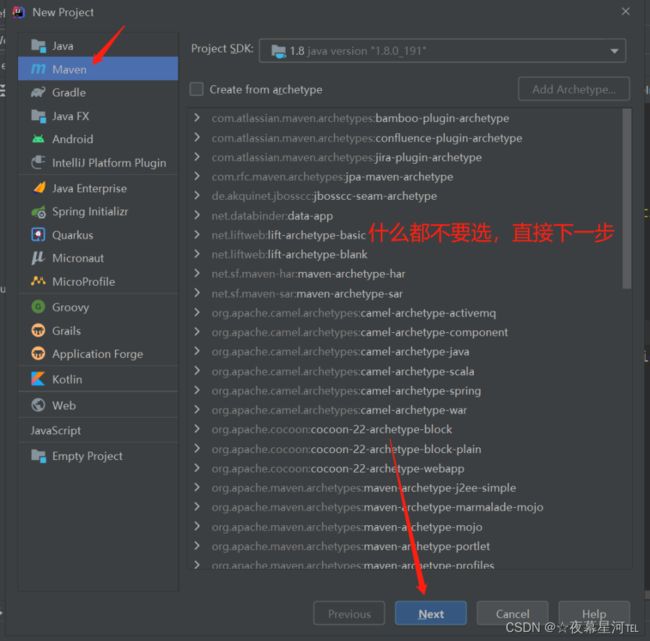
2.1、父工程
用idea创建项目时,直接创建

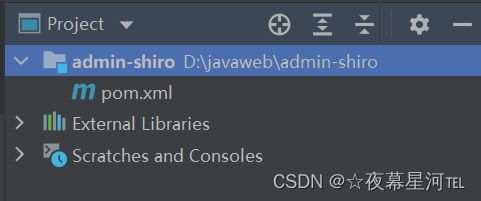
创建完成如图显示:

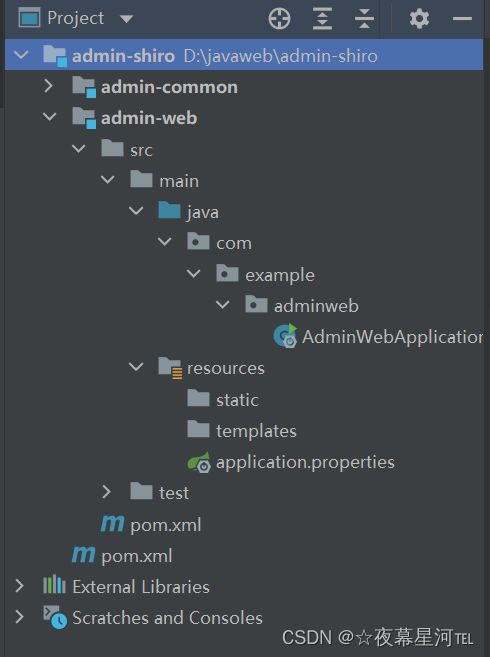
2.2、admin-common


可以看到父工程里面已经有admin-common了,如果没有可以自己加一个:

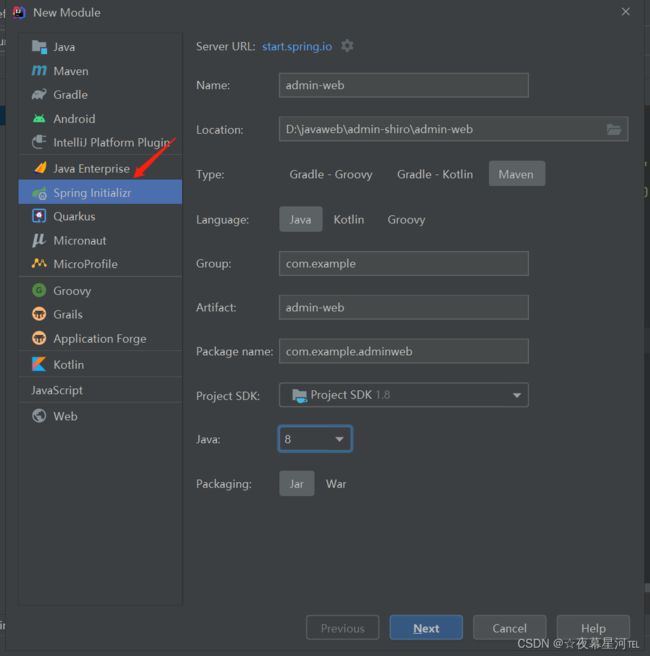
2.3、admin-web
<?xml version="1.0" encoding="UTF-8"?>
://maven.apache.org/POM/4.0.0" xmlns:xsi="http://www.w3.org/2001/XMLSchema-instance"
xsi:schemaLocation="http://maven.apache.org/POM/4.0.0 https://maven.apache.org/xsd/maven-4.0.0.xsd">
>4.0.0 >
>
>org.springframework.boot >
>spring-boot-starter-parent >
>2.3.0.RELEASE >
> <!-- lookup parent from repository -->
com.example
admin-web
0.0.1-SNAPSHOT
admin-web
SpringBoot admin Shiro
1.8
org.springframework.boot
spring-boot-starter-web
>
>org.springframework.boot >
>spring-boot-starter-test >
>test >
>
>
>
>
>
>org.springframework.boot >
>spring-boot-maven-plugin >
>
>
>
>


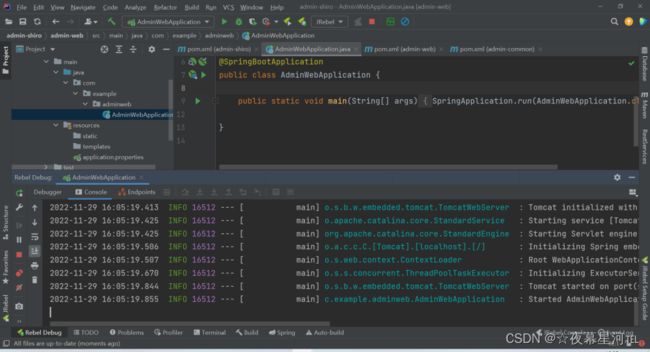
2.4、启动项目
启动成功,到这里项目已经创建好了
3、Mybatis Plus
3.1、依赖
<project xmlns="http://maven.apache.org/POM/4.0.0" xmlns:xsi="http://www.w3.org/2001/XMLSchema-instance"
  xsi:schemaLocation="http://maven.apache.org/POM/4.0.0 https://maven.apache.org/xsd/maven-4.0.0.xsd">
  <modelVersion>4.0.0modelVersion>
  <parent>
    <groupId>org.springframework.bootgroupId>
    <artifactId>spring-boot-starter-parentartifactId>
    <version>2.3.0.RELEASEversion>
    <relativePath/>
  parent>
  <groupId>com.examplegroupId>
  <artifactId>admin-webartifactId>
  <version>0.0.1-SNAPSHOTversion>
  <name>admin-webname>
  <description>SpringBoot admin Shirodescription>
  <properties>
    <java.version>1.8java.version>
  properties>
  <dependencies>
    <dependency>
      <groupId>org.springframework.bootgroupId>
      <artifactId>spring-boot-starter-webartifactId>
    dependency>


    <dependency>
      <groupId>mysqlgroupId>
      <artifactId>mysql-connector-javaartifactId>
    dependency>

    <dependency>
      <groupId>org.springframework.bootgroupId>
      <artifactId>spring-boot-starter-jdbcartifactId>
    dependency>

    <dependency>
      <groupId>com.alibabagroupId>
      <artifactId>druid-spring-boot-starterartifactId>
      <version>1.1.22version>
    dependency>

    <dependency>
      <groupId>com.baomidougroupId>
      <artifactId>mybatis-plus-boot-starterartifactId>
      <version>3.2.0version>
    dependency>


    <dependency>
      <groupId>com.alibabagroupId>
      <artifactId>fastjsonartifactId>
      <version>1.2.7version>
    dependency>


    <dependency>
      <groupId>org.projectlombokgroupId>
      <artifactId>lombokartifactId>
      <version>1.18.8version>
    dependency>


    <dependency>
      <groupId>org.springframework.bootgroupId>
      <artifactId>spring-boot-starter-testartifactId>
      <scope>testscope>
    dependency>
  dependencies>

  <build>
    <plugins>
      <plugin>
        <groupId>org.springframework.bootgroupId>
        <artifactId>spring-boot-maven-pluginartifactId>
      plugin>
    plugins>
  build>

project>
3.2、yml配置文件
server:
  port: 8080

spring:
  datasource:
    driver-class-name: com.mysql.cj.jdbc.Driver
    url: jdbc:mysql://localhost:3306/admin?useUnicode=true&characterEncoding=UTF-8&serverTimezone=Asia/Shanghai
    username: root
    password: 123456
    druid:
      initial-size: 5
      max-active: 100
      min-idle: 5
      max-wait: 60000
      time-between-eviction-runs-millis: 60000
      min-evictable-idle-time-millis: 30000
      validation-query: SELECT 1 FROM DUAL
      test-while-idle: true
      test-on-borrow: true
      test-on-return: false

# Mybatis-plus配置
mybatis-plus:
  # 配置Mapper映射文件
  mapper-locations: classpath*:/mapper/*Mapper.xml
  # 配置MyBatis数据返回类型别名(默认别名是类名)
  type-aliases-package: com.example.adminweb.entity
  configuration:
    # 自动驼峰命名
    map-underscore-to-camel-case: true
    # 打印SQL语句
    log-impl: org.apache.ibatis.logging.stdout.StdOutImpl

# Mybatis SQL 打印(方法接口所在的包,不是Mapper.xml所在的包)
logging:
  level:
    com.cs.admin.mapper: debug
上面除了配置数据库的信息,还配置了myabtis plus的一些配置
3.3、添加分页插件
package com.example.adminweb.config;

import com.baomidou.mybatisplus.autoconfigure.MybatisPlusPropertiesCustomizer;
import com.baomidou.mybatisplus.core.MybatisConfiguration;
import com.baomidou.mybatisplus.core.config.GlobalConfig;
import com.baomidou.mybatisplus.extension.handlers.MybatisEnumTypeHandler;
import com.baomidou.mybatisplus.extension.plugins.PaginationInterceptor;
import org.mybatis.spring.annotation.MapperScan;
import org.springframework.context.annotation.Bean;
import org.springframework.context.annotation.Configuration;
import org.springframework.transaction.annotation.EnableTransactionManagement;

@Configuration
@EnableTransactionManagement
@MapperScan("com.example.adminweb.dao")
public class MybatisPlusConfig {
    @Bean
    public MybatisPlusPropertiesCustomizer mybatisPlusPropertiesCustomizer() {
        // 序列化枚举值为数据库存储值
//        FastJsonConfig config = new FastJsonConfig();
//        config.setSerializerFeatures(SerializerFeature.WriteEnumUsingToString);
        return properties -> {
            GlobalConfig globalConfig = properties.getGlobalConfig();
            globalConfig.setBanner(false);
            MybatisConfiguration configuration = new MybatisConfiguration();
            configuration.setDefaultEnumTypeHandler(MybatisEnumTypeHandler.class);
            properties.setConfiguration(configuration);
        };
    }

    /**
     * 分页插件
     */
    @Bean
    public PaginationInterceptor paginationInterceptor() {
        return new PaginationInterceptor();
    }
}
3.4、代码生成
利用代码生成器生成entity、service、dao、controller

package com.example.adminweb;
import org.mybatis.spring.annotation.MapperScan;
import org.springframework.boot.SpringApplication;
import org.springframework.boot.autoconfigure.SpringBootApplication;
@SpringBootApplication
@MapperScan("com.example.adminweb.dao")
public class AdminWebApplication {
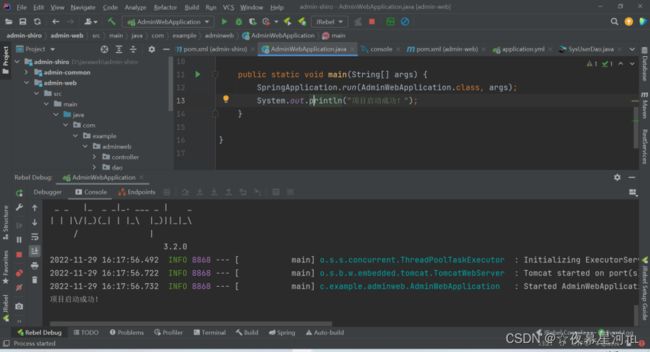
public static void main(String[] args) {
SpringApplication.run(AdminWebApplication.class, args);
System.out.println("项目启动成功!");
}
}
3.4、测试
package com.example.adminweb.controller;

import com.baomidou.mybatisplus.core.conditions.query.QueryWrapper;
import com.baomidou.mybatisplus.extension.api.R;
import com.baomidou.mybatisplus.extension.plugins.pagination.Page;
import com.example.adminweb.entity.SysUser;
import com.example.adminweb.service.SysUserService;
import lombok.extern.slf4j.Slf4j;
import org.springframework.web.bind.annotation.*;

import javax.annotation.Resource;
import java.io.Serializable;
import java.util.List;

/**
 * (SysUser)表控制层
 *
 * @author qrxm
 * @since 2022-11-29 16:15:30
 */
@Slf4j
@RestController
@RequestMapping("sysUser")
public class SysUserController {
    /**
     * 服务对象
     */
    @Resource
    private SysUserService sysUserService;

    /**
     * 分页查询所有数据
     *
     * @param page 分页对象
     * @param sysUser 查询实体
     * @return 所有数据
     */
    @GetMapping("/queryAll")
    public R selectAll(Page> page, SysUser sysUser) {
        log.info("操作成功!!!!");
        return R.ok(this.sysUserService.page(page, new QueryWrapper<>(sysUser)));
    }

    /**
     * 通过主键查询单条数据
     *
     * @param id 主键
     * @return 单条数据
     */
    @GetMapping("{id}")
    public R selectOne(@PathVariable Serializable id) {
        return R.ok(this.sysUserService.getById(id));
    }

    /**
     * 新增数据
     *
     * @param sysUser 实体对象
     * @return 新增结果
     */
    @PostMapping("/add")
    public R insert(@RequestBody SysUser sysUser) {
        return R.ok(this.sysUserService.save(sysUser));
    }

    /**
     * 修改数据
     *
     * @param sysUser 实体对象
     * @return 修改结果
     */
    @PutMapping("/edit")
    public R update(@RequestBody SysUser sysUser) {
        return R.ok(this.sysUserService.updateById(sysUser));
    }

    /**
     * 删除数据
     *
     * @param idList 主键结合
     * @return 删除结果
     */
    @DeleteMapping("/delete")
    public R delete(@RequestParam("idList") List> idList) {
        return R.ok(this.sysUserService.removeByIds(idList));
    }
}
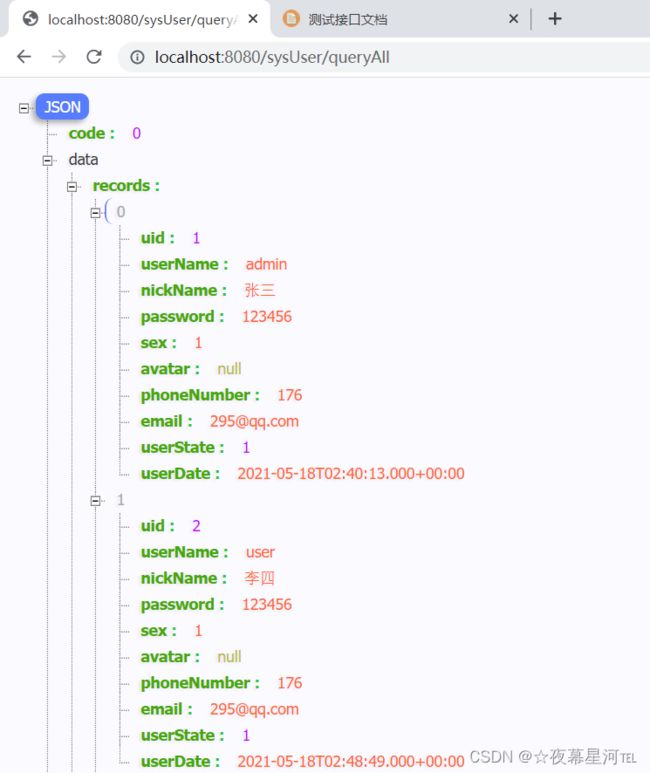
测试:http://localhost:8080/sysUser/queryAll

4、Swagger2
4.1、依赖
<!-- swagger2 依赖 -->
<dependency>
    <groupId>io.springfox</groupId>
    <artifactId>springfox-swagger2</artifactId>
    <version>2.7.0</version>
</dependency>
<!-- Swagger第三方ui依赖 -->
<dependency>
    <groupId>com.github.xiaoymin</groupId>
    <artifactId>swagger-bootstrap-ui</artifactId>
    <version>1.9.6</version>
</dependency>
4.2、Swagger2配置
package com.example.adminweb.config;
import org.springframework.context.annotation.Bean;
import org.springframework.context.annotation.Configuration;
import org.springframework.web.servlet.config.annotation.EnableWebMvc;
import springfox.documentation.builders.ApiInfoBuilder;
import springfox.documentation.builders.PathSelectors;
import springfox.documentation.builders.RequestHandlerSelectors;
import springfox.documentation.service.ApiInfo;
import springfox.documentation.service.Contact;
import springfox.documentation.spi.DocumentationType;
import springfox.documentation.spring.web.plugins.Docket;
import springfox.documentation.swagger2.annotations.EnableSwagger2;
/**
* Swagger2配置
*/
@Configuration
//@EnableWebMvc
@EnableSwagger2
public class Swagger2Config {
@Bean
public Docket createRestApi() {//规定扫描包下的注解
return new Docket(DocumentationType.SWAGGER_2)
.apiInfo(apiInfo())
.groupName("SpringBoot-Shiro-admin权限框架")
.select()
//为当前包下的controller生成api文档
.apis(RequestHandlerSelectors.basePackage("com.example.adminweb.controller"))
.paths(PathSelectors.any())
.build();
}
private ApiInfo apiInfo() {
//设置文档信息
return new ApiInfoBuilder()
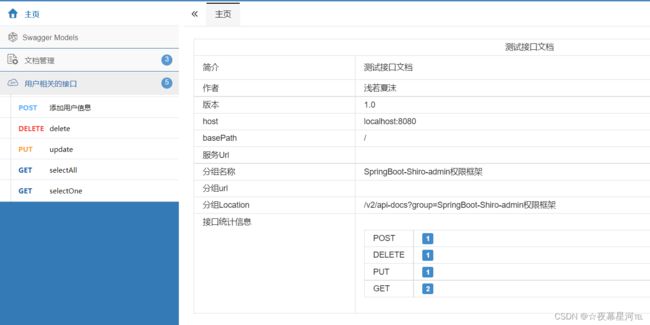
.title("测试接口文档")
.description("测试接口文档")
.contact(new Contact("浅若夏沫", "http:localhost:8080/doc.html",
"[email protected]"))
.version("1.0")
.build();
}
}
4.3、yml配置
server:
  port: 8080

spring:
  mvc:
    pathmatch:
      matching-strategy:
        ant_path_matcher
4.4、测试
测试地址:http://localhost:8080/doc.html
5、统一校验参数,统一结果,统一异常,统一日志
5.1、统一校验参数
<dependency>
  <groupId>org.springframework.bootgroupId>
  <artifactId>spring-boot-starter-validationartifactId>
dependency>
当我们表单数据提交的时候,前端的校验我们可以使用一些类似于jQuery Validate等js插件实现,而后端我们可以使用Hibernate validatior来做校验。
我们使用springboot框架作为基础,那么就已经自动集成了Hibernate validatior。
首先列举一下Hibernate-Validator所有的内置验证注解。
- 常用的
| 注解 | 使用 |
|---|---|
| @NotNull | 被注释的元素(任何元素)必须不为 null, 集合为空也是可以的。没啥实际意义 |
| @NotEmpty | 用来校验字符串、集合、map、数组不能为null或空 (字符串传入空格也不可以)(集合需至少包含一个元素) |
| @NotBlank | 只用来校验字符串不能为null,空格也是被允许的 。校验字符串推荐使用@NotEmpty |
| @Size(max=, min=) | 指定的字符串、集合、map、数组长度必须在指定的max和min内 允许元素为null,字符串允许为空格 |
| @Length(min=,max=) | 只用来校验字符串,长度必须在指定的max和min内 允许元素为null |
| @Range(min=,max=) | 用来校验数字或字符串的大小必须在指定的min和max内字符串会转成数字进行比较,如果不是数字校验不通过允许元素为null |
| @Min() | 校验数字(包括integer short long int 等)的最小值,不支持小数即double和float允许元素为null |
| @Max() | 校验数字(包括integer short long int 等)的最小值,不支持小数即double和float允许元素为null |
| @Pattern() | 正则表达式匹配,可用来校验年月日格式,是否包含特殊字符(regexp = "^[a-zA-Z0-9\u4e00-\u9fa5 |
除了@Empty要求字符串不能全是空格,其他的字符串校验都是允许空格的。message是可以引用常量的,但是如@Size里max不允许引用对象常量,基本类型常量是可以的。注意大部分规则校验都是允许参数为null,即当不存在这个值时,就不进行校验了
- 不常用的
@Null 被注释的元素必须为 null
@AssertTrue 被注释的元素必须为 true
@AssertFalse 被注释的元素必须为 false
@DecimalMin(value) 被注释的元素必须是一个数字,其值必须大于等于指定的最小值
@DecimalMax(value) 被注释的元素必须是一个数字,其值必须小于等于指定的最大值
@Digits (integer, fraction) 被注释的元素必须是一个数字,其值必须在可接受的范围内
@Past 被注释的元素必须是一个过去的日期
@Future 被注释的元素必须是一个将来的日期
@Email 被注释的元素必须是电子邮箱地址
- 分组校验
/**
* 注解@GroupSequence指定分组校验的顺序,即先校验Save分组的,如果不通过就不会去做后面分组的校验了
*/
@Data
@ApiModel("用户添加修改对象")
@GroupSequence({Save.class, Update.class, UserDto.class})
public class UserDto {

    @NotEmpty(message = DefaultErrorCode.ARGUMENTS_MISSING, groups = Update.class)
    @ApiModelProperty(notes = "用户id", example = "2441634686")
    private String id;

    @NotEmpty(message = DefaultErrorCode.ARGUMENTS_MISSING, groups = Save.class)
    @Size(min = 1, max = RestfulConstants.NAME_MAX_LENGTH, message = CountGroupErrorCode.USER_NAME_IS_ILLEGAL)
    @Pattern(regexp = ValidatorConstant.LEGAL_CHARACTER, message = CountGroupErrorCode.USER_NAME_IS_ILLEGAL)
    @ApiModelProperty(notes = "用户姓名", example = "张飞")
    private String name;

    @NotNull(message = DefaultErrorCode.ARGUMENTS_MISSING)
    @Min(value = 0, message = DefaultErrorCode.ARGUMENTS_MISSING, groups = Save.class)
    @ApiModelProperty(notes = "年龄", example = "12")
    private Integer age;

    @ApiModelProperty(notes = "手机号", example = "18108195635")
    @Pattern(regexp = ValidatorConstant.MOBILE)
    private String phone;

    @ApiModelProperty(notes = "出生日期,格式如2018-08-08", example = "2018-08-08")
    private LocalDate birthday;

    @EnumCheck(enumClass = SexEnum.class, message = CountGroupErrorCode.USER_SEX_ILLEGAL)
    @ApiModelProperty(notes = "性别,1-男,2-女,3-未知", example = "2")
    private Integer sex;

    /**
     * 级联校验只需要添加@Valid
     * 注解@ConvertGroup用于分组的转换,只能和@Valid一起使用。(一般用不到)
     */
    @Size(max = RestfulConstants.DIRECTION_MAX_NUMBER, message = CountGroupErrorCode.DIRECTION_NUMBER_IS_ILLEGAL)
    @ApiModelProperty(notes = "包含的方向列表")
    @Valid
    //@ConvertGroup(from = Search.class, to = Update.class)
    private List<DirectionDto> list;

}
- 接口校验
/**
 * 这里的@Validated({Save.class, Default.class}) 其中Default.class是校验注解默认的分组,
 * (也就说明自定义校验注解时要加上)
 */
@PostMapping(value = "/add")
@ApiOperation(value = "添加用户")
public BaseResponse addUser(@Validated({Save.class, Default.class}) @RequestBody UserDto addDto) {
    BaseResponse<String> response = new BaseResponse<>();
    response.setMsg("添加成功");
    return response;
}

@PostMapping(value = "/update")
@ApiOperation(value = "修改用户")
public BaseResponse updatedUser(@Validated({Update.class, Default.class}) @RequestBody UserDto updateDto) {
    BaseResponse<String> response = new BaseResponse<>();
    response.setMsg("修改成功");
    return response;
}
使用分组能极大的复用需要验证的类信息。而不是按业务重复编写冗余的类。其中@GroupSequence提供组序列的形式进行顺序式校验,即先校验@Save分组的,如果校验不通过就不进行后续的校验多了。我认为顺序化的校验,场景更多的是在业务处理类,例如联动的属性验证,值的有效性很大程度上不能从代码的枚举或常量类中来校验。
那么用起来啥样子的呢?
第一步:首先在实体的属性上添加对应的校验规则,比如:
@TableName("sys_user")
public class SysUser implements Serializable {
    private static final long serialVersionUID = 1L;
    @TableId(value = "id", type = IdType.AUTO)
    private Integer id;
    @NotBlank(message = "昵称不能为空")
    private String username;
    @NotBlank(message = "邮箱不能为空")
    @Email(message = "邮箱格式不正确")
    private String email;

    ...
}
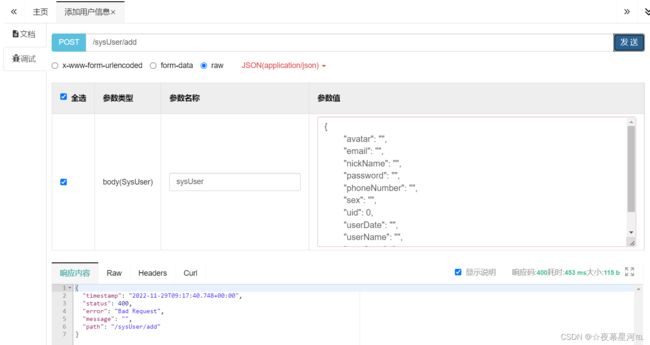
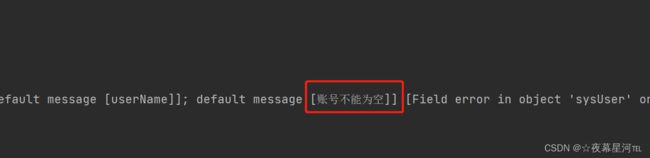
第二步 :这里我们使用@Validated注解方式,如果实体不符合要求,系统会抛出异常,那么我们的异常处理中就捕获到MethodArgumentNotValidException。
/**
* 测试实体校验
* @param user
* @return
*/
@ApiOperation(value = "添加用户信息")
@PostMapping("/add")
public R insert(@Validated @RequestBody SysUser sysUser) {
    return R.ok(sysUser);
}
测试
5.2、统一结果
目前的前后端开发大部分数据的传输格式都是json,因此定义一个统一规范的数据格式有利于前后端的交互与UI的展示。
        org.projectlombok
        lombok
        1.18.8
    org.example
    admin-common
    1.0-SNAPSHOT
5.2.1、统一结果的一般形式
- code :响应状态码
- message :响应结果描述
- data:返回的数据
- 是否响应成功
- 其他标识符
5.2.2、结果类枚举
响应状态码一般用枚举表示如:code ,message
package com.example.admincommon.enums;

import lombok.Getter;

@Getter
public enum ResultCodeEnum {
    SUCCESS(200,"操作成功"),
    ERROR(500,"操作失败"),
    UNKNOWN_ERROR(20001,"未知错误"),
    PARAM_ERROR(20002,"参数错误"),
    NULL_POINT(20003,"空指针异常"),
    HTTP_CLIENT_ERROR(20004,"接口请求异常");

    // 响应状态码
    private Integer code;
    // 响应信息
    private String message;

    ResultCodeEnum(Integer code, String message) {
        this.code = code;
        this.message = message;
    }
}
5.2.3、统一结果类
第5个属于自定义返回,利用前4者可定义统一返回对象
注意:
- 外界只可以调用统一返回类的方法,不可以直接创建,因此构造器私有;
- 内置静态方法,返回对象;
- 为便于自定义统一结果的信息,建议使用链式编程,将返回对象设类本身,即return this;
- 响应数据由于为json格式,可定义为JsonObject或Map形式,不知道类型可定义泛型T;
package com.example.admincommon.utils;

import com.example.admincommon.enums.ResultCodeEnum;
import lombok.Data;

@Data
public class Result {

    private Integer code;

    private String message;

    private T data;

    // 构造器私有
    private Result(){}

    // 通用返回成功
    public static  Result ok() {
        Result r = new Result<>();
        r.setCode(ResultCodeEnum.SUCCESS.getCode());
        r.setMessage(ResultCodeEnum.SUCCESS.getMessage());
        return r;
    }

    // 通用返回失败,未知错误
    public static  Result error() {
        Result r = new Result<>();
        r.setCode(ResultCodeEnum.UNKNOWN_ERROR.getCode());
        r.setMessage(ResultCodeEnum.UNKNOWN_ERROR.getMessage());
        return r;
    }

    // 设置结果,形参为结果枚举
    public static  Result setResult(ResultCodeEnum result) {
        Result r = new Result<>();
        r.setCode(result.getCode());
        r.setMessage(result.getMessage());
        return r;
    }

    /**------------使用链式编程,返回类本身-----------**/

    // 自定义返回数据
    public Result data(T map) {
        this.setData(map);
        return this;
    }

    // 自定义状态信息
    public Result message(String message) {
        this.setMessage(message);
        return this;
    }

    // 自定义状态码
    public Result code(Integer code) {
        this.setCode(code);
        return this;
    }
}
5.2.4、控制层返回
视图层使用统一结果
package com.example.adminweb.controller;

import com.baomidou.mybatisplus.core.conditions.query.QueryWrapper;
import com.baomidou.mybatisplus.extension.api.R;
import com.baomidou.mybatisplus.extension.plugins.pagination.Page;
import com.example.admincommon.utils.Result;
import com.example.adminweb.entity.SysUser;
import com.example.adminweb.service.SysUserService;
import io.swagger.annotations.Api;
import io.swagger.annotations.ApiOperation;
import lombok.extern.slf4j.Slf4j;
import org.springframework.validation.annotation.Validated;
import org.springframework.web.bind.annotation.*;

import javax.annotation.Resource;
import java.io.Serializable;
import java.util.List;

/**
 * (SysUser)表控制层
 *
 * @author qrxm
 * @since 2022-11-29 16:15:30
 */
@Slf4j
@RestController
@RequestMapping("sysUser")
@Api(value = "测试接口", tags = "用户相关的接口")
public class SysUserController {
    /**
     * 服务对象
     */
    @Resource
    private SysUserService sysUserService;

    /**
     * 分页查询所有数据
     *
     * @param page 分页对象
     * @param sysUser 查询实体
     * @return 所有数据
     */
    @GetMapping("/queryAll")
    public Result selectAll(Page page, SysUser sysUser) {
        log.info("操作成功!!!!");
        return Result.ok().data(this.sysUserService.page(page, new QueryWrapper<>(sysUser)));
    }
}
统一结果类的使用参考了mybatis-plus中R对象的设计
5.3、统一异常
有时候不可避免服务器报错的情况,如果不配置异常处理机制,就会默认返回tomcat或者nginx的5XX页面,对普通用户来说,不太友好,用户也不懂什么情况。这时候需要我们程序员设计返回一个友好简单的格式给前端。
处理办法如下:通过使用@ControllerAdvice来进行统一异常处理,@ExceptionHandler(value = RuntimeException.class)来指定捕获的Exception各个类型异常 ,这个异常的处理,是全局的,所有类似的异常,都会跑到这个地方处理。
因此,我们需要定义一个统一的全局异常来捕获这些信息,并作为一种结果返回控制层
@ControllerAdvice
该注解为统一异常处理的核心
是一种作用于控制层的切面通知(Advice),该注解能够将通用的@ExceptionHandler、@InitBinder和@ModelAttributes方法收集到一个类型,并应用到所有控制器上
该类中的设计思路:
- 使用@ExceptionHandler注解捕获指定或自定义的异常;
- 使用@ControllerAdvice集成@ExceptionHandler的方法到一个类中;
- 必须定义一个通用的异常捕获方法,便于捕获未定义的异常信息;
- 自定一个异常类,捕获针对项目或业务的异常;
- 异常的对象信息补充到统一结果枚举中;
自定义全局异常工具类
package com.example.admincommon.utils;

import java.io.PrintWriter;
import java.io.StringWriter;

public class ExceptionUtil {

    /**
     * 获取异常的堆栈信息
     *
     * @param t
     * @return
     */
    public static String getMessage(Throwable t) {
        StringWriter sw = new StringWriter();
        PrintWriter pw = new PrintWriter(sw);

        try {
            //将异常信息输出在控制台
            t.printStackTrace(pw);
            //将异常信息返回
            return sw.toString();
        } finally {
            pw.close();
        }
    }
}
自定义全局异常类
package com.example.adminweb.exceptions;

import com.example.admincommon.enums.ResultCodeEnum;
import lombok.Data;

@Data
public class CustomizeException extends RuntimeException {
    private Integer code;

    public CustomizeException(Integer code, String message) {
        super(message);
        this.code = code;
    }

    public CustomizeException(ResultCodeEnum resultCodeEnum) {
        super(resultCodeEnum.getMessage());
        this.code = resultCodeEnum.getCode();
    }

    @Override
    public String toString() {
        return "CMSException{" + "code=" + code + ", message=" + this.getMessage() + '}';
    }
}
统一异常处理器
package com.example.adminweb.exceptions;

import com.example.admincommon.enums.ResultCodeEnum;
import com.example.admincommon.utils.ExceptionUtil;
import com.example.admincommon.utils.Result;
import lombok.extern.slf4j.Slf4j;
import org.springframework.http.HttpStatus;
import org.springframework.validation.BindingResult;
import org.springframework.validation.ObjectError;
import org.springframework.web.bind.MethodArgumentNotValidException;
import org.springframework.web.bind.annotation.*;
import org.springframework.web.client.HttpClientErrorException;

import java.io.IOException;

@RestControllerAdvice
@Slf4j
public class GlobalExceptionHandler {

    /**-------- 通用异常处理方法 --------**/
    @ExceptionHandler(Exception.class)
    public Result error(Exception e) {
         //e.printStackTrace();
        log.error(ExceptionUtil.getMessage(e));
        return Result.error();    // 通用异常结果
    }

    /**-------- 指定异常处理方法 --------**/
    @ExceptionHandler(NullPointerException.class)
    public Result error(NullPointerException e) {
        e.printStackTrace();
        return Result.setResult(ResultCodeEnum.NULL_POINT);
    }

    @ExceptionHandler(HttpClientErrorException.class)
    public Result error(IndexOutOfBoundsException e) {
        e.printStackTrace();
        return Result.setResult(ResultCodeEnum.HTTP_CLIENT_ERROR);
    }

    // 捕捉shiro的异常
    //@ResponseStatus(HttpStatus.UNAUTHORIZED)
    //@ExceptionHandler(ShiroException.class)
    //public RespBean handle401(ShiroException e) {
    //    return RespBean.error(401, e.getMessage(),null);
    //}
    /**
     * 处理Assert的异常
     * 方法调用时判断
     */
    @ResponseStatus(HttpStatus.BAD_REQUEST)
    @ExceptionHandler(value = IllegalArgumentException.class)
    public Result handler(IllegalArgumentException e) throws IOException {
        log.error("Assert异常:-------------->{}",e.getMessage());
        return Result.error().message(e.getMessage());
    }
    /**
     * @Validated 校验错误异常处理
     * 实体校验:在controller方法里面加上@Validated注解就会进行校验
     * 错误,就放回错误信息
     */
    @ResponseStatus(HttpStatus.BAD_REQUEST)
    @ExceptionHandler(value = MethodArgumentNotValidException.class)
    public Result handler(MethodArgumentNotValidException e) throws IOException {
        log.error("运行时异常:-------------->",e);
        BindingResult bindingResult = e.getBindingResult();
        ObjectError objectError = bindingResult.getAllErrors().stream().findFirst().get();
        return Result.error().message(objectError.getDefaultMessage());
    }

    //@ResponseStatus(HttpStatus.BAD_REQUEST)
    //@ExceptionHandler(value = RuntimeException.class)
    //public Result handler(RuntimeException e) throws IOException {
    //    log.error("运行时异常:-------------->",e);
    //    return Result.error().message(e.getMessage());
    //}

    /**-------- 自定义定异常处理方法 --------**/
    @ExceptionHandler(CustomizeException.class)
    public Result error(CustomizeException e) {
        e.printStackTrace();
        return Result.error().message(e.getMessage()).code(e.getCode());
    }
}
控制层展示
以下为展示当遇到null指定异常时,返回的结果信息

5.4、统一日志
日志是追踪错误定位问题的关键,尤其在生产环境中,需要及时修复热部署,不会提供开发者debug的环境,此时日志将会是最快解决问题的关键
日志的框架比较丰富,由于spring boot对logback的集成,因此推荐使用logback在项目中使用。
Logback
关于logback的配置和介绍,可以参考官网或推荐博客glmapper的logback博客,logback-spring.xml配置文件,详细参考:https://blog.csdn.net/xu_san_duo/article/details/80364600
配置
以下直接贴出配置信息,介绍信息可以直接参考备注:logback.xml
<configuration>

  <contextName>admincontextName>
  <appender name="consoleLog" class="ch.qos.logback.core.ConsoleAppender">
    <encoder class="ch.qos.logback.classic.encoder.PatternLayoutEncoder">

      <pattern>%yellow(%d{yyyy-MM-dd HH:mm:ss}) %red([%thread]) %highlight(%-5level) %cyan(%logger{50}) --> %msg %npattern>
      <charset>UTF-8charset>
    encoder>
  appender>


  <appender name="fileInfoLog" class="ch.qos.logback.core.rolling.RollingFileAppender">
    <filter class="ch.qos.logback.classic.filter.LevelFilter">
      <level>ERRORlevel>
      <onMatch>DENYonMatch>
      <onMismatch>ACCEPTonMismatch>
    filter>
    <encoder class="ch.qos.logback.classic.encoder.PatternLayoutEncoder">
      <pattern>
        %d{yyyy-MM-dd HH:mm:ss} [%thread] %-5level %logger{50} - %msg%n
      pattern>
      <charset>UTF-8charset>
    encoder>

    <rollingPolicy class="ch.qos.logback.core.rolling.TimeBasedRollingPolicy">

      <fileNamePattern>D:/SpringBootLog/adminlayui.info.%d{yyyy-MM-dd}.logfileNamePattern>

      <MaxHistory>90MaxHistory>

      <totalSizeCap>1GBtotalSizeCap>
    rollingPolicy>
  appender>

  <appender name="fileErrorLog" class="ch.qos.logback.core.rolling.RollingFileAppender">
    <filter class="ch.qos.logback.classic.filter.ThresholdFilter">
      <level>ERRORlevel>
    filter>
    <encoder>
      <pattern>
        %d{yyyy-MM-dd HH:mm:ss} [%thread] %-5level %logger{50} - %msg%n
      pattern>
    encoder>

    <rollingPolicy class="ch.qos.logback.core.rolling.TimeBasedRollingPolicy">

      <fileNamePattern>D:/SpringBootLog/adminlayui.error.%d{yyyy-MM-dd}.logfileNamePattern>
      <MaxHistory>90MaxHistory>
    rollingPolicy>
  appender>
  <root level="info">
    <appender-ref ref="consoleLog"/>
    <appender-ref ref="fileInfoLog"/>
    <appender-ref ref="fileErrorLog"/>
  root>
configuration>
日志收集异常信息
日志信息往往伴随着异常信息的输出,因此,我们需要修改统一异常的处理器,将异常信息以流的方式写到日志文件中
异常信息文件工具类
@Slf4j
public class ExceptionUtil {

    /**
    * 打印异常信息
    */
    public static String getMessage(Exception e) {
        String swStr = null;
        try (StringWriter sw = new StringWriter(); PrintWriter pw = new PrintWriter(sw)) {
            e.printStackTrace(pw);
            pw.flush();
            sw.flush();
            swStr = sw.toString();
        } catch (IOException ex) {
            ex.printStackTrace();
            log.error(ex.getMessage());
        }
        return swStr;
    }
}
6、Redis
6.1、依赖
<dependency>
    <groupId>org.springframework.bootgroupId>
    <artifactId>spring-boot-starter-data-redisartifactId>
dependency>

<dependency>
    <groupId>org.apache.commonsgroupId>
    <artifactId>commons-pool2artifactId>
dependency>
6.2、yml配置
server:
  port: 8080

spring:
  redis:
    # Redis连接超时(毫秒)
    timeout: 10000ms
    # Redis服务器地址
    host: 47.115.143.129
    # Redis服务器端口
    port: 6379
    # 选择哪个库
    database: 0
    lettuce:
      pool:
        max-active: 8            # 可选,连接池最大连接数(使用负值表示没有限制)
        max-wait: 10000ms            # 可选,连接池最大阻塞时间(使用负值表示没有限制)
        max-idle: 8            # 可选,连接池最大空闲数
        min-idle: 0            # 可选,连接池最小空闲数
6.3、RedisConfig
package com.example.adminweb.config;

import org.springframework.context.annotation.Bean;
import org.springframework.context.annotation.Configuration;
import org.springframework.data.redis.connection.RedisConnectionFactory;
import org.springframework.data.redis.core.RedisTemplate;
import org.springframework.data.redis.serializer.RedisSerializer;
import org.springframework.data.redis.serializer.StringRedisSerializer;

@Configuration //当前类为配置类
    public class RedisConfig {
        @Bean //redisTemplate注入到Spring容器
        public RedisTemplate<String,String> redisTemplate(RedisConnectionFactory factory){
            RedisTemplate<String,String> redisTemplate=new RedisTemplate<>();
            RedisSerializer<String> redisSerializer = new StringRedisSerializer();
            redisTemplate.setConnectionFactory(factory);
            //key序列化
            redisTemplate.setKeySerializer(redisSerializer);
            //value序列化
            redisTemplate.setValueSerializer(redisSerializer);
            //value hashmap序列化
            redisTemplate.setHashKeySerializer(redisSerializer);
            //key hashmap序列化
            redisTemplate.setHashValueSerializer(redisSerializer);
            return redisTemplate;
        }
    }
6.4、测试
package com.example.adminweb.controller;
import com.baomidou.mybatisplus.core.conditions.query.QueryWrapper;
import com.baomidou.mybatisplus.extension.api.R;
import com.baomidou.mybatisplus.extension.plugins.pagination.Page;
import com.example.admincommon.utils.Result;
import com.example.adminweb.entity.SysUser;
import com.example.adminweb.service.SysUserService;
import io.swagger.annotations.Api;
import io.swagger.annotations.ApiOperation;
import lombok.extern.slf4j.Slf4j;
import org.springframework.beans.factory.annotation.Autowired;
import org.springframework.data.redis.core.RedisTemplate;
import org.springframework.validation.annotation.Validated;
import org.springframework.web.bind.annotation.*;
import javax.annotation.Resource;
import java.io.Serializable;
import java.util.List;
/**
* (SysUser)表控制层
*
* @author qrxm
* @since 2022-11-29 16:15:30
*/
@Slf4j
@RestController
@RequestMapping("sysUser")
@Api(value = "测试接口", tags = "用户相关的接口")
public class SysUserController {
@Autowired
private RedisTemplate redisTemplate;
@GetMapping("/setRedisValue")
public Result selectAll() {
redisTemplate.opsForValue().set("1","张三");
return Result.ok();
}
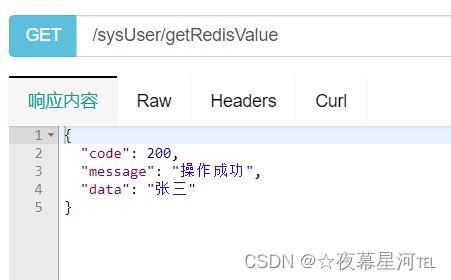
@GetMapping("/getRedisValue")
public Result getRedisValue(){
String name = redisTemplate.opsForValue().get("1").toString();
System.out.println(name);
if (!StringUtils.isEmpty(name)){
return Result.ok().data(name);
}
return Result.error();
}
}

7、Shiro+JWT
7.1、依赖
<dependency>
  <groupId>org.crazycakegroupId>
  <artifactId>shiro-redis-spring-boot-starterartifactId>
  <version>3.2.1version>
dependency>

<dependency>
  <groupId>cn.hutoolgroupId>
  <artifactId>hutool-allartifactId>
  <version>5.3.3version>
dependency>

<dependency>
  <groupId>io.jsonwebtokengroupId>
  <artifactId>jjwtartifactId>
  <version>0.9.1version>
dependency>

<dependency>
  <groupId>org.springframework.bootgroupId>
  <artifactId>spring-boot-configuration-processorartifactId>
  <optional>trueoptional>
dependency>
7.2、yml配置
shiro-redis:
  enabled: true
  redis-manager:
    host: 127.0.0.1:6379
blog:
  jwt:
    # 加密秘钥
    secret: f4e2e52034348f86b67cde581c0f9eb5
    # token有效时长,7天,单位秒
    expire: 604800
    header: token
JwtUtils
JwtUtils是个生成和校验jwt的工具类,其中有些jwt相关的密钥信息是从项目配置文件中配置的。
package com.example.adminweb.utils;

import io.jsonwebtoken.Claims;
import io.jsonwebtoken.Jwts;
import io.jsonwebtoken.SignatureAlgorithm;
import lombok.Data;
import lombok.extern.slf4j.Slf4j;
import org.springframework.boot.context.properties.ConfigurationProperties;
import org.springframework.stereotype.Component;

import java.util.Date;

/**
 * jwt工具类
 */
@Slf4j
@Data
@Component
@ConfigurationProperties(prefix = "blog.jwt")
public class JwtUtils {

    /**
     * JwtUtils是个生成和校验jwt的工具类,
     * 其中有些jwt相关的密钥信息是从项目配置文件中配置的
     */
    private String secret;
    private long expire;
    private String header;

    /**
     * 生成jwt token
     */
    public String generateToken(long userId) {
        Date nowDate = new Date();
        //过期时间
        Date expireDate = new Date(nowDate.getTime() + expire * 1000);

        return Jwts.builder()
                .setHeaderParam("typ", "JWT")
                .setSubject(userId+"")
                .setIssuedAt(nowDate)
                .setExpiration(expireDate)
                .signWith(SignatureAlgorithm.HS512, secret)
                .compact();
    }

    /**
     * 获取jwt的信息
     * @param token
     * @return
     */
    public Claims getClaimByToken(String token) {
        try {
            return Jwts.parser()
                    .setSigningKey(secret)
                    .parseClaimsJws(token)
                    .getBody();
        }catch (Exception e){
            log.debug("validate is token error ", e);
            return null;
        }
    }


    /**
     * token是否过期
     * @return  true:过期
     */
    public boolean isTokenExpired(Date expiration) {
        return expiration.before(new Date());
    }
}
JwtToken
shiro默认supports的是UsernamePasswordToken,而我们现在采用了jwt的方式,所以这里我们自定义一个JwtToken,来完成shiro的supports方法。
package com.example.admincommon.utils;

import org.apache.shiro.authc.AuthenticationToken;

public class JwtToken implements AuthenticationToken {

    private String token;

    public JwtToken(String token) {
        this.token = token;
    }
    @Override
    public Object getPrincipal() {
        return token;
    }
    @Override
    public Object getCredentials() {
        return token;
    }
}
UserProfile
而在UserRealm我们还用到了UserProfile,这是为了登录成功之后返回的一个用户信息的载体。
package com.example.admincommon.vo;

import lombok.Data;

import java.io.Serializable;

@Data
public class UserProfile implements Serializable {
    /**
     * 这是为了登录成功之后返回的一个用户信息的载体,
     */
    private Integer id;
    private String userName;
    private String avatar;
}
UserRealm
UserRealm是shiro进行登录或者权限校验的逻辑所在,算是核心了,我们需要重写3个方法,分别是
- supports:为了让realm支持jwt的凭证校验
- doGetAuthorizationInfo:权限校验
- doGetAuthenticationInfo:登录认证校验
package com.example.adminweb.realm;

import cn.hutool.core.bean.BeanUtil;
import com.alibaba.fastjson.JSON;
import com.alibaba.fastjson.JSONObject;
import com.example.admincommon.utils.JwtToken;
import com.example.admincommon.vo.UserProfile;
import com.example.adminweb.entity.SysUser;
import com.example.adminweb.service.SysUserService;
import com.example.adminweb.utils.JwtUtils;
import com.example.adminweb.utils.ShiroUtil;
import io.jsonwebtoken.Claims;
import lombok.extern.slf4j.Slf4j;
import org.apache.shiro.SecurityUtils;
import org.apache.shiro.authc.*;
import org.apache.shiro.authz.AuthorizationInfo;
import org.apache.shiro.authz.SimpleAuthorizationInfo;
import org.apache.shiro.realm.AuthorizingRealm;
import org.apache.shiro.session.Session;
import org.apache.shiro.subject.PrincipalCollection;
import org.springframework.beans.factory.annotation.Autowired;
import org.springframework.stereotype.Component;

import java.util.*;

@Slf4j
@Component
public class UserRealm extends AuthorizingRealm {
    /**
     * UserRealm是shiro进行登录或者权限校验的逻辑所在,算是核心了,我们需要重写3个方法,分别是
     * supports:为了让realm支持jwt的凭证校验
     * doGetAuthorizationInfo:权限校验
     * doGetAuthenticationInfo:登录认证校验
     */
    @Autowired
    JwtUtils jwtUtils;

    @Autowired
    SysUserService userService;

    /**
     * 根据token判断此Authenticator是否使用该realm
     * 必须重写不然shiro会报错
     * @param token
     * @return
     */
    @Override
    public boolean supports(AuthenticationToken token) {
        return token instanceof JwtToken;
    }

    /**
     * 只有当需要检测用户权限的时候才会调用此方法,例如 checkRole,checkPermission 之类的
     * @param principals
     * @return
     */
    @Override
    protected AuthorizationInfo doGetAuthorizationInfo(PrincipalCollection principals) {
        System.out.println("进入角色授权");
        //获取用户信息
        UserProfile profile = ShiroUtil.getProfile();
        System.out.println(profile.getUserName());

        //模拟从数据库获取当前用户的角色,通过用户名查询该用户拥有的角色名称
        List<Map<String, Object>> maps = userService.queryRolesPermissions(profile.getId());
        HashSet<String> hashSet = new HashSet<>();

        //模拟从数据库获取当前用户的权限,通过用户名查询该用户拥有的权限名称
//        Set qx = new HashSet<>();
        List<String> list = new ArrayList<>();

        //把角色和权限设置到 HashSet 和 List 中
        for (Map<String, Object> user : maps) {
            String role_name = user.get("role_code").toString();
            hashSet.add(role_name);
            String permission_name = user.get("permission").toString();
            list.add(permission_name);
            System.out.println("角色名称:"+role_name);
            System.out.println("角色权限:"+permission_name);
        }
        System.out.println("所有权限;"+list);

        //设置角色和权限
        SimpleAuthorizationInfo info = new SimpleAuthorizationInfo();
        //设置角色
        info.addRoles(hashSet);
        //设置权限
        info.addStringPermissions(list);

        //获取session
        Session session = SecurityUtils.getSubject().getSession();
        session.setAttribute("role", list);
        System.out.println("授权完成!");
        return info;
    }

    /**
     * 默认使用此方法进行用户名正确与否验证,错误抛出异常即可。
     * 认证信息 (身份验证)
     * Authentication 是用来验证用户身份
     * @param token
     * @return
     * @throws AuthenticationException
     */
    @Override
    protected AuthenticationInfo doGetAuthenticationInfo(AuthenticationToken token) throws AuthenticationException {
        JwtToken jwt = (JwtToken) token;
        log.info("jwt----------------->{}", jwt);
        String userId = jwtUtils.getClaimByToken((String) jwt.getPrincipal()).getSubject();
        SysUser user = userService.getById(Integer.parseInt(userId));
        if(user == null) {
            throw new UnknownAccountException("账户不存在!");
        }
        if(user.getUserState() == -1) {
            throw new LockedAccountException("账户已被锁定!");
        }
        //登录后返回的信息
        UserProfile profile = new UserProfile();
        BeanUtil.copyProperties(user, profile);
        profile.setId(user.getUid());
        log.info("profile----------------->{}", profile.toString());
        return new SimpleAuthenticationInfo(profile, jwt.getCredentials(), getName());

    }
}
其实主要就是doGetAuthenticationInfo登录认证这个方法,可以看到我们通过jwt获取到用户信息,判断用户的状态,最后异常就抛出对应的异常信息,否者封装成SimpleAuthenticationInfo返回给shiro。
ShiroUtil
package com.example.adminweb.utils;

import com.example.admincommon.vo.AccountProfile;
import lombok.Data;
import org.apache.shiro.SecurityUtils;

public class ShiroUtil {
    public static UserProfile getProfile(){
        return (UserProfile) SecurityUtils.getSubject().getPrincipal();
    }
}
JwtFilter
定义jwt的过滤器JwtFilter,这个过滤器是我们的重点,这里我们继承的是Shiro内置的AuthenticatingFilter,一个可以内置了可以自动登录方法的的过滤器,有些同学继承BasicHttpAuthenticationFilter也是可以的。
我们需要重写几个方法:
- createToken:实现登录,我们需要生成我们自定义支持的JwtToken;
- onAccessDenied:拦截校验,当头部没有Authorization时候,我们直接通过,不需要自动登录;当带有的时候,首先我们校验jwt的有效性,没问题我们就直接执行executeLogin方法实现自动登录;
- onLoginFailure:登录异常时候进入的方法,我们直接把异常信息封装然后抛出;
package com.example.adminweb.filter;

import cn.hutool.json.JSONUtil;
import com.example.admincommon.utils.JwtToken;
import com.example.admincommon.utils.Result;
import com.example.adminweb.utils.JwtUtils;
import io.jsonwebtoken.Claims;
import org.apache.shiro.authc.AuthenticationException;
import org.apache.shiro.authc.AuthenticationToken;
import org.apache.shiro.authc.ExpiredCredentialsException;
import org.apache.shiro.web.filter.authc.AuthenticatingFilter;
import org.springframework.beans.factory.annotation.Autowired;
import org.springframework.stereotype.Component;
import org.springframework.util.StringUtils;

import javax.servlet.ServletRequest;
import javax.servlet.ServletResponse;
import javax.servlet.http.HttpServletRequest;
import javax.servlet.http.HttpServletResponse;
import java.io.IOException;

@Component
public class JwtFilter extends AuthenticatingFilter {

    /**
     * 定义jwt的过滤器JwtFilter。
     * 这个过滤器是我们的重点,这里我们继承的是Shiro内置的AuthenticatingFilter,
     * 一个可以内置了可以自动登录方法的的过滤器
     *
     * 我们需要重写几个方法:
     * createToken:实现登录,我们需要生成我们自定义支持的JwtToken
     * onAccessDenied:拦截校验,当头部没有Authorization时候,我们直接通过,
     * 不需要自动登录;当带有的时候,首先我们校验jwt的有效性,
     * 没问题我们就直接执行executeLogin方法实现自动登录
     * onLoginFailure:登录异常时候进入的方法,我们直接把异常信息封装然后抛出
     */

    @Autowired
    JwtUtils jwtUtils;

    @Override
    protected AuthenticationToken createToken(ServletRequest servletRequest, ServletResponse servletResponse) throws Exception {
        HttpServletRequest request = (HttpServletRequest) servletRequest;
        String jwt = request.getHeader("Authorization");
        if(StringUtils.isEmpty(jwt)){
            return null;
        }
        return new JwtToken(jwt);
    }

    @Override
    protected boolean onAccessDenied(ServletRequest servletRequest, ServletResponse servletResponse) throws Exception {
        HttpServletRequest request = (HttpServletRequest) servletRequest;
        String token = request.getHeader("Authorization");
        //System.out.println("校验:" + token);
        if(StringUtils.isEmpty(token)) {
            return true;
        } else {
            // 检验jwt,判断是否已过期
            Claims claim = jwtUtils.getClaimByToken(token);
            if(claim == null || jwtUtils.isTokenExpired(claim.getExpiration())) {
                throw new ExpiredCredentialsException("token已失效,请重新登录!");
            }
        }
        // 执行自动登录
        return executeLogin(servletRequest, servletResponse);
    }
    @Override
    protected boolean onLoginFailure(AuthenticationToken token, AuthenticationException e, ServletRequest request, ServletResponse response) {
        HttpServletResponse httpResponse = (HttpServletResponse) response;
        try {
            //处理登录失败的异常
            Throwable throwable = e.getCause() == null ? e : e.getCause();
            Result r = Result.error().message(throwable.getMessage());
            String json = JSONUtil.toJsonStr(r);
            httpResponse.getWriter().print(json);
        } catch (IOException e1) {
        }
        return false;
    }

}
ShiroConfig
引入RedisSessionDAO和RedisCacheManager,为了解决shiro的权限数据和会话信息能保存到redis中,实现会话共享。
重写了SessionManager和DefaultWebSecurityManager,同时在DefaultWebSecurityManager中为了关闭shiro自带的session方式,我们需要设置为false,这样用户就不再能通过session方式登录shiro。后面将采用jwt凭证登录。
在ShiroFilterChainDefinition中,我们不再通过编码形式拦截Controller访问路径,而是所有的路由都需要经过JwtFilter这个过滤器,然后判断请求头中是否含有jwt的信息,有就登录,没有就跳过。跳过之后,有Controller中的shiro注解进行再次拦截,比如@RequiresAuthentication,这样控制权限访问。
package com.example.adminweb.config;

import com.example.adminweb.filter.JwtFilter;
import com.example.adminweb.realm.UserRealm;
import org.apache.shiro.mgt.DefaultSessionStorageEvaluator;
import org.apache.shiro.mgt.DefaultSubjectDAO;
import org.apache.shiro.mgt.SecurityManager;
import org.apache.shiro.session.mgt.SessionManager;
import org.apache.shiro.spring.web.ShiroFilterFactoryBean;
import org.apache.shiro.spring.web.config.DefaultShiroFilterChainDefinition;
import org.apache.shiro.spring.web.config.ShiroFilterChainDefinition;
import org.apache.shiro.web.mgt.DefaultWebSecurityManager;
import org.apache.shiro.web.session.mgt.DefaultWebSessionManager;
import org.crazycake.shiro.RedisCacheManager;
import org.crazycake.shiro.RedisSessionDAO;
import org.springframework.aop.framework.autoproxy.DefaultAdvisorAutoProxyCreator;
import org.springframework.beans.factory.annotation.Autowired;
import org.springframework.context.annotation.Bean;
import org.springframework.context.annotation.Configuration;

import javax.servlet.Filter;
import java.util.HashMap;
import java.util.LinkedHashMap;
import java.util.Map;

@Configuration
public class ShiroConfig {

    /**
     * 引入RedisSessionDAO和RedisCacheManager,
     * 为了解决shiro的权限数据和会话信息能保存到redis中,实现会话共享。
     * 重写了SessionManager和DefaultWebSecurityManager,
     * 同时在DefaultWebSecurityManager中为了关闭shiro自带的session方式,
     * 我们需要设置为false,这样用户就不再能通过session方式登录shiro。后面将采用jwt凭证登录。
     * 在ShiroFilterChainDefinition中,我们不再通过编码形式拦截Controller访问路径,
     * 而是所有的路由都需要经过JwtFilter这个过滤器,然后判断请求头中是否含有jwt的信息,
     * 有就登录,没有就跳过。跳过之后,有Controller中的shiro注解进行再次拦截,
     * 比如@RequiresAuthentication,这样控制权限访问。
     */

    @Autowired
    JwtFilter jwtFilter;

    @Bean
    public SessionManager sessionManager(RedisSessionDAO redisSessionDAO) {
        DefaultWebSessionManager sessionManager = new DefaultWebSessionManager();
        sessionManager.setSessionDAO(redisSessionDAO);
        return sessionManager;
    }
    @Bean
    public DefaultWebSecurityManager securityManager(UserRealm accountRealm,
                                                     SessionManager sessionManager,
                                                     RedisCacheManager redisCacheManager) {
        DefaultWebSecurityManager securityManager = new DefaultWebSecurityManager(accountRealm);
        securityManager.setSessionManager(sessionManager);
        securityManager.setCacheManager(redisCacheManager);
        /*
         * 关闭shiro自带的session,详情见文档
         */
        DefaultSubjectDAO subjectDAO = new DefaultSubjectDAO();
        DefaultSessionStorageEvaluator defaultSessionStorageEvaluator = new DefaultSessionStorageEvaluator();
        defaultSessionStorageEvaluator.setSessionStorageEnabled(false);
        subjectDAO.setSessionStorageEvaluator(defaultSessionStorageEvaluator);
        securityManager.setSubjectDAO(subjectDAO);
        return securityManager;
    }
    /**
     * 在ShiroFilterChainDefinition中,我们不再通过编码形式拦截Controller访问路径,
     * 而是所有的路由都需要经过JwtFilter这个过滤器,然后判断请求头中是否含有jwt的信息,有就登录,没有就跳过。
     * 跳过之后,有Controller中的shiro注解进行再次拦截,比如@RequiresAuthentication,这样控制权限访问。
     *
     * @return
     */
    @Bean
    public ShiroFilterChainDefinition shiroFilterChainDefinition() {
        DefaultShiroFilterChainDefinition chainDefinition = new DefaultShiroFilterChainDefinition();
        // 自定义url规则,配置系统受限资源以及公共资源
        Map<String, String> filterMap = new LinkedHashMap<>();
        // 所有请求通过我们自己的JWT Filter
        filterMap.put("/**", "jwt"); // 主要通过注解方式校验权限
        chainDefinition.addPathDefinitions(filterMap);
        return chainDefinition;
    }

    /**
     * Shiro内置过滤器,可以实现权限相关的拦截器
     *    常用的过滤器:
     *       anon: 无需认证(登录)可以访问
     *       authc: 必须认证才可以访问
     *       user: 如果使用rememberMe的功能可以直接访问
     *       perms: 该资源必须得到资源权限才可以访问
     *       role: 该资源必须得到角色权限才可以访问
     */
    @Bean("shiroFilterFactoryBean")
    public ShiroFilterFactoryBean shiroFilterFactoryBean(SecurityManager securityManager,
                                                         ShiroFilterChainDefinition shiroFilterChainDefinition) {
        ShiroFilterFactoryBean shiroFilter = new ShiroFilterFactoryBean();
        //设置安全管理器
        shiroFilter.setSecurityManager(securityManager);
        //添加Shiro内置过滤器
        Map<String, Filter> filters = new HashMap<>();
        // 在 Shiro过滤器链上加入 自定义过滤器JWTFilter 并取名为jwt
        filters.put("jwt", jwtFilter);
        shiroFilter.setFilters(filters);
        //设置访问权限
        Map<String, String> filterMap = shiroFilterChainDefinition.getFilterChainMap();
        shiroFilter.setFilterChainDefinitionMap(filterMap);
        return shiroFilter;
    }

    /**
     * 添加注解支持,如果不加的话很有可能注解失效
     */
    @Bean
    public DefaultAdvisorAutoProxyCreator defaultAdvisorAutoProxyCreator(){

        DefaultAdvisorAutoProxyCreator defaultAdvisorAutoProxyCreator=new DefaultAdvisorAutoProxyCreator();
        defaultAdvisorAutoProxyCreator.setProxyTargetClass(true);
        return defaultAdvisorAutoProxyCreator;
    }

}
Swagger2Config
添加登录认证
package com.example.adminweb.config;

import org.springframework.context.annotation.Bean;
import org.springframework.context.annotation.Configuration;
import org.springframework.web.servlet.config.annotation.EnableWebMvc;
import springfox.documentation.builders.ApiInfoBuilder;
import springfox.documentation.builders.PathSelectors;
import springfox.documentation.builders.RequestHandlerSelectors;
import springfox.documentation.service.ApiInfo;
import springfox.documentation.service.ApiKey;
import springfox.documentation.service.Contact;
import springfox.documentation.spi.DocumentationType;
import springfox.documentation.spring.web.plugins.Docket;
import springfox.documentation.swagger2.annotations.EnableSwagger2;

import java.util.ArrayList;
import java.util.List;

/**
 * Swagger2配置
 */
@Configuration
//@EnableWebMvc
@EnableSwagger2
public class Swagger2Config {
    @Bean
    public Docket createRestApi() {//规定扫描包下的注解
        return new Docket(DocumentationType.SWAGGER_2)
                .apiInfo(apiInfo())
                .groupName("SpringBoot-Shiro-admin权限框架")
                .select()
                //为当前包下的controller生成api文档
                .apis(RequestHandlerSelectors.basePackage("com.example.adminweb.controller"))
                .paths(PathSelectors.any())
                .build()
                //添加登录认证
                .securitySchemes(securitySchemes());
    }

    private ApiInfo apiInfo() {
        //设置文档信息
        return new ApiInfoBuilder()
                .title("测试接口文档")
                .description("测试接口文档")
                .contact(new Contact("浅若夏沫", "http:localhost:8080/doc.html",
                        "[email protected]"))
                .version("1.0")
                .build();
    }

    private List<ApiKey> securitySchemes() {
        //设置请求头信息
        List<ApiKey> result = new ArrayList<>();
        ApiKey apiKey = new ApiKey("Authorization", "Authorization", "header");
        result.add(apiKey);
        return result;
    }

}
8、验证码
依赖
<!--google kaptcha依赖-->
<dependency>
    <groupId>com.github.axet</groupId>
    <artifactId>kaptcha</artifactId>
    <version>0.0.9</version>
</dependency>
<!--产生随机数-->
<dependency>
    <groupId>org.apache.commons</groupId>
    <artifactId>commons-lang3</artifactId>
    <version>3.8.1</version>
</dependency>
RandomUtils
生成随机数
package com.example.admincommon.utils;

import java.awt.*;
import java.util.Random;

public class RandomUtils extends  org.apache.commons.lang3.RandomUtils {
    private static final char[] CODE_SEQ = { 'A', 'B', 'C', 'D', 'E', 'F', 'G', 'H', 'J',
            'K', 'L', 'M', 'N', 'P', 'Q', 'R', 'S', 'T', 'U', 'V', 'W',
            'X', 'Y', 'Z', '2', '3', '4', '5', '6', '7', '8', '9' };

    private static final char[] NUMBER_ARRAY = { '0', '1', '2', '3', '4', '5', '6', '7', '8', '9' };

    private static Random random = new Random();

    public static String randomString(int length) {
        StringBuilder sb = new StringBuilder();
        for (int i = 0; i < length; i++) {
            sb.append(String.valueOf(CODE_SEQ[random.nextInt(CODE_SEQ.length)]));
        }
        return sb.toString();
    }

    public static String randomNumberString(int length) {
        StringBuilder sb = new StringBuilder();
        for (int i = 0; i < length; i++) {
            sb.append(String.valueOf(NUMBER_ARRAY[random.nextInt(NUMBER_ARRAY.length)]));
        }
        return sb.toString();
    }

    public static Color randomColor(int fc, int bc) {
        int f = fc;
        int b = bc;
        Random random = new Random();
        if (f > 255) {
            f = 255;
        }
        if (b > 255) {
            b = 255;
        }
        return new Color(f + random.nextInt(b - f), f + random.nextInt(b - f), f + random.nextInt(b - f));
    }

    public static int nextInt(int bound) {
        return random.nextInt(bound);
    }
}
VerifyCode
package com.example.admincommon.vo;

import lombok.Data;

@Data
public class VerifyCode {
    private String code;

    private byte[] imgBytes;

    private long expireTime;
}
CaptchaUtils
生成验证码
package com.example.admincommon.utils;

import com.example.admincommon.vo.VerifyCode;
import org.slf4j.Logger;
import org.slf4j.LoggerFactory;

import javax.imageio.ImageIO;
import java.awt.*;
import java.awt.image.BufferedImage;
import java.io.ByteArrayOutputStream;
import java.io.IOException;
import java.io.OutputStream;
import java.util.Random;

public class CaptchaUtils {
    private static final Logger logger = LoggerFactory.getLogger(CaptchaUtils.class);

    private static final String[] FONT_TYPES = { "\u5b8b\u4f53", "\u65b0\u5b8b\u4f53", "\u9ed1\u4f53", "\u6977\u4f53", "\u96b6\u4e66" };

    private static final int VALICATE_CODE_LENGTH = 4;

    /**
     * 设置背景颜色及大小,干扰线
     *
     * @param graphics
     * @param width
     * @param height
     */
    private static void fillBackground(Graphics graphics, int width, int height) {
        // 填充背景
        graphics.setColor(Color.WHITE);
        //设置矩形坐标x y 为0
        graphics.fillRect(0, 0, width, height);

        // 加入干扰线条
        for (int i = 0; i < 8; i++) {
            //设置随机颜色算法参数
            graphics.setColor(RandomUtils.randomColor(40, 150));
            Random random = new Random();
            int x = random.nextInt(width);
            int y = random.nextInt(height);
            int x1 = random.nextInt(width);
            int y1 = random.nextInt(height);
            graphics.drawLine(x, y, x1, y1);
        }
    }

    /**
     * 生成随机字符
     *
     * @param width
     * @param height
     * @param os
     * @return
     * @throws IOException
     */
    public String generate(int width, int height, OutputStream os) throws IOException {
        BufferedImage image = new BufferedImage(width, height, BufferedImage.TYPE_INT_RGB);
        Graphics graphics = image.getGraphics();
        fillBackground(graphics, width, height);
        String randomStr = RandomUtils.randomString(VALICATE_CODE_LENGTH);
        createCharacter(graphics, randomStr);
        graphics.dispose();
        //设置JPEG格式
        ImageIO.write(image, "JPEG", os);
        return randomStr;
    }

    /**
     * 验证码生成
     *
     * @param width
     * @param height
     * @return
     */
    public VerifyCode generate(int width, int height) {
        VerifyCode verifyCode = null;
        try (
                //将流的初始化放到这里就不需要手动关闭流
                ByteArrayOutputStream baos = new ByteArrayOutputStream();
        ) {
            String code = generate(width, height, baos);
            verifyCode = new VerifyCode();
            verifyCode.setCode(code);
            verifyCode.setImgBytes(baos.toByteArray());
        } catch (IOException e) {
            logger.error(e.getMessage(), e);
            verifyCode = null;
        }
        return verifyCode;
    }

    /**
     * 设置字符颜色大小
     *
     * @param g
     * @param randomStr
     */
    private void createCharacter(Graphics g, String randomStr) {
        char[] charArray = randomStr.toCharArray();
        for (int i = 0; i < charArray.length; i++) {
            //设置RGB颜色算法参数
            g.setColor(new Color(50 + RandomUtils.nextInt(100),
                    50 + RandomUtils.nextInt(100), 50 + RandomUtils.nextInt(100)));
            //设置字体大小,类型
            g.setFont(new Font(FONT_TYPES[RandomUtils.nextInt(FONT_TYPES.length)], Font.BOLD, 26));
            //设置x y 坐标
            g.drawString(String.valueOf(charArray[i]), 15 * i + 5, 19 + RandomUtils.nextInt(8));
        }
    }
}
验证码接口
package com.example.adminweb.controller;

import cn.hutool.core.map.MapUtil;
import cn.hutool.crypto.SecureUtil;
import com.baomidou.mybatisplus.core.conditions.query.QueryWrapper;
import com.example.admincommon.utils.CaptchaUtils;
import com.example.admincommon.utils.Result;
import com.example.admincommon.vo.LoginUser;
import com.example.admincommon.vo.VerifyCode;
import com.example.adminweb.entity.SysUser;
import com.example.adminweb.service.SysUserService;
import com.example.adminweb.utils.JwtUtils;
import io.swagger.annotations.Api;
import io.swagger.annotations.ApiOperation;
import lombok.extern.slf4j.Slf4j;
import org.apache.shiro.SecurityUtils;
import org.apache.shiro.authz.annotation.RequiresAuthentication;
import org.springframework.beans.factory.annotation.Autowired;
import org.springframework.util.Assert;
import org.springframework.validation.annotation.Validated;
import org.springframework.web.bind.annotation.GetMapping;
import org.springframework.web.bind.annotation.PostMapping;
import org.springframework.web.bind.annotation.RequestBody;
import org.springframework.web.bind.annotation.RestController;

import javax.servlet.http.HttpServletRequest;
import javax.servlet.http.HttpServletResponse;
import java.io.IOException;
import java.util.Map;

@RestController
@Slf4j
@Api(value = "测试接口", tags = "用户登录接口")
public class LoginController {

    @ApiOperation(value = "验证码")
    @GetMapping("captcha")
    public void verifyCode(HttpServletRequest request, HttpServletResponse response) {
        CaptchaUtils iVerifyCodeGen = new CaptchaUtils();
        try {
            //设置长宽
            VerifyCode verifyCode = iVerifyCodeGen.generate(80, 28);
            String code = verifyCode.getCode();

            //将VerifyCode绑定session
            request.getSession().setAttribute("code", code);
            log.info("验证码:" + code);
            //设置响应头
            response.setHeader("Pragma", "no-cache");
            //设置响应头
            response.setHeader("Cache-Control", "no-cache");
            //在代理服务器端防止缓冲
            response.setDateHeader("Expires", 0);
            //设置响应内容类型
            response.setContentType("image/jpeg");
            response.getOutputStream().write(verifyCode.getImgBytes());
            response.getOutputStream().flush();
        } catch (IOException e) {
            log.info("", e);
            e.getStackTrace();
        }
    }
}
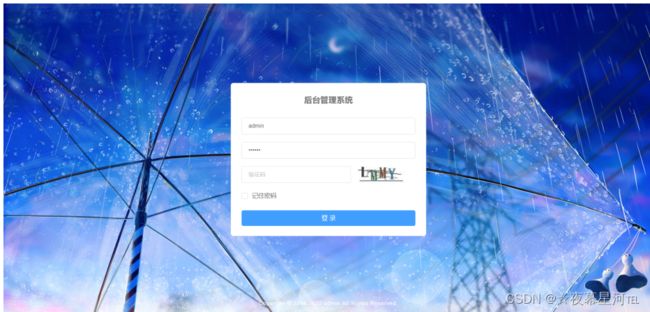
如图所示:
9、登录
package com.example.adminweb.controller;

import cn.hutool.core.map.MapUtil;
import cn.hutool.crypto.SecureUtil;
import com.baomidou.mybatisplus.core.conditions.query.QueryWrapper;
import com.example.admincommon.utils.CaptchaUtils;
import com.example.admincommon.utils.Result;
import com.example.admincommon.vo.LoginUser;
import com.example.admincommon.vo.VerifyCode;
import com.example.adminweb.entity.SysUser;
import com.example.adminweb.service.SysUserService;
import com.example.adminweb.utils.JwtUtils;
import io.swagger.annotations.Api;
import io.swagger.annotations.ApiOperation;
import lombok.extern.slf4j.Slf4j;
import org.apache.shiro.SecurityUtils;
import org.apache.shiro.authz.annotation.RequiresAuthentication;
import org.springframework.beans.factory.annotation.Autowired;
import org.springframework.util.Assert;
import org.springframework.validation.annotation.Validated;
import org.springframework.web.bind.annotation.GetMapping;
import org.springframework.web.bind.annotation.PostMapping;
import org.springframework.web.bind.annotation.RequestBody;
import org.springframework.web.bind.annotation.RestController;

import javax.servlet.http.HttpServletRequest;
import javax.servlet.http.HttpServletResponse;
import java.io.IOException;
import java.util.Map;

@RestController
@Slf4j
@Api(value = "测试接口", tags = "用户登录接口")
public class LoginController {

    @Autowired
    private SysUserService userService;

    @Autowired
    private JwtUtils jwtUtils;

    /**
     * 默认账号密码:admin / 123456
     * @param loginUser
     * @param response
     * @return
     */
    @ApiOperation(value = "登录")
    @PostMapping("/login")
    public Result login(@Validated @RequestBody LoginUser loginUser, HttpServletRequest request, HttpServletResponse response){
        //获取session里面的验证码
        String captcha = (String)request.getSession().getAttribute("code");
        if (loginUser.getCode().equals(captcha)){
            SysUser user = userService.getOne(new QueryWrapper<SysUser>().eq("user_name", loginUser.getUserName()));
            Assert.notNull(user,"用户不存在!");
            //!user.getPassword().equals(SecureUtil.md5(loginUser.getPassword()))
            if (!user.getPassword().equals(loginUser.getPassword())){
                return Result.error().message("密码不正确!");
            }
            //生成token
            String jwt = jwtUtils.generateToken(user.getUid());
            //把token放在请求头上
            response.setHeader("Authorization", jwt);
            response.setHeader("Access-Control-Expose-Headers", "Authorization");
            // 用户可以另一个接口
            //SysUser sysUser = new SysUser();
            Map<Object, Object> map = MapUtil.builder()
                    .put("user", user)
                    .put("token", jwt)
                    .map();
            return Result.ok().data(map).message("登录成功");
        }
        return Result.error().message("验证码不正确!");
    }

    // 退出
    @ApiOperation(value = "登出")
    @GetMapping("/logout")
    @RequiresAuthentication
    public Result logout() {
        SecurityUtils.getSubject().logout();
        return Result.ok().message("登出成功!");
    }
}
10、菜单管理
SysMenuController
package com.example.adminweb.controller;

import com.baomidou.mybatisplus.core.conditions.query.QueryWrapper;
import com.example.admincommon.utils.Result;
import com.example.admincommon.vo.UserProfile;
import com.example.adminweb.entity.SysMenu;
import com.example.adminweb.entity.SysRoleMenu;
import com.example.adminweb.service.SysMenuService;
import com.example.adminweb.service.SysRoleMenuService;
import com.example.adminweb.service.SysUserService;
import com.example.adminweb.utils.ShiroUtil;
import io.swagger.annotations.Api;
import io.swagger.annotations.ApiOperation;
import lombok.extern.slf4j.Slf4j;
import org.apache.shiro.authz.annotation.RequiresPermissions;
import org.springframework.web.bind.annotation.*;

import javax.annotation.Resource;
import java.util.ArrayList;
import java.util.HashMap;
import java.util.List;
import java.util.Map;

/**
 * (SysMenu)表控制层
 *
 * @author qrxm
 * @since 2022-12-08 02:30:28
 */
@Slf4j
@RestController
@RequestMapping("sysMenu")
@Api(value = "测试接口", tags = "菜单管理接口")
public class SysMenuController {
    /**
     * 服务对象
     */
    @Resource
    private SysMenuService sysMenuService;

    @Resource
    private SysUserService userService;

    @Resource
    private SysRoleMenuService sysRoleMenuService;

    @ApiOperation(value = "根据用户 id 获取角色菜单")
    @GetMapping("/getMenu")
    public Result getMenu() {
        List menu = sysMenuService.getMenu();
        if (!menu.isEmpty()) {
            return Result.ok().data(menu).message(null);
        }
        return Result.error();
    }

    @ApiOperation(value = "获取菜单信息")
    @GetMapping("/getMenuList")
    public Result getMenuList(SysMenu sysMenu) {
        List menu = sysMenuService.getMenuList(sysMenu);
        if (!menu.isEmpty()) {
            return Result.ok().data(menu).message(null);
        }
        return Result.error();
    }

    @ApiOperation(value = "获取按钮权限信息")
    @GetMapping("/getPermission")
    public Result getPermission() {
        //获取用户信息
        UserProfile profile = ShiroUtil.getProfile();
        List> maps = userService.queryRolesPermissions(profile.getId());
        Map map = new HashMap<>();
        if (!maps.isEmpty()) {
            for (Map user : maps) {
                String roleName = user.get("role_code").toString();
                map.put(roleName, roleName);
                String permission = user.get("permission").toString();
                map.put(permission, permission);
            }
            return Result.ok().data(map).message(null);
        }
        return Result.error();
    }

    /**
     * 获取权限树
     * @param rid
     * @return
     */
    @GetMapping("/getMenuTree")
    public Result getMenuTree(Integer rid) {
        List sysRoleMenus = sysRoleMenuService.list(new QueryWrapper().eq("rid", rid));
        List list = new ArrayList<>();
        for (SysRoleMenu s:sysRoleMenus) {
            list.add(s.getMid());
        }
        List maps = sysMenuService.getMenuTree();
        if (!maps.isEmpty()) {
            Map map = new HashMap<>();
            map.put("data",maps);
            map.put("expandedKey",list);
            return Result.ok().data(map).message(null);
        }
        return Result.error();
    }

    /**
     * 返回树形菜单集合
     *
     * @param lazy     是否是懒加载
     * @param parentId 父节点ID
     * @return 树形菜单
     */
    @ApiOperation(value = "返回树形菜单集合")
    @GetMapping(value = "/tree")
    public Result getTree(boolean lazy, Long parentId) {
        List sysMenus = sysMenuService.treeMenu(lazy, parentId);
        if (!sysMenus.isEmpty()) {
            return Result.ok().data(sysMenus).message(null);
        }
        return Result.error();
    }

    /**
     * 根据菜单 mid 获取菜单信息
     *
     * @param mid
     * @return
     */
    @ApiOperation(value = "根据菜单 mid 获取菜单信息")
    @GetMapping(value = "/getObj")
    public Result getObj(Integer mid) {
        SysMenu sysMenu = sysMenuService.getOne(new QueryWrapper().eq("mid", mid));
        if (sysMenu != null) {
            return Result.ok().data(sysMenu).message(null);
        }
        return Result.error();
    }

    /**
     * 添加菜单
     *
     * @param sysMenu
     * @return
     */
    @RequiresPermissions("system_menu_add")
    @ApiOperation(value = "添加菜单")
    @PostMapping(value = "/addObj")
    public Result addObj(@RequestBody SysMenu sysMenu) {
        boolean save = sysMenuService.save(sysMenu);
        if (save) {
            return Result.ok();
        }
        return Result.error();
    }

    /**
     * 修改菜单
     *
     * @param sysMenu
     * @return
     */
    @ApiOperation(value = "修改菜单")
    @PutMapping(value = "/putObj")
    public Result putObj(@RequestBody SysMenu sysMenu) {
        boolean update = sysMenuService.update(sysMenu, new QueryWrapper().eq("mid", sysMenu.getMid()));
        if (update) {
            return Result.ok();
        }
        return Result.error();
    }

    /**
     * 删除
     *
     * @param mid
     * @return
     */
    @ApiOperation(value = "删除菜单")
    @DeleteMapping(value = "delObj")
    public Result delObj(Integer mid) {
        SysMenu sysMenu = new SysMenu();
        sysMenu.setEnabled(0);
        boolean update = sysMenuService.update(sysMenu, new QueryWrapper().eq("mid", mid));
        if (update) {
            return Result.ok();
        }
        return Result.error();
    }

}
SysMenuServiceImpl
package com.example.adminweb.service.impl;

import com.baomidou.mybatisplus.core.conditions.query.QueryWrapper;
import com.example.admincommon.vo.UserProfile;
import com.example.adminweb.entity.SysMenu;
import com.example.adminweb.service.SysMenuService;
import com.example.adminweb.dao.SysMenuDao;
import com.baomidou.mybatisplus.extension.service.impl.ServiceImpl;
import com.example.adminweb.utils.ShiroUtil;
import org.springframework.stereotype.Service;

import javax.annotation.Resource;
import java.util.List;
import java.util.Objects;
import java.util.stream.Collectors;

/**
 * (SysMenu)表服务实现类
 *
 * @author qrxm
 * @since 2022-12-08 02:30:28
 */
@Service("sysMenuService")
public class SysMenuServiceImpl extends ServiceImpl implements SysMenuService {

    @Resource
    private SysMenuDao sysMenuDao;

    @Override
    public List getMenu() {
        //获取登录用户的信息
        UserProfile profile = ShiroUtil.getProfile();
        List sysMenus = sysMenuDao.getMenu(profile.getId());
        //获取父节点
        List collect = getSysMenus(sysMenus);
        return collect;
    }

    @Override
    public List treeMenu(boolean lazy, Long parentId) {
        if (!lazy) {
            List menuList = baseMapper
                    .selectList(new QueryWrapper().orderByDesc("sort_order"));
            //获取父节点
            List collect = getSysMenus(menuList);
            return collect;
        }
        Long parent = parentId == null ? 0 : parentId;
        List menuList = baseMapper
                .selectList(new QueryWrapper().eq("parent_id", parent).orderByDesc("sort_order"));
        //获取父节点
        List collect = getSysMenus(menuList);
        return collect;
    }

    @Override
    public List getMenuList(SysMenu sysMenu) {
        if (sysMenu.getName() != null || sysMenu.getPath() != null || sysMenu.getEnabled() != null) {
            List sysMenus = sysMenuDao.selectList(new QueryWrapper()
                    .like("name", sysMenu.getName()).or()
                    .like("path", sysMenu.getPath()).or()
                    .eq("enabled", sysMenu.getEnabled())
                    .orderByDesc("sort_order"));
            //获取父节点
            List collect = getSysMenus(sysMenus);
            return collect;
        }
        List sysMenus = sysMenuDao.selectList(new QueryWrapper()
                .orderByDesc("sort_order"));
        //获取父节点
        List collect = getSysMenus(sysMenus);
        return collect;
    }

    @Override
    public List getMenuTree() {
        List sysMenus = sysMenuDao.selectList(new QueryWrapper()
                .orderByDesc("sort_order"));
        //获取父节点
        List collect = getSysMenus(sysMenus);
        return collect;
    }

    /**
     * 获取父节点
     *
     * @param menuList
     * @return
     */
    private List getSysMenus(List menuList) {
        //获取父节点
        return menuList.stream().filter(m -> m.getParentId() == 0).map(
                (m) -> {
                    m.setChildren(getChildrens(m, menuList));
                    return m;
                }
        ).collect(Collectors.toList());
    }

    /**
     * 递归查询子节点
     *
     * @param root 根节点
     * @param all  所有节点
     * @return 根节点信息
     */
    private List getChildrens(SysMenu root, List all) {
        List children = all.stream().filter(m -> {
            return Objects.equals(m.getParentId(), root.getMid());
        }).map(
                (m) -> {
                    m.setChildren(getChildrens(m, all));
                    return m;
                }
        ).collect(Collectors.toList());
        return children;
    }
}
SysMenuMapper.xml
DOCTYPE mapper PUBLIC "-//mybatis.org//DTD Mapper 3.0//EN" "http://mybatis.org/dtd/mybatis-3-mapper.dtd">
<mapper namespace="com.example.adminweb.dao.SysMenuDao">

    <resultMap type="com.example.adminweb.entity.SysMenu" id="menuMap">
        <result property="mid" column="mid"/>
        <result property="url" column="url"/>
        <result property="path" column="path"/>
        <result property="component" column="component"/>
        <result property="name" column="name"/>
        <result property="iconCls" column="icon_cls"/>
        <result property="keepAlive" column="keep_alive"/>
        <result property="requireAuth" column="require_auth"/>
        <result property="parentId" column="parent_id"/>
        <result property="enabled" column="enabled"/>
    resultMap>

    <select id="getMenu" resultType="com.example.adminweb.entity.SysMenu">
        select m.*
        from sys_user_role as ur
                 inner join sys_role_menu as rm on ur.rid = rm.rid
                 inner join sys_menu as m on rm.mid = m.mid
        where ur.uid = #{id}
          and m.type = 0
          and m.enabled = 1
        GROUP BY m.`name`
    select>
    <select id="getMenuTree" resultType="com.example.admincommon.vo.MenuTreeVo">
        SELECT m.mid    AS id,
               m.`name` AS label,
               m.parent_id
        FROM sys_role_menu AS rm
                 INNER JOIN sys_menu AS m ON rm.mid = m.mid
        WHERE rm.rid = #{rid}
    select>

mapper>
SysUserMapper.xml
DOCTYPE mapper PUBLIC "-//mybatis.org//DTD Mapper 3.0//EN" "http://mybatis.org/dtd/mybatis-3-mapper.dtd">
<mapper namespace="com.example.adminweb.dao.SysUserDao">

    <select id="queryRolesPermissions" resultType="java.util.Map">
        SELECT u.uid,
               r.role_code  AS role_code,
               m.permission AS permission
        FROM sys_user AS u
                 INNER JOIN sys_user_role AS ur ON u.uid = ur.uid
                 INNER JOIN sys_role AS r ON ur.rid = r.rid
                 INNER JOIN sys_role_menu AS rm ON r.rid = rm.rid
                 INNER JOIN sys_menu AS m ON rm.mid = m.mid
        WHERE 1 = 1
          and m.permission IS NOT NULL
          and m.enabled = 1
          and u.uid = #{id}
        GROUP BY m.permission
    select>
mapper>