五、Flask学习之MySQL
五、Flask学习之MySQL
1. 下载MySQL
下载教程:MySQL安装及可视化工具SQLyog下载
2.常用指令
2.1. 查看已有数据库
show databases;

2.2. 创建数据库
create database 名字 DEFAULT CHARSET utf8 COLLATE utf8_general_ci;
![]()
2.3. 删除数据库
drop database 名字;

2.4. 进入数据库
USE 名字;

2.5. 查看当前数据库下所有数据
show tables;

2.6. 创建数据表
数据表类似于Excel表格,有列名和类型
create table 表名(
    列名称 类型,
    列名称 类型,
    列名称 类型
)default charset=utf8;
假设我要创建的表格为:
| id | Name | age |
|---|---|---|
那么就使用下面的代码:
create table info1(
    id int,
    name varchar(16),
    age int
)default charset=utf8;

然后运行show tables就能看到是否创建成功数据表了。
如果要求输入数据时某一列不能为空,那么就需要使用not null
create table info1(
    id int not null, -- 不能为空
    name varchar(16), -- 默认是可以为空的
    age int
)default charset=utf8;
也可以给某一列设置默认值,如果没有传入值,就使用默认值,如果传入值就使用传入的值
create table info1(
    id int,
    name varchar(16),
    age int default 3 -- 设置默认值为3
)default charset=utf8;
也可以在创建表的时候设置主键:主键不允许重复
id int primary key,
或者直接按照序号1.2.3…,内部维护:
id int auto_increament primary key,
2.7. 删除数据表
删除数据表使用:
drop table 数据表名字;

2.8. 查看表结构
desc 表名称;
mysql> desc info1;
+-------+-------------+------+-----+---------+----------------+
| Field | Type        | Null | Key | Default | Extra          |
+-------+-------------+------+-----+---------+----------------+
| id    | int(11)     | NO   | PRI | NULL    | auto_increment |
| name  | varchar(16) | YES  |     | NULL    |                |
| age   | int(11)     | YES  |     | NULL    |                |
+-------+-------------+------+-----+---------+----------------+
3 rows in set (0.01 sec)
2.9. 添加数据
insert into 表名(列名1,列名2) values(数据1,数据2);
insert into 表名(列名1,列名2) values(数据1,数据2),(数据3,数据4); -- 批量添加
mysql> insert into info1(name,age) values("panda",20);
Query OK, 1 row affected (0.02 sec)

mysql> insert into info1(name,age) values("panda01",21),("panda02",22);
Query OK, 2 rows affected (0.01 sec)
Records: 2  Duplicates: 0  Warnings: 0
2.10. 查看表
select * from 表名;
mysql> select * from info1;
+----+---------+------+
| id | name    | age  |
+----+---------+------+
|  1 | panda   |   20 |
|  2 | panda01 |   21 |
|  3 | panda02 |   22 |
+----+---------+------+
3 rows in set (0.00 sec)
3.常用数据类型
3.1. 整数
tinyint:用来存储比较小的整数
有符号范围:-128~127(默认)
无符号范围:0-255
int:用来存储一般的整数
有符号范围:-231~231-1(默认)
无符号范围:0-232-1
bigint:用来存储比较大的整数
有符号范围:-263~263-1(默认)
无符号范围:0-264-1
3.2. 小数
float、double用于存储小数,但是不精准,所以存储小数的时候一般用的是decimal
create table info2(
    id int not null primary key auto_increment,
    salary decimal(m,n) -- m是指传入数据的最大位数,n是指保留小数的位数,我这里假设m=3,n=2
)default charset=uft8;

insert into info2(salary) values(3.14); -- 没问题,不报错
insert into info2(salary) values(3.146); -- 超过设置的小数位数会四舍五入
insert into info2(salary) values(323.14); -- 有问题,会报错,超过最大位数了
3.3. 字符串
-
char定长字符串,例如
char(6)是指固定用6位来存储,如果输入的位数小于6位,也会按照六位去存储; -
varchar变长字符串,例如
varchar(6)是指按照传入多少位就存储多少位的规则,但是不能超过括号里的数(6); -
text用于保存长文本,最多保存216-1个字符;
-
mediumtext最多保存224-1个字符;
-
longtext最多保存232-1个字符;
3.4. 时间
datetime:比较精准,年月日时分秒date:只有年月日
4.数据表的增删改查
4.1. 增
insert into 表名(列名1,列名2) values(数据1,数据2);
insert into 表名(列名1,列名2) values(数据1,数据2),(数据3,数据4); -- 批量添加
创建一个表格:
create table info2(
    id int not null primary key auto_increment,
    name varchar(16),
    birth date,
    grade decimal(5,2)
);
插入数据:
insert into info2(name,birth,grade) values("小明","2002-3-2",98.66);
insert into info2(name,birth,grade) values("小赵","2003-4-1",99.99);
insert into info2(name,birth,grade) values("小张","2004-5-7",89.34);
insert into info2(name,birth,grade) values("小秦","2003-6-6",96.7);
insert into info2(name,birth,grade) values("大白","2002-4-15",95.9);
执行命令:
select * from info2;
效果:
mysql> select * from info2;
+----+------+------------+-------+
| id | name | birth      | grade |
+----+------+------------+-------+
|  1 | 小明 | 2002-03-02 | 98.66 |
|  2 | 小赵 | 2003-04-01 | 99.99 |
|  3 | 小张 | 2004-05-07 | 89.34 |
|  4 | 小秦 | 2003-06-06 | 96.70 |
|  5 | 大白 | 2002-04-15 | 95.90 |
+----+------+------------+-------+
5 rows in set (0.01 sec)
4.2. 删
delete from info2; -- 删除数据表info2中所有数据
delete from info2 where id=1; -- 删除数据表info2中id=1的数据
delete from info2 where id<3; -- 删除数据表info2中id<3的数据
-- 删除数据表info2中name="小明" 并且grade=98.66的数据
delete from info2 where name="小明" and grade=98.66;
4.3. 改
update info2 set grade=100; -- 修改数据表info2中列grade的数据为100
update info2 set grade=100 where 条件; -- 修改数据表info2中满足条件的列grade的数据为100
4.4. 查
select * from 表名称;-- 查询数据表中所有的数据
select 列名,列名 from 表名称;-- 查询数据表中特定列名的数据
select 列名,列名 from 表名称 where 条件;-- 查询数据表中符合条件的特定列名的数据
5.使用Python语句操作数据库
5.1. 创建数据
创建数据库:
create database demo DEFAULT CHARSET utf8 COLLATE utf8_general_ci;
use demo;
创建数据表:
create table info(
    id int not null primary key auto_increment,
    name varchar(16) not null,
    passwd varchar(64) not null,
    mobile char(11) not null
)default charset=utf8;
5.2. 使用python连接数据库
使用命令下载相关模块:
pip install -i https://pypi.tuna.tsinghua.edu.cn/simple pymysql==1.0.2
import pymysql

# 1.连接mysql
conn = pymysql.connect(host="127.0.0.1", port=3306, user="root", charset="utf8", passwd="123456", db="demo") # 这里的passwd和db要换成你自己密码和数据库
cursor = conn.cursor(cursor=pymysql.cursors.DictCursor)
5.3. 添加数据
# 2.发送指令
cursor.execute("insert into info(name,passwd,mobile) values('panda','123465','12345678911') ")
conn.commit()  # 提交指令
如果使用Pycharm可能会标红显示错误,不用管,直接运行即可
检查数据表是否添加上了:
mysql> select * from info;
+----+-------+--------+-------------+
| id | name  | passwd | mobile      |
+----+-------+--------+-------------+
|  1 | panda | 123465 | 12345678911 |
+----+-------+--------+-------------+
1 row in set (0.00 sec)
格式化输入
上面的形式是比较死板的,如果你想使用格式化字符串的方法,不能使用Python自己的方法,而是要使用pymysql自带:
列表形式:
# 列表形式
sql = "insert into info(name, passwd, mobile) values(%s, %s, %s)"
my_list = ["小明", "qwe789", "11111111111"]
cursor.execute(sql, my_list)
conn.commit()  # 提交指令
数据已添加上:
mysql> select * from info;
+----+-------+--------+-------------+
| id | name  | passwd | mobile      |
+----+-------+--------+-------------+
|  1 | panda | 123465 | 12345678911 |
|  2 | 小明  | qwe789 | 11111111111 |
+----+-------+--------+----
字典形式:
# 字典形式
sql = "insert into info(name, passwd, mobile) values(%(name)s, %(passwd)s, %(mobile)s)"
data = {"name": "小李", "passwd": "pythonmysql", "mobile": "22222222222"}
cursor.execute(sql, data)
conn.commit()  # 提交指令
数据已添加上:
mysql> select * from info;
+----+-------+-------------+-------------+
| id | name  | passwd      | mobile      |
+----+-------+-------------+-------------+
|  1 | panda | 123465      | 12345678911 |
|  2 | 小明  | qwe789      | 11111111111 |
|  3 | 小李  | pythonmysql | 22222222222 |
+----+-------+-------------+-------------+
3 rows in set (0.00 sec)
5.4. 关闭连接
前面连接成功了,但是在文件运行结束之前要关闭连接
# 3.关闭连接
conn.close()
cursor.close()
5.5. 第一个小案例
结合上述知识,可以让用户自定义输入:
import pymysql

while True:
    username = input("请输入用户名:")
    if username.upper() == "Q":
        break
    passwd = input("请输入密码:")
    mobile = input("请输入电话:")
    # 1.连接mysql
    conn = pymysql.connect(host="127.0.0.1", port=3306, user="root", charset="utf8", passwd="4636996", db="demo")
    cursor = conn.cursor(cursor=pymysql.cursors.DictCursor)
    # 2.发送指令
    # 列表形式
    sql = "insert into info(name, passwd, mobile) values(%s, %s, %s)"
    my_list = [username, passwd, mobile]
    cursor.execute(sql, my_list)

    conn.commit()  # 提交指令
    # 3.关闭连接
    conn.close()
    cursor.close()

然后查询表格,发现已添加上:
mysql> select * from info;
+----+-------+-------------+-------------+
| id | name  | passwd      | mobile      |
+----+-------+-------------+-------------+
|  1 | panda | 123465      | 12345678911 |
|  2 | 小明  | qwe789      | 11111111111 |
|  3 | 小李  | pythonmysql | 22222222222 |
|  4 | 小C   | 123456      | 33333333333 |
|  5 | 小S   | 456798      | 44444444444 |
+----+-------+-------------+-------------+
5 rows in set (0.00 sec)
5.6. 查询数据
import pymysql

# 1.连接mysql
conn = pymysql.connect(host="127.0.0.1", port=3306, user="root", passwd="4636996", charset="utf8", db="demo")
cursor = conn.cursor(cursor=pymysql.cursors.DictCursor)
# 2.发送指令
# cursor.execute("insert into info(name,passwd,mobile) values('panda','123465','12345678911')")

# 列表形式
sql = "select * from info"
cursor.execute(sql)
# 获取返还的数据
my_list = cursor.fetchall()
for each in my_list:
    print(each)
# 3.关闭连接
conn.close()
cursor.close()
得到:
{'id': 1, 'name': 'panda', 'passwd': '123465', 'mobile': '12345678911'}
{'id': 2, 'name': '小明', 'passwd': 'qwe789', 'mobile': '11111111111'}
{'id': 3, 'name': '小李', 'passwd': 'pythonmysql', 'mobile': '22222222222'}
{'id': 4, 'name': '小C', 'passwd': '123456', 'mobile': '33333333333'}
{'id': 5, 'name': '小S', 'passwd': '456798', 'mobile': '44444444444'}
5.7 删除数据
import pymysql

# 1.连接mysql
conn = pymysql.connect(host="127.0.0.1", port=3306, user="root", passwd="4636996", charset="utf8", db="demo")
cursor = conn.cursor(cursor=pymysql.cursors.DictCursor)
# 2.发送指令
# cursor.execute("insert into info(name,passwd,mobile) values('panda','123465','12345678911')")

# 列表形式
cursor.execute("delete from info where id=%s",[5])
conn.commit()

# 3.关闭连接
conn.close()
cursor.close()
查询数据库数据得知已被删除:
mysql> select * from info;
+----+-------+-------------+-------------+
| id | name  | passwd      | mobile      |
+----+-------+-------------+-------------+
|  1 | panda | 123465      | 12345678911 |
|  2 | 小明  | qwe789      | 11111111111 |
|  3 | 小李  | pythonmysql | 22222222222 |
|  4 | 小C   | 123456      | 33333333333 |
+----+-------+-------------+-------------+
4 rows in set (0.00 sec)
5.8. 修改数据
import pymysql

# 1.连接mysql
conn = pymysql.connect(host="127.0.0.1", port=3306, user="root", passwd="4636996", charset="utf8", db="demo")
cursor = conn.cursor(cursor=pymysql.cursors.DictCursor)
# 2.发送指令
# cursor.execute("insert into info(name,passwd,mobile) values('panda','123465','12345678911')")

# 列表形式
cursor.execute("update info set mobile='99999999999' where mobile=%s", ["22222222222"])
conn.commit()

# 3.关闭连接
conn.close()
cursor.close()
查询数据库数据得知已被修改:
mysql> select * from info;
+----+-------+-------------+-------------+
| id | name  | passwd      | mobile      |
+----+-------+-------------+-------------+
|  1 | panda | 123465      | 12345678911 |
|  2 | 小明  | qwe789      | 11111111111 |
|  3 | 小李  | pythonmysql | 99999999999 |
|  4 | 小C   | 123456      | 33333333333 |
+----+-------+-------------+-------------+
4 rows in set (0.00 sec)
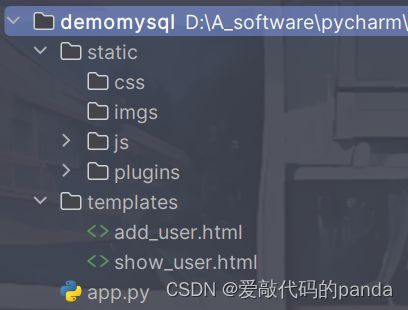
6.Flask+前端+MySQL案例
MySQL数据库使用的是上面的demo下的info表
项目的目录结构:
app.py完整代码:(把数据库的密码设置成你自己的)
from flask import Flask, render_template, request
import pymysql

app = Flask(__name__)


@app.route('/add/user', methods=['POST', 'GET'])
def add_user():
    if request.method == 'GET':
        return render_template("add_user.html")
    else:
        # 接收数据
        name = request.form.get("username")
        passwd = request.form.get("passwd")
        mobile = request.form.get("mobile")
        # 与数据库建立连接
        conn = pymysql.connect(host="127.0.0.1", user="root", passwd="123456", db="demo", charset="utf8", port=3306)
        cursor = conn.cursor(cursor=pymysql.cursors.DictCursor)
        # 添加数据
        sql = "insert into info(name,passwd,mobile) values(%s,%s,%s)"
        data_list = [name, passwd, mobile]
        cursor.execute(sql, data_list)
        conn.commit()
        # 关闭连接
        conn.close()
        cursor.close()
        return "添加成功"


@app.route('/show/user')
def show_user():
    # 与数据库建立连接
    conn = pymysql.connect(host="127.0.0.1", user="root", passwd="123456", db="demo", charset="utf8", port=3306)
    cursor = conn.cursor(cursor=pymysql.cursors.DictCursor)
    # 查询数据
    sql = "select * from info"
    cursor.execute(sql)
    data_list = cursor.fetchall()
    # 关闭连接
    conn.close()
    cursor.close()
    return render_template("show_user.html", data_list=data_list)


if __name__ == '__main__':
    app.run(debug=True)
用户注册界面add_user.html
DOCTYPE html>
<html lang="en">
<head>
    <meta charset="UTF-8">
    <title>注册title>
head>
<body>
<h1>注册h1>
<div>
    <form method="post" action="/add/user">
        <label>
            用户名:<input type="text" name="username" placeholder="请输入用户名......">
            密码:<input type="password" name="passwd" placeholder="请输入密码......">
            手机号:<input type="text" name="mobile" placeholder="请输入手机号......">
        label>
        <input type="submit" value="提 交">
    form>
div>
body>
html>
效果:

查询用户列表界面show_user.html:
    Title


        用户列表


                序号
                用户名
                密码
                手机号


            {% for each in data_list %}

                {{each.id}}
                {{each.name}}
                {{each.passwd}}
                {{each.mobile}}

            {% endfor%}
效果: