BootstrapTable 行内编辑解决方案:x-editable
一、x-editable组件介绍
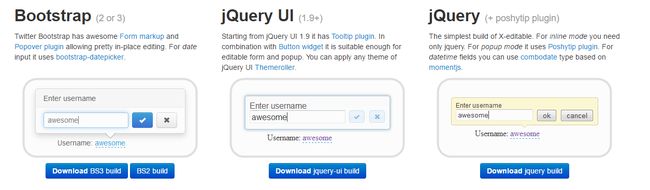
x-editable组件是一个用于创建可编辑弹出框的插件,它支持三种风格的样式:bootstrap、Jquery UI、Jquery。大致效果如下图:
根据博主一贯的风格,这里肯定是选用第一种喽。首先还是给出开源地址吧。
x-editable开源地址:https://github.com/vitalets/x-editable
x-editable文档地址:X-editable :: In-place editing with Twitter Bootstrap, jQuery UI or pure jQuery
x-editable在线Demo:X-editable Demo
1、x-editable初体验。
首先下载基于bootstrap的源码到本地。引用相关文件。需要引入的文件有:bootstrap-editable.css、bootstrap-editable.js、bootstrap-table-editable.js
页面元素
用户名
js初始化
    $(function () {
        $('#username').editable();
    });
效果展示

a、普通的行内一列编辑
$(function () {
$('#username').editable({
type: "text", //编辑框的类型。支持text|textarea|select|date|checklist等
title: "用户名", //编辑框的标题
disabled: false, //是否禁用编辑
emptytext: "空文本", //空值的默认文本
mode: "inline", //编辑框的模式:支持popup和inline两种模式,默认是popup
validate: function (value) { //字段验证
if (!$.trim(value)) {
return '不能为空';
}
}
});
});
b、行内编辑的部门下拉
$(function () {
$('#department').editable({
type: "select", //编辑框的类型。支持text|textarea|select|date|checklist等
source: [{ value: 1, text: "开发部" }, { value: 2, text: "销售部" }, {value:3,text:"行政部"}],
title: "选择部门", //编辑框的标题
disabled: false, //是否禁用编辑
emptytext: "空文本", //空值的默认文本
mode: "popup", //编辑框的模式:支持popup和inline两种模式,默认是popup
validate: function (value) { //字段验证
if (!$.trim(value)) {
return '不能为空';
}
}
});
});

二、bootstrapTable行内编辑初始方案
1、首先引入相关css和js文件 有:bootstrap-editable.css、bootstrap-editable.js、bootstrap-table-editable.js 三个。
2、前台js代码
后台用JSON接收并处理
    //放行条详细信息更改  行内编辑
    @RequestMapping("/updateFxOrderDetailByCell")
    @ResponseBody
    public String updateFxOrderDetailByCell(HttpServletRequest request,String strJson){
        System.out.println("========>行内编辑,进来了吗?"+strJson);
        String str=request.getParameter("strJson");//获取Json字符串
        /**
          json转JSONArray 报,net.sf.json.JSONException: A JSONArray text must start with '[' at               character
         方法一:在前端传入数据时在json串前后加上 "["和 "]"
            data : "["+ JSON.stringify(data) + "]",
         方法二:在后端接受数据后在json串前后加上 "["和 "]"
            json = "[" + json +  "]"
         方法三:把JSONArray换为JSONObject
         不推荐方法二和三,因为接受到前端的数据可能是集合json串也可能是单个对象json串。 后端保持一致,前端在         单个对象json串,采用方法一最好不过!
         */
        JSONArray arry = JSONArray.fromObject(str); //把字符串转成 JSONArray对象
        if(arry.size()>0){
            for (int i = 0; i < arry.size(); i++) {
                JSONObject fodArray = arry.getJSONObject(i);
                FxOrderDetails fod=new FxOrderDetails();
                fod.setId(Integer.parseInt(fodArray.getString("id")));
                fod.setName(fodArray.getString("name"));// 得到 每个对象中的属性值
                fod.setNum(fodArray.getDouble("num"));
                fod.setUnit(fodArray.getString("unit"));
                fxOrderDetailsService.updatefxOrderDetails(fod);
             }
        }

        return "ok";
    }
三、bootstrapTable行内编辑最终方案
1、首先导入相关的js和css文件。
2、文本框编辑。
$(function () {
        $("#tb_user").bootstrapTable({
            toolbar: "#toolbar",
            idField: "Id",
            pagination: true,
            showRefresh: true,
            search: true,
            clickToSelect: true,
            queryParams: function (param) {
                return {};
            },
            url: "/Editable/GetUsers",
            columns: [{
                checkbox: true
            }, {
                field: "UserName",
                title: "用户名",
                editable: {
                    type: 'text',
                    title: '用户名',
                    validate: function (v) { //验证用户名不能为空
                        if (!v) return '用户名不能为空';
                    }
                }
            }, {
                field: "Age",
                title: "年龄",
            }, {
                field: "Birthday",
                title: "生日",
                formatter: function (value, row, index) {
                    var date = eval('new ' + eval(value).source)
                    return date.format("yyyy-MM-dd");
                }
            },
            {
                field: "DeptName",
                title: "部门"
            }, {
                field: "Hobby",
                title: "兴趣爱好"
            }],
            onEditableSave: function (field, row, oldValue, $el) {
                $.ajax({
                    type: "post",
                    url: "/fxorder/Edit",
                    data: { strJson: "["+ JSON.stringify(row) + "]" },//推荐使用这种发送Json字符串
                    dataType: 'JSON',
                    success: function (data, status) {
                        if (status == "success") {
                            alert('提交数据成功');
                        }
                    },
                    error: function () {
                        alert('编辑失败');
                    },
                    complete: function () {
                        alert('完成');
                    }
                });
            }
        });
    });
后台用json接收,省略...
2、时间选择框
{
    field: "Birthday",
    title: "生日",
    formatter: function (value, row, index) {
    var date = eval('new ' + eval(value).source)
    return date.format("yyyy-MM-dd");
    },
    editable: {
    type: 'date',
    title: '生日'
    }
}
得到下面的效果

3、下拉框
{
    field: "DeptId",
    title: "部门",
    editable: {
    type: 'select',
    title: '部门',
    source:[{value:"1",text:"研发部"},{value:"2",text:"销售部"},{value:"3",text:"行政部"}]
    }
}
效果

如果本地配置的数据源不是我们想要的效果,我们可以从数据库中获取到。
{
    field: "DeptId",
        title: "部门",
            editable: {
                type: 'select',
                    title: '部门',
                        source: function () {
                            var result = [];
                            $.ajax({
                                url: '/fxorder/GetDepartments',
                                async: false,
                                type: "get",
                                data: {},
                                success: function (data, status) {
                                    $.each(data, function (key, value) {
                                        result.push({ value: value.ID, text: value.Name });
                                    });
                                }
                            });
                            return result;
                        }
            }
}
后台我们可以配置数据:
public JsonResult GetDepartments()
        {
            var lstRes = new List();
            lstRes.Add(new Department() { ID = "1", Name = "研发部" });
            lstRes.Add(new Department() { ID = "2", Name = "销售部" });
            lstRes.Add(new Department() { ID = "3", Name = "行政部" });
            lstRes.Add(new Department() { ID = "4", Name = "创意部" });
            lstRes.Add(new Department() { ID = "5", Name = "事业部" });
            return Json(lstRes, JsonRequestBehavior.AllowGet);
        }
注意:我们这里的 field: "DeptId" ,为什么这里要配置DeptId而不是DeptName呢?很简单,因为我们需要和数据源里面的value值对应
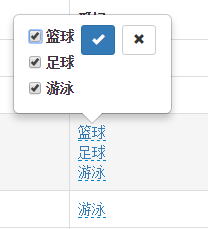
4、复选框
{
    field: "Hobby",
    title: "爱好",
    editable: {
    type: "checklist",
    separator:",",
    source: [{ value: 'bsb', text: '篮球' },
    { value: 'ftb', text: '足球' },
    { value: 'wsm', text: '游泳' }],
    }
}
效果:
5、select2
官方的demo效果

//引用select2文件
小试牛刀的代码:
{
                field: "Hobby",
                title: "爱好",
                editable: {
                    type: 'select2',
                    title: '爱好',
                    name: 'Hobby',
                    placement: 'top',
                    success: function (response, newValue) {
                        debugger;
                    },
                    error: function(response, newValue) {
                        debugger;
                    },
                    url: function(params) {
                        debugger;
                    },
                    source: [{ id: 'bsb', text: '篮球' },
                             { id: 'ftb', text: '足球' },
                             { id: 'wsm', text: '游泳' }],
                    inputclass: 'input-large',
                    select2: {
                        allowClear: true,
                        multiple: true,
                    }
                }
            }
效果就出现啦:

本文出处:懒得安分 - 博客园