huggingface学习|云服务器部署Grounded-Segment-Anything:bug总会一个一个一个一个又一个的解决的
文章目录
- 一、环境部署
-
- (一)模型下载
- (二)环境配置
- (三)库的安装
- 二、运行
-
- (一) 运行grounding_dino_demo.py文件
- (二)运行grounded_sam_demo.py文件
- (三)运行grounded_sam_inpainting_demo.py 文件
- 三、遇到的问题和bug
-
- (一)安装groundingdino库时报错command:'gcc' failed with exit status 1
- (二)运行grounding_dino_demo.py文件时报错OSError:
- (三)运行grounded_sam_inpainting_demo.py 文件时报错OSError:
一、环境部署
(一)模型下载
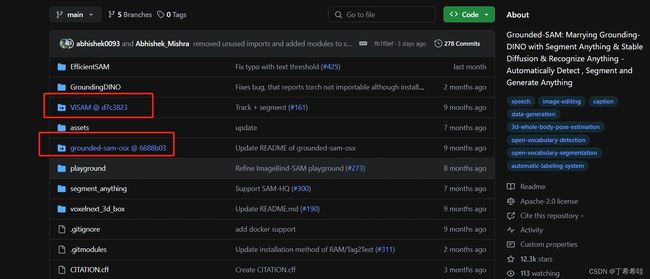
- 下载Grounded-Segment-Anything模型(如果git clone不下来可以直接官网上下压缩包然后解压,耗费的时间也不长)。
git clone https://github.com/IDEA-Research/Grounded-Segment-Anything.git
-
下载了Grounded-Segment-Anything模型后会发现以下两个文件夹是空的,因此需要另行下载,可以自己手动去官网(VISAM、grounded-sam-osx)下载压缩包解压,并保存在Grounded-Segment-Anything文件夹中所对应的位置。
-
模型权重下载:将以下模型权重下载后放在Grounded-Segment-Anything的文件夹下
groundingdino_swint_ogc.pth
sam_vit_h_4b8939.pth
(二)环境配置
- 创建虚拟环境:
conda create -n env_grounded_segment_anything python==3.8.10
- 进入虚拟环境:
conda activate env_grounded_segment_anything
- 安装pytorch:
(这里要特别注意torch和cuda的对应关系,pytorch官网)中有写,grounde-segment-anything模型的官方要求的cuda版本是11.3,但是我使用的学校的云服务器配置中cuda版本是12.0,不好换,查了issue里其他人说也是ok的就没有换。
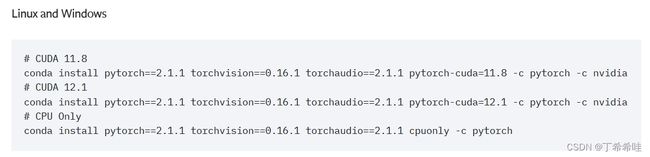
pip install torch==2.1.0+cu121 torchvision==0.16.0+cu121 torchaudio==2.1.0 -f https://download.pytorch.org/whl/torch_stable.html
- 手动设置环境变量,(在不适用docker,使用cuda构建本地GPU环境的情况下),如果之前cuda版本不是11.3的,记得自己换一下第三条代码。
export AM_I_DOCKER=False
export BUILD_WITH_CUDA=True
export CUDA_HOME=/path/to/cuda-11.3
(三)库的安装
pip install -r requirements.txt
- 安装segment_anything:
python -m pip install -e segment_anything
- 安装GroundingDINO:
gcc一定要是9.4.0版本的!!!(血的教训)(不然一直报错gcc)
python -m pip install -e GroundingDINO
python setup.py build
python setup.py install
- 安装diffusers:
pip install --upgrade diffusers[torch]
- 其他依赖项
pip install opencv-python pycocotools matplotlib onnxruntime onnx ipykernel
pip install --upgrade transformers
二、运行
(一) 运行grounding_dino_demo.py文件
python grounding_dino_demo.py
运行结果:(输出一个annotated_image.jpg)
(二)运行grounded_sam_demo.py文件
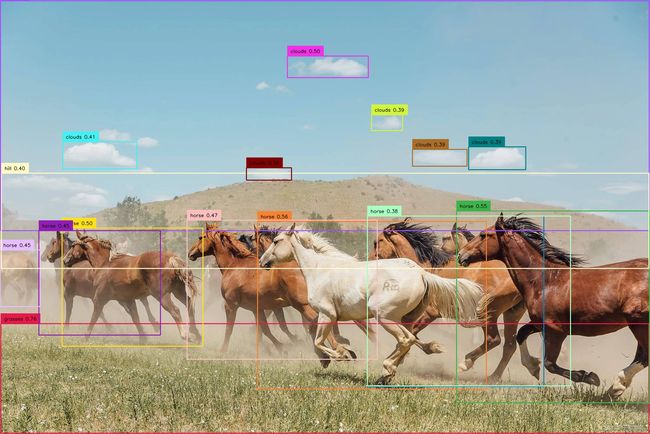
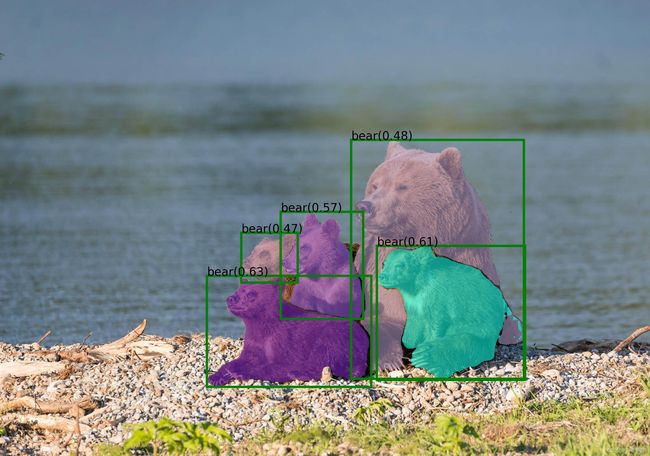
python grounded_sam_demo.py --config GroundingDINO/groundingdino/config/GroundingDINO_SwinT_OGC.py --grounded_checkpoint groundingdino_swint_ogc.pth --sam_checkpoint sam_vit_h_4b8939.pth --input_image assets/demo1.jpg --output_dir "outputs" --box_threshold 0.3 --text_threshold 0.25 --text_prompt "bear" --device "cuda"
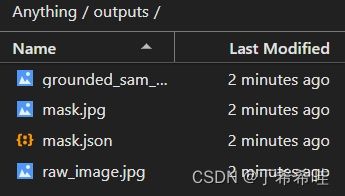
运行结果:生成一个output文件夹,文件夹里包含grouded_sam_output.jpg(显示生成框图片)、mask.jpg(mask掩码图片)、raw_image.jpg(原始图片)和mask.json:
grouded_sam_output.jpg(显示生成框图片):
mask.jpg(mask掩码图片):

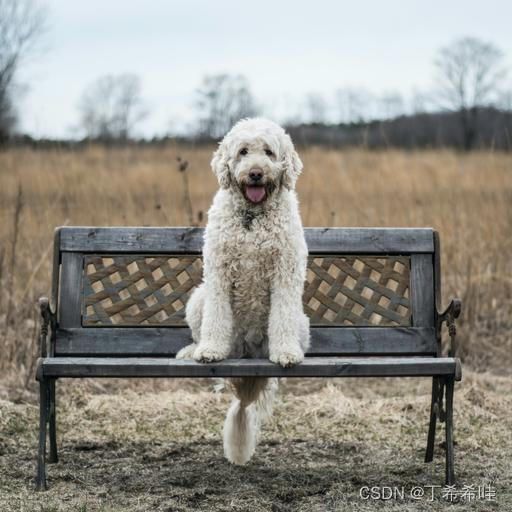
raw_image.jpg(原始图片):

(三)运行grounded_sam_inpainting_demo.py 文件
python grounded_sam_inpainting_demo.py \
  --config GroundingDINO/groundingdino/config/GroundingDINO_SwinT_OGC.py \
  --grounded_checkpoint groundingdino_swint_ogc.pth \
  --sam_checkpoint sam_vit_h_4b8939.pth \
  --input_image assets/inpaint_demo.jpg \
  --output_dir "outputs" \
  --box_threshold 0.3 \
  --text_threshold 0.25 \
  --det_prompt "bench" \
  --inpaint_prompt "A sofa, high quality, detailed" \
  --device "cuda"
运行结果:生成一个output文件夹,文件夹里包含grouded_sam_output.jpg(显示生成框图片)、grounded_sam_inpainting_output.jpg(修复后图片)和raw_image.jpg(原始图片):
grounded_sam_output.jpg(显示生成框图片):

grounded_sam_inpainting_output.jpg:

raw_image.jpg(原始图片):
三、遇到的问题和bug
(一)安装groundingdino库时报错command:‘gcc’ failed with exit status 1
这个问题困扰了好几天,最终得到的解决方案:
- 没有装gcc,这个可以在终端输入gcc -v如果没有输出结果就说明没有,应该去安装
- 装了gcc但是依旧报错,说明版本不对,试了很多次查了很多资料后发现gcc9.4.0是ok的(反正我是9.4.0才行)
- gcc版本和g++版本不一致,这个就是直接重新装gcc9.4.0的同时就可以解决
由于我用的学校服务器,没有root权限,很多命令比如说sudo等就用不了,因此只能采用以下方式下载gcc9.4.0,实际上可以直接通过sudo等命令直接下载。
gcc9.4.0下载方式:
- 下载gcc9.4.0的压缩包gcc-9.4.0.tar.gz:可以直接去官网下载,也可以使用代码:
conda install https://anaconda.org/brown-data-science/gcc/9.4.0/download/linux-64/gcc-9.4.0-0.tar.bz2
- 解压
tar -xzf gcc-9.4.0.tar.gz
- 进入gcc-9.4.0文件夹新建一个文件夹gcc-9.4.0-build(可以随便取名字),主要是用于安装 gcc
cd gcc-9.4.0
mkdir gcc-9.4.0-build
cd gcc-9.4.0-build
- 在刚刚创建的文件夹gcc-9.4.0-build中执行以下命令,安装gcc
../configure --disable-checking --enable-languages=c,c++,fortran --disable-multilib --prefix=/path/to/install/gcc-9.4 --enable-threads=posix
- 编译环境
编译的时间特别长,快的话一两个小时,慢的话可能要三四个小时,(所以如果像我一样是在学校服务器上运行代码,尽量申请长点的时间)可以直接用make,也可以在后边加上j+数字,比如说make -j4,表示选择4个核心去编译,速度会快一些。
make
- 安装
make install
- 添加环境变量
输入以下代码进入bashrc的编辑模式
vim ~/.bashrc
按下a键后进入insert模式(进入insert模式后才能对文件内容进行修改),然后在该界面的最后几行复制粘贴以下代码,其中path就是之前设置的gcc-9.4.0-build的地址
export PATH=/public/home/mcao/usr/xy/source/gcc/bin:$PATH
export LD_LIBRARY_PATH=/public/home/mcao/usr/xy/source/gcc/lib/:/public/home/mcao/usr/xy/source/gcc/lib64/:$LD_LIBRARY_PATH
输入完成后按ESC键,然后输入 :wq 后回车退出界面
最后输入以下代码使得配置的环境在这个终端生效
source ~/.bashrc
最后可以检查一下gcc版本:
gcc -v
(二)运行grounding_dino_demo.py文件时报错OSError:
OSError: We couldn’t connect to ‘https://huggingface.co’ to load this file, couldn’t find it in the cached files and it looks like bert-base-uncased is not the path to a directory containing a file named config.json.
Checkout your internet connection or see how to run the library in offline mode at ‘https://huggingface.co/docs/transformers/installation#offline-mode’.
解决方法一:(看到有人解决方式是设立代理服务器,但是我没成功)
import os
os.environ['HTTP_PROXY'] = 'http://127.0.0.1:7890'
os.environ['HTTPS_PROXY'] = 'http://127.0.0.1:7890'
解决方式二:手动下载模型到本地库,然后改代码
- 第一步: 在huggingface的bert-base-uncased库上下载包括 config.json, flax_model.msgpack, pytorch_model.bin, tf_model.h5, tokenizer.json, tokenizer_config.json, vocab.txt的文件:
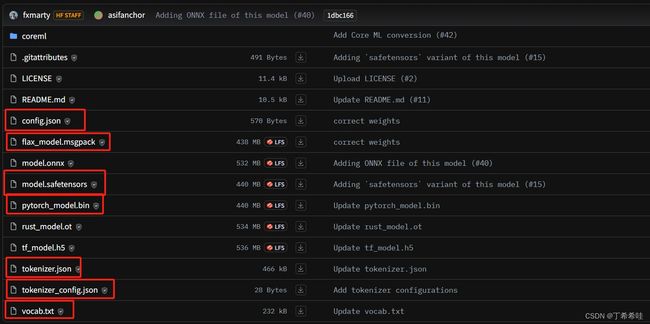
- 第二步: 创建一个bert-base-uncased文件夹,把第一步中下载的文件放到创建的这个文件夹中, 记住创建的这个文件夹的位置,我是直接放在了Grounded-Segment-Anything的文件夹下(事实证明还是放在这里比较稳妥,因为放在别的地方后边代码不太好改)
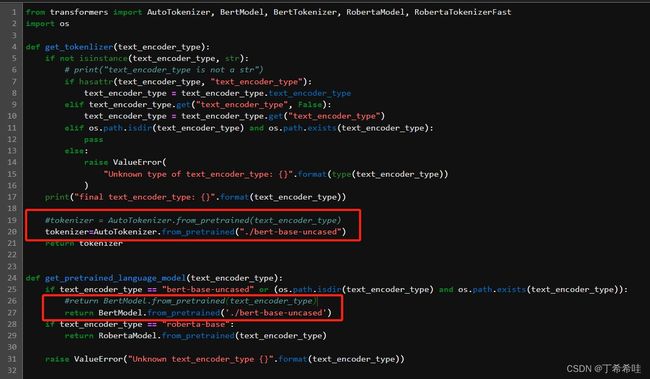
- 第三步: 在Grounded-Segment-Anything/GroundingDINO/groundingdino/util/get_tokenlizer.py文件中将代码进行修改,具体修改方式:红框中注释了的代码是原始代码,注释后的代码下边的代码是我修改后的代码。(这里特别注意修改后的代码中的文件路径是相对于Grounded-Segment-Anything文件夹的相对路径,我之前一直理解成对于get_tokenlizer.py的相对路径,结果一直没成功,理解了之后成功解决问题)
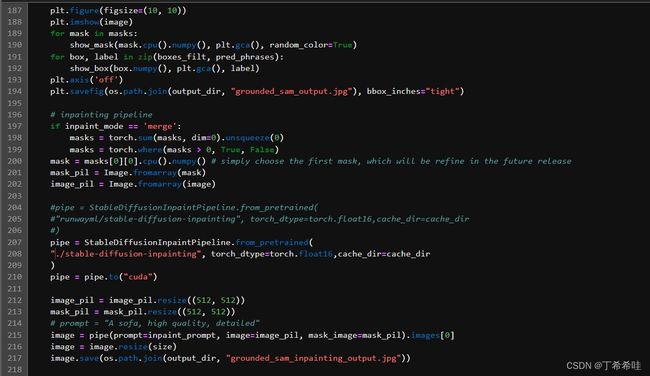
(三)运行grounded_sam_inpainting_demo.py 文件时报错OSError:
OSError: Cannot load model runwayml/stable-diffusion-inpainting: model is not cached locally and an error occured while trying to fetch metadata from the Hub. Please check out the root cause in the stacktrace above.
解决方式和上边一样:手动下载模型到本地库,然后改代码
先把stable-diffusion-inpainting模型下载到Grounded-Segment-Anything目录中,然后修改grounded_sam_inpainting_demo.py中的代码,具体修改方式是将下图中第204行-206行被注释掉的代码修改为207行-209行的代码。
参考:
Grounded-Segment-Anything本地部署
语义分割——Grounded Segment Anything 环境配置和使用教程(已解决 name ‘_C’ is not defined 报错)
Grounded-Segment-Anything环境安装踩坑记录