在Spring Boot中使用ZXing开源库生成带有Logo的二维码
在上一篇文章的基础上,我们将进一步扩展功能,实现在生成的二维码中嵌入Logo图片。这样的二维码更具个性化和识别度。让我们逐步完成这个功能。
第一步:引入Logo图片
首先,准备一张用作Logo的图片,并确保它的大小适中。将Logo图片放置在项目的资源文件夹中,例如src/main/resources。
第二步:修改生成服务
在QRCodeService中添加新的方法,用于在生成二维码时添加Logo:
@Service
public class QRCodeService {
    @Value("${logo.path}")
    private String logoPath;

    // 定义一个名为generateQRCode的公共方法,它接收三个参数:content(字符串类型,表示二维码的内容)、width(整数类型,表示二维码的宽度)和height(整数类型,表示二维码的高度)。
    public byte[] generateQRCode(String content, int width, int height) {
        try {
            // 创建一个名为hints的HashMap对象,用于存储二维码编码的提示信息。
            Map<EncodeHintType, Object> hints = new HashMap<>();
            // 设置错误纠正级别为L,表示较低的纠错能力。
            hints.put(EncodeHintType.ERROR_CORRECTION, ErrorCorrectionLevel.L);
            // 设置边距为2,即二维码边缘与内容之间的距离为2个像素。
            hints.put(EncodeHintType.MARGIN, 2);
            // 设置字符集为UTF-8,表示二维码支持UTF-8编码的字符。
            hints.put(EncodeHintType.CHARACTER_SET, "UTF-8");

            // 创建一个QRCodeWriter对象,用于生成二维码。
            QRCodeWriter qrCodeWriter = new QRCodeWriter();
            // 使用QRCodeWriter对象将内容编码为二维码,并指定宽度、高度和提示信息。
            BitMatrix bitMatrix = qrCodeWriter.encode(content, BarcodeFormat.QR_CODE, width, height, hints);

            // 将BitMatrix对象转换为BufferedImage对象,以便于后续处理。
            BufferedImage bufferedImage = MatrixToImageWriter.toBufferedImage(bitMatrix);
            // 创建一个ByteArrayOutputStream对象,用于将BufferedImage对象转换为字节数组。
            ByteArrayOutputStream byteArrayOutputStream = new ByteArrayOutputStream();
            // 将BufferedImage对象写入到ByteArrayOutputStream对象中,并指定输出格式为png。
            ImageIO.write(bufferedImage, "png", byteArrayOutputStream);

            // 将ByteArrayOutputStream对象中的数据转换为字节数组,并返回该字节数组。
            return byteArrayOutputStream.toByteArray();
        } catch (Exception e) {
            // 如果在生成二维码过程中出现异常,则打印异常信息。
            e.printStackTrace();
            // 返回空字节数组。
            return null;
        }
    }

    /**
     * 生成带有Logo的二维码
     *
     * @param content 二维码的内容
     * @param width 二维码的宽度
     * @param height 二维码的高度
     * @return 带有Logo的二维码的字节数组
     */
    public byte[] generateQRCodeWithLogo(String content, int width, int height) {
        try {
            // 调用方法生成二维码的字节数组
            byte[] qrCodeBytes = generateQRCode(content, width, height);

            // 从字节数组中读取二维码图像
            BufferedImage qrCodeImage = ImageIO.read(new ByteArrayInputStream(qrCodeBytes));
            System.out.println("logoPath"+logoPath);
            // 从指定路径读取Logo图像
            BufferedImage logoImage = ImageIO.read(new File(logoPath));

            // 计算Logo的大小,使其适合二维码的大小
            int logoWidth = qrCodeImage.getWidth() / 5;
            int logoHeight = qrCodeImage.getHeight() / 5;

            // 计算Logo在二维码上的位置,使其居中显示
            int x = (qrCodeImage.getWidth() - logoWidth) / 2;
            int y = (qrCodeImage.getHeight() - logoHeight) / 2;

            // 在二维码上绘制Logo图像
            Graphics2D graphics = qrCodeImage.createGraphics();
            graphics.drawImage(logoImage, x, y, logoWidth, logoHeight, null);
            graphics.dispose();

            // 将带有Logo的二维码转换为PNG格式的字节数组
            ByteArrayOutputStream byteArrayOutputStream = new ByteArrayOutputStream();
            ImageIO.write(qrCodeImage, "png", byteArrayOutputStream);

            // 返回带有Logo的二维码的字节数组
            return byteArrayOutputStream.toByteArray();
        } catch (IOException e) {
            // 打印异常堆栈信息
            e.printStackTrace();
            // 返回空字节数组(表示失败)
            return null;
        }
    }
}
在上述代码中,我们添加了generateQRCodeWithLogo方法,该方法先调用generateQRCode生成普通二维码,然后在其基础上添加Logo。Logo的位置在二维码中央,大小为二维码的五分之一。
第三步:更新Controller
在Controller中调用新添加的方法,生成带有Logo的二维码:
@RestController
public class QRCodeController {

    @Autowired
    private QRCodeService qrCodeService;

    // 使用@GetMapping注解,表示这是一个处理HTTP GET请求的方法。
    // value属性指定了该方法对应的URL路径为"/generateQRCode"。
    // produces属性指定了该方法返回的数据类型,即PNG格式的图片。
    @GetMapping(value = "/generateQRCode", produces = MediaType.IMAGE_PNG_VALUE)
    public byte[] generateQRCode(@RequestParam String content,
                                 @RequestParam(defaultValue = "200") int width,
                                 @RequestParam(defaultValue = "200") int height) {
        // 调用qrCodeService的generateQRCode方法来生成二维码。
        // 传入二维码的内容、宽度和高度作为参数。
        return qrCodeService.generateQRCode(content, width, height);
    }

    /**
     * 生成带有Logo的二维码的API接口
     *
     * @GetMapping 注解表示这是一个处理HTTP GET请求的方法,并映射到"/generateQRCodeWithLogo"路径。
     * @RequestParam 注解用于从请求中获取参数。
     * @RequestParam(defaultValue = "200") 表示如果请求中没有提供该参数,则使用默认值"200"。
     * @Produces 注解指定此方法将产生或接受的媒体类型为"image/png"。
     *
     * @param content 二维码的内容,将从请求中获取。
     * @param width 二维码的宽度,将从请求中获取,默认为200。
     * @param height 二维码的高度,将从请求中获取,默认为200。
     *
     * @return 返回生成的带有Logo的二维码的字节数组。
     */

    @GetMapping(value = "/generateQRCodeWithLogo", produces = MediaType.IMAGE_PNG_VALUE)
    public byte[] generateQRCodeWithLogo(@RequestParam String content,
                                         @RequestParam(defaultValue = "200") int width,
                                         @RequestParam(defaultValue = "200") int height) {
        return qrCodeService.generateQRCodeWithLogo(content, width, height);
    }
}
我们在Controller中添加了新的接口/generateQRCodeWithLogo,该接口调用generateQRCodeWithLogo方法生成带有Logo的二维码。
第四步:配置Logo路径
在application.properties或application.yml中添加Logo路径的配置:
logo.path=classpath:logo.png
第五步:测试
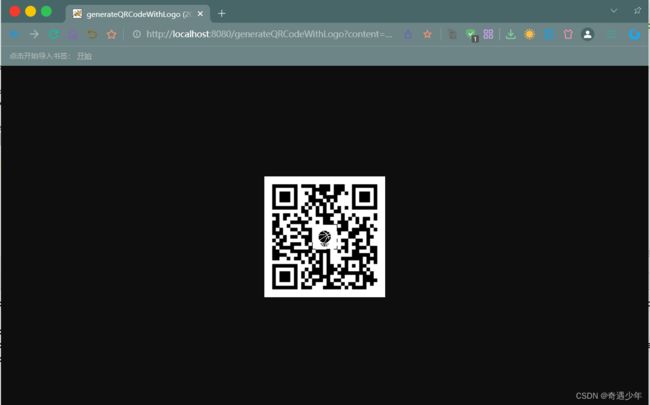
通过以上步骤,你已经成功地在Spring Boot项目中使用ZXing生成带有Logo的二维码。这样的二维码更具有品牌特色,也更易于用户识别。希望这篇博文对你有所帮助。