迁移 MySQL 数据到 OceanBase 集群
迁移 MySQL 数据库到 OceanBase 集群
- 一、目标
- 二、环境准备
- 三、实施
-
- 1、使用OBD安装一套OB
- 2、安装mysql实例
- 3、sysbench数据准备
- 4、使用mysqldump离线同步数据
- 5、使用datax (离线)从MySQL同步表数据到 OceanBase
- 6、(可选)使用datax配置OceanBase和CSV之间的同步
- 7、(可选)使用canal 配置 MySQL到 OceanBase 的增量同步
参考:https://open.oceanbase.com/docs/tutorials/quickstart/V1.0.0/4-2
https://open.oceanbase.com/docs/tutorials/quickstart/V1.0.0/4-10-how-to-use-canal-to-synchronize-mysql-data-to
https://www.modb.pro/db/222647等
一、目标
1.使用 mysqldump 将 mysql的表结构和数据同步到 OceanBase 的MySQL 租户中。
2.使用 datax 配置至少一个表的 MySQL 到 OceanBase 的 MySQL 租户的离线同步。
3.使用 datax 配置至少一个表的 OceanBase 到 CSV 以及 CSV 到 OceanBase 的离线同步。
4.(可选)使用 canal 配置 MySQL 的增量同步到 OceanBase 的 MySQL 租户。
二、环境准备
| DB | Host | Port | Cpu | Memory | Disk | Os version |
|---|---|---|---|---|---|---|
| Mysql | 172.17.0.15 | 3306 | 4 | 16G | 50G | CentOS Linux release 7.9.2009 (Core) |
| Oceabase | 172.17.0.15 | 2881/2882/5883/5884 | 4 | 16G | 50G | CentOS Linux release 7.9.2009 (Core) |
三、实施
1、使用OBD安装一套OB
创建admin用户
[admin@oceanbase01 ~]$ useradd admin
[admin@oceanbase01 ~]$ passwd admin
安装OBD
yum install -y yum-utils
yum-config-manager --add-repo https://mirrors.aliyun.com/oceanbase/OceanBase.repo
yum install -y ob-deploy
配置yaml文件
[admin@oceanbase01 soft]$ vi single.yaml
#only need to configure when remote login is required
# user:
# username: your username
# password: your password if need
# key_file: your ssh-key file path if need
# port: your ssh port, default 22
# timeout: ssh connection timeout (second), default 30
oceanbase-ce:
servers:
# Please don’t use hostname, only IP can be supported
- 172.17.0.15
global:
# The working directory for OceanBase Database. OceanBase Database is started under this directory. This is a required field.
home_path: /home/admin/oceanbase-ce
# The directory for data storage. The default value is $home_path/store.
data_dir: /data
# The directory for clog, ilog, and slog. The default value is the same as the data_dir value.
redo_dir: /redo
# Please set devname as the network adaptor’s name whose ip is in the setting of severs.
# if set severs as “127.0.0.1”, please set devname as “lo”
# if current ip is 192.168.1.10, and the ip’s network adaptor’s name is “eth0”, please use “eth0”
devname: eth0
mysql_port: 2881 # External port for OceanBase Database. The default value is 2881. DO NOT change this value after the cluster is started.
rpc_port: 2882 # Internal port for OceanBase Database. The default value is 2882. DO NOT change this value after the cluster is started.
zone: zone1
cluster_id: 1
# please set memory limit to a suitable value which is matching resource.
memory_limit: 8G # The maximum running memory for an observer
system_memory: 3G # The reserved system memory. system_memory is reserved for general tenants. The default value is 30G.
stack_size: 512K
cpu_count: 16 #使用4时后面创建unit会报资源不足
cache_wash_threshold: 1G
__min_full_resource_pool_memory: 268435456
workers_per_cpu_quota: 10
schema_history_expire_time: 1d
# The value of net_thread_count had better be same as cpu’s core number.
net_thread_count: 4
major_freeze_duty_time: Disable
minor_freeze_times: 10
enable_separate_sys_clog: 0
enable_merge_by_turn: FALSE
datafile_disk_percentage: 20 # The percentage of the data_dir space to the total disk space. This value takes effect only when datafile_size is 0. The default value is 90.
syslog_level: INFO # System log level. The default value is INFO.
enable_syslog_wf: false # Print system logs whose levels are higher than WARNING to a separate log file. The default value is true.
enable_syslog_recycle: true # Enable auto system log recycling or not. The default value is false.
max_syslog_file_count: 4 # The maximum number of reserved log files before enabling auto recycling. The default value is 0.
# observer cluster name, consistent with obproxy’s cluster_name
appname: obcluster
# root_password: # root user password, can be empty
# proxyro_password: # proxyro user pasword, consistent with obproxy’s observer_sys_password, can be empty
obproxy:
# Set dependent components for the component.
# When the associated configurations are not done, OBD will automatically get the these configurations from the dependent components.
depends:
- oceanbase-ce
servers:
- 172.17.0.15
global:
listen_port: 2883 # External port. The default value is 2883.
prometheus_listen_port: 2884 # The Prometheus port. The default value is 2884.
home_path: /home/admin/obproxy
# oceanbase root server list
# format: ip:mysql_port;ip:mysql_port. When a depends exists, OBD gets this value from the oceanbase-ce of the depends.
# rs_list: 192.168.1.2:2881
enable_cluster_checkout: false
# observer cluster name, consistent with oceanbase-ce’s appname. When a depends exists, OBD gets this value from the oceanbase-ce of the depends.
# cluster_name: obcluster
skip_proxy_sys_private_check: true
# obproxy_sys_password: # obproxy sys user password, can be empty. When a depends exists, OBD gets this value from the oceanbase-ce of the depends.
# observer_sys_password: # proxyro user pasword, consistent with oceanbase-ce’s proxyro_password, can be empty. When a depends exists, OBD gets this value from the oceanbase-ce of the
depends.
使用OBD安装集群
[admin@oceanbase01 soft]$ obd cluster deploy obce-single -c single.yaml

登录数据库创建资源和租户
[admin@oceanbase01 ~]$ obclient -h127.1 -uroot@sys -P5883 -p -c -A oceanbase
Enter password: Welcome123$
Welcome to the OceanBase. Commands end with ; or \g.
Your MySQL connection id is 6
Server version: 5.6.25 OceanBase 3.1.2 (r10000392021123010-d4ace121deae5b81d8f0b40afbc4c02705b7fc1d) (Built Dec 30 2021 02:47:29)
Copyright © 2000, 2018, Oracle, MariaDB Corporation Ab and others.
Type ‘help;’ or ‘\h’ for help. Type ‘\c’ to clear the current input statement.
MySQL [oceanbase]> show databases;
±-------------------+
| Database |
±-------------------+
| oceanbase |
| information_schema |
| mysql |
| SYS |
| LBACSYS |
| ORAAUDITOR |
| test |
±-------------------+
7 rows in set (0.003 sec)
MySQL [oceanbase]> alter resource unit sys_unit_config min_cpu=2;
Query OK, 0 rows affected (0.007 sec)
MySQL [oceanbase]> CREATE resource unit S2C1G max_cpu=2, min_cpu=2, max_memory=‘1G’, min_memory=‘1G’, max_iops=10000, min_iops=1000, max_session_num=10000, max_disk_size=‘10G’;
Query OK, 0 rows affected (0.011 sec)
MySQL [oceanbase]> CREATE resource pool my_pool unit = ‘S2C1G’, unit_num = 1;
Query OK, 0 rows affected (0.021 sec)
MySQL [oceanbase]> create tenant obmysql resource_pool_list=(‘my_pool’), primary_zone=‘RANDOM’,comment ‘mysql tenant/instance’, charset=‘utf8’ set ob_tcp_invited_nodes=’%’, ob_compatibility_mode=‘mysql’;
Query OK, 0 rows affected (1.229 sec)
创建数据库
[admin@oceanbase01 ~]$ obclient -h127.1 -uroot@sys -P2881 -p -c -A oceanbase
Enter password:
Welcome to the OceanBase. Commands end with ; or \g.
Your MySQL connection id is 3221487985
Server version: 5.7.25 OceanBase 3.1.2 (r10000392021123010-d4ace121deae5b81d8f0b40afbc4c02705b7fc1d) (Built Dec 30 2021 02:47:29)
Copyright © 2000, 2018, Oracle, MariaDB Corporation Ab and others.
Type ‘help;’ or ‘\h’ for help. Type ‘\c’ to clear the current input statement.
MySQL [oceanbase]> show parameters like ‘cluster’;
±------±---------±------------±---------±--------±----------±----------±--------------------±---------±--------±--------±------------------+
| zone | svr_type | svr_ip | svr_port | name | data_type | value | info | section | scope | source | edit_level |
±------±---------±------------±---------±--------±----------±----------±--------------------±---------±--------±--------±------------------+
| zone1 | observer | 172.17.0.15 | 2882 | cluster | NULL | obcluster | Name of the cluster | OBSERVER | CLUSTER | DEFAULT | DYNAMIC_EFFECTIVE |
±------±---------±------------±---------±--------±----------±----------±--------------------±---------±--------±--------±------------------+
1 row in set (0.003 sec)
[admin@oceanbase01 ~]$ obclient -h127.1 -uroot@obmysql#obcluster -P5883 -c -A test
MySQL [test]> create database obmysql1;

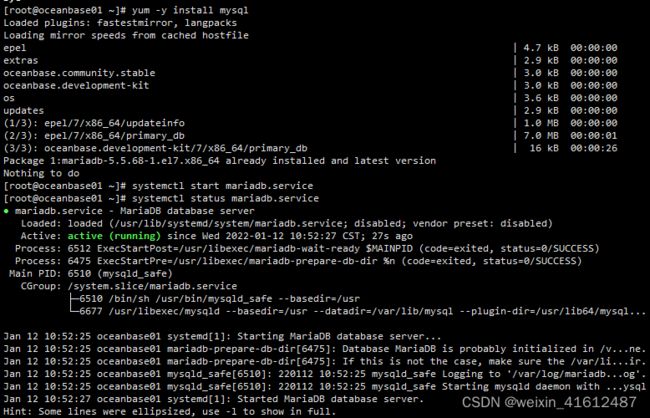
2、安装mysql实例
使用系统自带的mariadb建立mysql测试库
[root@oceanbase01 ~]# yum -y install mysql
[root@oceanbase01 ~]# systemctl start mariadb.service
[root@oceanbase01 ~]# systemctl status mariadb.service
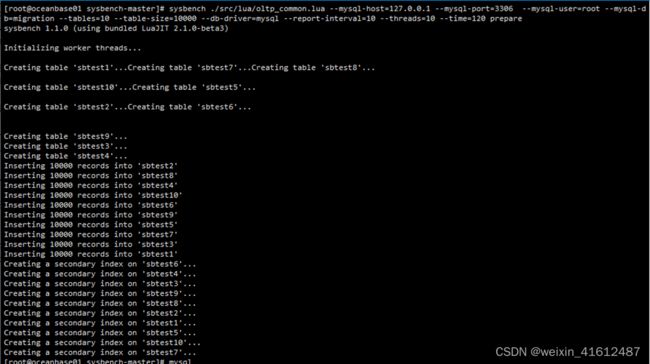
3、sysbench数据准备
本次使用sysbench作为数据初始化工具。
下载sysbench并上传到mysql数据库服务器上
https://codeload.github.com/Percona-Lab/tpcc-mysql/zip/master
解压编译安装
[root@oceanbase01 ~]# unzip sysbench-master.zip
./autogen.sh
./configure --with-mysql-includes=/usr/include/mysql --with-mysql-libs=/usr/lib64/mysql --with-mysql
make
make install
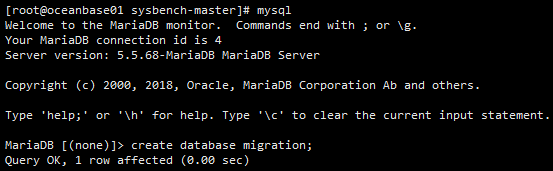
mysql中建立测试库
[root@oceanbase01 sysbench-master]# mysql
MariaDB [(none)]> create database migration;
加载测试数据
sysbench ./src/lua/oltp_common.lua --mysql-host=127.0.0.1 --mysql-port=3306 --mysql-user=root --mysql-db=migration --tables=10 --table-size=10000 --db-driver=mysql --report-interval=10 --threads=10 --time=120 prepare
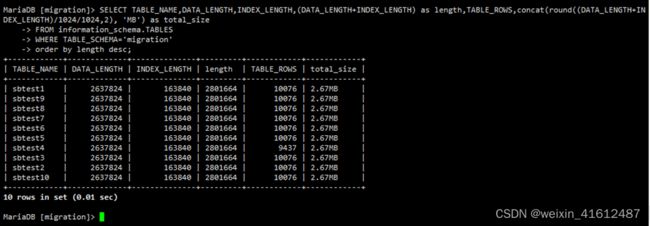
检查表的数据量
查看表数据量
SELECT TABLE_NAME,DATA_LENGTH,INDEX_LENGTH,(DATA_LENGTH+INDEX_LENGTH) as length,TABLE_ROWS,concat(round((DATA_LENGTH+INDEX_LENGTH)/1024/1024,2), ‘MB’) as total_size
FROM information_schema.TABLES
WHERE TABLE_SCHEMA=‘migration’
order by length desc;
4、使用mysqldump离线同步数据
将表结构和数据分开导出(MySQL源端)
[root@db01 dmp]# mysqldump -h 127.0.0.1 -uroot -proot -P3306 -d migration > exp_migration_ddl.sql
[root@db01 dmp]# mysqldump -h127.0.0.1 -uroot -P3306 -proot -t migration > exp_migration_data.sql
这个导出来的脚本有几个特征:
• 视图的定义也会在里面,但是会以注释 /!/。视图我们不关注,这部分内容可以删除。
• 会有一些特别的语法 OceanBase MYSQL 会不支持,但是不影响,需要替换掉其中部分。比如说变量 SQL_NOTES,DEFINER 语句等。
下面这个示例就是导出的脚本里有一个 MAX_ROWS= 的设置,这个是 MySQL 特有的,OceanBase MySQL 没有这个问题,也不需要这个设置,不支持这个语法,会报错。
/*!40101 SET character_set_client = @saved_cs_client /;
/!40101 SET @saved_cs_client = @@character_set_client /;
/!40101 SET character_set_client = utf8 */;
CREATE TABLENATION(
N_NATIONKEYint(11) NOT NULL,
N_NAMEchar(25) COLLATE utf8_unicode_ci NOT NULL,
N_REGIONKEYint(11) NOT NULL,
N_COMMENTvarchar(152) COLLATE utf8_unicode_ci DEFAULT NULL,
PRIMARY KEY (N_NATIONKEY)
) ENGINE=InnoDB DEFAULT CHARSET=utf8 COLLATE=utf8_unicode_ci MAX_ROWS=4294967295;
需要把所有 MAX_ROWS= 以及后面部分注释掉。使用批量替换技术。如在 vim 中使用 :%s/MAX_ROWS=/; – MAX_ROWS=/g 。
注意:上面导出的 SQL 中表名是大写,说明源端 MySQL 里设置表名默认很可能是大小写敏感。因此目标 OceanBase MySQL 租户也要设置。
在导出的表结构语句里,可能包含外键。在导入 OceanBase MySQL 里时,如果外键依赖的表没有创建时,导入脚本会报错。因此导入之前需要将外键检查约束先禁用掉。
MySQL [oceanbase]> set global foreign_key_checks=off;
Query OK, 0 rows affected (0.01 sec)
MySQL [oceanbase]> show global variables like ‘%foreign%’;
±-------------------±------+
| Variable_name | Value |
±-------------------±------+
| foreign_key_checks | OFF |
±-------------------±------+
1 row in set (0.00 sec)
修改后,退出会话,重新登录。 在 obclient 客户端里通过 source 命令可以执行外部 SQL 脚本文件。

检查文件中是否存在特殊语法|变量等,并在导入前将表中了latin1字符集的建表语句修改掉。
grep -Ei “SQL_NOTES|DEFINER|MAX_ROWS” exp_migration_ddl.sql
sed -i ‘s/CHARACTER\ SET\ latin1//g’ exp_migration_ddl.sql
或者使用vim进行替换
导入表结构
[root@oceanbase01 ~]# obclient -h127.1 -uroot@obmysql#obcluster -P5883 -proot -c -A obmysqll
Welcome to the OceanBase. Commands end with ; or \g.
Your MySQL connection id is 12
Server version: 5.6.25 OceanBase 3.1.2 (r10000392021123010-d4ace121deae5b81d8f0b40afbc4c02705b7fc1d) (Built Dec 30 2021 02:47:29)
Copyright © 2000, 2018, Oracle, MariaDB Corporation Ab and others.
Type ‘help;’ or ‘\h’ for help. Type ‘\c’ to clear the current input statement.
MySQL [obmysqll]> set global foreign_key_checks=off;
Query OK, 0 rows affected (0.002 sec)
MySQL [obmysqll]> source exp_migration_ddl.sql


导入数据
MySQL [obmysqll]> source exp_migration_data.sql
MySQL [obmysqll]> set global foreign_key_checks=on;
数据导入过程中在alter table disable keys和enable keys语句中有一些报错,不影响结果。

检查导入结果

数据完全一致。
5、使用datax (离线)从MySQL同步表数据到 OceanBase
部署datax软件
wget http://datax-opensource.oss-cn-hangzhou.aliyuncs.com/datax.tar.gz
解压
tar -xf datax.tar.gz
cd datax
删除datax中的隐藏文件
find ./plugin -name “.*” | xargs rm -f
生成模板文件
python ./bin/datax.py -r mysqlreader -w oceanbasev10writer > job/my2ob.json

根据实际环境修改参数文件
vim job/my2obce.json
[root@oceanbase01 datax]# cat job/my2ob.json
{
“job”: {
“content”: [
{
“reader”: {
“name”: “mysqlreader”,
“parameter”: {
“column”: ["*"],
“connection”: [
{
“jdbcUrl”:[ “jdbc:mysql://127.0.0.1:3306/migration?useUnicode=true&characterEncoding=utf8”
],
“table”: [“sbtest1”]
}
],
“password”: “root”,
“username”: “root”,
“where”: “”
}
},
“writer”: {
“name”: “oceanbasev10writer”,
“parameter”: {
“column”: ["*"],
“connection”: [
{
“jdbcUrl”: “||dsc_ob10_dsc||obcluster:obmysql||dsc_ob10_dsc||jdbc:oceanbase://127.0.0.1:5883/obmysql1”,
“table”:[“sbtest1”]
}
],
“obWriteMode”: “insert”,
“password”: “root”,
“username”: “root”
}
}
}
],
“setting”: {
“speed”: {
“channel”: 4
}
}
}
}
清理之前导入的数据
[root@oceanbase01 datax]# obclient -h127.1 -uroot@obmysql#obcluster -P5883 -proot -c -A obmysql1
MySQL [obmysql1]> truncate table sbtest1;

启动同步作业
python ./bin/datax.py ./job/my2ob.json


数据同步成功。
6、(可选)使用datax配置OceanBase和CSV之间的同步
生成ob2csv配置文件
[root@oceanbase01 datax]# python ./bin/datax.py -r oceanbasev10reader -w txtfilewriter > job/ob2csv.json
修改配置文件
[root@oceanbase01 datax]# vim ob2csv.json
{
“job”:{
“setting”:{
“speed”:{
“channel”:10
},
“errorLimit”:{
“record”:0, “percentage”: 0.02
}
},
“content”:[
{
“reader”:{
“name”:“oceanbasev10reader”,
“parameter”:{
“where”:"",
“column”: [
“*”
],
“connection”:[
{
“jdbcUrl”:["||_dsc_ob10_dsc_||obcluster:obmysql||_dsc_ob10_dsc_||jdbc:oceanbase://127.0.0.1:5883/obmysql1"],
“table”:[“sbtest2”]
}
],
“username”: “root”,
“password”: “root”
}
},
“writer”:{
“name”: “txtfilewriter”,
“parameter”: {
“path”: “/tmp/”,
“fileName”: “sbtest2”,
“writeMode”: “truncate”,
“dateFormat”: “yyyy-MM-dd hh:mm:ss”,
“charset”: “UTF-8”,
“nullFormat”: “\N”,
“fileDelimiter”: “,”
}
}
}
]
}
}
运行导出表sbtest2到csv
[root@oceanbase01 datax]# python ./bin/datax.py job/ob2csv.json


查看生成的csv文件

导出成功。
实现 CSV 到 OceanBase 导入
使用上一步导出sbtest2的CSV文件重新导入。
清理数据

生成导入配置
[root@oceanbase01 datax]# cat csv2ob1.json
{
“job”: {
“setting”: {
“speed”: {
“channel”: 4
},
“errorLimit”: {
“record”: 0,
“percentage”: 0.1
}
},
“content”: [
{
“reader”: {
“name”: “txtfilereader”,
“parameter”: {
“path”: ["/tmp/ob/"],
“fileName”: “btest2”,
“encoding”: “UTF-8”,
“column”: ["*"],
“dateFormat”: “yyyy-MM-dd hh:mm:ss” ,
“nullFormat”: “\N” ,
“fieldDelimiter”: “,”
}
},
“writer”: {
“name”: “oceanbasev10writer”,
“parameter”: {
“obWriteMode”: “insert”,
“column”: ["*"],
“preSql”: [
“truncate table sbtest2”
],
“connection”: [
{
“jdbcUrl”: “||_dsc_ob10_dsc_||obcluster:obmysql||_dsc_ob10_dsc_||jdbc:oceanbase://127.0.0.1:5883/obmysql1?useUnicode=true&characterEncoding=utf-8”,
“table”: [
“sbtest2”
]
}
],
“username”: “root”,
“password”: “root”,
“writerThreadCount”: 10,
“batchSize”: 100,
“memstoreThreshold”: “0.9”
}
}
}
]
}
}
导入数据
[root@oceanbase01 datax]# python ./bin/datax.py ./job/csv2ob.json
检查表数据
数据导入成功。


7、(可选)使用canal 配置 MySQL到 OceanBase 的增量同步
Canal 是 Alibaba 开源的一个产品,主要用途是基于 MySQL 数据库增量日志解析,提供增量数据订阅和消费。开源项目地址:https://github.com/alibaba/canal 。
架构原理
canal 主要提供了 4 个组件:
canal deployer:canal 的 server 端,进行 binlog 到 CanalEntry 的转换。
canal admin:canal 的配置管理服务,提供 web 页面管理 canal 的 server 端服务。
canal adapter:canal 的客户端适配器,解析 CanalEntry 并将增量变动同步到目的端。
canal example:canal 的 client 端示例,用户可以基于该部分代码实现自己的消费逻辑。
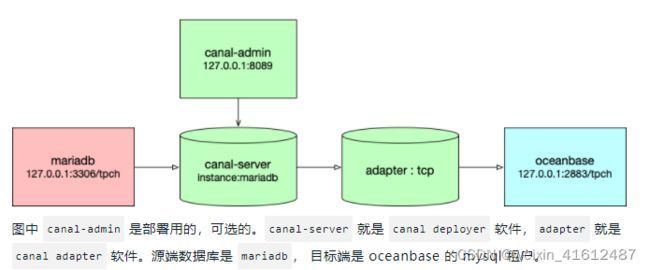
Canal Deployer
Canal Deployer 的服务中有 Server 和 Instance 的概念,一个 server 代表一个 deployer 服务,一个 instance 代表一个实际的数据同步通路,在 Canal Server 中,一个 Server 可以有多个 Instance。
Canal Instance 由 Spring 在运行时创建,其配置信息 canal deployer 的 conf/canal.properties 中指定。Canal 本身提供了几种可以直接使用的配置,存放在 conf/spring 目录下。
Canal Instance 在解析完日志信息后,得到的 CanalEntry 数据会放入内存等待消费。Canal 提供了两种消费方式供用户选择:
TCP 模式:直接使用客户端连接Canal消费数据。
MQ 模式:先将 Canal 内存中的数据写入 MQ ,用户可以使用客户端连接 MQ 进行数据消费。
Canal 中有两种位点信息,一个是解析位点,即日志转化 Entry 的过程记录的位点,由 LogPositionManager 管理,另一个是客户端消费的位点,由 MetaManager 管理。两者同样是在 instance 的 spring xml 文件进行配置。
Canal Adapter
Canal Adapter 用于消费 CanalEntry,并写入对应的目的容器。adapter 与 deployer 一样有 instance 的概念,实际运行时,adapter 本身由 adapter launcher 服务启动,并根据用户配置生成 adapter instance,由 instance 执行具体的 CanalEntry 读取和目的端写入的工作。
Canal Admin
Canal Admin 就是为了简化部署操作而引入的一个管理平台服务。Canal Deployer 和 Canal Instance 都分别支持单机部署和高可用集群部署两种模式,通过 Canal Admin,用户可以通过 web 页面来方便地管理 Canal Deployer 和 Canal Instance 的部署,同样也是支持单机部署和高可用集群化部署。
对于自建 MySQL , 需要先开启 Binlog 写入功能,配置 binlog-format 为 ROW 模式,my.cnf 中配置如下:
[mysqld]
log-bin=mysql-bin # 开启 binlog
binlog-format=ROW # 选择 ROW 模式
server_id=1 # 配置 MySQL replaction 需要定义,不要和 canal 的 slaveId 重复
授权 canal 链接 MySQL 账号具有作为 MySQL slave 的权限, 如果已有账户可直接 grant 。
MariaDB [(none)]> CREATE USER canal IDENTIFIED BY ‘canal’;
MariaDB [(none)]> GRANT SELECT, REPLICATION SLAVE, REPLICATION CLIENT ON . TO ‘canal’@’%’;
MariaDB [(none)]> GRANT SELECT, REPLICATION SLAVE, REPLICATION CLIENT ON . TO ‘canal’@‘localhost’ identified by “canal”;
– MariaDB [(none)]> GRANT ALL PRIVILEGES ON . TO ‘canal’@’%’ ;
–GRANT ALL PRIVILEGES ON canal_manager.* TO ‘canal’@‘localhost’ ;
MariaDB [(none)]> FLUSH PRIVILEGES;

下载 Canal Admin,访问地址:https://github.com/alibaba/canal/releases
wget
wget https://github.com/alibaba/canal/releases/download/canal-1.1.5/canal.admin-1.1.5.tar.gz
解压缩到指定目录
[root@oceanbase01 ob]# mkdir ~/canal-admin && tar zxvf canal.admin-1.1.5.tar.gz -C ~/canal-admin/
修改配置文件
cd ~/canal-admin && vim conf/application.yml
内容如下:
server:
port: 8089
spring:
jackson:
date-format: yyyy-MM-dd HH:mm:ss
time-zone: GMT+8
spring.datasource:
address: 127.0.0.1:3306
database: canal_manager
username: canal
password: canal
driver-class-name: com.mysql.jdbc.Driver
url: jdbc:mysql:// s p r i n g . d a t a s o u r c e . a d d r e s s / {spring.datasource.address}/ spring.datasource.address/{spring.datasource.database}?useUnicode=true&characterEncoding=UTF-8&useSSL=false
hikari:
maximum-pool-size: 30
minimum-idle: 1
canal:
adminUser: admin
adminPasswd: admin

初次测试时,不要修改上面密码 adminPasswd,以免后面密码修改不对导致连接不上。
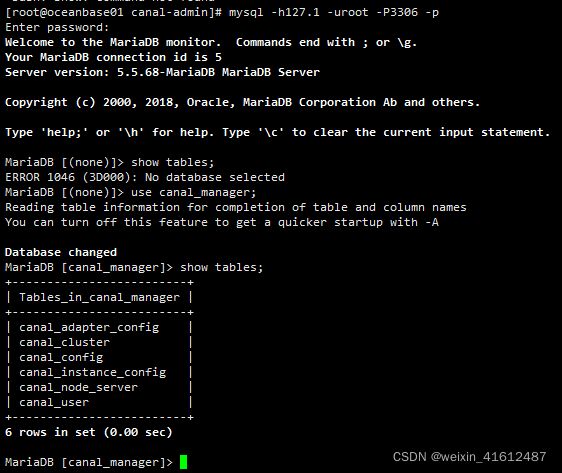
初始化元数据库
[root@oceanbase01 canal-admin]# mysql -h127.1 -uroot -P3306 -p
MariaDB [(none)]> source conf/canal_manager.sql
脚本自动创建了如下数据库和表
[root@oceanbase01 canal-admin]# mysql -h127.1 -uroot -P3306 -proot
MariaDB [(none)]> use canal_manager;
MariaDB [(none)]> show tables;

启动 web 服务
[root@oceanbase01 canal-admin]# cd ~/canal-admin && bin/startup.sh

正常情况下,启动成功会监听 8089 端口。
[root@oceanbase01 canal-admin]# netstat -ntlp |grep 8089
启动如果有问题,可以通过查看日志进行分析。
[root@oceanbase01 canal-admin]#less logs/admin.log
由于使用的公有云,使用公网ip登录 web 界面
Canal Admin 的 web 访问地址:http://81.69.96.182:8089/
登录用户名:admin
登录密码:123456

登录进去界面如图

部署 Canal Deployer
下载 canal,访问地址:https://github.com/alibaba/canal/releases。
[root@oceanbase01 ob]# wget https://github.com/alibaba/canal/releases/download/canal-1.1.5/canal.deployer-1.1.5.tar.gz
解压缩
[root@oceanbase01 ob]# cd /tmp/ob/
[root@oceanbase01 ob]# mkdir ~/canal && tar zxvf canal.deployer-1.1.5.tar.gz -C ~/canal
修改配置
如果不使用 Canal Admin 部署,则使用默认的配置文件 conf/canal.properties 和 conf/example/instance.properties。这个是默认创建了一个 instance 叫 example。需要修改 example 的实例配置文件,修改数据库连接地址、用户名和密码。
vi conf/example/instance.properties
# mysql serverId
canal.instance.mysql.slaveId = 1234
#position info,需要改成自己的数据库信息
canal.instance.master.address = 127.0.0.1:3306
canal.instance.master.journal.name =
canal.instance.master.position =
canal.instance.master.timestamp =
#canal.instance.standby.address =
#canal.instance.standby.journal.name =
#canal.instance.standby.position =
#canal.instance.standby.timestamp =
#username/password,需要改成自己的数据库信息
canal.instance.dbUsername = canal
canal.instance.dbPassword = canal
canal.instance.defaultDatabaseName =
canal.instance.connectionCharset = UTF-8
#table regex
canal.instance.filter.regex = .\…

canal.instance.connectionCharset 代表数据库的编码方式对应到 java 中的编码类型,比如 UTF-8,GBK,ISO-8859-1 。 如果系统是1个 cpu,需要将 canal.instance.parser.parallel 设置为 false 。
如果使用 Canal Admin 部署 server 和 instance,则使用配置文件 conf/canal_local.properties 替换 conf/canal.properties。需要修改 conf/canal.properties 里的 manager 地址,其他参数值可以保持默认。
[root@obce00 canal]# cat conf/canal.properties
# register ip
canal.register.ip =
# canal admin config
canal.admin.manager = 127.0.0.1:8089
canal.admin.port = 11110
canal.admin.user = admin
canal.admin.passwd = 4ACFE3202A5FF5CF467898FC58AAB1D615029441
# admin auto register
canal.admin.register.auto = true
canal.admin.register.cluster =
canal.admin.register.name =
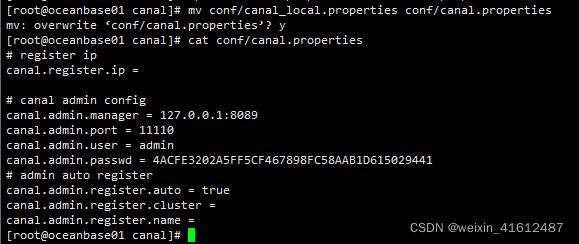
注意
passwd 后面的字符串是 admin 在 MySQL 里的密文。这个密码跟前面 Canal Admin 配置文件里的密码保持一致。如果前面密码改了,这里也要相应修改,密文的值可以通过 MySQL 的 password 方法获取。
MariaDB [canal_manager]> select password(‘admin’);
±------------------------------------------+
| password(‘admin’) |
±------------------------------------------+
| *4ACFE3202A5FF5CF467898FC58AAB1D615029441 |
±------------------------------------------+
1 row in set (0.00 sec)
启动 Cananl Server
不管是那种部署方法,配置文件修改好后,就可以启动服务。
sh bin/startup.sh
启动后日志中出现错误
>MariaDB [(none)]> GRANT ALL PRIVILEGES ON canal_manager.* TO ‘canal’@‘localhost’ ;
还是报错,重启mysql后正常启动
检查进程状态

图形化部署 Canal server 和 Canal instance
如果使用 Canal Admin 管理 Canal server,则登录 admin 的管理界面http://172.24.50.39:8089/#/canalServer/nodeServers,选择 Canal Server>Server 管理,单击 新建 Server。

在弹出的 新建Server信息 界面单击 确定 按钮。
之后,选择 Canal Server>Instance 管理,单击 新建 Instance。

单击 载入模板,显示一个配置文件,跟前面看到的类似。修改配置文件中的跟源端 canal 和数据库有关的信息。

单击 保存,命名为 mariadb。
保存后的 instance 状态为 停止,单击 操作>启动 可启动 instance,启动后,instance 状态为 启动。

查看 server 日志
可以命令行下查看日志,或者在 Canal Admin 里查看 server 的日志。
vi logs/canal/canal.log
可以命令行下查看日志,或者在 Canal Admin 里查看 instance 的日志。
tail -f logs/canal/canal.log
tail -f logs/example/example.log
tail -f logs/mariadb/mariadb.log
停止服务
sh bin/stop.sh
部署 RDB 适配器
Canal Adapter 提供了对多种目标容器的支持,对于 OceanBase 社区版来说,主要使用它的 rdb 模块,目的端容器为 MySQL 或社区版 OceanBase 。
Adapter 的部署需要手动部署。
修改启动器配置: application.yml,这里以 OceanBase 目标库为例。
首先指定 adapter 源端类型,通过 mode 指定。这里选择 tcp。后面就要指定 canal.tcp 相关属性,包括 canal server 的 IP 和 端口,数据库的连接用户和密码。
然后指定 adapter 目标端连接信息。instance 是源端实例名称,在 canal 部署的时候定义的。如果没有用 Canal Admin 部署,沿用的是 example 这个名称;如果用了 Canal Admin 部署 instance,前面命名的是 mariadb。
key 是自定义,名字后面有用。jdbc 相关属性是目标端 OceanBase MySQL 的连接方式,可以使用 MySQL 自带的驱动。
mode: tcp #tcp kafka rocketMQ rabbitMQ
flatMessage: true
zookeeperHosts:
syncBatchSize: 1000
retries: 0
timeout:
accessKey:
secretKey:
consumerProperties:
#canal tcp consumer
canal.tcp.server.host: 127.0.0.1:11111
canal.tcp.zookeeper.hosts:
canal.tcp.batch.size: 500
canal.tcp.username: tpch
canal.tcp.password: Dg0gIexJAV
canalAdapters:
- instance: mariadb # canal instance Name or mq topic name
groups:- groupId: g1
outerAdapters: - name: logger
- name: rdb
key: obmysql
properties:
jdbc.driverClassName: com.mysql.jdbc.Driver
jdbc.url: jdbc:mysql://127.0.0.1:2883/tpch?useUnicode=true
jdbc.username: tpch@obmysql#obdemo
jdbc.password: Dg0gIexJAV
RDB 映射文件
- name: rdb
- groupId: g1
修改 conf/rdb/mytest_user.yml 文件。
映射有两种:一是按表映射;二是整库映射。下面示例是整库映射。
[root@obce00 adapter]# cat conf/rdb/mytest_user.yml
#dataSourceKey: defaultDS
#destination: example
#groupId: g1
#outerAdapterKey: mysql1
#concurrent: true
#dbMapping:
#database: mytest
#table: user
#targetTable: mytest
#targetPk:
#id: id
##mapAll: true
#targetColumns:
#id:
#name:
#role_id:
#c_time:
#test1:
#etlCondition: “where c_time>={}”
#commitBatch: 3000 # 批量提交的大小
#Mirror schema synchronize config
dataSourceKey: defaultDS
destination: mariadb
groupId: g1
outerAdapterKey: obmysql
concurrent: true
dbMapping:
mirrorDb: true
database: tpch
commitBatch: 1000
其中,destination 指定的是 canal instance 名称;outerAdapterKey 是前面定义的 key;mirrorDb 指定数据库级别 DDL 和 DML 镜像同步。
导入的类型以目标表的元类型为准, 将自动进行类型转换。
启动 RDB
如果使用了 OceanBase 的驱动,则将目标库 OceanBase 驱动包放入 lib文件夹。
启动 canal-adapter 启动器。
bin/startup.sh
验证修改 mysql mytest.user 表的数据, 将会自动同步到 MySQL 的 MYTEST.TB_USER 表下面, 并会打出 DML 的 log。
停止 RDB
bin/stop.sh
查看 RDB 日志
tail -f logs/adapter/adapter.log
2021-12-09 09:56:04.148 [pool-6-thread-1] DEBUG c.a.o.canal.client.adapter.rdb.service.RdbSyncService - DML: {“data”:{“s_suppkey”:99995,“s_name”:null,“s_address”:null,“s_nationkey”:null,“s_phone”:null,“s_acctbal”:null,“s_comment”:null},“database”:“tpch”,“destination”:“mariadb”,“old”:null,“table”:“supplier2”,“type”:“INSERT”}
2021-12-09 09:56:04.149 [pool-6-thread-1] DEBUG c.a.o.canal.client.adapter.rdb.service.RdbSyncService - DML: {“data”:{“s_suppkey”:99998,“s_name”:null,“s_address”:null,“s_nationkey”:null,“s_phone”:null,“s_acctbal”:null,“s_comment”:null},“database”:“tpch”,“destination”:“mariadb”,“old”:null,“table”:“supplier2”,“type”:“INSERT”}
2021-12-09 10:13:35.915 [Thread-3] INFO c.a.o.canal.client.adapter.rdb.monitor.RdbConfigMonitor - Change a rdb mapping config: mytest_user.yml of canal adapter
同步测试
可以对源端 MySQL 数据库 tpch 做 DML 和 DDL 测试,都可以同步到目标端。这里就不详细展开,只介绍一些已知的功能限制。
同步的表必须有主键。否则,源端删除无主键表的任意一笔记录,同步到目标端会导致整个表被删除。
DDL 支持新建表、新增列。但受 OceanBase MySQL 租户功能限制,不支持后期加主键、修改列的类型(指大类型变更,如数值、字符串、日期之间类型变化)。