Nvidia Jetson AGX Orin 基于NVJPG硬件编码的图像压缩实现
Nvidia Jetson AGX Orin 基于NVJPG硬件编码的图像压缩实现
参考:Xavier 下GMSL相机ROS驱动发布CompressedImage消息(基于NVJPG硬件编码)
前言
对图像进行压缩的方法有很多,比如直接利用opencv的imwrite函数就可以直接对保存的图像进行压缩
std::vector<int> params;
params.push_back(cv::IMWRITE_JPEG_QUALITY);
params.push_back(10);
//params.push_back(50);
//params.push_back(100);
cv::imwrite("C:\\test.jpg", image, params);
但大多数都是利用cpu进行压缩,在使用Nvidia Jetson AGX Orin进行开发时,我们可以利用其自带的NVJPG对图像进行压缩
学习NVJPG
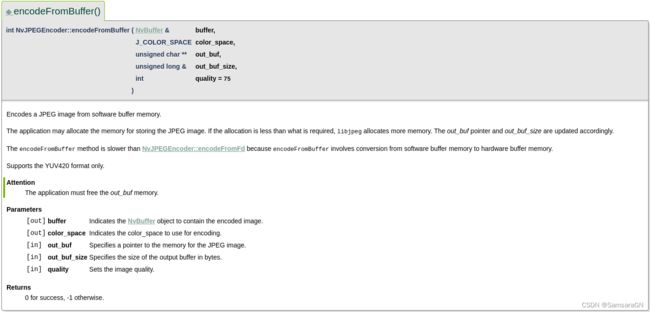
首先,我们要学习如何使用NVJPG进行图像压缩,我这边参考了一个博主的分享,除此之外我们可以到nvidia官方去找教程,参考https://docs.nvidia.com/jetson/l4t-multimedia/中的Multimedia APIs,我主要阅读了一下05_jpeg_encode这部分内容,要利用NVJPG进行图像压缩我们可以调用以下两个函数实现

根据我参考的这位博主我也选择了利用encodeFromBuffer这个函数来实现,我们点进去可以看到这个函数仅支持对输入图像格式为yuv420的图像进行压缩
接着,我们去系统下面找/usr/src/jetson_multimedia_api/samples/05_jpeg_encode,里面存放着示例代码,如果找不到jetson_multimedia_api,说明你的系统在刷机的时候可能没勾上这个模块的选项,我们可以在终端输入命令sudo apt-get install nvidia-l4t-jetson-multimedia-api进行安装
然后,我们对它的源码进行分析,利用encodeFromBuffer实现步骤相对比较简单,首先创建一个NvBuffer并分配内存,接着读取图像数据到NvBuffer,然后调用encodeFromBuffer进行图像压缩,最后保存成文件
    /**
     * Case 1:
     * Read YUV420 image from file system to CPU buffer, encode by
     * encodeFromBuffer() then write to file system.
     */
    if (!ctx.use_fd)
    {
        NvBuffer buffer(V4L2_PIX_FMT_YUV420M, ctx.in_width,
                ctx.in_height, 0);

        buffer.allocateMemory();

        ret = read_video_frame(ctx.in_file, buffer);
        TEST_ERROR(ret < 0, "Could not read a complete frame from file",
                cleanup);

        for (int i = 0; i < iterator_num; ++i)
        {
            ret = ctx.jpegenc->encodeFromBuffer(buffer, JCS_YCbCr, &out_buf,
                    out_buf_size, ctx.quality);
            TEST_ERROR(ret < 0, "Error while encoding from buffer", cleanup);
        }

        ctx.out_file->write((char *) out_buf, out_buf_size);

        goto cleanup;
    }
其中ctx是一个配置参数的结构体,长这样
typedef struct
{
    NvJPEGEncoder *jpegenc;

    char *in_file_path;
    std::ifstream * in_file;
    uint32_t in_width;
    uint32_t in_height;
    uint32_t in_pixfmt;

    char *out_file_path;
    std::ofstream * out_file;

    bool got_error;
    bool use_fd;

    bool perf;

    uint32_t crop_left;
    uint32_t crop_top;
    uint32_t crop_width;
    uint32_t crop_height;
    int  stress_test;
    bool scaled_encode;
    uint32_t scale_width;
    uint32_t scale_height;
    int quality;
} context_t;
而read_video_frame这个函数就是读取图像数据到NvBuffer的函数,我们可以参考源码自行实现
int read_video_frame(std::ifstream * stream, NvBuffer & buffer)
{
    uint32_t i, j;
    char *data;

    for (i = 0; i < buffer.n_planes; i++)
    {
        NvBuffer::NvBufferPlane &plane = buffer.planes[i];
        std::streamsize bytes_to_read =
            plane.fmt.bytesperpixel * plane.fmt.width;
        data = (char *) plane.data;
        plane.bytesused = 0;
        for (j = 0; j < plane.fmt.height; j++)
        {
            stream->read(data, bytes_to_read);
            if (stream->gcount() < bytes_to_read)
                return -1;
            data += plane.fmt.stride;
        }
        plane.bytesused = plane.fmt.stride * plane.fmt.height;
    }
    return 0;
}
代码实现
首先,准备环境,需要将一些源文件和头文件加入到我们自己的项目当中,将/usr/src/jetson_multimedia_api/samples目录下的common文件夹拷贝到自己的项目中,里面存放的是一些要用到的源文件,再将/usr/src/jetson_multimedia_api目录下的include文件夹拷贝到自己的项目中,并在CMakeLists.txt中编写相应的语句,这里提供一份CMakeLists.txt作为参考,注意:NvUtils.cpp、NvBuffer.cpp、NvElement.cpp、NvLogging.cpp、NvJpegEncoder.cpp、NvElementProfiler.cpp需要一起编译!!!对应的头文件路径也要添加上(特别注意要包含${PROJECT_SOURCE_DIR}/include/nv_include/libjpeg-8b 这个路径,是对应的libjpeg.h,否则可能报类似这种错:JPEG parameter struct mismatch: library thinks size is 664 caller expects 632)
project(nvjpg_test)
cmake_minimum_required(VERSION 3.5)

set(CMAKE_BUILD_TYPE Release)

MESSAGE("Build type: " ${CMAKE_BUILD_TYPE})

set(CMAKE_C_FLAGS_DEBUG "-O2 -g")
set(CMAKE_CXX_FLAGS_DEBUG "-O2 -g")

set(CMAKE_C_FLAGS_RELEASE "-O3")
set(CMAKE_CXX_FLAGS_RELEASE "-O3")
set(CMAKE_CXX_FLAGS "${CMAKE_CXX_FLAGS} -std=c++11")

#set(Boost_USE_STATIC_LIBS ON)
find_package(Boost REQUIRED COMPONENTS system filesystem)
find_package(OpenCV REQUIRED)

set(EXECUTABLE_OUTPUT_PATH ${PROJECT_SOURCE_DIR})
set(LIBRARY_OUTPUT_PATH /data/UGV_Program_jpeg/lib)
include_directories(
    ${PROJECT_SOURCE_DIR}/include
    ${PROJECT_SOURCE_DIR}/include/libyuv
    ${PROJECT_SOURCE_DIR}/include/nv_include
    ${PROJECT_SOURCE_DIR}/include/nv_include/libjpeg-8b
    ${OpenCV_INCLUDE_DIRS}
    ${CUDA_INCLUDE_DIRS}

    )

link_directories(
    ${OpenCV_LIBRARY_DIRS}
    ${LIBRARY_OUTPUT_PATH}
    /usr/local/lib
    )

set(NVJPG_SRC
        src/common/classes/NvUtils.cpp
        src/common/classes/NvBuffer.cpp
        src/common/classes/NvElement.cpp
        src/common/classes/NvLogging.cpp
        src/common/classes/NvJpegEncoder.cpp
        src/common/classes/NvElementProfiler.cpp
        )

add_executable(nvjpg_test
    ${NVJPG_SRC}
    src/main.cpp
    )

target_link_libraries(nvjpg_test
    ${PCL_LIBRARIES}
    ${Boost_LIBRARIES}
    ${OpenCV_LIBS}

    pthread
    protobuf
    boost_serialization

    libcamerav4l2.a
    libpublic.a
    /usr/local/lib/libyuv.a
    /usr/lib/aarch64-linux-gnu/tegra/libnvjpeg.so
    /usr/lib/aarch64-linux-gnu/tegra/libnvbufsurface.so
    )
接着,开始编写我们的代码,还记得上面提到的实现步骤吗?有一步很关键的步骤上面没有提到,那就是要把输入encodeFromBuffer的图像数据转成yuv420格式的图像数据,这也是最坑的一步,为什么说它坑呢?听我给大家细细道来,
一开始,由于我的摄像头采集的数据格式是yuv422的,我在网上找了很多资料也没找到yuv422转yuv420的代码,于是我便根据自己对图像格式的了解自己编写函数实现YUV422toyuv420_i420实现,最终功能能够实现,但是技术有限,自己编写的函数效率太低了,于是我便想用opencv库去实现,但是opencv无法将yuv422直接转成yuv420,于是我只好先将yuv422转成bgr再将bgr转成yuv420,但是此时又有一个问题,就是输出的图像值域被截取了,理论上我的图像值域应该是[0-255],但是输出的图像值域却是[16-235],这里有两种可能,一是在yuv422转yuv420的时候被截取了,二是在调用encodeFromBuffer对图像进行压缩的时候被截取了,我通过查阅大量资料后发现众说纷纭,说这两种可能都有,没办法,我只好自己测试,最终发现是在yuv422转yuv420的时候被截取了值域,我只好尝试用其他方法转换图像格式了,最终在网上我找到了一个利用yuvlib开源库的RGB24ToJ420函数将rgb图像转成yuv420的方法可以输出完整的值域,但奇怪的是当我输入rgb图像时出来的结果是红色和蓝色正好对调了,反而我输入bgr图像时,输出的图像时正常的,难道yuvlib库的函数命名弄错了?不应该把,总之不管怎么样,这样最终是实现了我想要的效果,最后贴上源码
#include demo在这里
gitcode
csdn资源下载