树莓派配置ubuntu server 22.04环境
背景
比起raspberry系统ubuntu更通用,结合公司项目开发需要,将树莓派4B刷上ubuntu server系统,并且安装LXDE桌面环境。
一波next
烧写镜像
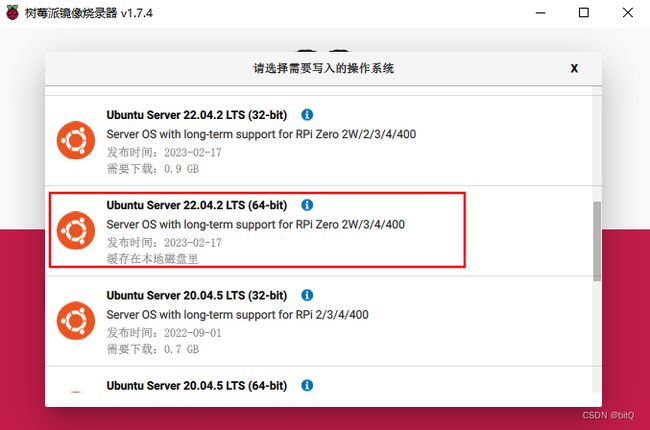
用树莓派镜像烧录软件安装比较简单,选择操作系统:Other general-purpose OS中选择Ubuntu,然后选择 ubuntu server 22.04.2(64bit)烧录SD卡就好。
安装软件LXDE和VNC
参考:1. 配置lxde和vnc server
安装x window:
apt-get install xorg
安装lxde:
apt-get install lxde-core
安装svn server:
apt-get install tightvncserver
第一次运行vnc server生成配置文件,需要输入密码:
tightvncserver :1
tightvncserver -kill :1
编辑~/.vnc/xstartup文件,在尾部添加:
lxterminal &
/usr/bin/lxsession -s LXDE &
启用vnc server:
vncserver -geometry 800x600
2. 下载vnc viewer
在这里下载: http://www.realvnc.com/download/viewer/
打开客户端,输入IP:590x,这里x是x桌面的编号:
连接后输入密码,就可以进入桌面了。
3. 解决中文乱码
VPS默认locale是en,程序在创建文件和文件夹的时候会出现乱码。
cd /usr/share/locales
./install-language-pack zh_CN
apt-get install language-pack-zh-hans
apt-get install ttf-wqy-zenhei
问题解决整理
HDMI无输出
采用PC的显示屏(1920x1080)显示是可以的,采用触摸屏(1280*800)不可以。
参考:Ubuntu 20.04 HDMI display driver problem - Raspberry Pi Forums
想到raspberry系统有个config.txt,但在ubuntu下没有找到,那配置工具有吗?
sudo apt-get install raspi-config
可以安装!!!
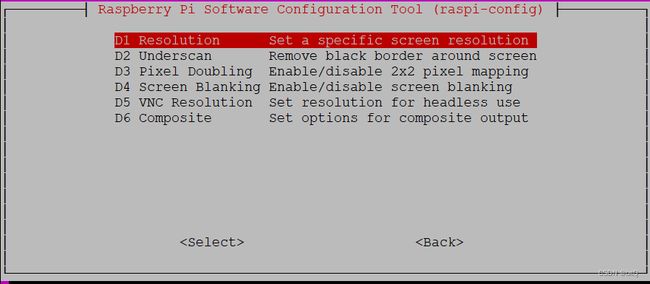
在里面把屏幕的尺寸配置进去:2、Display Options->D1 Resolution->选择屏幕尺寸

设置静态IP
参考 Ubuntu22.04 配置静态IP_ubuntu 22.04 静态ip_Imagine Miracle的博客-CSDN博客
sudo nano /etc/netplan/50-cloud-init.yaml
xxx-cloud-init.yaml每个系统会有差异
network:
	ethernets:
		ens33:
			dhcp4: no
			dhcp6: no
			addresses:
				- 192.168.0.10/24
			routes:
				- to: default
				  via: 192.168.0.1
			nameservers:
				addresses:
					- 114.114.114.114
					- 8.8.8.8
	version: 2
	renderer: networkd
开机加速优化
参考:如何快速启动树莓派 |2023 年修订 (raspians.com)
不修改的情况下,启动时间1分钟。
raspberry底层优化
1、关闭网络
sudo raspi-config
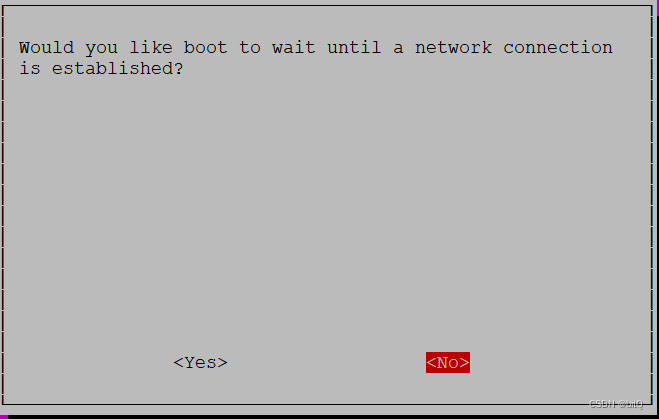
System Options -> Network at Boot -> 不等待网络建立

2、关闭蓝牙&wifi
安装上 raspi-config,config.txt同时也有了
sudo nano /boot/firmware/config.txt
在末尾添加两行之后重启即可
dtoverlay=disable-wifi
dtoverlay=disable-bt
3、彩虹屏禁用
disable_splash=1
4、boot_delay=0:(除非添加此行,否则默认延迟时间为 1 秒)
5、cpu超频
参考:树莓派 4B 超频教程 - 叶寻的博客 (cyrusyip.org)
树莓派 4B 温度达到 80°C 后 CPU 会降频,超过 85°C 后 CPU 和 GPU 都降频。所以超频前一定要给树莓派 4B 加上散热器以保证温度不超过 80°C。
CPU温度监控 sudo s-tui
# overclock
over_voltage=6 # 增加电压
arm_freq=2000 # CPU 频率,单位是 MHz,最高 2147
# gpu_freq=750 # GPU 频率,单位是 MHz
# force_turbo=1 # 以最高频率运行
7、关闭参数打印(小心修改,错误无法开机)
sudo nano /boot/firmware/cmdline.txt
原始参数为:
console=serial0,115200 dwc_otg.lpm_enable=0 console=tty1 root=LABEL=writable rootfstype=ext4 rootwait fixrtc quiet splash
Delete the parameter “splash”
Add the parameter “quiet” instead
修改后为:
console=serial0,115200 dwc_otg.lpm_enable=0 console=tty1 root=LABEL=writable rootfstype=ext4 rootwait fixrtc quiet quiet
系统层面优化
参考:解决ubuntu开机变慢;删除耗时启动项_ubuntu启动慢_集智飞行的博客-CSDN博客
systemd-analyze blame
 snapd.service 耗时的
关闭耗时服务
sudo systemctl disable NetworkManager-wait-online.service
自动登录
参考 https://blog.csdn.net/ieeso/article/details/81542331
LightDM 配置文件包括:
1./usr/share/lightdm/lightdm.conf.d/*.conf
2./etc/lightdm/lightdm.conf.d/*.conf
3./etc/lightdm/lightdm.conf
系统使用的配置参数保存在 /usr/share/lightdm/lightdm.conf.d/*.conf,用户不能编辑。系统管理员可以在 /etc/lightdm/lightdm.conf.d/*.conf 和 /etc/lightdm/lightdm.conf 重载系统配置参数。系统会依次读取前述的三个文件最后得到 LightDM 的有效配置信息。
如果想设置用户自动登录:(默认会话保存在 /usr/share/lightdm/lightdm.conf.d/50-ubuntu.conf),你可以新建文件 /etc/lightdm/lightdm.conf.d/50-myconfig.conf,内容如下:
[SeatDefaults]
autologin-user=ubuntu
autologin-user-timeout=0
设置 autologin-user 来设置系统启动时自动登录某个帐户。设置 autologin-user-timeout 限制用户在设定秒内如果没有自动登录则不能自动登录。
后续完善中。。。