Qt+html+JavaScript实现类似QQ聊天界面的气泡效果
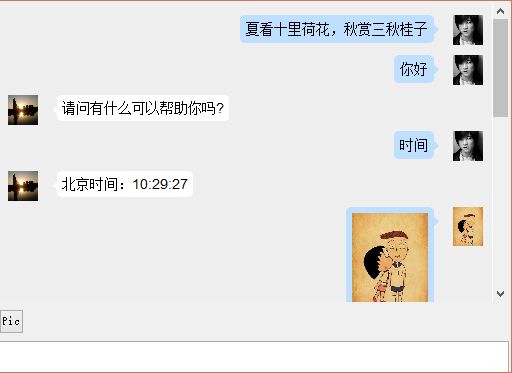
这是一个简单的类似QQ聊天界面的Demo,用Qt实现,在QWebView里嵌入网页的方式实现。先看效果图:
无论怎样,我觉得自己动手写出来的东西才是自己的,所以源码不全,重点的代码我会放上来。只是模拟实现了两个人的聊天,并没有真正实现聊天。
首先这里定义两个人的头像,可以看到,otherhead的图片是在桌面上,因此,文件并不一定非要加载在资源文件里面,使用相对路径来定义。
以下均在构造函数中定义和加载:
/**定义两个人的头像*/
Myhead = " ";
QString strHead = QString("C:/Users/tax10_000/Desktop/ql_184555_828078.jpg");
otherhead = QString ("
";
QString strHead = QString("C:/Users/tax10_000/Desktop/ql_184555_828078.jpg");
otherhead = QString (" ").arg(strHead);
接下来,重点来了,因为是用html+JavaScript实现的气泡效果,所以,一定要在QWebView中加载html文件。
QFile source( ":/chatdemo/Msg/msg.html" );
    int fd = source.open( QIODevice::ReadOnly );

    m_ui.webView->setHtml( QString::fromUtf8( source.readAll().constData() ) );
    source.close();
    /**定时器产生*/
    m_timer = new QTimer();
    connect( m_timer , SIGNAL( timeout() ) , this, SLOT( disTime() ) );
    m_timer->start( 6000 );
下面这个函数是实现图片的发送和接收:
void chatdemo::slot_btnpicClicked()
{
QString FilePath = QFileDialog::getOpenFileName();
QFile file( FilePath );
bool ok = file.open( QIODevice::ReadOnly );
if( !ok ) { return; }
QString msg = QString("")
.arg( FilePath );
QString MyHead = QString("").arg(FilePath);
QString Msg = QString (" ");
SendMsgShow(msg,MyHead);
RevMsgShow( Msg,otherhead);
}
");
SendMsgShow(msg,MyHead);
RevMsgShow( Msg,otherhead);
}下面这个函数的功能是当LineEdit中有内容时,将LineEdit中的内容显示在界面上并清除LineEdit中的内容,如果发送是“你好”或者“时间”时,假设对方会回答你。
void chatdemo::slot_lineEditReturnpressed()
{
    if( m_ui.lineEdit->text() == NULL )
    {
        QMessageBox::warning( this , "warning","Can't send an empty msg!" );
        return;
    }
    /**自己发送的消息*/
    SendMsgShow( m_ui.lineEdit->text() , Myhead );

    if( m_ui.lineEdit->text() == QString::fromLocal8Bit("你好") )
    {
        RevMsgShow( QString::fromLocal8Bit( "请问有什么可以帮助你吗?" ), otherhead );
    }
    else if(m_ui.lineEdit->text() == QString::fromLocal8Bit( "时间" ) )
    {
        RevMsgShow( QString::fromLocal8Bit( "北京时间:%1" )
                    .arg( QTime::currentTime().toString( "hh:mm:ss" ) ), otherhead );
    }

    m_ui.lineEdit->clear();
}
下面这个函数的功能是将自己发送的消息显示界面上:
void chatdemo::SendMsgShow(QString msg ,QString head)
{
    QString html = QString( "" );
    html.append(QString(
        "document.getElementById(\"content\").insertAdjacentHTML(\"beforeEnd\",\"<div style='overflow:hidden;'><p class='divMyHead'>%1 p><p class='triangle-right right'>%2p>div>\")" )
                .arg( head )
                .arg( msg ) );
    m_ui.webView->page()->mainFrame()->evaluateJavaScript(html);
    m_timer->start( 30000 );
}
下面这个函数的功能是将对方发来的消息显示在界面上:
void chatdemo::RevMsgShow(QString msg,QString head)
{

    QString html = QString("document.getElementById(\"content\").insertAdjacentHTML(\"beforeEnd\",\"<div style='overflow:hidden;'><p class='divotherhead'>%1 p><p class='triangle-left left'>%2p>div>\")")
                        .arg(head)
                        .arg(msg);
    m_ui.webView->page()->mainFrame()->evaluateJavaScript(html);
下面函数的定义是结束定时器
void chatdemo::disTime()
{
    m_timer->stop();
}
当然,最重要的还是html文件,因为在这个demo里面,html文件起着最重要的作用:
<html>
<head>
<style>
img{max-width:100px;max-height:100px;margin: 0 0;}
/*定义显示的格式*/
p{
color: black;
font-family: "Arial", "san-serif";
font-size: 14px;
display: inline;
}
/*自己的消息*/
.myMsg{
max-height: 300px;
max-width: 300px;
position: relative;
float: right;
}
/*显示自己的头像*/
.divMyHead{
position: relative;
float: right;
margin:5px 0px 5px 0px;
right: 1px;
border-radius: 5px;
}
/*对方的消息*/
.otherMsg{
max-height: 300px;
max-width: 300px;
position: relative;
float: right;
}
/*显示对方的头像*/
.divotherHead{
position: relative;
float: left;
margin:5px 0px 0px 0px;
left: 1px;
border-radius: 5px;
}
/*实现对方发送来的消息的方框*/
.triangle-left{
float:left;
max-width:380px;
border:1px solid #ffffff;
border-radius:5px;
padding:4px;
background:#ffffff;
position:relative;
display:inline-block;
margin:5px 0px 5px 20px;
word-wrap: break-word;
}
.triangle-left:before{
position:absolute;
content:"";
display:block;
}
/*实现对方消息的那个小三角,小三角的实现其实是将一个正方形对角线划分为四个小三角,其余的三个设置颜色不可见,只将对自己有用的那一个留下来*/
.triangle-left.left:before{
border-color:rgba(0, 0, 0, 0) #ffffff rgba(0, 0, 0, 0) rgba(0, 0, 0, 0);
border-width:5px 5px 5px 0;
border-style:solid;
bottom:auto;
left:-5px;
top:8px;
}
.triangle-left.left:after{
border-color:rgba(0, 0, 0, 0) #ffffff rgba(0, 0, 0, 0) rgba(0, 0, 0, 0);
border-width:5px 5px 5px 0;
border-style:solid;
bottom:auto;
left:-5px;
top:8px;
}
/*实现右边的气泡*/
.triangle-right{
float:right;
max-width:380px;
border:1px solid #bedfff;
border-radius:5px;
padding:5px;
background:#bedfff;
position:relative;
display:inline-block;
margin:5px 20px 5px 0;
word-wrap: break-word;
}
.triangle-right:before{
position:absolute;
content:"";
display:block;
}
.triangle-right.right:before{
border-color:rgba(0, 0, 0, 0) rgba(0, 0, 0, 0) rgba(0, 0, 0, 0) #bedfff;
border-width:5px 0px 5px 5px;
border-style:solid;
bottom:auto;
right:-6px;
top:8px;
}
.triangle-right:after{
position:absolute;
content:"";
display:block;
}
.triangle-right.right:after{
border-color:rgba(0, 0, 0, 0) rgba(0, 0, 0, 0) rgba(0, 0, 0, 0) #bedfff;
border-width:5px 0px 5px 5px;
border-style:solid;
bottom:auto;
right:-6px;
top:8px;
}
style>
<script language="JavaScript" >
function img()
{
}
function addFile()
{
var str = ''
document.getElementById("MyFile").insertAdjacentHTML("beforeEnd", str)
alert("hello word!")
}
function getAll(){
content = document.body.innerHTML
}
/*将发送或接收的图片显示在气泡里面*/
function append(){
var obj = document.getElementById("content");
obj.insertAdjacentHTML("beforeEnd","");
}
function choosephoto(){
var obj = document.getElementById("content");
obj.insertAdjacentHTML("afterEnd","");
}
function clear(){
document.body.innerHTML=''
}
script>
head>
<body id="content" style='background:#efefef'>
body>
html>
无论怎样,我觉得只有自己动手做了,其中的味道才能自己体会的到。