MySQL LVS+Keepalived+MHA 高可用群集 应用部署操作手册
系列文章目录
MySQL LVS+Keepalived+MHA 高可用群集 应用部署操作手册
第1章 MHA 架构介绍
MHA(Master High Availability)目前在 MySQL 高可用方面是一个相对成熟的解决方案,
它由日本人 youshimaton 开发,是一套优秀的作为 MySQL 高可用性环境下故障切换和主从提
升的高可用软件。在 MySQL 故障切换过程中,MHA 能做到 0~30 秒之内自动完成数据库的故障
切换操作,并且在进行故障切换的过程中,MHA 能最大程度上保证数据库的一致性,以达到
真正意义上的高可用。
MHA 由两部分组成:MHA Manager(管理节点)和 MHA Node(数据节点)。MHA Manager
可以独立部署在一台独立的机器上管理多个Master-Slave集群,也可以部署在一台Slave上。
当 Master 出现故障是,它可以自动将最新数据的 Slave 提升为新的 Master,然后将所有其他
的 Slave 重新指向新的 Master。整个故障转移过程对应用程序是完全透明的。
1.1 存在隐患
在 MHA 自动故障切换的过程中,MHA 试图从宕掉的主服务器上保存二进制日志,最大程度
保证数据的不丢失,但这并不总是可行的。
例如,如果主服务器硬件故障或无法通过 SSH 访问,MHA 没有办法保存二进制日志,只能
进行故障转移而丢失了最新数据。
拓:MySQL 服务挂了,但是可以从服务器拷贝二进制。但如果硬件宕机或者 SSH 不能连接,
不能获取到最新的 binlog 日志,如果复制出现延迟,会丢失数据。
使用 MySQL5.5 的半同步复制,可以大大降低数据丢失的风险。MHA 可以和半同步复制结
合起来。如果只有一个 Slave 已经收到了最新的二进制日志,MHA 可以将最新的二进制日志
应用于其他所有 Slave 服务器上,保持数据一致性。
最新版 0.56 版本,增加了支持 GTID 的功能,建议在 MySQL5.6 及之后版本使用。MySQL5.5
建议使用管理节点版本 0.55,数据节点 0.54。
1.2 适用场景
目前 MHA 主要支持一主多从的架构,要搭建 MHA,要求一个复制集群必须最少有 3 台数据
库服务器,一主二从,即一台充当 Master,一台充当备用 Master,另一台充当从库。出于成
本考虑,淘宝在此基础上进行了改造,目前淘宝开发的 TMHA 已经支持一主一从。
1.3 MHA 工作原理

1.从宕机崩溃的 Master 保存二进制日志事件(binlog event);
2.识别含有最新更新的 Slave;
3.应用差异的中继日志(relay log)到其他 Slave;
4.应用从 Master 保存的二进制日志事件;
5.提升一个 Slave 为新的 Master;
6.使其他的 Slave 连接新的 Master 进行复制;
1.4 MHA 的组成
MHA 软件由两部分组成,Manager 工具包和 Node 工具包,具体如下。
1.Manager 工具包情况如下:
masterha_check_ssh:检查 MHA 的 SSH 配置情况。
masterha_check_repl:检查 MySQL 复制状况。
masterha_manager:启动 MHA。
masterha_check_status:检测当前 MHA 运行状态。
masterha_master_monitor:检测 Master 是否宕机。
masterha_master_switch:控制故障转移(自动或手动)。
masterha_conf_host:添加或删除配置的 server 信息。
2.Node 工具包(通常由 MHA Manager 的脚本触发,无需人工操作)情况如下:
save_binary_logs:保存和复制 Master 的 binlog 日志。
apply_diff_relay_logs:识别差异的中级日志时间并将其应用到其他 Slave。
filter_mysqlbinlog:去除不必要的 ROOLBACK 事件(已经废弃)
purge_relay_logs:清除中继日志(不阻塞 SQL 线程)
重:为了尽可能的减少因为主库硬件损坏宕机造成的数据丢失,因此在配置 MHA 的同时建议
必须配置 MySQL5.5 半同步复制。
拓展思想:为了保证数据一致性,MySQL 复制中,常常会在 Master 上使用 sync_binlog 参数
保证 binlog 持久化,保证数据一致性。但这种方式对磁盘 I/O 会造成 10~20%的影响。但是
还有另外一个思路,就是使用 MySQL 半同步复制来保证数据一致性,MySQL 半同步复制是在
从服务器的内存中处理数据并进行发聩,虽然也会造成性能影响,但是相对于对 Master 造成
的磁盘 I/O 的影响来说,反而是个更好的方法。据《高性能 MySQL》 第三版中 10.9 的测试,
写入远程的内存(一台从库的反馈)比写入本地的磁盘(写入并刷新)要更快。使用半同步
复制相比主在主库上进行强持久化的性能有两倍的改善。
第2章 搭建环境情况
2.1 基础环境情况一
操作系统:Centos 6.5 64 位;
SSH:使用默认端口;
用户:root
写 VIP:192.168.1.20
读 VIP:192.168.1.21
2.2 基础环境情况二


2.4.2 实现原理
1.读操作
1) LVS 实现读操作的负载均衡;
2) Keepalived 在上层管理 LVS,并对两台从库进行健康检测(通过定义 Check 脚本);
3) 一台从库出现故障后,Keepalived 将其剔除出负载均衡集群;
2.写操作
1) 在 Master 上绑定写 VIP(MHA 启动后会通过脚本进行操作);
2) MHA 监控 Master 状态,当 Master 出现故障后(宕机、复制暂停)时;
3) 通过 Failover 脚本,卸载 Master 上的 WVIP;
4) 通过 Failover 在 CMaster 上绑定 WVIP,提升其为主库;
5) 同步并应用差异日志,并将从库指向新主库;
问题:当 MHA 把 Master 切换到了 CMaster 上后,LVS 如何处理分发在 CMaster 上的读操作?
解释:由于 Keepalived 会通过脚本定期监控 CMaster 的状态,包括同步、SQL 线程、I/O 线
程,所以当 CMaster 升级为主库后,这些状态都将消失,Keepalived 将自动将 CMaster 剔除
出负载均衡集群。
第3章 安装部署 MySQL 并配置复制
3.1 搭建主从复制环境
1.mysqldump 出主库数据,增加 master-data=2;
2.导入从库;
3.change master to
master_host='192.168.1.200',master_user='repl',master_password='replpassword'
,master_port=3306,master_log_file='mysql-bin.00000x',master_log_pos=xxx;
4.start slave;
5.配置从服务器只读;
第4章 安装部署 MHA
在所有的 MySQL 服务器上安装;在 MHA 的管理节点安装 Node 节点。
4.1.1 配置 YUM 源,依赖关系很难搞。
wget -O /etc/yum.repos.d/CentOS-Base.repo http://mirrors.aliyun.com/repo/Centos-6.repo
4.1.2 MySQL 服务器上安装 perl 模块(DBD::mysql)
1.方法一 使用 YUM 安装(推荐)
yum install -y perl-DBD-MySQL.x86_64 perl-DBI.x86_64
2.方法二 使用 cpanm 安装(Centos 5.5 下不太好用)
编写脚本 DBD_install.sh
#!/bin/bash
wget http://xrl.us/cpanm --no-check-certificate
mv cpanm /usr/bin/
chmod 755 /usr/bin/cpanm
cat >/root/list<<EOF
install DBD::mysql
EOF
for package in `cat /root/list`
do
 cpanm $package
done
二次安装时出现了 Config::mysql 和 Log::Dispatch 安装不上的情况,由于是恢复快照,
怀疑可能是时间的问题,二次安装后,手动 cpanm install Config::Tiny 安装成功。
4.1.3 在所有节点上安装 MHA Node:
tar xf mha4mysql-node-0.53.tar.gz
cd mha4mysql-node
perl Makefile.PL
make && make install
4.2 安装 MHA Manger
MHA Manager 中主要几个管理员的命令行工具,也是依赖一些 Perl 模块的。
1.方法一 使用 YUM 安装(推荐)
yum install -y perl-Config-Tiny.noarch perl-Log-Dispatch.noarch perl-Parallel-ForkManager.noarch
perl-DBD-MySQL perl-DBI
2.方法二 使用 cpanm 安装。注意:时间必须整正确
编写脚本 DBD_install.sh
#!/bin/bash
wget http://xrl.us/cpanm --no-check-certificate
mv cpanm /usr/bin/
chmod 755 /usr/bin/cpanm
cat >/root/list<<EOF
install DBD::mysql
install Config::Tiny
install Log::Dispatch
install Parallel::ForkManager
install Time::HiRes
EOF
for package in `cat /root/list`
do
 cpanm $package
done
4.2.2 在所有节点上安装 MHA Node:
tar xf mha4mysql-node-0.53.tar.gz
cd mha4mysql-node
perl Makefile.PL
make && make install
4.2.3 安装 MHA Manager
tar zxf mha4mysql-manager-0.53.tar.gz
cd mha4mysql-manager-0.53
perl Makefile.PL
make
make install
安装过程中出现很多情况,比如在 Centos5 中,不适合 cpanm 的方法,使用 yum 是个好主意,
而且安装 MHA 之前必须要 MySQL
Cannot find the file 'mysql_config'! Your execution PATH doesn't seem
not contain the path to mysql_config. Resorting to guessed values!
Can't exec "mysql_config": No such file or directory at Makefile.PL line 473.
Can't find mysql_config. Use --mysql_config option to specify where mysql_config is located
Can't exec "mysql_config": No such file or directory at Makefile.PL line 473.
Can't find mysql_config. Use --mysql_config option to specify where mysql_config is located
Can't exec "mysql_config": No such file or directory at Makefile.PL line 473.
10

Can't find mysql_config. Use --mysql_config option to specify where mysql_config is located
4.3 配置 SSH 登录无密码验证
在 Manager 上配置到所有的 Node 节点的无密码验证
ssh-keygen -t rsa
ssh-copy-id -i /root/.ssh/id_rsa.pub "[email protected]"
ssh-copy-id -i /root/.ssh/id_rsa.pub "[email protected]"
ssh-copy-id -i /root/.ssh/id_rsa.pub "[email protected]"
在 Master 上配置到所有的 Node 节点的无密码验证
ssh-keygen -t rsa
ssh-copy-id -i /root/.ssh/id_rsa.pub "[email protected]"
ssh-copy-id -i /root/.ssh/id_rsa.pub "[email protected]"
在 Candicate Master 上配置到所有的 Node 节点的无密码验证
ssh-keygen -t rsa
ssh-copy-id -i /root/.ssh/id_rsa.pub "[email protected]"
ssh-copy-id -i /root/.ssh/id_rsa.pub "[email protected]"
在 Slave 上配置到所有的 Node 节点的无密码验证
ssh-keygen -t rsa
ssh-copy-id -i /root/.ssh/id_rsa.pub "[email protected]"
ssh-copy-id -i /root/.ssh/id_rsa.pub "[email protected]"
配置主机名
cat >>/etc/hosts<< EOF
192.168.1.200 ip200
192.168.1.201 ip201
192.168.1.202 ip202
192.168.1.203 ip203
EOF
在 Master 上建立监控账户
grant all on *.* to 'root' @'192.168.1.%' identified by 'rootpassword';
否则,在 MHA 检查复制时,会报如下错误
[root@MHA mha]# masterha_check_repl --conf=/etc/mha/app1.cnf
Tue Dec 23 16:21:52 2014 - [warning] Global configuration file /etc/masterha_default.cnf not found. Skipping.
Tue Dec 23 16:21:52 2014 - [info] Reading application default configurations from /etc/mha/app1.cnf..
Tue Dec 23 16:21:52 2014 - [info] Reading server configurations from /etc/mha/app1.cnf..
Tue Dec 23 16:21:52 2014 - [info] MHA::MasterMonitor version 0.55.
Tue Dec 23 16:21:52 2014 - [error][/usr/local/share/perl5/MHA/ServerManager.pm, ln255] Got MySQL error when
connecting 192.168.1.202(192.168.1.202:3306) :1045:Access denied for user 'root'@'192.168.1.203' (using
password: YES), but this is not mysql crash. Check MySQL server settings.
at /usr/local/share/perl5/MHA/ServerManager.pm line 251
Tue Dec 23 16:21:52 2014 - [error][/usr/local/share/perl5/MHA/ServerManager.pm, ln255] Got MySQL error when
connecting 192.168.1.200(192.168.1.200:3306) :1045:Access denied for user 'root'@'192.168.1.203' (using
password: YES), but this is not mysql crash. Check MySQL server settings.
at /usr/local/share/perl5/MHA/ServerManager.pm line 251
Tue Dec 23 16:21:52 2014 - [error][/usr/local/share/perl5/MHA/ServerManager.pm, ln255] Got MySQL error when
connecting 192.168.1.201(192.168.1.201:3306) :1045:Access denied for user 'root'@'192.168.1.203' (using
password: YES), but this is not mysql crash. Check MySQL server settings.
at /usr/local/share/perl5/MHA/ServerManager.pm line 251
Tue Dec 23 16:21:52 2014 - [error][/usr/local/share/perl5/MHA/ServerManager.pm, ln263] Got fatal error, stopping
operations
Tue Dec 23 16:21:52 2014 - [error][/usr/local/share/perl5/MHA/MasterMonitor.pm, ln386] Error happend on checking
configurations. at /usr/local/share/perl5/MHA/MasterMonitor.pm line 300
Tue Dec 23 16:21:52 2014 - [error][/usr/local/share/perl5/MHA/MasterMonitor.pm, ln482] Error happened on
monitoring servers.
Tue Dec 23 16:21:52 2014 - [info] Got exit code 1 (Not master dead).
4.4 配置 MHA(由于前期端口问题,将端口修改为默认)
4.4.1 在 Manager 上创建配置文件
mkdir -p /etc/masterha
vim /etc/masterha/app1.cnf
注意:由于脚本中并没有/opt/master_ip_failover 脚本,启动时会报错,请到 mha4mysqlmanager-0.5X/samples/scripts 下拷贝对应脚本到指定位置。
[server default]
manager_log=/etc/mha/app1/app1.log
manager_workdir=/etc/mha/app1/
master_binlog_dir=/var/lib/mysql
master_ip_failover_script=/etc/mha/master_ip_failover
ping_interval=1
remote_workdir=/tmp
secondary_check_script=/usr/local/bin/masterha_secondary_check -s ip201 -s ip200 --user=root
--master_host=ip200 --master_ip=192.168.1.200 --master_port=3306
ssh_user=root
user=root
password=rootpassword
repl_password=replpassword
repl_user=repl
[server1]
hostname=192.168.1.200
port=3306
[server2]
candidate_master=1
check_repl_delay=0
hostname=192.168.1.201
port=3306
[server3]
hostname=192.168.1.202
port=3306
4.4.2 故障转移脚本
[root@MHA mha]# cat master_ip_failover
#!/usr/bin/env perl
use strict;
use warnings FATAL => 'all';
use Getopt::Long;
my (
 $command, $ssh_user, $orig_master_host, $orig_master_ip,
 $orig_master_port, $new_master_host, $new_master_ip, $new_master_port,
);
my $vip = '192.168.1.20/24'; # Virtual IP
my $key = "1";
my $ssh_start_vip = "/sbin/ifconfig eth1:$key $vip";
my $ssh_stop_vip = "/sbin/ifconfig eth1:$key down";
$ssh_user = "root";
GetOptions(
 'command=s' => \$command,
 'ssh_user=s' => \$ssh_user,
 'orig_master_host=s' => \$orig_master_host,
 'orig_master_ip=s' => \$orig_master_ip,
 'orig_master_port=i' => \$orig_master_port,
 'new_master_host=s' => \$new_master_host,
 'new_master_ip=s' => \$new_master_ip,
 'new_master_port=i' => \$new_master_port,
);

exit &main();
sub main {
 print "\n\nIN SCRIPT TEST====$ssh_stop_vip==$ssh_start_vip===\n\n";
 if ( $command eq "stop" || $command eq "stopssh" ) {
 # $orig_master_host, $orig_master_ip, $orig_master_port are passed.
 # If you manage master ip address at global catalog database,
 # invalidate orig_master_ip here.
 my $exit_code = 1;
 #eval {
 # print "Disabling the VIP on old master: $orig_master_host \n";
 # &stop_vip();
 # $exit_code = 0;
 #};
 eval {
 print "Disabling the VIP on old master: $orig_master_host \n";
 #my $ping=`ping -c 1 10.0.0.13 | grep "packet loss" | awk -F',' '{print $3}' | awk '{print $1}'`;
 #if ( $ping le "90.0%" && $ping gt "0.0%" ){
 #$exit_code = 0;
 #}
 #else {
 &stop_vip();
 # updating global catalog, etc
 $exit_code = 0;
 #}
 };
 if ($@) {
 warn "Got Error: $@\n";
 exit $exit_code;
 }
 exit $exit_code;
 }
 elsif ( $command eq "start" ) {
 # all arguments are passed.
 # If you manage master ip address at global catalog database,
 # activate new_master_ip here.
 # You can also grant write access (create user, set read_only=0, etc) here.
 my $exit_code = 10;
 eval {
 print "Enabling the VIP - $vip on the new master - $new_master_host \n";
 &start_vip();
 $exit_code = 0;
 };
 if ($@) {
 warn $@;
 exit $exit_code;
 }
 exit $exit_code;
 }
 elsif ( $command eq "status" ) {
 print "Checking the Status of the script.. OK \n";
 `ssh $ssh_user\@$orig_master_ip \" $ssh_start_vip \"`;
 exit 0;
 }
 else {
 &usage();
 exit 1;
 }
}
# A simple system call that enable the VIP on the new master
sub start_vip() {
 `ssh $ssh_user\@$new_master_host \" $ssh_start_vip \"`;
}
# A simple system call that disable the VIP on the old_master
sub stop_vip() {
 `ssh $ssh_user\@$orig_master_host \" $ssh_stop_vip \"`;
}
sub usage {
 print
 "Usage: master_ip_failover --command=start|stop|stopssh|status --orig_master_host=host
--orig_master_ip=ip --orig_master_port=port --new_master_host=host --new_master_ip=ip
--new_master_port=port\n";
}
# the end.
4.4.3 配置从库手动清除 relay log 清除方式
set global relay_log_purge = 0;
同时添加到配置文件中。
4.4.4 配置从库定时任务清理 relay log
echo "0 4 * * * /usr/bin/purge_relay_logs --user=root --password=123.com -disable_relay_log_purge --port=3306
--workdir=/tmp >>/usr/local/masterha/log/purge_relay_logs.log 2>&1" > /etc/cron.d/purge_relay_logs
待验证是否起作用?
拓:/etc/cron.d/ 这个目录用来存放任何要执行的 crontab 文件或脚本。
手动测试清理脚本
[root@Server-C mysql]# /usr/bin/purge_relay_logs --user=root --password=123.com -disable_relay_log_purge
--port=3306 --workdir=/tmp
2014-11-18 10:01:37: purge_relay_logs script started.
Found relay_log.info: /var/lib/mysql/relay-log.info
Opening /var/lib/mysql/mysql-relay-bin.000001 ..
Opening /var/lib/mysql/mysql-relay-bin.000002 ..
Executing SET GLOBAL relay_log_purge=1; FLUSH LOGS; sleeping a few seconds so that SQL thread can delete older
relay log files (if it keeps up); SET GLOBAL relay_log_purge=0; .. ok.
2014-11-18 10:01:40: All relay log purging operations succeeded.
4.4.5 所有 MySQL 节点增加 mysqlbinlog 环境变量
echo "export PATH=$PATH:/usr/local/mysql/bin" >> /etc/bashrc ;source /etc/bashrc
如果不添加,在 MHA 在检查复制情况时会报如下错误
Tue Dec 23 16:22:18 2014 - [info] Master MHA Node version is 0.54.
Tue Dec 23 16:22:18 2014 - [info] Checking recovery script configurations on the current master..
Tue Dec 23 16:22:18 2014 - [info] Executing command: save_binary_logs --command=test --start_pos=4
--binlog_dir=/var/lib/mysql --output_file=/tmp/save_binary_logs_test --manager_version=0.55
--start_file=mysql-bin.000003
Tue Dec 23 16:22:18 2014 - [info] Connecting to [email protected](192.168.1.200)..
 Creating /tmp if not exists.. ok.
 Checking output directory is accessible or not..
 ok.
 Binlog found at /var/lib/mysql, up to mysql-bin.000003
Tue Dec 23 16:22:19 2014 - [info] Master setting check done.
Tue Dec 23 16:22:19 2014 - [info] Checking SSH publickey authentication and checking recovery script
configurations on all alive slave servers..
Tue Dec 23 16:22:19 2014 - [info] Executing command : apply_diff_relay_logs --command=test --slave_user='root'
--slave_host=192.168.1.201 --slave_ip=192.168.1.201 --slave_port=3306 --workdir=/tmp
--target_version=5.5.32-log --manager_version=0.55 --relay_log_info=/var/lib/mysql/relay-log.info
--relay_dir=/var/lib/mysql/ --slave_pass=xxx
美河学习在线 www.eimhe.com
Tue Dec 23 16:22:19 2014 - [info] Connecting to [email protected](192.168.1.201:22)..
Can't exec "mysqlbinlog": No such file or directory at /usr/local/share/perl5/MHA/BinlogManager.pm line 99.
mysqlbinlog version not found!
at /usr/local/bin/apply_diff_relay_logs line 482
Tue Dec 23 16:22:20 2014 - [error][/usr/local/share/perl5/MHA/MasterMonitor.pm, ln195] Slaves settings check
failed!
Tue Dec 23 16:22:20 2014 - [error][/usr/local/share/perl5/MHA/MasterMonitor.pm, ln375] Slave configuration
failed.
Tue Dec 23 16:22:20 2014 - [error][/usr/local/share/perl5/MHA/MasterMonitor.pm, ln386] Error happend on checking
configurations. at /usr/local/bin/masterha_check_repl line 48
Tue Dec 23 16:22:20 2014 - [error][/usr/local/share/perl5/MHA/MasterMonitor.pm, ln482] Error happened on
monitoring servers.
Tue Dec 23 16:22:20 2014 - [info] Got exit code 1 (Not master dead).
MySQL Replication Health is NOT OK!
缺报错
4.4.6 检查 SSH/复制/MHA Manager 的配置
检查 SSH 情况:masterha_check_ssh --conf=/etc/mha/app1.cnf
检查复制情况:masterha_check_repl --conf=/etc/mha/app1.cnf
检查 MHA 状态:masterha_check_status --conf=/etc/mha/app1.cnf
1.检查 SSH
[root@Server-D app1]# masterha_check_ssh --conf=/etc/masterha/app1.cnf
Thu Dec 11 21:33:06 2014 - [warning] Global configuration file /etc/masterha_default.cnf not found. Skipping.
Thu Dec 11 21:33:06 2014 - [info] Reading application default configuration from /etc/masterha/app1.cnf..
Thu Dec 11 21:33:06 2014 - [info] Reading server configuration from /etc/masterha/app1.cnf..
Thu Dec 11 21:33:06 2014 - [info] Starting SSH connection tests..
Thu Dec 11 21:33:06 2014 - [debug]
Thu Dec 11 21:33:06 2014 - [debug] Connecting via SSH from [email protected](192.168.1.200:22) to [email protected](192.168.1.201:22)..
Thu Dec 11 21:33:06 2014 - [debug] ok.
Thu Dec 11 21:33:06 2014 - [debug] Connecting via SSH from [email protected](192.168.1.200:22) to [email protected](192.168.1.202:22)..
Thu Dec 11 21:33:06 2014 - [debug] ok.
Thu Dec 11 21:33:07 2014 - [debug]
Thu Dec 11 21:33:06 2014 - [debug] Connecting via SSH from [email protected](192.168.1.201:22) to [email protected](192.168.1.200:22)..
Thu Dec 11 21:33:06 2014 - [debug] ok.
Thu Dec 11 21:33:06 2014 - [debug] Connecting via SSH from [email protected](192.168.1.201:22) to [email protected](192.168.1.202:22)..
Thu Dec 11 21:33:07 2014 - [debug] ok.
Thu Dec 11 21:33:07 2014 - [debug]
Thu Dec 11 21:33:07 2014 - [debug] Connecting via SSH from [email protected](192.168.1.202:22) to [email protected](192.168.1.200:22)..
Thu Dec 11 21:33:07 2014 - [debug] ok.
Thu Dec 11 21:33:07 2014 - [debug] Connecting via SSH from [email protected](192.168.1.202:22) to [email protected](192.168.1.201:22)..
Thu Dec 11 21:33:07 2014 - [debug] ok.
Thu Dec 11 21:33:07 2014 - [info] All SSH connection tests passed successfully.
拓:Warning: Permanently added ‘192.168.1.201’ (RSA) to the list of known hosts.
永久添加主机 RSA 列表(不知道有什么作用,在此执行没问题了)
2.检查复制
masterha_check_repl --conf=/etc/masterha/app1.cnf
[root@Server-D app1]# masterha_check_repl --conf=/etc/masterha/app1.cnf
Thu Dec 11 21:35:53 2014 - [warning] Global configuration file /etc/masterha_default.cnf not found. Skipping
没有默认脚本。.
Thu Dec 11 21:35:53 2014 - [info] Reading application default configuration from /etc/masterha/app1.cnf..
Thu Dec 11 21:35:53 2014 - [info] Reading server configuration from /etc/masterha/app1.cnf..
Thu Dec 11 21:35:53 2014 - [info] MHA::MasterMonitor version 0.56.
Thu Dec 11 21:35:53 2014 - [info] GTID failover mode = 0
Thu Dec 11 21:35:53 2014 - [info] Dead Servers:
Thu Dec 11 21:35:53 2014 - [info] Alive Servers:
Thu Dec 11 21:35:53 2014 - [info] 192.168.1.200(192.168.1.200:3306)
Thu Dec 11 21:35:53 2014 - [info] 192.168.1.201(192.168.1.201:3306)
Thu Dec 11 21:35:53 2014 - [info] 192.168.1.202(192.168.1.202:3306)
Thu Dec 11 21:35:53 2014 - [info] Alive Slaves:
Thu Dec 11 21:35:53 2014 - [info] 192.168.1.201(192.168.1.201:3306) Version=5.5.32-log (oldest major version between
slaves) log-bin:enabled
Thu Dec 11 21:35:53 2014 - [info] Replicating from 192.168.1.200(192.168.1.200:3306)
Thu Dec 11 21:35:53 2014 - [info] Primary candidate for the new Master (candidate_master is set)
Thu Dec 11 21:35:53 2014 - [info] 192.168.1.202(192.168.1.202:3306) Version=5.5.32-log (oldest major version between
slaves) log-bin:enabled
Thu Dec 11 21:35:53 2014 - [info] Replicating from 192.168.1.200(192.168.1.200:3306)
Thu Dec 11 21:35:53 2014 - [info] Current Alive Master: 192.168.1.200(192.168.1.200:3306)
Thu Dec 11 21:35:53 2014 - [info] Checking slave configurations..
Thu Dec 11 21:35:53 2014 - [info] Checking replication filtering settings..
Thu Dec 11 21:35:53 2014 - [info] binlog_do_db= , binlog_ignore_db=
Thu Dec 11 21:35:53 2014 - [info] Replication filtering check ok.
Thu Dec 11 21:35:53 2014 - [info] GTID (with auto-pos) is not supported
不支持 GTID
此处省略 N 行。。。。。
Checking the Status of the script.. OK
Thu Dec 11 21:35:56 2014 - [info] OK.
Thu Dec 11 21:35:56 2014 - [warning] shutdown_script is not defined.没有这个脚本
Thu Dec 11 21:35:56 2014 - [info] Got exit code 0 (Not master dead).
MySQL Replication Health is OK.
错误:ln -s /usr/local/mysql/bin/* /usr/local/bin/
错误:解决:由于修改了 IP 地址,其他三台机器的 hosts 没有修改,修改后正常。
[root@Server-D opt]# masterha_check_repl --conf=/etc/masterha/app1.cnf
Fri Dec 19 11:09:50 2014 - [warning] Global configuration file /etc/masterha_default.cnf not found. Skipping.
Fri Dec 19 11:09:50 2014 - [info] Reading application default configurations from /etc/masterha/app1.cnf..
Fri Dec 19 11:09:50 2014 - [info] Reading server configurations from /etc/masterha/app1.cnf..
Fri Dec 19 11:09:50 2014 - [info] MHA::MasterMonitor version 0.53.
Fri Dec 19 11:09:58 2014 - [error][/usr/local/share/perl5/MHA/ServerManager.pm, ln188] There is no alive server.
We can't do failover
Fri Dec 19 11:09:58 2014 - [error][/usr/local/share/perl5/MHA/MasterMonitor.pm, ln383] Error happend on checking
configurations. at /usr/local/share/perl5/MHA/MasterMonitor.pm line 298
Fri Dec 19 11:09:58 2014 - [error][/usr/local/share/perl5/MHA/MasterMonitor.pm, ln478] Error happened on
monitoring servers.
Fri Dec 19 11:09:58 2014 - [info] Got exit code 1 (Not master dead).
3.检查 MHA Manager
[root@Server-D app1]# masterha_check_status --conf=/etc/masterha/app1.cnf
app1 is stopped(2:NOT_RUNNING).
表示 MHA Manager 没有启动
4.启动 MHA Manager
nohup masterha_manager --conf=/etc/masterha/app1.cnf --remove_dead_master_conf --ignore_last_failover<
/dev/null >/masterha/app1/manager.log 2>&1 &
如果启动一段时间后退出 nohup,请查看 app1.log 文件中的报错。
处省略 N 行
Thu Dec 11 21:44:48 2014 - [info] Checking master_ip_failover_script status:
Thu Dec 11 21:44:48 2014 - [info] /opt/master_ip_failover --command=status --ssh_user=root
--orig_master_host=192.168.1.200 --orig_master_ip=192.168.1.200 --orig_master_port=3306
重:Unknown option: orig_master_ssh_port
因为我的 SSH 是 52020 端口,所以这个的这个变量报错不知道哪出的,感觉要修改 perl 脚本,待研究。
IN SCRIPT TEST====sudo /sbin/ifconfig eth0:1 down==sudo /sbin/ifconfig eth0:1 192.168.1.10/24===
Checking the Status of the script.. OK
Thu Dec 11 21:44:48 2014 - [info] OK.
Thu Dec 11 21:44:48 2014 - [warning] shutdown_script is not defined.
Thu Dec 11 21:44:48 2014 - [info] Set master ping interval 1 seconds.
Thu Dec 11 21:44:48 2014 - [info] Set secondary check script: /usr/local/bin/masterha_secondary_check -s ip201
-s ip200 --user=root --master_host=ip200 --master_ip=192.168.1.200 --master_port=3306
Thu Dec 11 21:44:48 2014 - [info] Starting ping health check on 192.168.1.200(192.168.1.200:3306)..
Thu Dec 11 21:44:48 2014 - [info] Ping(SELECT) succeeded, waiting until MySQL doesn't respond..
拓:如果 KILL 掉进程,会出现如下报错
Thu Dec 11 21:47:45 2014 - [info] MHA::MasterMonitor version 0.56.
Thu Dec 11 21:47:45 2014 - [warning] /masterha/app1/app1.master_status.health already exists. You might have kille
d manager with SIGKILL(-9), may run two or more monitoring process for the same application, or use the same working d
irectory. Check for details, and consider setting --workdir separately.
原因是 KILL 掉后,/masterha/app1/下产生的 app1.master_status.health 没有删除,如果
KILL 还要删掉这个文件
5.在此检查 MHA Manager 状态
[root@Server-D app1]# masterha_check_status --conf=/etc/masterha/app1.cnf
app1 monitoring program is now on initialization phase(10:INITIALIZING_MONITOR). Wait for a while and try checking
again.
启动几秒后
[root@Server-D app1]# masterha_check_status --conf=/etc/masterha/app1.cnf
app1 (pid:2624) is running(0:PING_OK), master:192.168.1.200
重:截止到现在为止,MHA 部署完成,暂时停止 MHA 服务,然后部署 LVS+Keepalived。
拓展:Linux 下快速删除大文件(硬连接方式)
原理:
 硬链接基础
 当多个文件共同指向同一 inode、inode 链接数 N>1、删除任何一个文件都是巨快
 因为、此时删除的仅仅是指向 inode 的指针
 而当 N=1 时、则不一样了、此时删除的文件相关的所有数据块、所以慢
测试:
root@ # ln stock.ibd stock.id.hdlk
root@ # ls stock.* -l
-rw-rw—- 1 mysql mysql 9196 Apr 14 23:03 stock.frm
-rw-r–r– 2 mysql mysql 19096666112 Apr 15 09:55 stock.ibd
-rw-r–r– 2 mysql mysql 19096666112 Apr 15 09:55 stock.id.hdlk
你会发现 stock.ibd 的 INODES 属性变成了 2;
下面我们继续来删表。
[email protected] : test 21:44:37> show table status like ‘stock’ \G
*************************** 1. row ***************************
Name: stock
Engine: InnoDB
Version: 10
Row_format: Compact
Rows: 49916863
Avg_row_length: 356
20
美河学习在线 www.eimhe.com
Data_length: 17799577600
Max_data_length: 0
Index_length: 1025507328
Data_free: 4194304
Auto_increment: NULL
Create_time: 2011-05-18 14:55:08
Update_time: NULL
Check_time: NULL
Collation: utf8_general_ci
Checksum: NULL
Create_options:
Comment:
1 row in set (0.23 sec)
[email protected] : test 21:39:34> drop table stock ;
Query OK, 0 rows affected (0.99 sec)
1 秒不到就删除完成; 也就是 DROP TABLE 不用再 HANG 这么久了。
但 table 是删除了,数据文件还在,所以你还需要最后数据文件给删除。
root # ll
total 19096666112
-rw-r–r– 2 mysql mysql 19096666112 Apr 15 09:55 stock.id.hdlk
root # rm stock.id.hdlk
 最后一步删除原始大文件也可以选择 rsync 来删除、比 rm 快多了
报错 1
```bash
sh: /opt/master_ip_failover: Permission denied
Tue Dec 9 23:14:08 2014 - [error][/usr/local/share/perl5/MHA/MasterMonitor.pm, ln226] Failed to get
master_ip_failover_script status with return code 126:0.
Tue Dec 9 23:14:08 2014 - [error][/usr/local/share/perl5/MHA/MasterMonitor.pm, ln424] Error happened on
checking configurations. at /usr/local/bin/masterha_manager line 50
Tue Dec 9 23:14:08 2014 - [error][/usr/local/share/perl5/MHA/MasterMonitor.pm, ln523] Error happened on
monitoring servers.
缺少执行权限。
报错 2

```bash
un Mar 2 13:13:46 2014 - [error][/usr/share/perl5/vendor_perl/MHA/ManagerUtil.pm, ln178] Got ERROR: Use of
uninitialized value $msg in scalar chomp at /usr/share/perl5/vendor_perl/MHA/ManagerConst.pm line 90.
-----------------------------------------------------------
解决这个错误 是在文件/usr/share/perl5/vendor_perl/MHA/ManagerConst.pm 第 90 行(chomp $msg)前加入一行:
1
$msg = "" unless($msg);
第5章 LVS+Keepalived 安装部署
5.1 LVS 部署
Centos 5 使用 LVS 1.24
Centos 6 使用 LVS 1.26
ln -s /usr/src/kernels/2.6.18-371.el5-x86_64/ /usr/src/linux
yum install libnl* popt* -y
wget http://www.linuxvirtualserver.org/software/kernel-2.6/ipvsadm-1.26.tar.gz
tar xzf ipvsadm-1.26.tar.gz
cd ipvsadm-1.26
make
echo $?
make install
/sbin/ipvsadm
lsmod | grep ip_vs
5.2 Keepalived 部署
Keepalived 运行在 LVS 之上,所以必须和 LVS 部署在一台服务器上。Keepalived 在目前架构
中起到了健康检查的功能和管理负载均衡节点的功能。
yum -y install openssl-devel
wget http://www.keepalived.org/software/keepalived-1.1.19.tar.gz
tar xzf keepalived-1.1.19.tar.gz
cd keepalived-1.1.19
./configure
make
make install
复制相关文件到目录
/bin/cp /usr/local/etc/rc.d/init.d/keepalived /etc/init.d/
/bin/cp /usr/local/etc/sysconfig/keepalived /etc/sysconfig/
mkdir /etc/keepalived -p
/bin/cp /usr/local/etc/keepalived/keepalived.conf /etc/keepalived/
/bin/cp /usr/local/sbin/keepalived /usr/sbin/
5.3 配置 Keepalived 配置文件(读负载均衡部分)
5.3.1 配置 CMaster 和 Slave
1.Cmaster 运行 Rvip 脚本
2.Slave 运行 Rvip 脚本
Rvip 脚本
[root@Server-B opt]# cat lvs-start-client-read.sh
#!/bin/bash
#real_server.sh
vip=192.168.1.21
open() {
 ifconfig lo:Rvip ${vip}/32 up
 sysctl -w net.ipv4.conf.lo.arp_announce=2
 sysctl -w net.ipv4.conf.lo.arp_ignore=1
 sysctl -w net.ipv4.conf.all.arp_announce=2
 sysctl -w net.ipv4.conf.all.arp_ignore=1
}
close() {
 ifconfig lo:Rvip down
 sysctl -w net.ipv4.conf.lo.arp_announce=0
 sysctl -w net.ipv4.conf.lo.arp_ignore=0
 sysctl -w net.ipv4.conf.all.arp_announce=0
 sysctl -w net.ipv4.conf.all.arp_ignore=0
}
case $1 in
start)
 open
;;
stop)
 close
;;
*)
 echo "Usage: $0 need argument [start|stop]"
;;
esac
esac
3.编辑 Keepalived 配置文件
[root@LVS-A opt]# cat /etc/keepalived/keepalived.conf
! Configuration File for keepalived
global_defs {
23
美河学习在线 www.eimhe.com
 notification_email {
 [email protected]
 }
 notification_email_from [email protected]
 smtp_server 127.0.0.1
 smtp_connect_timeout 30
 router_id MHA-A
}
# db Read
vrrp_instance VI_1 {
 state MASTER
 interface eth0
 virtual_router_id 51
 priority 150
 advert_int 6
 authentication {
 auth_type PASS
 auth_pass 123qwe
 }
 virtual_ipaddress {
 192.168.1.21/24
 }
}
# VIP 192.168.1.21
virtual_server 192.168.1.21 3306 {
 delay_loop 10
 lb_algo rr
 lb_kind DR
 nat_mask 255.255.255.0
 protocol TCP
 #sorry_server 192.168.1.201 3306
 real_server 192.168.1.201 3306 {
 weight 1
 TCP_CHECK {
 connect_port 3306
 connect_timeout 10
 nb_get_retry 3
 delay_before_retry 5
 }
 MISC_CHECK {
 misc_path "/etc/keepalived/check_slave.pl 192.168.1.201 3306"
 misc_dynamic
 }
 }
 real_server 192.168.1.202 3306 {
 weight 1
 TCP_CHECK {
 connect_port 3306
 connect_timeout 10
 nb_get_retry 3
 delay_before_retry 5
 }
 MISC_CHECK {
 misc_path "/etc/keepalived/check_slave.pl 192.168.1.202 3306"
 misc_dynamic
 }
 }
}
4.配置检测脚本
上传到 LVS 指定目录/etc/keepalived 下

cat /etc/keepalived/check_slave.pl
#!/usr/bin/perl -w
use DBI;
use DBD::mysql;
# CONFIG VARIABLES
$SBM = 200;
$db = "information_schema";
$host = $ARGV[0];
$port = $ARGV[1];
$user = "repl_user";
$pw = "testpasswd";
# SQL query
$query = "show slave status";
$dbh = DBI->connect("DBI:mysql:$db:$host:$port", $user, $pw, { RaiseError => 0,PrintError => 0 });
#print "$db, $host , $port , $user, $pw";
if (!defined($dbh)) {
 #print "connect fail.";
 exit 1;
}
$sqlQuery = $dbh->prepare($query);
$sqlQuery->execute;
$Slave_IO_Running = "";
$Slave_SQL_Running = "";
$Seconds_Behind_Master = "";
while (my $ref = $sqlQuery->fetchrow_hashref()) {
 $Slave_IO_Running = $ref->{'Slave_IO_Running'};
 $Slave_SQL_Running = $ref->{'Slave_SQL_Running'};
 $Seconds_Behind_Master = $ref->{'Seconds_Behind_Master'};
}
#print "Slave_IO_Running = $Slave_IO_Running\n";
#print "Slave_SQL_Running = $Slave_SQL_Running\n";
#print "Seconds_Behind_Master = $Seconds_Behind_Master\n";
$sqlQuery->finish;
$dbh->disconnect();
if ( $Slave_IO_Running eq "No" || $Slave_SQL_Running eq "No" ) {
 #print "Slave_IO_Running or Slave_SQL_Running is No";
 exit 1;
} else {
 if ( $Seconds_Behind_Master > $SBM ) {
 #print "Seconds_Behind_Master > SBM";
 exit 1;
 } else {
 #print "Seconds_Behind_Master < SBM";
 exit 0;
 }
}
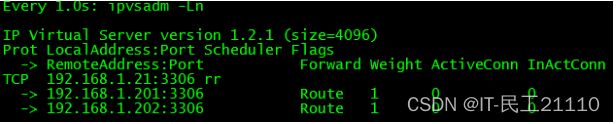
5.查看 LVS 状态
watch -n1 ipvsadmin -Ln

6.启动 MHA Manager
启动 MHA,启动过程中会在 Master 上配置 WVIP
nohup masterha_manager --conf=/etc/mha/app1.cnf --remove_dead_master_conf --ignore_last_failover<
/dev/null >/masterha/app1/manager.log 2>&1 &
检查 MHA 状态
masterha_check_status --conf=/etc/mha/app1.cnf
7.查看 Master 状态

8.测试 Master
客户端连接。
9.模拟 Master 故障中的问题
情景描述:
1.模拟 Master 故障后,MHA 完成了 Master 想 CMaster 的故障转移;
2.Keepalived 通过 check_mysql.pl 脚本检测 MySQL 从库状态,主要检测了 SQL 线程、I/O 线
程和延迟时间。
问题现象:由于 MHA 进行切换后,CMaster 之前从库的配置完全消失(show slave status\G),
但是 Keepalived 的 check_mysql.pl 脚本,并不能检测到 MySQL 状态改变,出现了不能从读
负载均衡中剔除 CMaster 的情况。
第6章 部署 LVS 高可用
6.1 LVS 部署
Centos 5 使用 LVS 1.24
Centos 6 使用 LVS 1.26
ln -s /usr/src/kernels/2.6.32-358.el6.x86_64/ /usr/src/linux
yum install libnl* popt* -y
wget http://www.linuxvirtualserver.org/software/kernel-2.6/ipvsadm-1.26.tar.gz
tar xzf ipvsadm-1.26.tar.gz
cd ipvsadm-1.26
make
echo $?
make install
/sbin/ipvsadm
lsmod | grep ip_vs
6.2 Keepalived 部署
Keepalived 运行在 LVS 之上,所以必须和 LVS 部署在一台服务器上。Keepalived 在目前架构
中起到了健康检查的功能和管理负载均衡节点的功能。
yum -y install openssl-devel
wget http://www.keepalived.org/software/keepalived-1.1.19.tar.gz
tar xzf keepalived-1.1.19.tar.gz
cd keepalived-1.1.19
./configure
make
make install
复制相关文件到目录
/bin/cp /usr/local/etc/rc.d/init.d/keepalived /etc/init.d/
/bin/cp /usr/local/etc/sysconfig/keepalived /etc/sysconfig/
mkdir /etc/keepalived -p
/bin/cp /usr/local/etc/keepalived/keepalived.conf /etc/keepalived/
/bin/cp /usr/local/sbin/keepalived /usr/sbin/
6.3 配置备份 Keepalived 配置文件
[root@LVS-B keepalived]# cat keepalived.conf
! Configuration File for keepalived
global_defs {
 notification_email {
 [email protected]
 }
 notification_email_from [email protected]
 smtp_server 127.0.0.1
 smtp_connect_timeout 30
 router_id MHA-B
}
# db Read
vrrp_instance VI_1 {
 state BACKUP
 interface eth2
 virtual_router_id 51
 priority 100
 advert_int 1
 authentication {
 auth_type PASS
 auth_pass 123qwe
 }
 virtual_ipaddress {
 192.168.1.21/24
 }
}
# VIP 192.168.1.21
virtual_server 192.168.1.21 3306 {
 delay_loop 10
 lb_algo rr
 lb_kind DR
 nat_mask 255.255.255.0
 protocol TCP
 #sorry_server 192.168.1.201 3306
 real_server 192.168.1.201 3306 {
 weight 1
 TCP_CHECK {
 connect_port 3306
 connect_timeout 10
 nb_get_retry 3
 delay_before_retry 5
}
 MISC_CHECK {
 misc_path "/etc/keepalived/check_slave.pl 192.168.1.201 3306"
 misc_dynamic
 }
 }
 real_server 192.168.1.202 3306 {
 weight 1
 TCP_CHECK {
 connect_port 3306
 connect_timeout 10
 nb_get_retry 3
 delay_before_retry 5
 }
 MISC_CHECK {
 misc_path "/etc/keepalived/check_slave.pl 192.168.1.202 3306"
 misc_dynamic
 }
 }
}
6.4 配置检测脚本
[root@LVS-B keepalived]# cat check_slave.pl
#!/usr/bin/perl -w
use DBI;
use DBD::mysql;
# CONFIG VARIABLES
$SBM = 200;
$db = "information_schema";
$host = $ARGV[0];
$port = $ARGV[1];
$user = "repl";
$pw = "replpassword";
# SQL query
$query = "show slave status";
$dbh = DBI->connect("DBI:mysql:$db:$host:$port", $user, $pw, { RaiseError => 0,PrintError => 0 });
#print "$db, $host , $port , $user, $pw";
if (!defined($dbh)) {
 #print "connect fail.";
 exit 1;
}
$sqlQuery = $dbh->prepare($query);
$sqlQuery->execute;
$Slave_IO_Running = "";
$Slave_SQL_Running = "";
$Seconds_Behind_Master = "";
while (my $ref = $sqlQuery->fetchrow_hashref()) {
 $Slave_IO_Running = $ref->{'Slave_IO_Running'};
 $Slave_SQL_Running = $ref->{'Slave_SQL_Running'};
 $Seconds_Behind_Master = $ref->{'Seconds_Behind_Master'};
}
#print "Slave_IO_Running = $Slave_IO_Running\n";
#print "Slave_SQL_Running = $Slave_SQL_Running\n";
#print "Seconds_Behind_Master = $Seconds_Behind_Master\n";
$sqlQuery->finish;
$dbh->disconnect();
if ( $Slave_IO_Running eq "No" || $Slave_SQL_Running eq "No" ) {
 #print "Slave_IO_Running or Slave_SQL_Running is No";
 exit 1;
} else {
 if ( $Seconds_Behind_Master > $SBM ) {
 #print "Seconds_Behind_Master > SBM";
 exit 1;
 } else {
 #print "Seconds_Behind_Master < SBM";
 exit 0;
 }
}
第7章 模拟故障测试
7.1 Master 故障
由于 Keepalived 中的 check_slave.pl 脚本不完善,只识别 SQL 线程、I/O 线程和延迟过高
的情况,当由于 Master 故障后,MHA 自动将主库迁移到 CMaster 上后,CMaster 的“show slave
status\G”为空,Keepalived 则不能检测到。即出现 CMaster 即承担读也承担写的情况。
由于 shell 脚本效率问题,不太建议使用。可以考虑 python 编写或修改 perl 脚本。
7.1.1 停止 Master,MHA 切换 VIP 并应用差异数据
1.Master 状态


4.启动 SQL 线程
start slave io_thread
start slave sql_thread
5.查看状态
7.3 CMaster 故障
CMaster 如果出现故障,应当理解配置 Slave 为候选主库,避免由 Master 宕机后,不进行切
换。停止 MHA,将 Slave 配置中增加候选配置
7.4 LVS-A 故障
7.4.1 当 LVS-A 停止 Keepalived 后,LVS-B 接管 LVS-A 的所有工作
1.LVS-A 状态(通过管理工具模拟连接)

4.查看 LVS-B 状态

